HttpUrlConnection使用详解--转
http://blog.csdn.net/fightingXia/article/details/71775516
一,HttpURLconnection的介绍
在Android开发中网络请求是最常用的操作之一, Android SDK中对HTTP(超文本传输协议)也提供了很好的支持,这里包括两种接口:
1、标准Java接口(java.NET) —-HttpURLConnection,可以实现简单的基于URL请求、响应功能;
2、Apache接口(org.appache.http)—-HttpClient,使用起来更方面更强大。
但在android API23的SDK中Google将HttpClient移除了。Google建议使用httpURLconnection进行网络访问操作。
HttpURLconnection是基于http协议的,支持get,post,put,delete等各种请求方式,最常用的就是get和post,下面针对这两种请求方式进行讲解。
二,get请求的使用方法
HttpURLconnection是同步的请求,所以必须放在子线程中。使用示例如下:
new Thread(new Runnable() {

    @Override

    public void run() {

        try {

            String url = "https://www.baidu.com/";

            URL url = new URL(url);

            //得到connection对象。

            HttpURLConnection connection = (HttpURLConnection) url.openConnection();

            //设置请求方式

            connection.setRequestMethod("GET");

            //连接

            connection.connect();

            //得到响应码

            int responseCode = connection.getResponseCode();

            if(responseCode == HttpURLConnection.HTTP_OK){

                //得到响应流

                InputStream inputStream = connection.getInputStream();

                //将响应流转换成字符串

                String result = is2String(inputStream);//将流转换为字符串。

                Log.d("kwwl","result============="+result);

            }

        } catch (Exception e) {

            e.printStackTrace();

        }

    }

}).start();
get请求的使用方法如上。如果需要传递参数,则直接把参数拼接到url后面,其他完全相同,如下:
String url = "https://www.baidu.com/?userName=zhangsan&password=123456";
注意点:
1,url与参数之间用?隔开。
2,键值对中键与值用=连接。
3,两个键值对之间用&连接。
分析:
1, 使用connection.setRequestMethod(“GET”);设置请求方式。
2, 使用connection.connect();连接网络。请求行,请求头的设置必须放在网络连接前。
3, connection.getInputStream()只是得到一个流对象,并不是数据,不过我们可以从流中读出数据,从流中读取数据的操作必须放在子线程。
4, connection.getInputStream()得到一个流对象,从这个流对象中只能读取一次数据,第二次读取时将会得到空数据。
三,post请求的使用方法
1,post的基本用法如下:
使用示例如下:
new Thread(new Runnable() {

    @Override

    public void run() {

        try {

            URL url = new URL(getUrl);

            HttpURLConnection connection = (HttpURLConnection) url.openConnection();

            connection.setRequestMethod("POST");//设置请求方式为POST

            connection.setDoOutput(true);//允许写出

            connection.setDoInput(true);//允许读入

            connection.setUseCaches(false);//不使用缓存

            connection.connect();//连接

            int responseCode = connection.getResponseCode();

            if(responseCode == HttpURLConnection.HTTP_OK){

                InputStream inputStream = connection.getInputStream();

                String result = is2String(inputStream);//将流转换为字符串。

                Log.d("kwwl","result============="+result);

            }

        } catch (Exception e) {

            e.printStackTrace();

        }

    }

}).start();
注:post请求与get请求有很多相似,只是在连接之前多了一些设置,两者可以对比学习使用。
2,使用post请求传递键值对参数
使用示例如下:
new Thread(new Runnable() {

    @Override

    public void run() {

        try {

            URL url = new URL(getUrl);

            HttpURLConnection connection = (HttpURLConnection) url.openConnection();

            connection.setRequestMethod("POST");

            connection.setDoOutput(true);

            connection.setDoInput(true);

            connection.setUseCaches(false);

            connection.connect();

            String body = "userName=zhangsan&password=123456";

            BufferedWriter writer = new BufferedWriter(new OutputStreamWriter(connection.getOutputStream(), "UTF-8"));

            writer.write(body);

            writer.close();

            int responseCode = connection.getResponseCode();

            if(responseCode == HttpURLConnection.HTTP_OK){

                InputStream inputStream = connection.getInputStream();

                String result = is2String(inputStream);//将流转换为字符串。

                Log.d("kwwl","result============="+result);

            }

        } catch (Exception e) {

            e.printStackTrace();

        }

    }

}).start();
分析:
1,post方式传递参数的本质是:从连接中得到一个输出流,通过输出流把数据写到服务器。
2,数据的拼接采用键值对格式,键与值之间用=连接。每个键值对之间用&连接。
3,使用post请求传递json格式参数
post请求也可以传递json格式的参数,使用示例如下:
new Thread(new Runnable() {

    @Override

    public void run() {

        try {

            URL url = new URL(getUrl);

            HttpURLConnection connection = (HttpURLConnection) url.openConnection();

            connection.setRequestMethod("POST");

            connection.setDoOutput(true);

            connection.setDoInput(true);

            connection.setUseCaches(false);

            connection.setRequestProperty("Content-Type", "application/json;charset=utf-8");//设置参数类型是json格式

            connection.connect();

            String body = "{userName:zhangsan,password:123456}";

            BufferedWriter writer = new BufferedWriter(new OutputStreamWriter(connection.getOutputStream(), "UTF-8"));

            writer.write(body);

            writer.close();

            int responseCode = connection.getResponseCode();

            if(responseCode == HttpURLConnection.HTTP_OK){

                InputStream inputStream = connection.getInputStream();

                String result = is2String(inputStream);//将流转换为字符串。

                Log.d("kwwl","result============="+result);

            }

        } catch (Exception e) {

            e.printStackTrace();

        }

    }

}).start();
传递json格式的参数与传递键值对参数不同点有两个:
1,传递json格式数据时需要在请求头中设置参数类型是json格式。
2,body是json格式的字符串。
四,设置请求头
Get请求与post请求都可以设置请求头,设置请求头的方式也是相同的。为了节约篇幅,重复的代码不再列出,核心代码如下:
connection.setRequestMethod("POST");

connection.setRequestProperty("version", "1.2.3");//设置请求头

connection.setRequestProperty("token", token);//设置请求头

connection.connect();
注意:
1,请求头必须在connection.connect();代码前设置。
2,可以设置多个请求头参数。
五,上传文件
在post请求传递参数时知道,可以从连接中得到一个输出流,输出流可以像服务器写数据。同理,可以使用这个输出流将文件写到服务器。代码如下:
try {

    URL url = new URL(getUrl);

    HttpURLConnection connection = (HttpURLConnection) url.openConnection();

    connection.setRequestMethod("POST");

    connection.setDoOutput(true);

    connection.setDoInput(true);

    connection.setUseCaches(false);

    connection.setRequestProperty("Content-Type", "file/*");//设置数据类型

    connection.connect();

    OutputStream outputStream = connection.getOutputStream();

    FileInputStream fileInputStream = new FileInputStream("file");//把文件封装成一个流

    int length = -1;

    byte[] bytes = new byte[1024];

    while ((length = fileInputStream.read(bytes)) != -1){

        outputStream.write(bytes,0,length);//写的具体操作

    }

    fileInputStream.close();

    outputStream.close();

    int responseCode = connection.getResponseCode();

    if(responseCode == HttpURLConnection.HTTP_OK){

        InputStream inputStream = connection.getInputStream();

        String result = is2String(inputStream);//将流转换为字符串。

        Log.d("kwwl","result============="+result);

    }

} catch (Exception e) {

    e.printStackTrace();

}
注:
1,上传文件使用的是post请求方式。
2,使用的原理类似于post请求中上传参数。
六,同时上传参数和文件
在实际应用时,上传文件的同时也常常需要上传键值对参数。比如在微信中发朋友圈时,不仅有图片,还有有文字。此时就需要同时上传参数和文件。
在httpURLconnection中并没有提供直接上传参数和文件的API,需要我们自己去探索。我们知道在Web页面上传参数和文件很简单,只需要在form标签写上contentype=”multipart/form-data”即可,剩余工作便都交给浏览器去完成数据收集并发送Http请求。但是如果没有页面的话要怎么上传文件呢?
由于脱离了浏览器的环境,我们就要自己去完成数据的封装并发送。首先我们来看web页面上传参数和文件是什么样子的?
我们写一个web表单,上传两个键值对参数和一个文件。使用抓包工具抓取的数据结果如下:
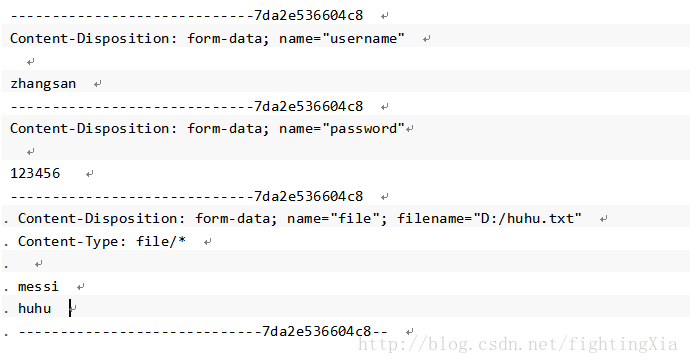
经过分析可知,上传到服务器的数据除了键值对数据和文件数据外,还有其他字符串,使用这些这些字符串来拼接一定的格式。
那么我们只要模拟这个数据,并写入到Http请求中便能实现同时传递参数和文件。
代码如下:
try {

    String BOUNDARY = java.util.UUID.randomUUID().toString();

    String TWO_HYPHENS = "--";

    String LINE_END = "\r\n";

    URL url = new URL(URLContant.CHAT_ROOM_SUBJECT_IMAGE);

    HttpURLConnection connection = (HttpURLConnection) url.openConnection();

    connection.setRequestMethod("POST");

    connection.setDoOutput(true);

    connection.setDoInput(true);

    connection.setUseCaches(false);

    //设置请求头

    connection.setRequestProperty("Connection", "Keep-Alive");

    connection.setRequestProperty("Charset", "UTF-8");

    connection.setRequestProperty("Content-Type","multipart/form-data; BOUNDARY=" + BOUNDARY);

    connection.setRequestProperty("Authorization","Bearer "+UserInfoConfigure.authToken);

    connection.connect();

    DataOutputStream outputStream = new DataOutputStream(connection.getOutputStream());

    StringBuffer strBufparam = new StringBuffer();

    //封装键值对数据一

    strBufparam.append(TWO_HYPHENS);

    strBufparam.append(BOUNDARY);

    strBufparam.append(LINE_END);

    strBufparam.append("Content-Disposition: form-data; name=\"" + "groupId" + "\"");

    strBufparam.append(LINE_END);

    strBufparam.append("Content-Type: " + "text/plain" );

    strBufparam.append(LINE_END);

    strBufparam.append("Content-Lenght: "+(""+groupId).length());

    strBufparam.append(LINE_END);

    strBufparam.append(LINE_END);

    strBufparam.append(""+groupId);

    strBufparam.append(LINE_END);

    //封装键值对数据二

    strBufparam.append(TWO_HYPHENS);

    strBufparam.append(BOUNDARY);

    strBufparam.append(LINE_END);

    strBufparam.append("Content-Disposition: form-data; name=\"" + "title" + "\"");

    strBufparam.append(LINE_END);

    strBufparam.append("Content-Type: " + "text/plain" );

    strBufparam.append(LINE_END);

    strBufparam.append("Content-Lenght: "+"kwwl".length());

    strBufparam.append(LINE_END);

    strBufparam.append(LINE_END);

    strBufparam.append("kwwl");

    strBufparam.append(LINE_END);

    //拼接完成后,一块写入

    outputStream.write(strBufparam.toString().getBytes());

    //拼接文件的参数

    StringBuffer strBufFile = new StringBuffer();

    strBufFile.append(LINE_END);

    strBufFile.append(TWO_HYPHENS);

    strBufFile.append(BOUNDARY);

    strBufFile.append(LINE_END);

    strBufFile.append("Content-Disposition: form-data; name=\"" + "image" + "\"; filename=\"" + file.getName() + "\"");

    strBufFile.append(LINE_END);

    strBufFile.append("Content-Type: " + "image/*" );

    strBufFile.append(LINE_END);

    strBufFile.append("Content-Lenght: "+file.length());

    strBufFile.append(LINE_END);

    strBufFile.append(LINE_END);

    outputStream.write(strBufFile.toString().getBytes());

    //写入文件

    FileInputStream fileInputStream = new FileInputStream(file);

    byte[] buffer = new byte[1024*2];

    int length = -1;

    while ((length = fileInputStream.read(buffer)) != -1){

        outputStream.write(buffer,0,length);

    }

    outputStream.flush();

    fileInputStream.close();

    //写入标记结束位

    byte[] endData = (LINE_END + TWO_HYPHENS + BOUNDARY + TWO_HYPHENS + LINE_END).getBytes();//写结束标记位

    outputStream.write(endData);

    outputStream.flush();

    //得到响应

    int responseCode = connection.getResponseCode();

    if(responseCode == HttpURLConnection.HTTP_OK){

        InputStream inputStream = connection.getInputStream();

        String result = is2String(inputStream);//将流转换为字符串。

        Log.d("kwwl","result============="+result);

    }

} catch (Exception e) {

    e.printStackTrace();

}
注:http最早出现时就是为了浏览器与服务器之间的数据传输,所以有固定的协议,协议规范了一定的数据格式,所以在浏览器中传递数据时会自动按照一定的格式封装。在android中不能自动封装,所以这些操作需要手动操作。
七,下载文件
从服务器下载文件是比较简单的操作,只要得到输入流,就可以从流中读出数据。使用示例如下:
try {

     String urlPath = "https://www.baidu.com/";

      URL url = new URL(urlPath);

      HttpURLConnection connection = (HttpURLConnection) url.openConnection();

      connection.setRequestMethod("GET");

      connection.connect();

      int responseCode = connection.getResponseCode();

      if(responseCode == HttpURLConnection.HTTP_OK){

          InputStream inputStream = connection.getInputStream();

          File dir = new File("fileDir");

          if (!dir.exists()){

              dir.mkdirs();

          }

          File file = new File(dir, "fileName");//根据目录和文件名得到file对象

          FileOutputStream fos = new FileOutputStream(file);

          byte[] buf = new byte[1024*8];

          int len = -1;

          while ((len = inputStream.read(buf)) != -1){

              fos.write(buf, 0, len);

          }

          fos.flush();

      }

  } catch (Exception e) {

      e.printStackTrace();

  }
八,对httpURLconnection的封装
经过上面的学习可知,httpURLconnection的使用非常麻烦,每次访问网络都需要写大量的代码,尤其在同时上传参数和文件时更加繁琐,一不小心就容易出现错误。而且httpURLconnection请求是同步的,使用时必须开启子线程,修改UI时需要跳转到UI线程。等等导致不得不对httpURLconnection封装后再使用。Google也提供了网络请求封装类volley,熟悉volley的小伙伴都知道,volley在操作文件时性能并不好,而且没有提供同时上传参数和文件的方法。所以我们必须自己封装一套httpURLconnection的工具类。
我个人研究httpURLconnection的用法后封装了一套httpURLconnection的工具类,叫UrlHttpUtils。这套UrlHttpUtils最大的优点是简单和便于使用,这是我项目中实际用的网络请求工具类,完全可以说拿来即用。而且代码简单,可供学习使用。
UrlHttpUtils在github上的地址是:https://github.com/guozhengXia/UrlHttpUtils
封装的功能有:
* 一般的get请求
* 一般的post请求
* 上传单个文件(包含进度)
* 上传list集合文件
* 上传map集合文件
* 文件下载(包含进度)
* 图片下载(实现了图片的压缩)
请大家多多支持,多多提出宝贵意见,谢谢!
HttpUrlConnection使用详解--转的更多相关文章
- HttpUrlConnection使用详解--转AAAAA
http://hc.apache.org/httpclient-3.x/apidocs/org/apache/commons/httpclient/HttpConnection.html HttpUr ...
- HttpURLConnection用法详解
针对JDK中的URLConnection连接Servlet的问题,网上有虽然有所涉及,但是只是说明了某一个或几个问题,是以FAQ的方式来解决的,而且比较零散,现在对这个类的使用就本人在项目中的使用经验 ...
- 【转】HttpURLConnection用法详解
原文链接:http://www.blogjava.net/supercrsky/articles/247449.html 针对JDK中的URLConnection连接Servlet的问题,网上有虽然有 ...
- zt:HttpUrlConnection使用详解
下文转载自:https://www.cnblogs.com/tenWood/p/8563617.html 一,HttpURLconnection的介绍 在Android开发中网络请求是最常用的操作之一 ...
- Java中HttpURLConnection使用详解、总结。
感谢大佬:https://blog.csdn.net/qq_40036754/article/details/102554755 文章目录 一.前言 二.HttpURLConnection 介绍 三. ...
- HttpURLConnection详解
HttpURLConnection详解 07. 五 / J2EE / 没有评论 HttpURLConnection类的作用是通过HTTP协议向服务器发送请求,并可以获取服务器发回的数据. Http ...
- HTTP和HTTPS详解
http://blog.csdn.net/mingli198611/article/details/8055261/ 转自:http://www.cnblogs.com/ok-lanyan/archi ...
- java.util.Scanner应用详解++扫描控制台输入
java.util.Scanner应用详解 java.util.Scanner是Java5的新特征,主要功能是简化文本扫描.这个类最实用的地方表现在获取控制台输入,其他的功能都很鸡肋,尽管Java ...
- HTMLParser 使用详解
htmlparser是一个纯的java写的html解析的库,它不依赖于其它的java库文件,主要用于改造或 提取html.它能超高速解析html,而且不会出错.现在htmlparser最新版本为2 ...
随机推荐
- 玩转X-CTR100 l STM32 l STM32F4 l 蓝牙串口通信
我造轮子,你造车,创客一起造起来!更多塔克创新资讯[塔克社区 www.xtark.cn ][塔克博客 www.cnblogs.com/xtark/ ] 蓝牙串口通信模块,X-CTR100控制 ...
- VM VirtualBox虚拟机与物理主机之间的复制
物理主机: 系统:Ubuntu 11.04 X86_64 虚拟机: 系统:Windows XP Pack3 点击虚拟机的 设备->安装增强功能即可 安装后两系统之间的复制,粘贴可正常使用,如同一 ...
- ubuntu16 intellij idea install lombok plugin
项目中用到lombok,idea会出现类似编译报错的红色,但并不影响运行.所以为了没有类似警告,就在idea上安装lombok插件.file-settings 安装完成之后,按照提示重启idea,问题 ...
- hadoop之HDFS运行小观察
hadoop 是当前很火的一个 大数据运行框架和平台, 对于这个神奇的大家伙我甚是搞不清楚,前段时间闲来无视便把 HADOOP 运行起来, 看着它的操作记录存储部分(操作日志), IMAGE 记录着 ...
- shell 脚本实战笔记(11)--Mysql在linux下的安装和简单运维
前言: linux中安装mysql以及配置的管理, 基础的运维和管理还是需要会一些的. 这边作下笔记, 以求天天向上(^_^). 安装流程:*). 安装mysql-server1). 借助yum检索相 ...
- 批量分割视频opencv
前言 视频处理过程中,会用到对等长的视频进行处理,此时要对大视频进行分割. 实现步骤 1.批量读取视频集: 2.视频分割: 测试代码 1.批量读取视频集: /********************* ...
- BZOJ5091: [Lydsy1711月赛]摘苹果【期望DP】
Description 小Q的工作是采摘花园里的苹果.在花园中有n棵苹果树以及m条双向道路,苹果树编号依次为1到n,每条道路的两 端连接着两棵不同的苹果树.假设第i棵苹果树连接着d_i条道路.小Q将会 ...
- linux搜索命令之find和grep
在使用linux时,经常需要进行文件查找,其中查找的命令主要有find和grep.两个命令是有区的. 区别:(1)find命令是根据文件的属性进行查找,如文件名,文件大小,所有者,所属组,是否为空,访 ...
- The Alphabet Sticker
题目大意:给你一串字符串,其中有一部分未知,用'?'表示. 现在定义一种合法的Sticker,比如"aabcc","ccccab".即所有相同的字母要在一起才是 ...
- ARP命令详解
ARP是一个重要的TCP/IP协议,并且用于确定对应IP地址的网卡物理地址.实用arp命令,我们能够查看本地计算机或另一台计算机的ARP高速缓存中的当前内容.此外,使用arp命令,也可以用人工方式输入 ...