【转】Android各种Adapter的用法
转自:http://my.oschina.net/u/658933/blog/372151
Android各种Adapter的用法
寻找 会’偷懒’的开发者线下公开课,报名即享受免费体验云主机
Android各种Adapter的用法
同样是一个ListView,可以用不同的
Adapter让它显示出来,比如说最常用的ArrayAdapter,SimpleAdapter,SimpleCursorAdapter,以及重写BaseAdapter等方法。
ArrayAdapter比较简单,但它只能用于显示文字。而SimpleAdapter则有很强的扩展性,可以自定义出各种效果,SimpleCursorAdapter则可以从数据库中读取数据显示在列表上,通过从写BaseAdapter可以在列表上加处理的事件等。
下面先来看看ArrayAdapter:
|
1
2
3
4
5
6
7
8
9
10
11
12
13
14
15
16
17
18
19
20
21
22
23
24
25
26
27
28
29
30
31
32
33
34
35
36
37
|
package com.shang.test; import java.util.ArrayList; import android.app.Activity; import android.os.Bundle; import android.widget.ArrayAdapter; import android.widget.ListView; /** * * @author shangzhenxiang * */ public class TestArrayAdapterActivity extends Activity{ private ListView mListView; private ArrayList<String> mArrayList = new ArrayList<String>(); @Override protected void onCreate(Bundle savedInstanceState) { super.onCreate(savedInstanceState); setContentView(R.layout.testarrayadapter); mListView = (ListView) findViewById(R.id.myArrayList); mListView.setAdapter(new ArrayAdapter<String>(this, android.R.layout.simple_expandable_list_item_1, getData())); } private ArrayList<String> getData() { mArrayList.add("测试数据1"); mArrayList.add("测试数据2"); mArrayList.add("测试数据3"); mArrayList.add("测试数据4"); mArrayList.add("测试数据5"); mArrayList.add("测试数据6"); return mArrayList; }} |
布局里面有个ListView就可以了:
|
1
2
3
4
5
6
7
8
9
10
11
12
13
14
|
<?xml version="1.0" encoding="utf-8"?> <LinearLayout xmlns:android="http://schemas.android.com/apk/res/android" android:orientation="vertical" android:layout_width="match_parent" android:layout_height="fill_parent"> <TextView android:layout_width="match_parent" android:layout_height="wrap_content" android:text="@string/hello"/> <ListView android:id="@+id/myArrayList" android:layout_width="match_parent" android:layout_height="wrap_content"/> </LinearLayout> |
上面的代码中用到了ArrayAdapter的构造方法:
public ArrayAdapter (Context context, int textViewResourceId, T[] objects)
Api中是这么描述的:

其中Context为当前的环境变量,可以显示一行文字的一个布局文件,和一个List的集合,也就是数据源。
布局文件可以自己写,也可以用系统的,我这里是用的系统的。自己写的布局中包含一个TextView就可以了,当然系统中也有包含一个TextView的布局文件:就是 android.R.layout.simple_expandable_list_item_1,调用这个比较方便。
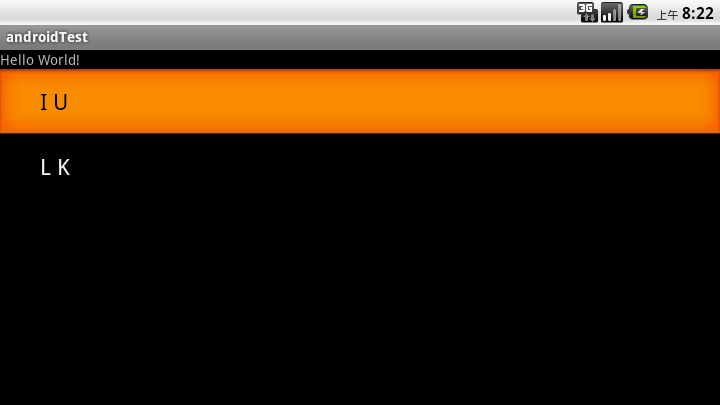
这里给出运行后的效果图:

下面说说SimpleCursorAdapter:
Api中是这么说的:An easy adapter to map columns from a cursor to TextViews or ImageViews defined in an XML file. You can specify which columns you want, which views you want to display the columns, and the XML file that defines the appearance of these views.
简单的说就是 方便把Cursor中得到的数据进行列表显示,并可以把指定的列映射到指定的TextView上。
我这里写的是从联系人中拿到数据并显示在列表上。代码如下:
|
1
2
3
4
5
6
7
8
9
10
11
12
13
14
15
16
17
18
19
20
21
22
23
24
25
26
27
28
29
30
31
|
package com.shang.test; import android.app.Activity; import android.database.Cursor; import android.os.Bundle; import android.provider.Contacts.People; import android.widget.ListView; import android.widget.SimpleCursorAdapter; /** * * @author shangzhenxiang * */public class TestSimpleCursorAdapter extends Activity { private ListView mListView; private Cursor mCursor; private SimpleCursorAdapter mAdapter; @Override protected void onCreate(Bundle savedInstanceState) { super.onCreate(savedInstanceState); setContentView(R.layout.testsimplecursoradapter); mListView = (ListView) findViewById(R.id.mySimpleCursorList); mCursor = getContentResolver().query(People.CONTENT_URI, null, null, null, null); startManagingCursor(mCursor); mAdapter = new SimpleCursorAdapter(TestSimpleCursorAdapter.this, android.R.layout.simple_expandable_list_item_1, mCursor, new String[]{People.NAME}, new int[]{android.R.id.text1}); mListView.setAdapter(mAdapter); }} |
mCursor = getContentResolver().query(People.CONTENT_URI, null, null, null, null);是先获得一个指向系统联系人的Cursor
startManagingCursor(mCursor);是指我们把Cursor交给这个Activity保管,这样Cursor便会和Activity同步,我们不用手动管理了。
simpleCursorAdapter API中是这样说的:
其中前面的2个参数跟ArrayAdapter中是一样的,第三个参数是传个来的参数, 其实也是数据源,后面的2个参数是2个数组,前一个是String【】类型的,而后一个是int【】类型的,说明前一个参数中的值对应的是从数据库中的字 段,后一个是布局文件中和这个字段对应的id,也就是说这个字段对应得值要显示在哪里(比如说我们这里查到的联系人中的NAME字段,要显示在一个对应的 TextView上面)。
这里我们具体看一下系统的布局,也就是我们这里的第二个参数的布局,便于理解,android.R.layout.simple_expandable_list_item_1.xml文件中是这么写的:
|
1
2
3
4
5
6
7
8
9
10
11
12
13
14
15
16
17
18
19
20
21
22
23
24
|
<?xml version="1.0" encoding="utf-8"?><!-- Copyright (C) 2006 The Android Open Source Project Licensed under the Apache License, Version 2.0 (the "License"); you may not use this file except in compliance with the License. You may obtain a copy of the License at http://www.apache.org/licenses/LICENSE-2.0 Unless required by applicable law or agreed to in writing, software distributed under the License is distributed on an "AS IS" BASIS, WITHOUT WARRANTIES OR CONDITIONS OF ANY KIND, either express or implied. See the License for the specific language governing permissions and limitations under the License.--><TextView xmlns:android="http://schemas.android.com/apk/res/android" android:id="@android:id/text1" android:layout_width="match_parent" android:layout_height="?android:attr/listPreferredItemHeight" android:paddingLeft="?android:attr/expandableListPreferredItemPaddingLeft" android:textAppearance="?android:attr/textAppearanceLarge" android:gravity="center_vertical"/> |
注意他有一个id,这个id也是系统的id,这个布局中只有一个TextView,所以只能显示一个字段,我们这里显示的联系人的名字,
而最后的一个参数就是由这么写id组成的一个数据(如果有很多TextView的话)。比如说我们要显示很多字段,布局文件中就要写很多TextView,而每一个TextView都有一个ID,第三个参数中有多少个字段,第四个参数中就有多少个id,并一一对应。
我们来看一下运行效果图:
上面说到的2种方法都是显示的文字,比方说我们要显示图片怎么办呢,还要显示很多内容,还要按自己喜欢的布局排列怎么办呢,用SimpleAdapter,扩展性好,可以定义各种各样的布局。
代码如下:
|
1
2
3
4
5
6
7
8
9
10
11
12
13
14
15
16
17
18
19
20
21
22
23
24
25
26
27
28
29
30
31
32
33
34
35
36
37
38
39
40
41
42
43
44
45
46
47
48
49
50
51
52
53
54
55
|
package com.shang.test;import java.util.ArrayList;import java.util.HashMap;import java.util.List;import android.app.Activity;import android.os.Bundle;import android.widget.ListView;import android.widget.SimpleAdapter;/** * * @author shangzhenxiang * */public class TestSimpleAdapter extends Activity { private ListView mListView; private SimpleAdapter mAdapter; private List<HashMap<String, Object>> mHashMaps; private HashMap<String, Object> map; @Override protected void onCreate(Bundle savedInstanceState) { super.onCreate(savedInstanceState); setContentView(R.layout.testsimpleadapter); mListView = (ListView) findViewById(R.id.mySimpleList); mAdapter = new SimpleAdapter(this, getData(), R.layout.simpleitem, new String[]{"image", "title", "info"}, new int[]{R.id.img, R.id.title, R.id.info}); mListView.setAdapter(mAdapter); } private List<HashMap<String, Object>> getData() { mHashMaps = new ArrayList<HashMap<String,Object>>(); map = new HashMap<String, Object>(); map.put("image", R.drawable.gallery_photo_1); map.put("title", "G1"); map.put("info", "google 1"); mHashMaps.add(map); map = new HashMap<String, Object>(); map.put("image", R.drawable.gallery_photo_2); map.put("title", "G2"); map.put("info", "google 2"); mHashMaps.add(map); map = new HashMap<String, Object>(); map.put("image", R.drawable.gallery_photo_3); map.put("title", "G3"); map.put("info", "google 3"); mHashMaps.add(map); return mHashMaps; }} |
simpleAdapter的数据都是用HashMap构成的List,List里面的每一节对应的是ListView的没一行,这里先建一个HashMap构成的List,布局中有3个元素,ImageView,2个TextView,每个item项的布局文件如下:
|
1
2
3
4
5
6
7
8
9
10
11
12
13
14
15
16
17
18
19
20
21
22
23
24
25
26
27
28
29
30
31
|
<?xml version="1.0" encoding="utf-8"?><LinearLayout xmlns:android="http://schemas.android.com/apk/res/android" android:layout_width="match_parent" android:layout_height="match_parent" android:orientation="horizontal"> <ImageView android:layout_width="wrap_content" android:id="@+id/img" android:layout_margin="5px" android:layout_height="wrap_content"> </ImageView> <LinearLayout android:id="@+id/linearLayout1" android:layout_width="wrap_content" android:layout_height="wrap_content" android:orientation="vertical"> <TextView android:id="@+id/title" android:layout_width="wrap_content" android:layout_height="wrap_content" android:textColor="#ffffff" android:textSize="22px"></TextView> <TextView android:id="@+id/info" android:layout_width="wrap_content" android:layout_height="wrap_content" android:textColor="#ffffff" android:textSize="13px"></TextView> </LinearLayout></LinearLayout> |
所以有了HashMap构成的数组后,我们要在HashMap中加入数据,按顺序加入图片,title,info,一个HashMap就构成了ListView中的一个Item项,我们在看下API中是怎么描述simpleAdapter的:

第一个参数和第三个参数跟ArrayAdapter中的是一样的,第二个参数就是由HashMap组成的List,也就是数据源,而第5个参数也就是map中的key,最后一个参数就是map中key对应的值要显示在布局中的位置的id。
看下效果:

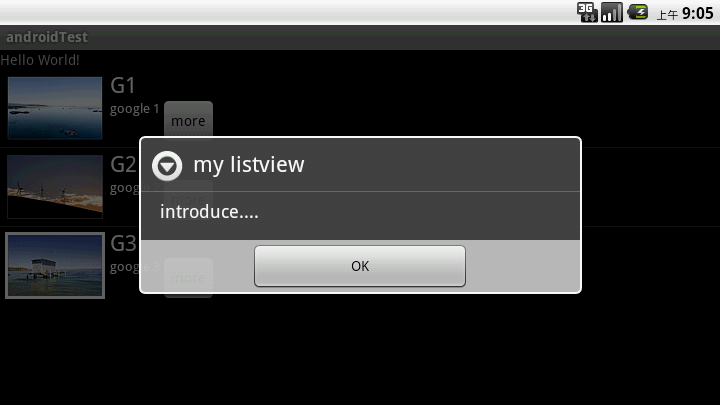
如果我们想在每个Item中加个button,而且点击button有对应的操作,那该怎么办呢。
这时我们可以重写baseAdapter,看代码:
|
1
2
3
4
5
6
7
8
9
10
11
12
13
14
15
16
17
18
19
20
21
22
23
24
25
26
27
28
29
30
31
32
33
34
35
36
37
38
39
40
41
42
43
44
45
46
47
48
49
50
51
52
53
54
55
56
57
58
59
60
61
62
63
64
65
66
67
68
69
70
71
72
73
74
75
76
77
78
79
80
81
82
83
84
85
86
87
88
89
90
91
92
93
94
95
96
97
98
99
100
101
102
103
104
105
106
107
108
109
110
111
112
113
114
115
116
117
118
119
120
121
122
123
124
125
126
127
128
129
130
131
132
133
134
135
136
137
138
139
|
package com.shang.test;import java.util.ArrayList;import java.util.HashMap;import java.util.List;import android.app.Activity;import android.app.AlertDialog;import android.content.Context;import android.content.DialogInterface;import android.os.Bundle;import android.view.LayoutInflater;import android.view.View;import android.view.View.OnClickListener;import android.view.ViewGroup;import android.widget.BaseAdapter;import android.widget.Button;import android.widget.ImageView;import android.widget.ListView;import android.widget.TextView;/** * * @author shangzhenxiang * */public class TestBaseAdapter extends Activity { private ListView mListView; @Override protected void onCreate(Bundle savedInstanceState) { super.onCreate(savedInstanceState); setContentView(R.layout.baseadapterlist); mListView = (ListView) findViewById(R.id.baselist); mListView.setAdapter(new BaseListAdapter(this)); } private List<HashMap<String, Object>> getData() { List<HashMap<String, Object>> maps = new ArrayList<HashMap<String,Object>>(); HashMap<String, Object> map = new HashMap<String, Object>(); map.put("image", R.drawable.gallery_photo_1); map.put("title", "G1"); map.put("info", "google 1"); maps.add(map); map = new HashMap<String, Object>(); map.put("image", R.drawable.gallery_photo_2); map.put("title", "G2"); map.put("info", "google 2"); maps.add(map); map = new HashMap<String, Object>(); map.put("image", R.drawable.gallery_photo_3); map.put("title", "G3"); map.put("info", "google 3"); maps.add(map); return maps; } private class BaseListAdapter extends BaseAdapter implements OnClickListener { private Context mContext; private LayoutInflater inflater; public BaseListAdapter(Context mContext) { this.mContext = mContext; inflater = LayoutInflater.from(mContext); } @Override public int getCount() { return getData().size(); } @Override public Object getItem(int position) { return null; } @Override public long getItemId(int position) { return 0; } @Override public View getView(int position, View convertView, ViewGroup parent) { ViewHolder viewHolder = null; if(convertView == null) { viewHolder = new ViewHolder(); convertView = inflater.inflate(R.layout.testbaseadapter, null); viewHolder.img = (ImageView) convertView.findViewById(R.id.img); viewHolder.title = (TextView) convertView.findViewById(R.id.title); viewHolder.info = (TextView) convertView.findViewById(R.id.info); viewHolder.button = (Button) convertView.findViewById(R.id.basebutton); convertView.setTag(viewHolder); } else { viewHolder = (ViewHolder) convertView.getTag(); } System.out.println("viewHolder = " + viewHolder); viewHolder.img.setBackgroundResource((Integer) getData().get(position).get("image")); viewHolder.title.setText((CharSequence) getData().get(position).get("title")); viewHolder.info.setText((CharSequence) getData().get(position).get("info")); viewHolder.button.setOnClickListener(this); return convertView; } class ViewHolder { ImageView img; TextView title; TextView info; Button button; } @Override public void onClick(View v) { int id = v.getId(); switch(id) { case R.id.basebutton: showInfo(); break; } } private void showInfo() { new AlertDialog.Builder(TestBaseAdapter.this).setTitle("my listview").setMessage("introduce...."). setPositiveButton("OK", new DialogInterface.OnClickListener() { @Override public void onClick(DialogInterface dialog, int which) { // TODO Auto-generated method stub } }).show(); } }} |
在看下item的布局文件:
|
1
2
3
4
5
6
7
8
9
10
11
12
13
14
15
16
17
18
19
20
21
22
23
24
25
26
27
28
29
30
31
32
33
34
35
36
37
38
39
|
<?xml version="1.0" encoding="utf-8"?><LinearLayout xmlns:android="http://schemas.android.com/apk/res/android" android:layout_width="match_parent" android:layout_height="match_parent" android:orientation="horizontal"> <ImageView android:layout_width="wrap_content" android:id="@+id/img" android:layout_margin="5px" android:layout_height="wrap_content"> </ImageView> <LinearLayout android:id="@+id/linearLayout1" android:layout_width="wrap_content" android:layout_height="wrap_content" android:orientation="vertical"> <TextView android:id="@+id/title" android:layout_width="wrap_content" android:layout_height="wrap_content" android:textColor="#ffffff" android:textSize="22px"></TextView> <TextView android:id="@+id/info" android:layout_width="wrap_content" android:layout_height="wrap_content" android:textColor="#ffffff" android:textSize="13px"></TextView> </LinearLayout> <Button android:id="@+id/basebutton" android:text="more" android:focusable="false" android:layout_gravity="bottom|right" android:layout_height="wrap_content" android:layout_width="wrap_content"/></LinearLayout> |
listView在开始绘制的时候,系统首先调用getCount()函数,根据他的返回值得到listView的长度(这也是为什么在开始的第一张图特 别的标出列表长度),然后根据这个长度,调用getView()逐一绘制每一行。如果你的getCount()返回值是0的话,列表将不显示同样 return 1,就只显示一行。
如果我们要自定义适配器,那就要重写getView方法,getView()有三个参数,position表示将显示的是第几 行,covertView是从布局文件中inflate来的布局。我们写一个类来描述布局文件中的各个组件,比如ImageView,TextView 等,然后判断convertView是否为空,如果为空就从inflate中拿到布局,并新建一个ViewHolder,然后从convertView中 拿到布局中的各个组件,同时把ViewHolder放到tag中去,下次就不用重写new了,直接从tag中拿就可以了,然后把布局中的各个组件都设上对 应的值,这里的Position对应到含有HashMap的List中的position。
在实际的运行过程中会发现listView的每一行没有焦点了,这是因为Button抢夺了listView的焦点,只要布局文件中将Button设置为没有焦点就OK了。
看下运行效果:
源代码:
【转】Android各种Adapter的用法的更多相关文章
- Android RecyclerView Adapter 新式用法之SortedListAdapterCallback
引言 前几天在同事的提醒下发现V7中有了一个新的工具类SortedListAdapterCallback,配合RecyclerView Adapter和SortedList一起使用更加方便的管理我们在 ...
- Android之Adapter用法总结-(转)
Android之Adapter用法总结 1.概念 Adapter是连接后端数据和前端显示的适配器接口,是数据和UI(View)之间一个重要的纽带.在常见的View(List View,Grid Vie ...
- Android之Adapter用法总结(转)
Android之Adapter用法总结 1.概念 Adapter是连接后端数据和前端显示的适配器接口,是数据和UI(View)之间一个重要的纽带.在常见的View(List View,Grid Vie ...
- Android之Adapter用法总结
http://blog.csdn.net/fznpcy/article/details/8658155 Android之Adapter用法总结 1.概念 Adapter是连接后端数据和前端显示的适配器 ...
- 转:各种Adapter的用法
各种Adapter的用法 同样是一个ListView,可以用不同的Adapter让它显示出来,比如说最常用的ArrayAdapter,SimpleAdapter,SimpleCursorAdapt ...
- Android中Adapter之BaseAdapter使用
Android界面中有时候需要显示稍微复杂的界面时,就需要我们自定义一个adapter,而此adapter就要继承BaseAdapter,重新其中的方法. Android中Adapte ...
- android的logcat详细用法
Android日志系统提供了记录和查看系统调试信息的功能.日志都是从各种软件和一些系统的缓冲区中记录下来的,缓冲区可以通过 logcat 命 令来查看和使用. 使用logcat命令 你可以用 logc ...
- 怎么通过activity里面的一个按钮跳转到另一个fragment(android FragmentTransaction.replace的用法介绍)
即:android FragmentTransaction.replace的用法介绍 Fragment的生命周期和它的宿主Activity密切相关,几乎和宿主Activity的生命周期一致,他们之间最 ...
- Android开发中Bundle用法包裹数据(转)
Android开发中Bundle用法包裹数据 Bundle的经典用法,包裹数据放入Intent中,目的在于传输数据. SDK 里是这样描述: A mapping from String values ...
随机推荐
- 【BZOJ】2463: [中山市选2009]谁能赢呢?(博弈论)
http://www.lydsy.com/JudgeOnline/problem.php?id=2463 好神的证明! 首先对于n是偶数,一定能被1*2的骨牌覆盖!所以从起点开始,先手一定走的是骨牌的 ...
- 转:mysql中int、bigint、smallint 和 tinyint的区别与长度的含义
bigint 从 -2^63 (-9223372036854775808) 到 2^63-1 (9223372036854775807) 的整型数据(所有数字).存储大小为 8 个字节. P.S. b ...
- SQL SERVER事务处理
SQL SERVER事务处理 一.事务定义: 事务是单个的工作单元.如果某一事务成功,则在该事务中进行的所有数据更改均会提交,成为数据库中的永久组成部分. 如果事务遇到错误且必须取消或回滚,则所有 ...
- Resources
McGuire Computer Graphics Data http://mesh.brown.edu/calibration/software.html Pixar Online Library ...
- shell中的case语句
case语法: case $arg in arg1) 语句1 ;; arg2) 语句2 ;; *) help 语句 ;; esac eg: eg:
- uva10098 Generating Fast, Sorted Permutation
#include"iostream"#include"stdio.h"#include"string.h"#include"alg ...
- java的包装类(转)
Java语言是一个面向对象的语言,但是Java中的基本数据类型却是不面向对象的,这在实际使用时存在很多的不便,为了解决这个不足,在设计类时为每个基本数据类型设计了一个对应的类进行代表,这样八个和基本数 ...
- elasticsearch插件大全
Elasticsearch扩展性非常好,有很多官方和第三方开发的插件,下面以分词.同步.数据传输.脚本支持.站点.其它这几个类别进行划分. 分词插件 Combo Analysis Plugin (作者 ...
- JavaScript编码规范[百度]
JavaScript编码规范 1 前言 2 代码风格 2.1 文件 2.2 结构 2.2.1 缩进 2.2.2 空格 2.2.3 换行 2.2.4 语句 2.3 命名 ...
- mysql主从复制 主主复制 读写分离
首先是mysql的主从复制很简单 主主复制也就是互相主从最麻烦的最难的就是日志恢复,增量恢复什么的比较复杂 首先如果你不会安装mysql版本最好一样,或者往上的版本,因为mysql是向下兼容 请注意不 ...