Spring+Spring MVC+Hibernate框架搭建实例
前言:这里只是说明整个搭建流程,并不进行原理性的讲解
一 下面所需要用到的数据库配置:
数据库方面,使用mysql创建一个users表,具体代码如下:
|
1
2
3
4
5
6
7
8
9
10
11
12
13
14
15
16
17
|
DROP TABLE IF EXISTS `users`;CREATE TABLE `users` ( `UserID` int(4) NOT NULL AUTO_INCREMENT, `UserName` varchar(16) NOT NULL, `Password` varchar(16) NOT NULL, `Telephone` varchar(16) NOT NULL, `Address` varchar(16) NOT NULL, PRIMARY KEY (`UserID`)) ENGINE=InnoDB AUTO_INCREMENT=8 DEFAULT CHARSET=utf8;-- ------------------------------ Records of users-- ----------------------------INSERT INTO `users` VALUES ('1', 'aa', 'aa12', 'aa', 'aa');INSERT INTO `users` VALUES ('2', 'bb', 'bb', 'bb', 'bb');INSERT INTO `users` VALUES ('3', 'cc', 'cc', 'cc', 'cc');INSERT INTO `users` VALUES ('7', 'admin', 'admin', '12306', '北京天安门'); |
二 创建web项目,并导入相关jar包:
创建一个dynamic web project,然后在WEB-INF/lib下导入spring和hibernate的jar包,嫌麻烦的话也可以使用我用到的jar包,链接:http://pan.baidu.com/s/1kUse26z 。整个项目的结构是这样的:

三 创建视图页面user.jsp:
路径是:/WEB-INF/jsp/user/user.jsp,代码如下:
|
1
2
3
4
5
6
7
8
9
10
11
12
13
14
15
16
17
18
|
<%@ page language="java" contentType="text/html; charset=UTF-8" pageEncoding="UTF-8"%><%String path = request.getContextPath();String basePath = request.getScheme()+"://"+request.getServerName()+":"+request.getServerPort()+path+"/";%><!DOCTYPE html><html><head><meta http-equiv="Content-Type" content="text/html; charset=UTF-8"> <base href="<%=basePath%>"> <title>Insert title here</title></head><body> <h1>Message : ${message}</h1> </body></html> |
四 根据数据库表的字段建立实体类Users.java:
实体类放在cn.zifangsky.entity包中,这里采用了注解的方式来配置,Users.java代码如下:
|
1
2
3
4
5
6
7
8
9
10
11
12
13
14
15
16
17
18
19
20
21
22
23
24
25
26
27
28
29
30
31
32
33
34
35
36
37
38
39
40
41
42
43
44
45
46
47
48
49
50
51
52
53
54
55
56
57
58
59
60
61
62
63
64
|
package cn.zifangsky.entity;import javax.persistence.Column;import javax.persistence.Entity;import javax.persistence.GeneratedValue;import javax.persistence.GenerationType;import javax.persistence.Id;@Entity(name="users")public class Users implements java.io.Serializable{ @Id @GeneratedValue(strategy=GenerationType.AUTO) @Column(name="UserID") private Integer userId; @Column(name="UserName",length=16) private String userName; @Column(name="Password",length=16) private String password; @Column(name="Telephone",length=16) private String telephone; @Column(name="Address",length=16) private String address; public Users(){ } public Users(Integer userId, String userName, String password, String telephone, String address) { this.userId = userId; this.userName = userName; this.password = password; this.telephone = telephone; this.address = address; } public Integer getUserId() { return userId; } public void setUserId(Integer userId) { this.userId = userId; } public String getUserName() { return userName; } public void setUserName(String userName) { this.userName = userName; } public String getPassword() { return password; } public void setPassword(String password) { this.password = password; } public String getTelephone() { return telephone; } public void setTelephone(String telephone) { this.telephone = telephone; } public String getAddress() { return address; } public void setAddress(String address) { this.address = address; }} |
五 处理框架整合的配置文件:
(1)首先是web.xml,路径是:WEB-INF/web.xml:
|
1
2
3
4
5
6
7
8
9
10
11
12
13
14
15
16
17
18
19
20
21
22
23
24
25
26
27
28
29
30
31
32
33
34
35
36
37
38
39
40
41
42
43
44
45
46
47
48
49
50
51
52
53
54
55
56
57
58
59
60
61
62
|
<?xml version="1.0" encoding="UTF-8"?><web-app xmlns:xsi="http://www.w3.org/2001/XMLSchema-instance" xmlns="http://java.sun.com/xml/ns/javaee" xmlns:web="http://java.sun.com/xml/ns/javaee" xsi:schemaLocation="http://java.sun.com/xml/ns/javaee http://java.sun.com/xml/ns/javaee/web-app_3_0.xsd" id="WebApp_ID" version="3.0"> <display-name>Archetype Created Web Application</display-name> <!-- 配置Spring --> <context-param> <param-name>contextConfigLocation</param-name> <param-value>/WEB-INF/classes/spring-*.xml</param-value> </context-param> <listener> <listener-class>org.springframework.web.context.ContextLoaderListener</listener-class> </listener> <!-- 定义DispatcherServlet --> <servlet> <servlet-name>springmvc</servlet-name> <servlet-class>org.springframework.web.servlet.DispatcherServlet</servlet-class> <init-param> <param-name>contextConfigLocation</param-name> <param-value>/WEB-INF/classes/springmvc-servlet.xml</param-value> </init-param> <load-on-startup>1</load-on-startup> </servlet> <servlet-mapping> <servlet-name>springmvc</servlet-name> <url-pattern>/</url-pattern> </servlet-mapping> <!-- 设置字符集 --> <filter> <filter-name>encodingFilter</filter-name> <filter-class>org.springframework.web.filter.CharacterEncodingFilter</filter-class> <init-param> <param-name>encoding</param-name> <param-value>UTF-8</param-value> </init-param> <init-param> <param-name>forceEncoding</param-name> <param-value>true</param-value> </init-param> </filter> <filter-mapping> <filter-name>encodingFilter</filter-name> <url-pattern>/*</url-pattern> </filter-mapping> <!-- 控制Session的开关 --> <filter> <filter-name>openSession</filter-name> <filter-class>org.springframework.orm.hibernate5.support.OpenSessionInViewFilter</filter-class> </filter> <filter-mapping> <filter-name>openSession</filter-name> <url-pattern>/*</url-pattern> </filter-mapping></web-app> |
(2)spring mvc所需要用到的配置文件springmvc-servlet.xml,路径是:src/springmvc-servlet.xml:
|
1
2
3
4
5
6
7
8
9
10
11
12
13
14
15
16
17
18
19
20
21
22
23
24
25
26
27
28
29
30
31
32
33
34
35
36
|
<?xml version="1.0" encoding="UTF-8"?><beans xmlns="http://www.springframework.org/schema/beans" xmlns:context="http://www.springframework.org/schema/context" xmlns:mvc="http://www.springframework.org/schema/mvc" xmlns:p="http://www.springframework.org/schema/p" xmlns:xsi="http://www.w3.org/2001/XMLSchema-instance" xmlns:tx="http://www.springframework.org/schema/tx" xsi:schemaLocation=" http://www.springframework.org/schema/beans http://www.springframework.org/schema/beans/spring-beans-3.0.xsd http://www.springframework.org/schema/context http://www.springframework.org/schema/context/spring-context-3.0.xsd http://www.springframework.org/schema/mvc http://www.springframework.org/schema/mvc/spring-mvc-3.0.xsd http://www.springframework.org/schema/tx http://www.springframework.org/schema/tx/spring-tx-4.0.xsd "> <!-- 启用spring mvc 注解 --> <mvc:annotation-driven /> <!-- 不操作静态资源 --> <mvc:default-servlet-handler /> <!-- 启动自动扫描该包下所有的Bean(例如@Controller) --> <context:component-scan base-package="cn.zifangsky.controller" /> <!-- 定义视图解析器 --> <bean class="org.springframework.web.servlet.view.InternalResourceViewResolver"> <property name="prefix"> <value>/WEB-INF/jsp/user/</value> </property> <property name="suffix"> <value>.jsp</value> </property> </bean> </beans> |
(3)整合hibernate所需要用到的配置文件spring-hibernate.xml,这里为了简单只用了基础的jdbc数据源,路径是src/spring-hibernate.xml:
|
1
2
3
4
5
6
7
8
9
10
11
12
13
14
15
16
17
18
19
20
21
22
23
24
25
26
27
28
29
30
31
32
33
34
35
36
37
38
39
40
41
42
43
44
45
46
47
48
49
50
51
52
53
54
55
56
57
58
59
60
61
62
63
64
65
66
67
|
<?xml version="1.0" encoding="UTF-8"?><beans xmlns="http://www.springframework.org/schema/beans" xmlns:context="http://www.springframework.org/schema/context" xmlns:xsi="http://www.w3.org/2001/XMLSchema-instance" xmlns:tx="http://www.springframework.org/schema/tx" xmlns:aop="http://www.springframework.org/schema/aop" xsi:schemaLocation=" http://www.springframework.org/schema/beans http://www.springframework.org/schema/beans/spring-beans-4.0.xsd http://www.springframework.org/schema/context http://www.springframework.org/schema/context/spring-context-4.0.xsd http://www.springframework.org/schema/aop http://www.springframework.org/schema/aop/spring-aop-4.0.xsd http://www.springframework.org/schema/tx http://www.springframework.org/schema/tx/spring-tx-4.0.xsd "> <!-- 声明事务管理器 --> <bean id="myHibTxManager" class="org.springframework.orm.hibernate5.HibernateTransactionManager"> <property name="sessionFactory" ref="sessionFactory" /> </bean> <!-- 定义事务通知 --> <tx:advice id="tx_Advice" transaction-manager="myHibTxManager"> <!-- 定义事务传播规则 --> <tx:attributes> <!-- 对get/load/search开头的方法应用只读事务规则 --> <tx:method name="get*" propagation="SUPPORTS" read-only="true" /> <tx:method name="load*" propagation="SUPPORTS" read-only="true" /> <tx:method name="search*" propagation="SUPPORTS" read-only="true" /> <!-- 对其他方法应用REQUIRED事务规则 --> <tx:method name="*" propagation="REQUIRED" /> </tx:attributes> </tx:advice> <aop:config> <!-- 对com.zxpm.biz包下的所有类的所有方法都应用事务规则 --> <aop:pointcut id="bizMethods" expression="execution(* cn.zifangsky.service.*.*(..))" /> <!-- 将事务通知和切面组合 --> <aop:advisor advice-ref="tx_Advice" pointcut-ref="bizMethods" /> </aop:config> <!-- 配置数据源 --> <bean id="dataSource" class="org.springframework.jdbc.datasource.DriverManagerDataSource"> <property name="driverClassName" value="com.mysql.jdbc.Driver" /> <property name="url" value="jdbc:mysql://127.0.0.1/zxpm" /> <property name="username" value="root" /> <property name="password" value="root" /> </bean> <bean id="sessionFactory" class="org.springframework.orm.hibernate5.LocalSessionFactoryBean"> <property name="dataSource" ref="dataSource" /> <property name="packagesToScan"> <list> <!-- 可以加多个包 --> <value>cn.zifangsky.entity</value> </list> </property> <property name="hibernateProperties"> <props> <prop key="hibernate.show_sql">true</prop> </props> </property> </bean></beans> |
(4)加载bean配置文件spring-bean.xml,当然具体的一些bean将在下一环节中配置,路径:src/spring-bean.xml:
|
1
2
3
4
5
6
7
8
9
10
11
12
13
14
15
16
17
18
19
20
21
|
<?xml version="1.0" encoding="UTF-8"?><beans xmlns="http://www.springframework.org/schema/beans" xmlns:context="http://www.springframework.org/schema/context" xmlns:xsi="http://www.w3.org/2001/XMLSchema-instance" xsi:schemaLocation=" http://www.springframework.org/schema/beans http://www.springframework.org/schema/beans/spring-beans-4.2.xsd http://www.springframework.org/schema/context http://www.springframework.org/schema/context/spring-context-4.2.xsd http://www.springframework.org/schema/aop http://www.springframework.org/schema/aop/spring-aop-4.2.xsd http://www.springframework.org/schema/tx http://www.springframework.org/schema/tx/spring-tx-4.2.xsd"> <bean id="usersDAO" class="cn.zifangsky.dao.UsersDAO"> <property name="sessionFactory" ref="sessionFactory"></property> </bean> <bean id="userService" class="cn.zifangsky.service.UserService"> <property name="userDao" ref="usersDAO"></property> </bean></beans> |
六 业务处理DAO,Service和Controller:
(1)UsersDAO.java,在cn.zifangsky.dao这个包中:
|
1
2
3
4
5
6
7
8
9
10
11
12
13
14
15
16
17
18
19
20
21
22
23
24
25
26
|
package cn.zifangsky.dao;import java.util.List;import org.hibernate.HibernateException;import org.hibernate.Query;import org.hibernate.Session;import org.springframework.orm.hibernate5.HibernateCallback;import org.springframework.orm.hibernate5.support.HibernateDaoSupport;import cn.zifangsky.entity.Users;public class UsersDAO extends HibernateDaoSupport{ public List<Users> getAllUser(){ Object execute = super.getHibernateTemplate().execute(new HibernateCallback<Object>() { public Object doInHibernate(Session session) throws HibernateException { String hql="from users"; Query query = session.createQuery(hql); return query.list(); } }); return (List<Users>) execute; }} |
(2)UserService.java,在cn.zifangsky.service这个包中:
|
1
2
3
4
5
6
7
8
9
10
11
12
13
14
15
16
17
18
19
20
|
package cn.zifangsky.service;import cn.zifangsky.dao.UsersDAO;public class UserService { private UsersDAO userDao; public int userCount(){ return userDao.getAllUser().size(); } public UsersDAO getUserDao() { return userDao; } public void setUserDao(UsersDAO userDao) { this.userDao = userDao; }} |
(3)UserController.java,在cn.zifangsky.controller这个包中:
|
1
2
3
4
5
6
7
8
9
10
11
12
13
14
15
16
17
18
19
20
21
22
23
24
25
26
27
28
29
30
31
32
33
34
35
36
37
|
package cn.zifangsky.controller;import javax.annotation.Resource;import org.springframework.stereotype.Controller;import org.springframework.web.bind.annotation.RequestMapping;import org.springframework.web.bind.annotation.RequestMethod;import org.springframework.web.servlet.ModelAndView;import cn.zifangsky.service.UserService;@Controller@RequestMapping("/user")public class UserController { @Resource(name="userService") private UserService service; @RequestMapping(value="/manager",method=RequestMethod.GET) public ModelAndView hello2(){ ModelAndView mv = new ModelAndView(); mv.addObject("message", "HelloMVC"); mv.setViewName("user"); return mv; } @RequestMapping(value="/count",method=RequestMethod.GET) public ModelAndView count(){ int c = service.userCount(); ModelAndView mv = new ModelAndView(); mv.addObject("message", c); mv.setViewName("user"); return mv; }} |
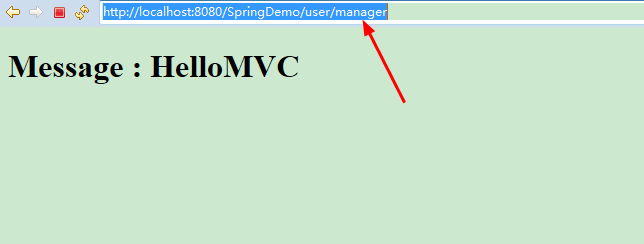
从上面的代码可以看出,定义了两个请求,分别是:http://localhost:8080/SpringDemo/user/manager 和 http://localhost:8080/SpringDemo/user/count ,分别返回一个字符串和users这个表中数据的条数。下面我们将对这两个请求进行测试
七 测试:
测试结果如下:
http://localhost:8080/SpringDemo/user/manager
http://localhost:8080/SpringDemo/user/count

可以看出,这个框架已经搭建成功了
针对这些问题鉴于这里文字图片描述的方式可能不太好理解,我这里找朋友录了一些视频提供给大家,相信大家看了会发现有些东西其实很简单很好理解。如果想学习Java 线程,框架,数据结构,web和数据库等技术可以加群:318261748 群里免费提供学习资料和交流环境,不定期会有技术视频免费分享给大家。
注:如果在项目启动时报错的话,第一是检查配置文件中是不是有哪个地方写错了,第二是注意看下/WEB-INF/lib下有没有aopalliance.jar和aspectjweaver-1.5.4.jar这两个jar包。因为我刚开始时就是因为没有这两个jar包,在项目启动时各种报错,真的挺坑的
Spring+Spring MVC+Hibernate框架搭建实例的更多相关文章
- Hibernate框架搭建实例
一,Hibernate是一个持久层,是一个专门负责管理数据库连接的框架: 二,Hibernate的搭建实例: 1.在Hibernate的官方网站(http://www.hibernate.org)可以 ...
- SSH(Struts2+Spring+Hibernate)框架搭建流程<注解的方式创建Bean>
此篇讲的是MyEclipse9工具提供的支持搭建自加包有代码也是相同:用户登录与注册的例子,表字段只有name,password. SSH,xml方式搭建文章链接地址:http://www.cnblo ...
- Spring MVC + jpa框架搭建,及全面分析
一,hibernate与jpa的关系 首先明确一点jpa是什么?以前我就搞不清楚jpa和hibernate的关系. 1,JPA(Java Persistence API)是Sun官方提出的Java持久 ...
- Spring 4 MVC+Hibernate 4+MySQL+Maven使用注解集成实例
Spring 4 MVC+Hibernate 4+MySQL+Maven使用注解集成实例 转自:通过注解的方式集成Spring 4 MVC+Hibernate 4+MySQL+Maven,开发项目样例 ...
- Spring+Mybatis+SpringMVC+Maven+MySql搭建实例
林炳文Evankaka原创作品.转载请注明出处http://blog.csdn.net/evankaka 摘要:本文主要讲了如何使用Maven来搭建Spring+Mybatis+SpringMVC+M ...
- 【转】Spring+Mybatis+SpringMVC+Maven+MySql搭建实例
林炳文Evankaka原创作品.转载请注明出处http://blog.csdn.net/evankaka 摘要:本文主要讲了如何使用Maven来搭建Spring+Mybatis+SpringMVC+M ...
- 基于Maven的S2SH(Struts2+Spring+Hibernate)框架搭建
1. 前言 基于Maven的开发方式开发项目已经成为主流.Maven能很好的对项目的层次及依赖关系进行管理.方便的解决大型项目中复杂的依赖关系.S2SH(Struts2+Spring+Hibernat ...
- springMVC+spring+hibernate 框架整合实例
先说一下流程思路: 流程讲解1:首先访问会先定位到控制器.这就用到了过滤器配置文件"spring-mvc.xml".这个文件负责定义控制器的包路径.视图的格式等.其次从" ...
- Spring MVC+Hibernate JPA搭建的博客系统项目中所遇到的坑
标签: springmvc hibernate 2016年12月21日 21:48:035133人阅读 评论(0) 收藏 举报 分类: Spring/Spring MVC(6) Hibernate ...
随机推荐
- php的switch函数
PHP Switch 语句 PHP If...Else PHP While 循环 switch 语句用于基于不同条件执行不同动作. Switch 语句 如果您希望有选择地执行若干代码块之一,请使用 S ...
- Class constructor FileManager cannot be invoked without 'new' in undefined (line undefined, column undefined)
解决办法: 1.删除package.json属性devDependencies的 less 和 less-loader ; 2.重新安装 npm i less less-loader --save-d ...
- webpack 第二部分
默认根目录 当前项目 修改目录 devServer devServer:{ open:true, //自动打开浏览器 port:3000, // 端口 contentBase:"dist&q ...
- UVa 839 -- Not so Mobile(树的递归输入)
UVa 839 Not so Mobile(树的递归输入) 判断一个树状天平是否平衡,每个测试样例每行4个数 wl,dl,wr,dr,当wl*dl=wr*dr时,视为这个天平平衡,当wl或wr等于0是 ...
- JavaScript getClass() 函数
定义和用法 getClass() 函数可返回一个 JavaObject 的 JavaClass. 语法 getClass(javaobj) 参数 描述 javaobj 一个 JavaObject 对象 ...
- NSIS 打包工具使用
打包工具nsis,打开是在D:\NSIS\VNISEdit文件下VNISEdit.exe. 菜单NSIS->配置打开,编辑器和帮助配置相对应的路径,如下图 然后点击如下图的图标就可以生成安装包
- Rate 评分
评分组件 基础用法 评分被分为三个等级,可以利用颜色对分数及情感倾向进行分级(默认情况下不区分颜色).三个等级所对应的颜色用过colors属性设置,而它们对应的两个阈值则通过 low-threshol ...
- pip安装selenium时,报错“You are using pip version 10.0.1, however version 18.0 is available.”的问题
pip安装selenium,pip install selenium 类型这样错误 1 原因可能不是以管理员身份运行cmd安装selenium 2 解决方式 也是要管理员身份运行 重点在最后一句 ...
- mysql允许外网访问 和修改mysql 账号密码
mysql的root账户,我在连接时通常用的是localhost或127.0.0.1,公司的测试服务器上的mysql也是localhost所以我想访问无法访问,测试暂停. 解决方法如下: 1,修改表, ...
- MVC1:.Net MVC Cotroller向View传值
下面介绍 ASP .Net MVC中 Cotroller 向 View 传值 的4中方式: ViewBag,ViewData,TempData,Model. (注:参数可根据需要为复杂类型,只需在应用 ...