Linux下Oracle 10.2.0.1升级到10.2.0.4总结
最近部署测试环境时,将测试环境ORACLE数据库从10.2.0.1升级到了10.2.0.4,顺便整理记录一下升级过程。
实验环境: 操作系统:Oracle Linux Server release 5.7 数据库:Oracle 10.2.0.1
下载解压补丁包
1: [oracle@DB-Server tmp]$ unzip p6810189_10204_Linux-x86-64.zip
2:
3: [oracle@DB-Server Disk1]$ ls
4: 10204_buglist.htm install patch_note.htm response runInstaller stage
解压后生成Disk1目录,里面patch_note.htm 有详细的升级补丁的介绍,建议升级补丁前,应该好好看看patch_note.htm,里面介绍了Oracle Database、Oracle Real Application Clusters、Oracle Database Client、Oracle Database Vault等各类情况升级。
安装前任务
1:操作系统要求
如下所示,官方文档有system requirements,即必须满足操作系统要求才能打补丁,一般情况下很少有不满足条件。
System Requirements
The following are the system requirements for this patch set:
Operating System
Asianux 2.0
Asianux 3.0
Oracle Enterprise Linux 4.0/Oracle VM
Oracle Enterprise Linux 5.0/Oracle VM
Red Hat Enterprise Linux AS/ES 3.0
Red Hat Enterprise Linux AS/ES 4.0/Oracle VM
Red Hat Enterprise Linux AS/ES 5.0/Oracle VM
SUSE Linux Enterprise Server (SLES) 9
SUSE Linux Enterprise Server (SLES) 10
Oracle Database 10g (10.2.0.1) or later
2:检查设置环境变量
1: [oracle@DB-Server ~]$ echo $ORACLE_HOME
2: /u01/app/oracle/product/dbhome_1
3: [oracle@DB-Server ~]$ echo $ORACLE_SID
4: epps
5: [oracle@DB-Server ~]$
3:查看安装补丁情况
1: [oracle@DB-Server OPatch]$ ./opatch
2: Invoking OPatch 10.2.0.1.0
3:
4: Oracle interim Patch Installer version 10.2.0.1.0
5: Copyright (c) 2005, Oracle Corporation. All rights reserved..
6:
7:
8: Oracle Home : /u01/app/oracle/product/dbhome_1
9: Central Inventory : /u01/app/oracle/oraInventory
10: from : /u01/app/oracle/product/dbhome_1/oraInst.loc
11: OPatch version : 10.2.0.1.0
12: OUI version : 10.2.0.1.0
13: OUI location : /u01/app/oracle/product/dbhome_1/oui
14: Log file location : /u01/app/oracle/product/dbhome_1/cfgtoollogs/opatch/opatch-2014_Mar_11_15-22-45-CST_Tue.log
15:
16:
17: Usage: opatch [ -help ] [ -r[eport] ] [ command ]
18:
19: command := apply
20: lsinventory
21: query
22: rollback
23: version
24:
25: <global_arguments> := -help Displays the help message for the command.
26: -report Print the actions without executing (deprecated).
27:
28: example:
29: 'opatch -help'
30: 'opatch apply -help'
31: 'opatch lsinventory -help'
32: 'opatch rollback -help'
33:
34:
35: OPatch succeeded.
36: [oracle@DB-Server OPatch]$ ./opatch lsinventory -all
37: Invoking OPatch 10.2.0.1.0
38:
39: Oracle interim Patch Installer version 10.2.0.1.0
40: Copyright (c) 2005, Oracle Corporation. All rights reserved..
41:
42:
43: Oracle Home : /u01/app/oracle/product/dbhome_1
44: Central Inventory : /u01/app/oracle/oraInventory
45: from : /u01/app/oracle/product/dbhome_1/oraInst.loc
46: OPatch version : 10.2.0.1.0
47: OUI version : 10.2.0.1.0
48: OUI location : /u01/app/oracle/product/dbhome_1/oui
49: Log file location : /u01/app/oracle/product/dbhome_1/cfgtoollogs/opatch/opatch-2014_Mar_11_15-23-02-CST_Tue.log
50:
51: Lsinventory Output file location : /u01/app/oracle/product/dbhome_1/cfgtoollogs/opatch/lsinv/lsinventory-2014_Mar_11_15-23-02-CST_Tue.txt
52:
53: --------------------------------------------------------------------------------
54: List of Oracle Homes:
55: Name Location
56: OraDb10g_home1 /u01/app/oracle/product/dbhome_1
57:
58: Installed Top-level Products (1):
59:
60: Oracle Database 10g 10.2.0.1.0
61: There are 1 products installed in this Oracle Home.
62:
63:
64: There are no Interim patches installed in this Oracle Home.
65:
66: --------------------------------------------------------------------------------
67:
68: OPatch succeeded.
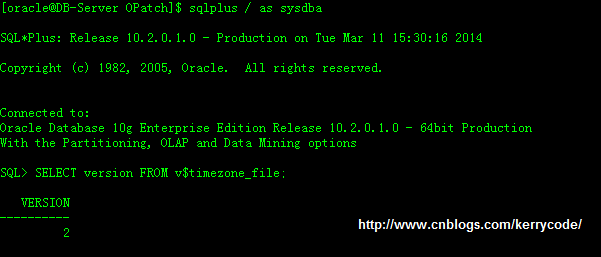
4:检查Oracle Time Zone Definitions
5:停止所有进程(Stop All Processes)
$ emctl stop dbconsole
$ isqlplusctl stop
$ lsnrctl stop
SQL> SHUTDOWN IMMEDIATE
1: [oracle@DB-Server ~]$ emctl stop dbconsole
2: TZ set to Asia/Chungking
3: OC4J Configuration issue. /u01/app/oracle/product/dbhome_1/oc4j/j2ee/OC4J_DBConsole_DB-Server.localdomain_epps not found.
4: [oracle@DB-Server ~]$ isqlplusctl stop
5: iSQL*Plus 10.2.0.1.0
6: Copyright (c) 2003, 2005, Oracle. All rights reserved.
7: getnameinfo failed
8: getnameinfo failed
9: iSQL*Plus instance on port 5560 is not running ...
10: [oracle@DB-Server ~]$ lsnrctl stop
11:
12: LSNRCTL for Linux: Version 10.2.0.1.0 - Production on 11-MAR-2014 15:33:20
13:
14: Copyright (c) 1991, 2005, Oracle. All rights reserved.
15:
16: Connecting to (DESCRIPTION=(ADDRESS=(PROTOCOL=TCP)(HOST=192.168.10.11)(PORT=1521)))
17: The command completed successfully
18:
19: [oracle@DB-Server ~]$ sqlplus / as sysdba
20:
21: SQL*Plus: Release 10.2.0.1.0 - Production on Tue Mar 11 15:34:02 2014
22:
23: Copyright (c) 1982, 2005, Oracle. All rights reserved.
24:
25:
26: Connected to:
27: Oracle Database 10g Enterprise Edition Release 10.2.0.1.0 - 64bit Production
28: With the Partitioning, OLAP and Data Mining options
29:
30: SQL> shutdown immediate;
31: Database closed.
32: Database dismounted.
33: ORACLE instance shut down.
备份数据库
因为是测试数据库,可以做备份或不做备份关系不大,生产环境则必须先做一个冷备或热备。
安装补丁包
Oracle提供了两种方式安装补丁包,即图形化安装或静默安装。即Installing the Oracle Database 10g Patch Set Interactively 和
Installing the Oracle Database 10g Patch Set Noninteractively 安装。
下面我们先用Installing the Oracle Database 10g Patch Set Interactively
Installing the Oracle Database 10g Patch Set Interactively
1.Log in as the oracle user.
2.If you are not installing the software on the local computer, then run the following command on remote machine:
Bourne, Bash, or Korn shell:
$ export DISPLAY=localhost:0.0
C shell:
% setenv DISPLAY local_host:0.0
In this example, local_host is the host name or IP address of the computer that you want to use to display Oracle Universal Installer.
Now to enable X applications, run the following command on the machine that you want to use to display Oracle Universal Installer:
$ xhost + [fully_qualified_remote_host_name]
注意上面事项,否则有可能出现下面错误信息。
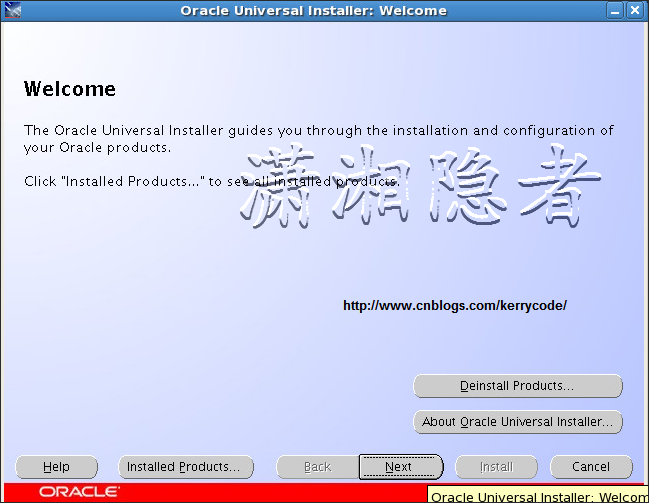
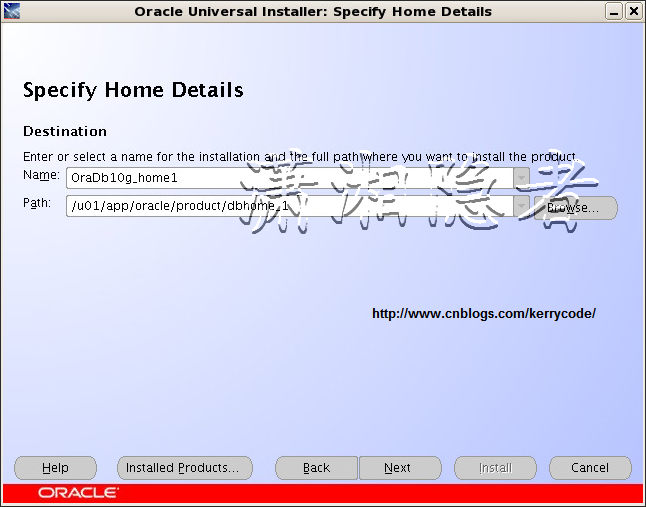
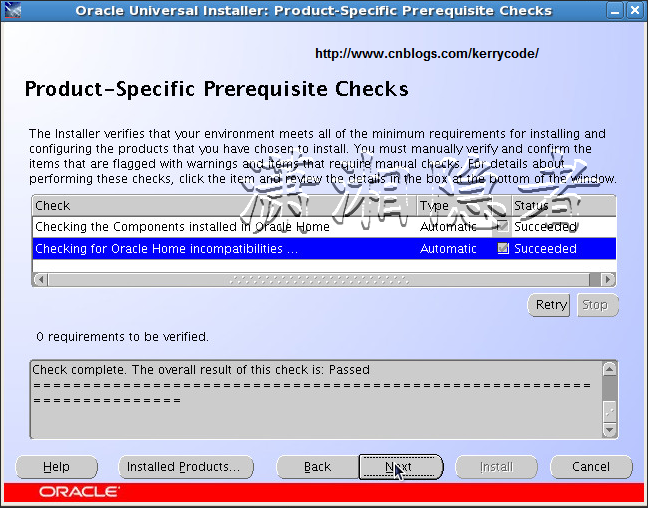
1: [oracle@DB-Server Disk1]$ ./runInstaller
2:
3: Starting Oracle Universal Installer...
4:
5: Checking installer requirements...
6:
7: Checking operating system version: must be redhat-3, SuSE-9, SuSE-10, redhat-4, redhat-5, UnitedLinux-1.0, asian
8:
9: ux-1, asianux-2 or asianux-3
10:
11: Passed
12:
13: All installer requirements met.
14:
15: Preparing to launch Oracle Universal Installer from /tmp/OraInstall2014-03-11_03-39-25PM. Please wait ...[oracle
16:
17: @DB-Server Disk1]$ Oracle Universal Installer, Version 10.2.0.4.0 Production
18:
19: Copyright (C) 1999, 2008, Oracle. All rights reserved.
20:
21: Xlib: connection to ":0.0" refused by server
22:
23: Xlib: No protocol specified
24:
25: Can't connect to X11 window server using ':0.0' as the value of the DISPLAY variable.
26:
27: :0.0
28:
29: :0.0
30:
31: OUI-10025:Unable to start an interactive install session because of the following error:Can't connect to X11 win
32:
33: dow server using ':0.0' as the value of the DISPLAY variable. The DISPLAY environment variable should be set to
34:
35: <hostname or IP address>:<screen>, where the <screen> is usually '0.0'.
36:
37: OUI-10026:Depending on the Unix Shell, you can use one of the following commands as examples to set the DISPLAY
38:
39: environment variable:
40:
41: - For csh: % setenv DISPLAY 192.168.1.128:0.0
42:
43: - For sh, ksh and bash: $ DISPLAY=192.168.1.128:0.0; export DISPLAY
44:
45: Use the following command to see what shell is being used:
46:
47: echo $SHELL
48:
49: Use the following command to view the current DISPLAY environment variable setting:
50:
51: echo $DISPLAY
52:
53: - Make sure that client users are authorized to connect to the X Server.
54:
55: OUI-10027:To enable client users to access the X Server, open an xterm, dtterm or xconsole as the user that star
56:
57: ted the session and type the following command:
58:
59: % xhost +
60:
61: To test that the DISPLAY environment variable is set correctly, run a X11 based program that comes with the nati
62:
63: ve operating system such as 'xclock':
64:
65: % <full path to xclock... see below>
66:
67: If you are not able to run xclock successfully, please refer to your PC-X Server or OS vendor for further assistance.
68:
69: Typical path for 'xclock': '/usr/X11R6/bin/xclock'
70:
71: [oracle@DB-Server ~]$
72:
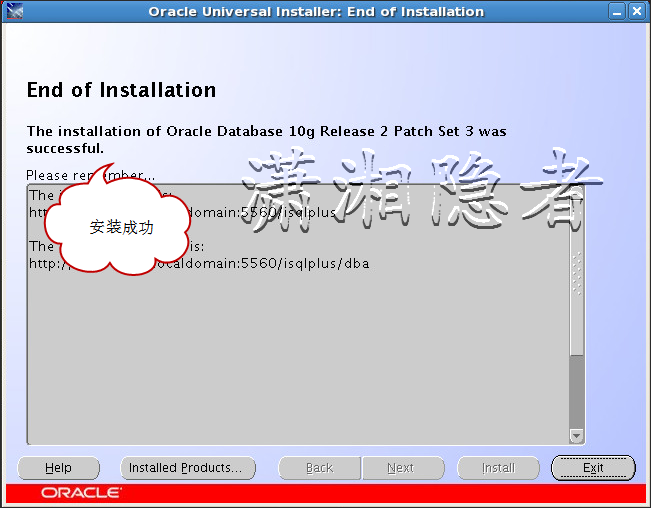
[oracle@DB-Server Disk1]$ ./runInstaller
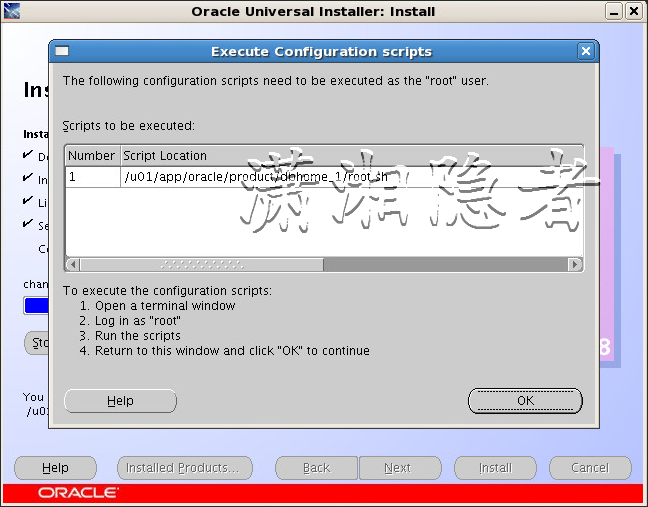
在root账号下执行/u01/app/oracle/product/dbhome_1/root.sh
安装后任务
升级数据库
可以使用手工升级数据库或使用DBUA界面安装数据库。下面我们选择使用手工升级数据库

1:Start the database in the UPGRADE mode
1: [oracle@DB-Server ~]$ sqlplus / as sysdba
2:
3: SQL*Plus: Release 10.2.0.4.0 - Production on Tue Mar 11 16:27:30 2014
4:
5: Copyright (c) 1982, 2007, Oracle. All Rights Reserved.
6:
7: Connected to an idle instance.
8:
9: SQL> startup upgrade
10: ORACLE instance started.
11:
12: Total System Global Area 2483027968 bytes
13: Fixed Size 2085968 bytes
14: Variable Size 603982768 bytes
15: Database Buffers 1862270976 bytes
16: Redo Buffers 14688256 bytes
17: Database mounted.
18: Database opened.
2.Set the system to spool results to a log file for later analysis:
SQL> SPOOL upgrade_info.log
3.Run the Pre-Upgrade Information Tool:
1: SQL> @?/rdbms/admin/utlu102i.sql
2: Oracle Database 10.2 Upgrade Information Utility 03-11-2014 16:30:19
3: .
4: **********************************************************************
5: Database:
6: **********************************************************************
7: --> name: EPPS
8: --> version: 10.2.0.1.0
9: --> compatible: 10.2.0.1.0
10: --> blocksize: 8192
11: .
12: **********************************************************************
13: Tablespaces: [make adjustments in the current environment]
14: **********************************************************************
15: --> SYSTEM tablespace is adequate for the upgrade.
16: .... minimum required size: 544 MB
17: .... AUTOEXTEND additional space required: 4 MB
18: --> UNDOTBS1 tablespace is adequate for the upgrade.
19: .... minimum required size: 400 MB
20: .... AUTOEXTEND additional space required: 270 MB
21: --> SYSAUX tablespace is adequate for the upgrade.
22: .... minimum required size: 410 MB
23: --> TEMP tablespace is adequate for the upgrade.
24: .... minimum required size: 58 MB
25: --> EXAMPLE tablespace is adequate for the upgrade.
26: .... minimum required size: 69 MB
27: .
28: **********************************************************************
29: Update Parameters: [Update Oracle Database 10.2 init.ora or spfile]
30: **********************************************************************
31: -- No update parameter changes are required.
32: .
33: **********************************************************************
34: Renamed Parameters: [Update Oracle Database 10.2 init.ora or spfile]
35: **********************************************************************
36: -- No renamed parameters found. No changes are required.
37: .
38: **********************************************************************
39: Obsolete/Deprecated Parameters: [Update Oracle Database 10.2 init.ora or spfile]
40: **********************************************************************
41: -- No obsolete parameters found. No changes are required
42: .
43: **********************************************************************
44: Components: [The following database components will be upgraded or installed]
45: **********************************************************************
46: --> Oracle Catalog Views [upgrade] VALID
47: --> Oracle Packages and Types [upgrade] VALID
48: --> JServer JAVA Virtual Machine [upgrade] VALID
49: --> Oracle XDK for Java [upgrade] VALID
50: --> Oracle Java Packages [upgrade] VALID
51: --> Oracle Text [upgrade] VALID
52: --> Oracle XML Database [upgrade] VALID
53: --> Oracle Workspace Manager [upgrade] VALID
54: --> Oracle Data Mining [upgrade] VALID
55: --> OLAP Analytic Workspace [upgrade] VALID
56: --> OLAP Catalog [upgrade] VALID
57: --> Oracle OLAP API [upgrade] VALID
58: --> Oracle interMedia [upgrade] VALID
59: --> Spatial [upgrade] VALID
60: --> Expression Filter [upgrade] VALID
61: --> EM Repository [upgrade] VALID
62: --> Rule Manager [upgrade] VALID
63: .
64: **********************************************************************
65: Miscellaneous Warnings
66: **********************************************************************
67: PL/SQL procedure successfully completed.
查看已经安装的补丁情况:
1: [oracle@DB-Server OPatch]$ ./opatch lsinventory -all
2: Invoking OPatch 10.2.0.4.2
3:
4: Oracle Interim Patch Installer version 10.2.0.4.2
5: Copyright (c) 2007, Oracle Corporation. All rights reserved.
6:
7:
8: Oracle Home : /u01/app/oracle/product/dbhome_1
9: Central Inventory : /u01/app/oracle/oraInventory
10: from : /etc/oraInst.loc
11: OPatch version : 10.2.0.4.2
12: OUI version : 10.2.0.4.0
13: OUI location : /u01/app/oracle/product/dbhome_1/oui
14: Log file location : /u01/app/oracle/product/dbhome_1/cfgtoollogs/opatch/opatch2014-03-11_16-55-25PM.log
15:
16: Lsinventory Output file location : /u01/app/oracle/product/dbhome_1/cfgtoollogs/opatch/lsinv/lsinventory2014-03-11_16-55-25PM.txt
17:
18: --------------------------------------------------------------------------------
19: List of Oracle Homes:
20: Name Location
21: OraDb10g_home1 /u01/app/oracle/product/dbhome_1
22:
23: Installed Top-level Products (2):
24:
25: Oracle Database 10g 10.2.0.1.0
26: Oracle Database 10g Release 2 Patch Set 3 10.2.0.4.0
27: There are 2 products installed in this Oracle Home.
28:
29:
30: There are no Interim patches installed in this Oracle Home.
31:
32:
33: --------------------------------------------------------------------------------
34:
35: OPatch succeeded.
关闭数据库,然后执行脚本:
SQL> STARTUP UPGRADE
SQL> SPOOL patch.log
SQL> @?/rdbms/admin/catupgrd.sql
SQL> SPOOL OFF
@?/rdbms/admin/catupgrd.sql

1: SQL> shutdown immediate;
2:
3: Database closed.
4:
5: Database dismounted.
6:
7: ORACLE instance shut down.
8:
9: SQL> startup
10:
11: ORACLE instance started.
12:
13: Total System Global Area 2483027968 bytes
14:
15: Fixed Size 2085968 bytes
16:
17: Variable Size 637537200 bytes
18:
19: Database Buffers 1828716544 bytes
20:
21: Redo Buffers 14688256 bytes
22:
23: Database mounted.
24:
25: Database opened.
26:
27: SQL> @?/rdbms/admin/utlrp.sql
28:
验证
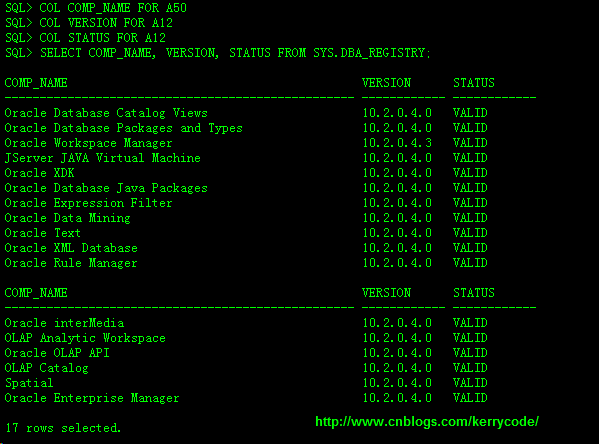
1: SQL> COL COMP_NAME FOR A50
2: SQL> COL VERSION FOR A12
3: SQL> COL STATUS FOR A12
4: SQL> SELECT COMP_NAME, VERSION, STATUS FROM SYS.DBA_REGISTRY;
5:
6: COMP_NAME VERSION STATUS
7: -------------------------------------------------- ------------ ------------
8: Oracle Database Catalog Views 10.2.0.4.0 VALID
9: Oracle Database Packages and Types 10.2.0.4.0 VALID
10: Oracle Workspace Manager 10.2.0.4.3 VALID
11: JServer JAVA Virtual Machine 10.2.0.4.0 VALID
12: Oracle XDK 10.2.0.4.0 VALID
13: Oracle Database Java Packages 10.2.0.4.0 VALID
14: Oracle Expression Filter 10.2.0.4.0 VALID
15: Oracle Data Mining 10.2.0.4.0 VALID
16: Oracle Text 10.2.0.4.0 VALID
17: Oracle XML Database 10.2.0.4.0 VALID
18: Oracle Rule Manager 10.2.0.4.0 VALID
19:
20: COMP_NAME VERSION STATUS
21: -------------------------------------------------- ------------ ------------
22: Oracle interMedia 10.2.0.4.0 VALID
23: OLAP Analytic Workspace 10.2.0.4.0 VALID
24: Oracle OLAP API 10.2.0.4.0 VALID
25: OLAP Catalog 10.2.0.4.0 VALID
26: Spatial 10.2.0.4.0 VALID
27: Oracle Enterprise Manager 10.2.0.4.0 VALID
28:
29: 17 rows selected.
30:
如果你需要升级emca,那么可以通过emca –upgrade db命令实现。如下所示
1: [oracle@DB-Server ~]$ emca -upgrade db
2:
3: STARTED EMCA at Mar 12, 2014 2:59:18 PM
4: EM Configuration Assistant, Version 10.2.0.1.0 Production
5: Copyright (c) 2003, 2005, Oracle. All rights reserved.
6:
7: Enter the following information:
8: ORACLE_HOME for the database to be upgraded: /u01/app/oracle/product/dbhome_1
9: Database SID: epps
10: Listener port number: 15
11: ...........
Linux下Oracle 10.2.0.1升级到10.2.0.4总结的更多相关文章
- Oracle数据库版本10.2.0.1升级到10.2.0.3(转)
Oracle数据库版本10.2.0.1升级到10.2.0.3 1.停止OEM/isqlplus/监听/DB实例 $ emctl stop dbconsole $ isqlplusctl stop $ ...
- rac 10g 10.2.0.1升级到10.2.0.5具体解释
RAC 10.2.0.1 升级到 10.2.0.5 一. 准备: Patch 包:p8202632_10205_LINUX.zip 节点数:3个节点 RAC1 RAC2 ...
- 解决Linux下Oracle中文乱码的一些心得体会 ,转自
以下转自 http://blog.itpub.net/29151695/viewspace-1173238/ 最近在linux上安装完oracle 10gR2后,又遇到了字符集乱码的问题,之前在网上找 ...
- linux下oracle数据库服务和监听的启动停止
oracle数据库是重量级的,其管理非常复杂,将其在linux平台上的启动和关闭步骤整理一下. 安装完毕oracle以后,需要创建oracle系统用户,并在/home/oracle下面的.bash_p ...
- linux 下oracle导入dmp文件
2017年08月01日 19:10:49 xuxie13 阅读数:17788 最近要到某公司进行poc演示,整了个新项目,需要我数据库修改项目,这才有了这篇博客. 首先进入linux下oracle ...
- linux下oracle数据库字符集修改
linux下oracle数据库字符集修改 0.RHEL6.7.oracle11gr2 1.登录oracle.在安装oracle的用户下进入数据库. $ sqlplus / as sysdba 2.查询 ...
- linux 下 取进程占用内存(MEM)最高的前10个进程
# linux 下 取进程占用 cpu 最高的前10个进程ps aux|head -1;ps aux|grep -v PID|sort -rn -k +3|head # linux 下 取进程占用内存 ...
- Linux下Oracle的启动和关闭
默认情况下,Linux下Oracle是不会随系统自动启动的. 1.启动Oracle 1.以oracle账户登录到CentOS,或者切换到oracle用户权限 # su – oracle 2.然后输入 ...
- Linux下Oracle 12c的卸载
注:本文来源于:<Linux下Oracle 12c的卸载> 与Windows下Oracle的安装容易卸载麻烦相反,Linux下Oracle的安装麻烦下载简单. 1.关闭Oracle数据库 ...
- Linux下Oracle中SqlPlus时上下左右键乱码问题的解决办法
window下的sqlplus可以通过箭头键,来回看历史命令,用起来非常的方便. 但是在Linux下,会出现各种乱码,非常不方便,如下图所示,每次打错一个字符就需要重新打一遍. 解决办法:rlwrap ...
随机推荐
- 【记录】GitHub/TortoiseGit 修改邮箱/提交者
我使用 Git 客户端工具是 TortoiseGit,在提交更新的时候,不知何时起会出现下面这种情况: 正常提交作者信息显示应该是: 本来也没怎么注意,但是在提交历史中,记录就不显示出来了,也就是在首 ...
- Java ConcurrentHashMap Example and Iterator--转
原文地址:http://www.journaldev.com/122/java-concurrenthashmap-example-iterator#comment-27448 Today we wi ...
- IEE重建表完全释放磁盘空间具体步骤参考
环境:RHEL 5.3 + IEE 5.1.40 本文目的:指导项目侧人员再遇到此类改动需求时可以自己更改.需求:mr_intrainterfreq表重建,历史数据全部删掉. 1.停库: 1.1确认现 ...
- 【JUC】JDK1.8源码分析之LockSupport(一)
一.前言 最开始打算分析ReentrantLock,但是分析到最后,发现离不开LockSuport的支持,所以,索性就先开始分析LockSupport,因为它是锁中的基础,是一个提供锁机制的工具类,所 ...
- jquery实现分页功能
RT,不是很难,但是感觉代码一点都不简洁,就是多加点判断,直接上代码了. HTML部分: <div class = "container-fluid"> <div ...
- Windows Phone 如何振动手机?
1. 导入命名空间. using Windows.Phone.Devices.Notification; 2. 通过调用对 VibrationDevice 类的静态 GetDefault 方法获取对振 ...
- jQuery获取Select选中的Text和Value
获取Select选中的Text和Value语法解释:$("#select_id").change(function(){//code...}); // 为Select添加事件, ...
- Hibernate框架中Criteria语句
在Hibernate中有一种查询语句是Criteria查询(QBC查询),今天呢 我们就一个个的详细的跟大家一起探讨Criteria语句的相关知识点 案例前的准备 //插入测试数据,构建数据库 pub ...
- 浅谈SQL Server中的三种物理连接操作
简介 在SQL Server中,我们所常见的表与表之间的Inner Join,Outer Join都会被执行引擎根据所选的列,数据上是否有索引,所选数据的选择性转化为Loop Join,Merge J ...
- jquery属性
1.toggleClass() 如果对象有class属性,则删除: 如果没有class属性,则加上. <style> .hide{ display: none; } </style ...