Springboot 4.Springboot 集成SwaggerUi
SwaggerUi就是自动生成接口文档的这么一个类似于插件的工具,可以直接访问接口。
首先打开pom文件,将插件引进来,然后增加一个属性<properties>,用来设置版本号的,然后直接用${}引用。
<?xml version="1.0" encoding="UTF-8"?>

<project xmlns="http://maven.apache.org/POM/4.0.0"

         xmlns:xsi="http://www.w3.org/2001/XMLSchema-instance"

         xsi:schemaLocation="http://maven.apache.org/POM/4.0.0 http://maven.apache.org/xsd/maven-4.0.0.xsd">

    <parent>

        <artifactId>JavaInterfaceTest</artifactId>

        <groupId>com.peixm.code</groupId>

        <version>1.0-SNAPSHOT</version>

    </parent>

    <modelVersion>4.0.0</modelVersion>

    <artifactId>Chapter10</artifactId>

    <properties>

        <swagger.version>2.6.1</swagger.version>

    </properties>

    <dependencies>

        <dependency>

            <groupId>org.springframework.boot</groupId>

            <artifactId>spring-boot-starter-web</artifactId>

        </dependency>

        <dependency>

            <groupId>io.springfox</groupId>

            <artifactId>springfox-swagger2</artifactId>

            <version>${swagger.version}</version>

        </dependency>

        <dependency>

            <groupId>io.springfox</groupId>

            <artifactId>springfox-swagger-ui</artifactId>

            <version>${swagger.version}</version>

        </dependency>

        <dependency>

            <groupId>org.projectlombok</groupId>

            <artifactId>lombok</artifactId>

            <version>1.16.14</version>

        </dependency>

    </dependencies>

</project>
然后创建一个config包,在创建一个类SwaggerConfig.java,用来配置swager
package com.course.config;

import org.springframework.context.annotation.Bean;

import org.springframework.context.annotation.Configuration;

import springfox.documentation.builders.ApiInfoBuilder;

import springfox.documentation.builders.PathSelectors;

import springfox.documentation.service.ApiInfo;

import springfox.documentation.service.Contact;

import springfox.documentation.spi.DocumentationType;

import springfox.documentation.spring.web.plugins.Docket;

import springfox.documentation.swagger2.annotations.EnableSwagger2;

@Configuration  //在springboot里面专门为了加载配置文件的标签

@EnableSwagger2   //自动加载配置文件

public class SwaggerConfig {

    @Bean

    public Docket api(){

        return new Docket(DocumentationType.SWAGGER_2)

                .apiInfo(apiInfo())

                .pathMapping("/")

                .select()

                .paths(PathSelectors.regex("/.*"))   //匹配那些访问的方法

                .build();

    }

    private ApiInfo apiInfo() {

        //http://localhost:8888/swagger-ui.html

        return new ApiInfoBuilder().title("我的接口文档")

                .contact(new Contact("xiaomin","","553238711@qq.com"))

                .description("这是我的swaggerui生成的接口文档")

                .version("1.0.0.0")

                .build();

    }

}
然后在想要在swagger看到的接口类的类名上添加注解:@Api(value = "/",description = "这是我全部的get方法"),在每个方法上面添加 @ApiOperation(value = "通过这个方法可以获取到cookies的值",httpMethod ="GET"),(或者post)value就是一个描述,描述这个方法是做什么的。
package com.course.server;

import io.swagger.annotations.Api;

import io.swagger.annotations.ApiOperation;

import org.springframework.web.bind.annotation.*;

import javax.servlet.http.Cookie;

import javax.servlet.http.HttpServletRequest;

import javax.servlet.http.HttpServletResponse;

import java.util.HashMap;

import java.util.Map;

import java.util.Objects;

@RestController    //被告诉我是你需要扫描的类

@Api(value = "/",description = "这是我全部的get方法")

public class MyGetMethod {

    @RequestMapping(value = "/getCookies",method = RequestMethod.GET)    //访问的路径是什么

    @ApiOperation(value = "通过这个方法可以获取到cookies的值",httpMethod ="GET")

    public String getCookies(HttpServletResponse response){

        //HttpServerletRequest    装请求信息

        //HttpServerletResponse   装响应信息

        Cookie cookie = new Cookie("login","ture");

        response.addCookie(cookie);

        return "恭喜你获得cookies信息成功";

    }

    /**

     * 要求客户端携带cookies访问

     * */

    @RequestMapping(value = "/get/with/cookies",method = RequestMethod.GET)

    @ApiOperation(value = "要求客户端携带cookies访问",httpMethod = "GET")

    public String getWithCookies(HttpServletRequest request){

        Cookie[] cookies = request.getCookies();

        if(Objects.isNull(cookies)){

            return "你必须携带cookies信息来";

        }

        for(Cookie cookie : cookies){

            if(cookie.getName().equals("login") && cookie.getName().equals("true")){

                return "恭喜你访问成功";

            }

        }

        return "你必须携带cookies信息来";

    }

    /**

    * 开发一个需要携带参数才能访问的get请求

    * 第一种实现方式是 url: ip:port/get/with/param?key=value&key=value

    * 模拟获取商品列表  开始页数,结束的页数,一页20条数据

    * */

    //第一种需要携带参数访问的get请求

    @RequestMapping(value = "/get/with/param",method = RequestMethod.GET)

    @ApiOperation(value = "携带参数才能访问的get请求",httpMethod = "GET")

    public Map<String,Integer> getList(@RequestParam Integer start,

                                       @RequestParam Integer end){

        Map<String,Integer> myList = new HashMap<>();

        myList.put("鞋",400);

        myList.put("衬衫",300);

        myList.put("干脆面",1);

        return myList;

    }

    /**

     *第2种需要携带参数访问的get请求

     * url:  ip:port/get/with/param/10/20

     * */

    @RequestMapping(value = "/get/with/param/{start}/{end}")

    @ApiOperation(value = "第2种需要携带参数访问的get请求",httpMethod = "GET")

    public Map myGetList(@PathVariable Integer start,

                         @PathVariable Integer end){

        Map<String,Integer> myList = new HashMap<>();

        myList.put("鞋",400);

        myList.put("衬衫",300);

        myList.put("干脆面",1);

        return myList;

    }

}
然后改变启动文件里面的要检测的包
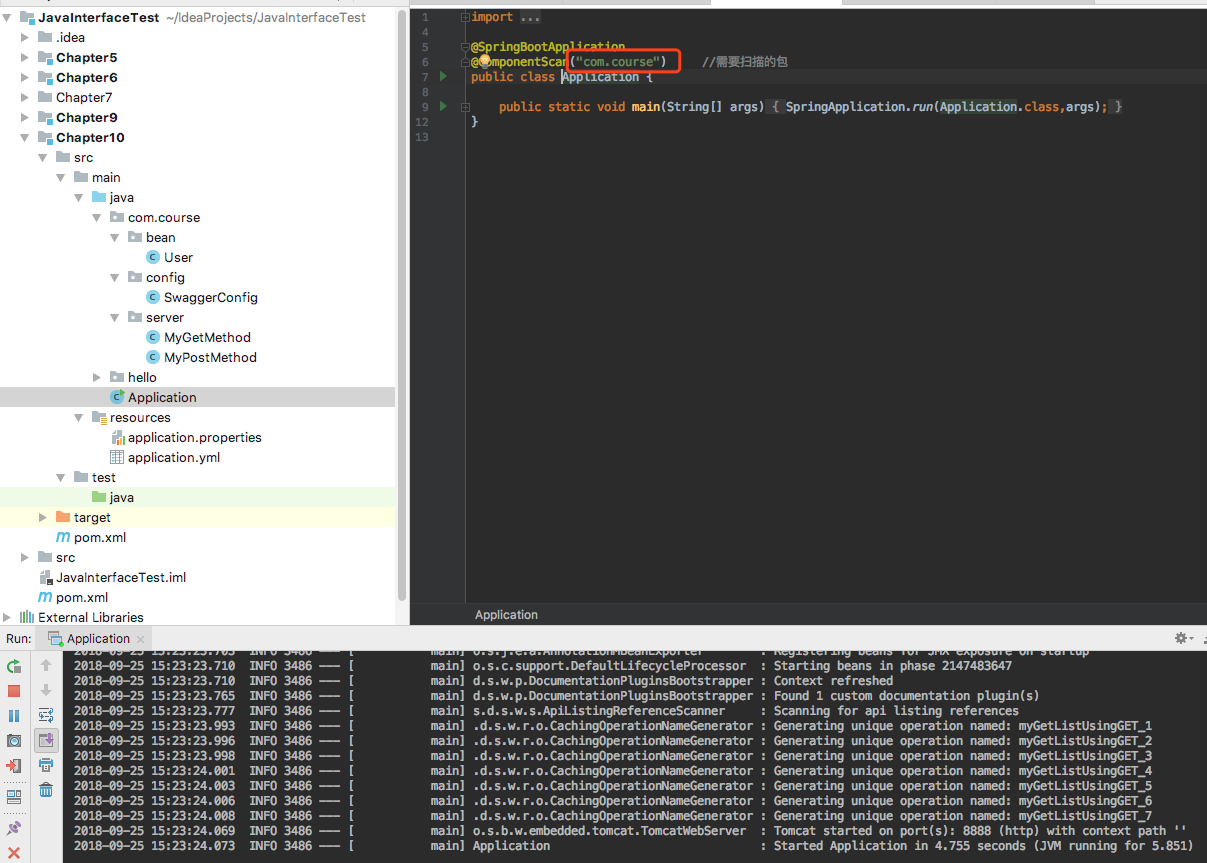
然后在浏览器输入:http://localhost:8888/swagger-ui.html 就会出现所有的接口
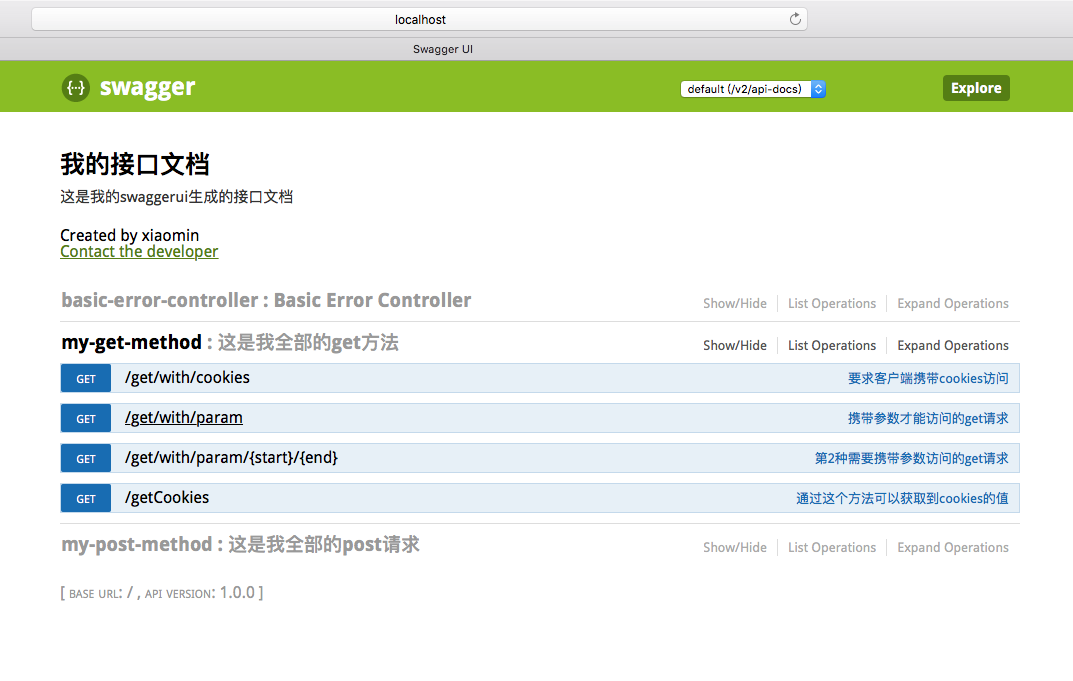
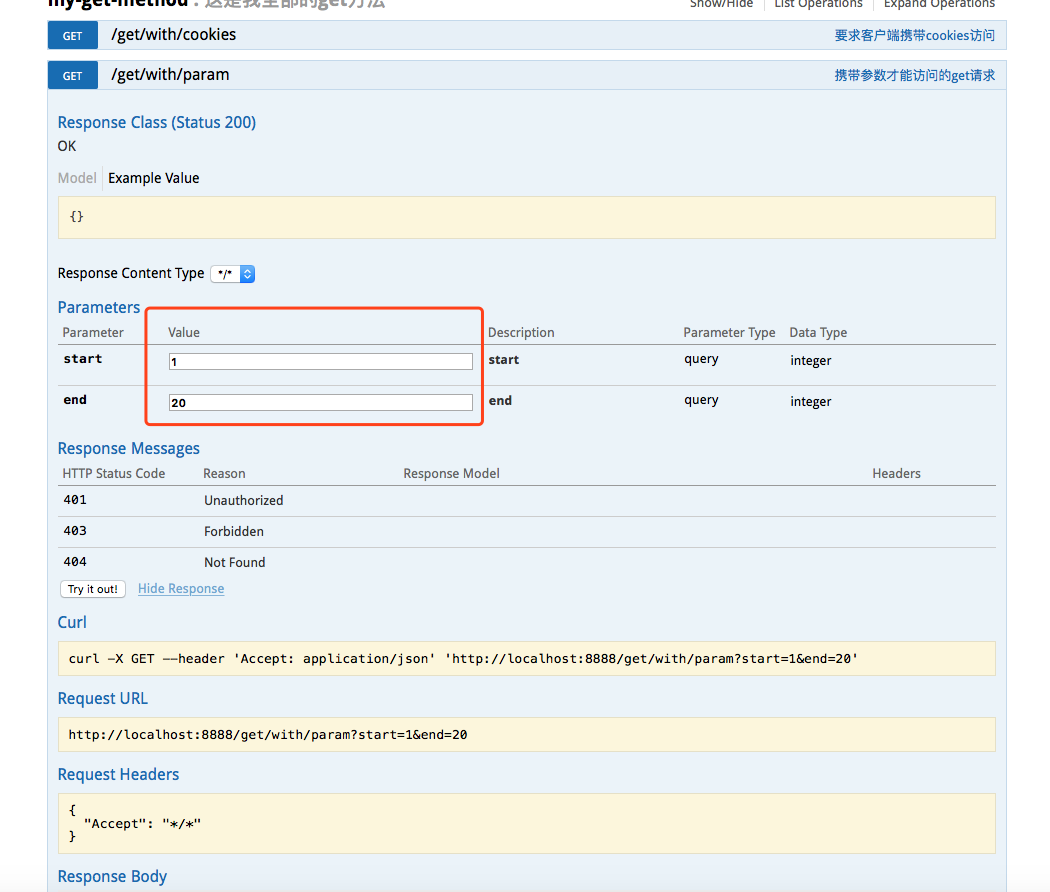
点击接口可以进行接口测试:try out就可以请求
Springboot 4.Springboot 集成SwaggerUi的更多相关文章
- Springboot+swagger2.7集成开发
Springboot+swagger2.7集成开发 本篇文章是介绍最新的springboot和swagger2.7集成开发和2.0稍微有一些出入: Springboot集成环境配置 Swagger2. ...
- 【java框架】SpringBoot(3) -- SpringBoot集成Swagger2
1.SpringBoot web项目集成Swagger2 1.1.认识Swagger2 Swagger 是一个规范和完整的框架,用于生成.描述.调用和可视化 RESTful 风格的 Web 服务.总体 ...
- SpringBoot12 QueryDSL01之QueryDSL介绍、springBoot项目中集成QueryDSL
1 QueryDSL介绍 1.1 背景 QueryDSL的诞生解决了HQL查询类型安全方面的缺陷:HQL查询的扩展需要用字符串拼接的方式进行,这往往会导致代码的阅读困难:通过字符串对域类型和属性的不安 ...
- SpringBoot(七):集成DataSource 与 Druid监控配置
绑定DataSource:Spring Boot默认的数据源是:org.apache.tomcat.jdbc.pool.DataSource,Druid是Java语言中最好的数据库连接池,并且能够提供 ...
- DEMO: springboot 与 freemarker 集成
直接在 DEMO: springboot 与 mybatis 集成 基础上,进行修改. 1.pom.xml 中引用 依赖 <dependency> <groupId>org.s ...
- Springboot 和 Mybatis集成开发
Springboot 和 Mybatis集成开发 本项目使用的环境: 开发工具:Intellij IDEA 2017.1.3 jdk:1.7.0_79 maven:3.3.9 额外功能 PageHel ...
- 微服务学习三:springboot与springcloud集成之Eurake的使用(server端,client端)
这个多亏了网站上的一个大神的博客: http://blog.csdn.net/forezp/article/details/70148833 强烈推荐学习: 1.springcloud是什么,这个大家 ...
- 在前后端分离的SpringBoot项目中集成Shiro权限框架
参考[1].在前后端分离的SpringBoot项目中集成Shiro权限框架 参考[2]. Springboot + Vue + shiro 实现前后端分离.权限控制 以及跨域的问题也有涉及
- SpringBoot系列之集成jsp模板引擎
目录 1.模板引擎简介 2.环境准备 4.源码原理简介 SpringBoot系列之集成jsp模板引擎 @ 1.模板引擎简介 引用百度百科的模板引擎解释: 模板引擎(这里特指用于Web开发的模板引擎)是 ...
- SpringBoot系列之集成Druid配置数据源监控
SpringBoot系列之集成Druid配置数据源监控 继上一篇博客SpringBoot系列之JDBC数据访问之后,本博客再介绍数据库连接池框架Druid的使用 实验环境准备: Maven Intel ...
随机推荐
- Vue一个案例引发的递归组件的使用
今天我们继续使用 Vue 的撸我们的实战项目,只有在实战中我们才会领悟更多,光纸上谈兵然并卵,继上篇我们的<Vue一个案例引发的动态组件与全局事件绑定总结> 之后,今天来聊一聊我们如何在项 ...
- Python模块time、datetime
模块: 模块是一系列常用功能的集合体,一个py文件就是一个模块. 一.模块的作用: 1.从文件级别组织程序,方便管理,随着程序的发展,功能越来越多,我们通常将程序分成一个个py文件,这样做程序的结构更 ...
- 【原】Java学习笔记024 - 包装类
package cn.temptation; public class Sample01 { public static void main(String[] args) { // 之前对于基本数据类 ...
- c/c++ 网络编程 UDP 主机网络信息取得
网络编程 UDP 主机网络信息取得 1,if_nametoindex 通过网卡名字取得网卡编号 2,if_indextoname 通过网卡编号取得网卡名字 #include <stdio.h&g ...
- Flex builder4.6激活【转】
方法一: 1.到Adobe官网下载FlashBuilder 4.6 http://download.adobe.com/pub/adobe/flex/win/FlashBuilder_4_6_LS10 ...
- [LeeCode]14. 最长公共前缀
题目链接:https://leetcode-cn.com/problems/longest-common-prefix/ 题目描述: 编写一个函数来查找字符串数组中的最长公共前缀. 如果不存在公共前缀 ...
- JRE与JDK简介
如何进行 Java 开发: JRE: JDK:
- MSIL学习------从HelloWorld开始
我的博客即将搬运同步至腾讯云+社区,邀请大家一同入驻:https://cloud.tencent.com/developer/support-plan?invite_code=3889z1y72b28 ...
- Linux soft lockup分析
关键词:watchdog.soft lockup.percpu thread.lockdep等. 近日遇到一个soft lockup问题,打印类似“[ 56.032356] NMI watchdog: ...
- 真正的轻量级WebService框架——使用JAX-WS(JWS)发布WebService(转载)
WebService历来都很受重视,特别是Java阵营,WebService框架和技术层出不穷.知名的XFile(新的如CXF).Axis1.Axis2等. 而Sun公司也不甘落后,从早期的JAX-R ...