
SpringFactoriesLoader解析
一、SpringFactoriesLoader 介绍
1.1 SpringFactoriesLoader 简介
SpringFactoriesLoader 工厂加载机制是 Spring 内部提供的一个约定俗成的加载方式,与 java spi 类似,只需要在模块的 META-INF/spring.factories 文件中,以 Properties 类型(即 key-value 形式)配置,就可以将相应的实现类注入 Spirng 容器中。
Properties 类型格式:
key:是全限定名(抽象类|接口)

value:是实现,多个实现通过 **逗号** 进行分隔
1.2 SpringFactoriesLoader 常用方法
loadFactoryNames
读取 classpath上 所有的 jar 包中的所有 META-INF/spring.factories属 性文件,找出其中定义的匹配类型 factoryClass 的工厂类,然后并返回这些工厂类的名字列表,注意是包含包名的全限定名。
loadFactories
读取 classpath 上所有的jar包中的所有 META-INF/spring.factories 属性文件,找出其中定义的匹配类型 factoryClass 的工厂类,然后创建每个工厂类的对象/实例,并返回这些工厂类对象/实例的列表。
1.3 loadFactories 流程图
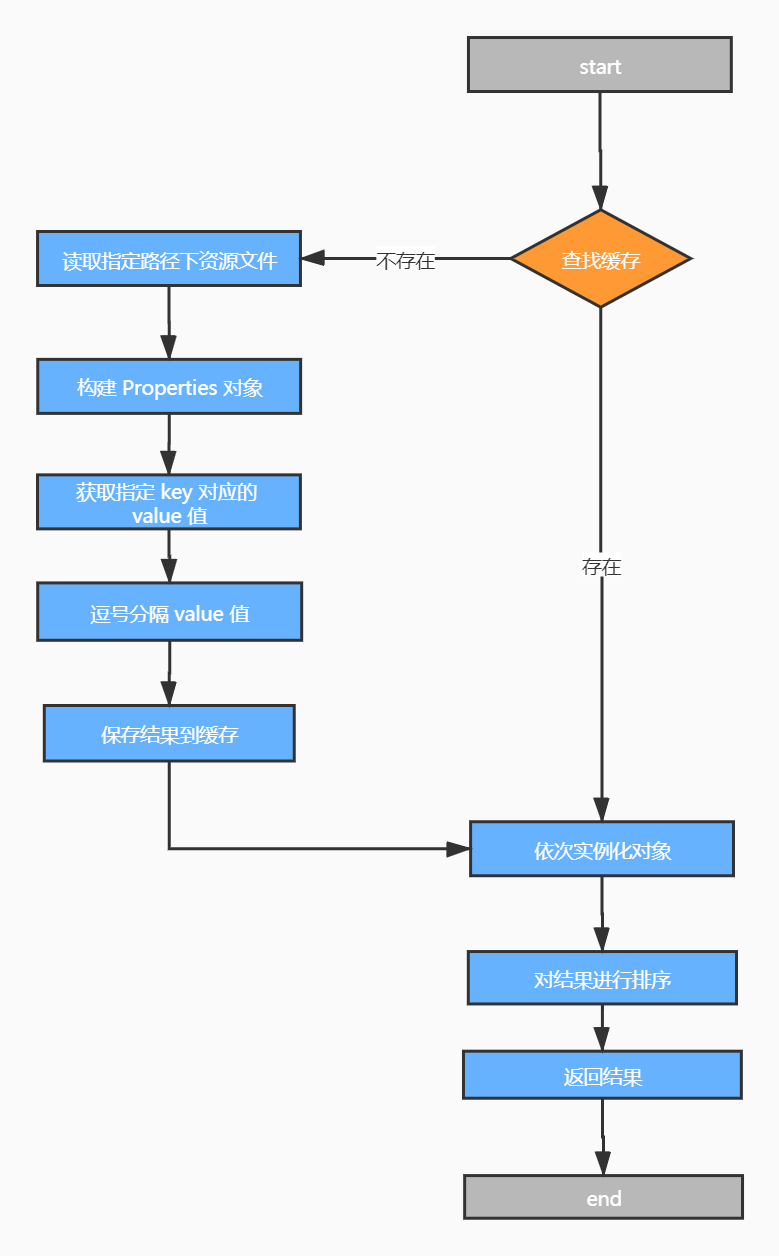
二、SpringFactoriesLoader 源码解析
2.1 loadFactoryNames 解析
public static List<String> loadFactoryNames(Class<?> factoryType, @Nullable ClassLoader classLoader) {

    // 获取包含包名的工厂类名称

	String factoryTypeName = factoryType.getName();

    // 获取所有配置在 META-INF/spring.factories 文件的值

    // 然后获取指定类的实现类名列表

	return loadSpringFactories(classLoader).getOrDefault(factoryTypeName, Collections.emptyList());

}
// 默认的工厂配置路径地址,可以存放在多个 JAR 包下

public static final String FACTORIES_RESOURCE_LOCATION = "META-INF/spring.factories";

private static Map<String, List<String>> loadSpringFactories(@Nullable ClassLoader classLoader) {

    // 判断是否有缓存结果,如果有直接返回

	MultiValueMap<String, String> result = cache.get(classLoader);

	if (result != null) {

		return result;

	}

	try {

        // 扫描 classpath 上所有 JAR 中的文件 META-INF/spring.factories

		Enumeration<URL> urls = (classLoader != null ?

				classLoader.getResources(FACTORIES_RESOURCE_LOCATION) :

				ClassLoader.getSystemResources(FACTORIES_RESOURCE_LOCATION));

		result = new LinkedMultiValueMap<>();

		while (urls.hasMoreElements()) {

            // 找到的每个 META-INF/spring.factories 文件都是一个 Properties 文件,将其内容加载到一个 Properties 对象然后处理其中的每个属性

			URL url = urls.nextElement();

			UrlResource resource = new UrlResource(url);

			Properties properties = PropertiesLoaderUtils.loadProperties(resource);

			for (Map.Entry<?, ?> entry : properties.entrySet()) {

                // 获取工厂类名称(接口或者抽象类的全限定名)

				String factoryTypeName = ((String) entry.getKey()).trim();

                // 将逗号分割的属性值逐个取出,然后放到 结果result 中去

				for (String factoryImplementationName : StringUtils.commaDelimitedListToStringArray((String) entry.getValue())) {

					result.add(factoryTypeName, factoryImplementationName.trim());

				}

			}

		}

        // 将结果存放到缓存中

		cache.put(classLoader, result);

		return result;

	}

	catch (IOException ex) {

		throw new IllegalArgumentException("Unable to load factories from location [" +

				FACTORIES_RESOURCE_LOCATION + "]", ex);

	}

}
default V getOrDefault(Object key, V defaultValue) {

    V v;

    return (((v = get(key)) != null) || containsKey(key))

        ? v

        : defaultValue;

}
2.2 loadFactories 解析
public static <T> List<T> loadFactories(Class<T> factoryType, @Nullable ClassLoader classLoader) {

	Assert.notNull(factoryType, "'factoryType' must not be null");

    // 如果未指定类加载器,则使用默认的

	ClassLoader classLoaderToUse = classLoader;

	if (classLoaderToUse == null) {

		classLoaderToUse = SpringFactoriesLoader.class.getClassLoader();

	}

    // 获取指定工厂名称列表

	List<String> factoryImplementationNames = loadFactoryNames(factoryType, classLoaderToUse);

    // 如果记录器Trace跟踪激活的话,将工厂名称列表输出

	if (logger.isTraceEnabled()) {

		logger.trace("Loaded [" + factoryType.getName() + "] names: " + factoryImplementationNames);

	}

    // 创建结果集

	List<T> result = new ArrayList<>(factoryImplementationNames.size());

	for (String factoryImplementationName : factoryImplementationNames) {

        // 实例化工厂类,并添加到结果集中

		result.add(instantiateFactory(factoryImplementationName, factoryType, classLoaderToUse));

	}

    // 对结果集列表进行排序

	AnnotationAwareOrderComparator.sort(result);

	return result;

}
private static <T> T instantiateFactory(String factoryImplementationName, Class<T> factoryType, ClassLoader classLoader) {

	try {

		Class<?> factoryImplementationClass = ClassUtils.forName(factoryImplementationName, classLoader);

		if (!factoryType.isAssignableFrom(factoryImplementationClass)) {

			throw new IllegalArgumentException(

					"Class [" + factoryImplementationName + "] is not assignable to factory type [" + factoryType.getName() + "]");

		}

		return (T) ReflectionUtils.accessibleConstructor(factoryImplementationClass).newInstance();

	}

	catch (Throwable ex) {

		throw new IllegalArgumentException(

			"Unable to instantiate factory class [" + factoryImplementationName + "] for factory type [" + factoryType.getName() + "]",

			ex);

	}

}
SpringFactoriesLoader解析的更多相关文章
- springboot源码解析 - 构建SpringApplication
1 package com.microservice.framework; 2 3 import org.springframework.boot.SpringApplication; 4 impor ...
- SpringBoot启动流程解析
写在前面: 由于该系统是底层系统,以微服务形式对外暴露dubbo服务,所以本流程中SpringBoot不基于jetty或者tomcat等容器启动方式发布服务,而是以执行程序方式启动来发布(参考下图ke ...
- springboot之启动原理解析
前言 SpringBoot为我们做的自动配置,确实方便快捷,但是对于新手来说,如果不大懂SpringBoot内部启动原理,以后难免会吃亏.所以这次博主就跟你们一起一步步揭开SpringBoot的神秘面 ...
- Spring Boot自动配置源码解析(基于Spring Boot 2.0.2.RELEASE)
在Spring Boot官方介绍中,首一段话是这样的(如下图).我们可以大概了解到其所表达的含义:我们可以利用Spring Boot写很少的配置来创建一个非常方便的基于Spring整合第三方类库的单体 ...
- spring boot(二):启动原理解析
我们开发任何一个Spring Boot项目,都会用到如下的启动类 @SpringBootApplication public class Application { public static voi ...
- SpringBoot的自动配置原理过程解析
SpringBoot的最大好处就是实现了大部分的自动配置,使得开发者可以更多的关注于业务开发,避免繁琐的业务开发,但是SpringBoot如此好用的 自动注解过程着实让人忍不住的去了解一番,因为本文的 ...
- SpringBoot初体验及原理解析
一.前言 上篇文章,我们聊到了SpringBoot得以实现的幕后推手,这次我们来用SpringBoot开始HelloWorld之旅.SpringBoot是Spring框架对“约定大于配置(Conv ...
- springboot之启动原理解析及源码阅读
前言 SpringBoot为我们做的自动配置,确实方便快捷,但是对于新手来说,如果不大懂SpringBoot内部启动原理,以后难免会吃亏.所以这次博主就跟你们一起一步步揭开SpringBoot的神秘面 ...
- 【转】Spring Boot干货系列:(三)启动原理解析
前言 前面几章我们见识了SpringBoot为我们做的自动配置,确实方便快捷,但是对于新手来说,如果不大懂SpringBoot内部启动原理,以后难免会吃亏.所以这次博主就跟你们一起一步步揭开Sprin ...
随机推荐
- MySQL5.7.x安装教程(tar.gz)
博主本人平和谦逊,热爱学习,读者阅读过程中发现错误的地方,请帮忙指出,感激不尽 二.MySQL安装(tar.gz) 1.系统环境设置 1.1清空系统mysql 安装mysql之前需要将系统自带的my ...
- django框架基础-ORM单表操作-长期维护
############### 单表操作-添加数据 ################ import os if __name__ == '__main__': os.environ.set ...
- scala语言yield配合for的用法实例
yield配合for的用法 话不多说见实例 package com.donews.reynold /** * Created by reynold on 2017/3/23. */ object Sc ...
- Go语言如何实现单例模式
单例模式是常见的设计模式,被广泛用于创建数据库,redis等单实例.作用在于可以控制实例个数节省系统资源 特点: 保证调用多次,只会产生单个实例 全局访问 单例的分类 单例模式大致分为2大类: 懒汉式 ...
- JS Style Guide_1
当你在回调函数里要使用函数表达式时,尽量使用箭头函数,比如数组中的 Map.filter.reduce等的回调函数中 [1,2,3].map((x) => { let y = x + 1; re ...
- Scarpy框架安装教程
在一切之前,建议升级pip,如果版本太低,安装会失败 升级pip命令: python -m pip install --upgrade pip 如果上面的命令不能用,用下面这个 easy_instal ...
- 5G-NR物理信道与调制-下行链路v1.1.0
上接<5G-NR物理信道与调制v1.1.0>下行链路 References Definitions, symbols and abbreviations 帧结构与物理资源 通用函数 上行链 ...
- 《SDN期末作业——实现负载均衡》
队名:取个队名真难 一.网络拓扑(场景二) 二.负载均衡程序 1.建立拓扑的代码 拓扑 2.下发组表流表的代码 下发组表流表 三.演示视频 1.目的 服务器h2,h3,h4上各自有不同的服务,h1是客 ...
- 达拉草201771010105《面向对象程序设计(java)》第八周学习总结
达拉草201771010105<面向对象程序设计(java)>第八周学习总结 实验六接口的定义与使用 实验时间 2018-10-18 1.实验目的与要求 (1) 掌握接口定义方法: (2) ...
- Mariadb 修改root密码及跳过授权方式启动数据库
默认情况下,yum方式新安装的 mariadb 的密码为空,在shell终端直接输入 mysql 就能登陆数据库. 如果是刚安装第一次使用,请使用 mysql_secure_installation ...