
Ansible安装部署
Ansible安装部署
Ansible是一种集成IT系统的配置管理, 应用部署, 执行特定任务的开源平台. 它基于Python语言实现, 部署只需在主控端部署Ansible环境, 被控端无需安装代理工具, 只需打开SSH, 让主控端通过SSH秘钥认证对其进行所有的管理监控操作.它有一个很庞大的用户群体以及丰富的API, 相对适合部署到数量比较大且对系统软件安装要求比较严格的集群中.
安装环境:
System: Centos 6.7 x64
Master: master.example.com
Minion: client01.example.com
Minion: client02.example.com
一. 环境部署及安装
1. 关闭iptables和SELINUX
2. Master端安装EPEL第三方yum源
# rpm -Uvh http://ftp.linux.ncsu.edu/pub/epel/6/i386/epel-release-6-8.noarch.rpm
3.安装Ansible
# yum install ansible -y
4.添加环境变量以便vi能正常显示中文注释.
# vi /etc/profile

添加:

export LC_ALL=en_US.UTF-8

export LANG=en_US.UTF-8

export LANGUAGE=en_US.UTF-8
# source /etc/profile
二. 初始配置
1. 修改主机及组配置
# cd /etc/ansible

# cp hosts hosts.bak

# cat /dev/null > hosts

# vi /etc/ansible/hosts

[webservers]

client01.example.com

client02.example.com

[nginx01]

client01.example.com

[nginx02]

client02.example.com
2.配置SSH秘钥认证
# yum install ssh* -y

# ssh-keygen -t rsa

Generating public/private rsa key pair.

Enter file in which to save the key (/root/.ssh/id_rsa):

Created directory '/root/.ssh'.

Enter passphrase (empty for no passphrase):

Enter same passphrase again:

Your identification has been saved in /root/.ssh/id_rsa.

Your public key has been saved in /root/.ssh/id_rsa.pub.

The key fingerprint is:

24:13:34:e9:71:2b:20:0b:48:a6:86:9a:1d:1b:1d:26 root@master.example.comThe key's randomart p_w_picpath is:

+--[ RSA 2048]----+

|ooE o.+.         |

|* .+..oo.        |

|oooo.ooo..       |

|oo.+  o+.        |

|o o    .S        |

|                 |

|                 |

|                 |

|                 |

+-----------------+
同步公钥文件id_rsa.pub到目标主机
# ssh-copy-id -i /root/.ssh/id_rsa.pub root@client01.example.com

# ssh-copy-id -i /root/.ssh/id_rsa.pub root@client02.example.com
校验SSH免密码配置是否成功.
# ssh root@client02.example.com
如直接进入则配置完成.
3.定义主机与组
(一个组就是一个标签,标签内的主机配置一样,在使用时调用标签执行写好的脚本或命令)
所有定义的主机与组规则都在/etc/Ansible/hosts下.
常见的写法:
192.168.1.21:2135 定义一个IP为192.168.1.21, SSH端口为2135的主机.
jumper ansible_ssh_port=22 ansible_ssh_host=192.168.1.50 定义一个别名为jumper, SSH端口为22, IP为192.168.1.50的主机.
组成员主机名称范例:
[webservers]

www[001:006].example.com

[dbservers]

db-[a:f].example.com
4.定义主机变量
主机可以指定变量, 后面可以供Playbooks调用
[atlanta]

host1 http_port=80 maxRequestsPerChild=808

host2 http_port=8080 maxRequestsPerChild=909
5.定义组变量
[atlanta]

host1

host2

[atlanta:vars]

ntp_server=ntp.atlanta.example.com

proxy=proxy.atlanta.example.com
6.匹配目标
重启webservers组所有SSH服务.
# ansible webservers -m service -a "name=sshd state=restarted"
client01.example.com | success >> {

    "changed": true,

    "name": "sshd",

    "state": "started"

}

client02.example.com | success >> {

    "changed": true,

    "name": "sshd",

    "state": "started"

}
三. Ansible常用模块及API
1.远程命令模块
command: 执行远程主机SHELL命令:
# ansible webservers -m command -a "free -m"

client01.example.com | success | rc=0 >>

             total       used       free     shared    buffers     cached

Mem:           996        108        887          0          7         41

-/+ buffers/cache:         58        937

Swap:         1023          0       1023

client02.example.com | success | rc=0 >>

             total       used       free     shared    buffers     cached

Mem:           996        108        888          0          7         41

-/+ buffers/cache:         58        937

Swap:         1023          0       1023
script: 远程执行MASTER本地SHELL脚本.(类似scp+shell)
# echo "df -h" > ~/test.sh

# ansible webservers -m script -a "~/test.sh"

client01.example.com | success >> {

    "changed": true,

    "rc": 0,

    "stderr": "OpenSSH_5.3p1, OpenSSL 1.0.1e-fips 11 Feb 2013\ndebug1: Reading configuration data /etc/ssh/ssh_config\r\ndebug1: Applying options for *\r\ndebug1: auto-mux: Trying existing master\r\ndebug1: mux_client_request_session: master session id: 2\r\ndebug1: mux_client_request_session: master session id: 2\r\nShared connection to client01.example.com closed.\r\n",

    "stdout": "Filesystem      Size  Used Avail Use% Mounted on\r\n/dev/sda3       6.6G  815M  5.5G  13% /\r\ntmpfs           499M     0  499M   0% /dev/shm\r\n/dev/sda1       190M   27M  154M  15% /boot\r\n"

}

client02.example.com | success >> {

    "changed": true,

    "rc": 0,

    "stderr": "OpenSSH_5.3p1, OpenSSL 1.0.1e-fips 11 Feb 2013\ndebug1: Reading configuration data /etc/ssh/ssh_config\r\ndebug1: Applying options for *\r\ndebug1: auto-mux: Trying existing master\r\ndebug1: mux_client_request_session: master session id: 2\r\ndebug1: mux_client_request_session: master session id: 2\r\nShared connection to client02.example.com closed.\r\n",

    "stdout": "Filesystem      Size  Used Avail Use% Mounted on\r\n/dev/sda3       6.6G  815M  5.5G  13% /\r\ntmpfs           499M     0  499M   0% /dev/shm\r\n/dev/sda1       190M   27M  154M  15% /boot\r\n"

}
2. copy模块
实现主控端向目标主机拷贝文件, 类似scp功能.
该实例实现~/test.sh文件至webservers组目标主机/tmp下, 并更新文件owner和group
# ansible webservers -m copy -a "src=~/test.sh dest=/tmp/ owner=root group=root mode=0755"

client01.example.com | success >> {

    "changed": true,

    "checksum": "c989bd551bfa8c755f6cacacb90c5c509432110e",

    "dest": "/tmp/test.sh",

    "gid": 0,

    "group": "root",

    "md5sum": "69a238d8cb3c5f979252010b3299e524",

    "mode": "0755",

    "owner": "root",

    "size": 6,

    "src": "/root/.ansible/tmp/ansible-tmp-1445322165.21-234077402845688/source",

    "state": "file",

    "uid": 0

}

client02.example.com | success >> {

    "changed": true,

    "checksum": "c989bd551bfa8c755f6cacacb90c5c509432110e",

    "dest": "/tmp/test.sh",

    "gid": 0,

    "group": "root",

    "md5sum": "69a238d8cb3c5f979252010b3299e524",

    "mode": "0755",

    "owner": "root",

    "size": 6,

    "src": "/root/.ansible/tmp/ansible-tmp-1445322165.2-164402895387597/source",

    "state": "file",

    "uid": 0

}
3.stat模块
获取远程文件状态信息, 包括atime, ctime, mtime, md5, uid, gid等信息.
# ansible webservers -m stat -a "path=/etc/sysctl.conf"

client02.example.com | success >> {

    "changed": false,

    "stat": {

    、

    、

    、

    }

}

client01.example.com | success >> {

    "changed": false,

    "stat": {

    、

    、

    、

    }

}
4.get_url模块
实现在远程主机下载指定URL到本地.
#  ansible webservers -m get_url -a "url=http://www.showerlee.com dest=/tmp/index.html mode=0400 force=yes"

client02.example.com | success >> {

    "changed": true,

    "checksum": "470d6ab960810153bb8149c3754b0e8a2d89209d",

    "dest": "/tmp/index.html",

    "gid": 0,

    "group": "root",

    "md5sum": "009949f770f35a4ea82105e5e923abcb",

    "mode": "0400",

    "msg": "OK (unknown bytes)",

    "owner": "root",

    "sha256sum": "",

    "size": 81635,

    "src": "/tmp/tmpa44PoE",

    "state": "file",

    "uid": 0,

    "url": "http://www.showerlee.com"

}

client01.example.com | success >> {

    "changed": true,

    "checksum": "9b1afd16f97c07638965ba0c5cf01037af00a38a",

    "dest": "/tmp/index.html",

    "gid": 0,

    "group": "root",

    "md5sum": "5a935e77927286dfcb7a0190e8af461b",

    "mode": "0400",

    "msg": "OK (unknown bytes)",

    "owner": "root",

    "sha256sum": "",

    "size": 81679,

    "src": "/tmp/tmp5WHuj0",

    "state": "file",

    "uid": 0,

    "url": "http://www.showerlee.com"

}
5.yum模块
Linux包管理平台操作, 常见都会有yum和apt, 此处会调用yum管理模式
# ansible webservers -m yum -a "name=curl state=latest"

client01.example.com | success >> {

    "changed": false,

    "msg": "",

    "rc": 0,

    "results": [

        "All packages providing curl are up to date"

    ]

}

client02.example.com | success >> {

    "changed": false,

    "msg": "",

    "rc": 0,

    "results": [

        "All packages providing curl are up to date"

    ]

}
6. cron模块
远程主机crontab配置
# ansible webservers -m cron -a "name='check dir' hour='5,2' job='ls -alh > /dev/null'"

client02.example.com | success >> {

    "changed": true,

    "jobs": [

        "check dir"

    ]

}

client01.example.com | success >> {

    "changed": true,

    "jobs": [

        "check dir"

    ]

}
7.service模块
远程主机系统服务管理
# ansible webservers -m service -a "name=crond state=stopped"

# ansible webservers -m service -a "name=crond state=restarted"

# ansible webservers -m service -a "name=crond state=reloaded"
8.user服务模块
远程主机系统用户管理
添加用户:

# ansible webservers -m user -a "name=johnd comment='John Doe'"

删除用户:

# ansible webservers -m user -a "name=johnd state=absent remove=yes"
四. playbook介绍(http://www.jianshu.com/p/41c4ed3ce779)
1、playbook简介
像很多其它配置文件管理方法一样,Ansible使用一种比较直白的方法来描述自己的任务配置文件。
Ansible 的任务配置文件被称之为“playbook”,我们可以称之为“剧本”。
每一出剧本(playbook)中都包含一系列的任务,这每个任务在ansible中又被称为一出“戏剧”(play)。一个剧本(playbook)中包含多出戏剧(play)。
2、playbook语法简介
YAML语法编写
格式如下所示:

house:

  family:

    name: Doe

    parents:

      - John

      - Jane

    children:

      - Paul

      - Mark

      - Simone

  address:

    number: 34

    street: Main Street

    city: Nowheretown

  zipcode: 12345
3、playbook实战
之前我们分享的Ansbile基础模块使用时,那种Ad-hoc点对点的,一次执行一个模块的操作方式已经使得Andsible一种非常强大的管理工具;但playbook将会使Ansible成为超一流的管理工具。
现在越来越多的DevOPS也开始将目光移向了Ansible,因为Ansible可以轻松的将shell脚本或简单的shell命令转换为Ansible plays.
:
#!/bin/bash

# 安装Apache

yum install --quiet -y httpd httpd-devel

# 复制配置文件

cp /path/to/config/httpd.conf /etc/httpd/conf/httpd.conf

cp /path/to/httpd-vhosts.conf /etc/httpd/conf/httpd-vhosts.conf

# 启动Apache,并设置开机启动

service httpd start

chkconfig httpd on
将其转换为一个完整的playbook后:
---

- hosts: all

  tasks:

   - name: "安装Apache"

     command: yum install --quiet -y httpd httpd-devel

   - name: "复制配置文件"

     command: cp /tmp/httpd.conf /etc/httpd/conf/httpd.conf

     command: cp /tmp/httpd-vhosts.conf /etc/httpd/conf/httpd-vhosts.conf

   - name: "启动Apache,并设置开机启动"

     command: service httpd start

     command: chkconfig httpd on
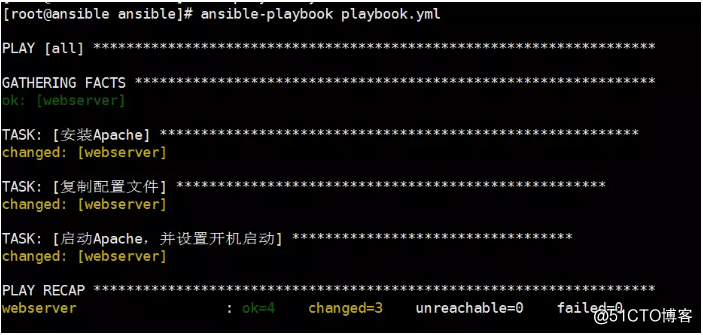
将以上内容放在一个名为playbook.yml的文件中,直接调用ansible-playbook命令,即可运行,运行结果和脚本运行结果一致:
# ansible-playbook ./playbook.yml
在上述playbook中,我们使用了“command”模块来运行了标准的shell命令。我们还给了每一出play一个“name”,因此当我们运行playbook时,每一个play都会有非常易读的的信息输出:
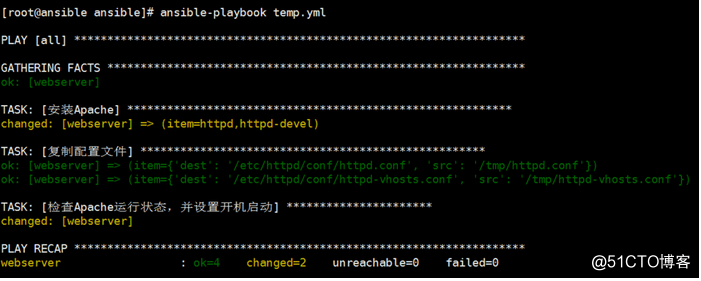
上面的playbook已经可以很好的运行shell脚本了,但是Ansible还有很多其他内置模块,可以大幅提升处理复杂配置的能力。
---

- hosts: all

  sudo: yes

  tasks:

   - name: 安装Apache

     yum: name={{ item }} state=present

     with_items:

     - httpd

     - httpd-devel

   - name: 复制配置文件     copy:

       src: "{{ item.src }}"

       dest: "{{ item.dest }}"

       owner: root

       group: root

       mode: 0644

     with_items:

     - {

       src: "/tmp/httpd.conf",

         dest: "/etc/httpd/conf/httpd.conf" }

     - {

       src: "/tmp/httpd-vhosts.conf",

       dest: "/etc/httpd/conf/httpd-vhosts.conf"

       }

   - name: 检查Apache运行状态,并设置开机启动

     service: name=httpd state=started enabled=yes
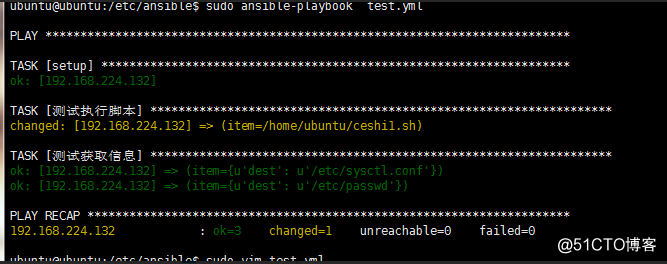
测试:
---

  - hosts: test

    #sudo: yes

    vars:

        bupath: "/home/ubuntu/ceshi1.sh"

        sconf: "/etc/sysctl.conf"

    tasks:

        - name: "测试执行脚本"

          shell: "{{ item }}"

          with_items:

          - "/home/ubuntu/ceshi1.sh"

        - name: "测试获取信息"

          stat: "path={{ item.dest }}"

          with_items:

          - {

            dest: "/etc/sysctl.conf" }

          - {

            dest: "/etc/passwd" }

YAML语法
1 YAML使用可打印的Unicode字符,可使用UTF-8或UTF-16。
2 使用空白字符未文件缩排来表示结构;不过不能使用跳格字符。
3 注解由井字号( # )开始,可以出现在一行中的任何位置,而且范围只有一行(也就是一般所谓的单行注解)
4 每个清单成员以单行表示,并用短杠+空白( - )起始。或使用方括号( [ ] ),并用逗号+空白( , )分开成员。
5 每个杂凑表的成员用冒号+空白( : )分开键值和内容。或使用大括号( { } ),并用逗号+空白( , )分开。 杂凑表的键值可以用问号 ( ? )起始,用来明确的表示多个词汇组成的键值。
6 字串平常并不使用引号,但必要的时候可以用双引号 ( " )或单引号 ( ' )框住。使用双引号表示字串时,可用倒斜线( \ )开始的跳脱字符(这跟C语言类似)表示特殊字符。
7 区块的字串用缩排和修饰词(非必要)来和其他资料分隔,有新行保留(preserve)(使用符号 | )或新行折叠(flod)(使用符号 > )两种方式。
8 在单一档案中,可用连续三个连字号(——)区分多个档案。另外,还有选择性的连续三个点号( ... )用来表示档案结尾。
9 重复的内容可使从参考标记星号 ( * )复制到锚点标记( & )。
10 指定格式可以使用两个惊叹号 ( !! ),后面接上名称。
11 档案中的单一文件可以使用指导指令,使用方法是百分比符号( % )。有两个指导指令
日志-如何获取日志ansible-playbook模块执行的详细信息?
如果在命令行上将-v标志传递给ansible-playbook,那么您将看到每个执行任务的stdout和stderr:
$ ansible-playbook -v playbook.yaml
Ansible还内置了对日志记录的支持。打开日志记录,修改ansible.ctl
[defaults]

log_path = /var/log/ansible.log
本文转载自:
转载于:https://blog.51cto.com/hellvenus/1982079
Ansible安装部署的更多相关文章
- Ansible安装部署以及常用模块详解
一. Ansible 介绍Ansible是一个配置管理系统configuration management system, python 语言是运维人员必须会的语言, ansible 是一个基于py ...
- 第1天:Ansible安装部署
Ansible介绍 Ansible是一个简单的自动化引擎,可完成配置管理.应用部署.服务编排以及各种IT需求.它是一款使用Python语言开发实现的开源软件,其依赖Jinjia2.paramiko和P ...
- Ansible安装部署及常用模块详解
Ansible命令使用 Ansible语法使用ansible <pattern_goes_here> -m <module_name> -a <arguments> ...
- 运维工具Ansible安装部署
http://blog.51cto.com/liqingbiao/1875921 centos7安装部署ansible https://www.cnblogs.com/bky185392793/p/7 ...
- 使用Ansible安装部署nginx+php+mysql之安装mysql(3)
三.使用Ansible安装mysql 1.mysq.yaml文件 - hosts: clong remote_user: root gather_facts: no tasks: # 安装rpm包 - ...
- 使用Ansible安装部署nginx+php+mysql之安装php(2)
二.使用Ansible安装php 1.php.yaml文件内容 - hosts: clong remote_user: root gather_facts: no tasks: # 安装libseli ...
- 使用Ansible安装部署nginx+php+mysql之安装nginx(1)
使用Ansible安装nginx 1.nginx.yaml文件 --- - hosts: clong remote_user: root gather_facts: no tasks: # 安装epe ...
- Ansible安装部署和常用命令,及其主机清单inventory(二)
1.ansible的安装方式 1.1使用yum源安装 yum install ansible -y 1.2使用rpm包安装 https://dl.fedoraproject.org/pub/epel/ ...
- 使用Ansible安装部署nginx+php+mysql之配置iptables防火墙(0)
前提: 1.已配置好hosts文件且免密码登录 2.需要的yaml文件已上传到主控端 一.使用Ansible配置iptables 1.iptables.yaml文件 --- - hosts: clon ...
随机推荐
- 为什么MySQL要用B+树?聊聊B+树与硬盘的前世今生【宇哥带你玩转MySQL 索引篇(二)】
为什么MySQL要用B+树?聊聊B+树与硬盘的前世今生 在上一节,我们聊到数据库为了让我们的查询加速,通过索引方式对数据进行冗余并排序,这样我们在使用时就可以在排好序的数据里进行快速的二分查找,使得查 ...
- VSCode设置大小写转换的快捷键
本文已同步到专业技术网站 www.sufaith.com, 该网站专注于前后端开发技术与经验分享, 包含Web开发.Nodejs.Python.Linux.IT资讯等板块. VSCode在默认情况下没 ...
- python3(二十六)slots
""" """ __author__ = 'shaozhiqi' # python是动态语言,所以定义类后,我们可以动态的给类绑定属性和方法 ...
- 运行jmeter.bat时 提示 not able to find java executable or version
安装过好几次,这是第一次遇到运行jmeter.bat时 提示 not able to find java executable or version Please check your Java in ...
- python如何操作excel 基础代码
一 基础操作1打开excel表格并获取表格名称 wookbook = load_workbook(filename = 表格文件路径) (注意只能打开存在的表格,不能用该方法创建一个新表格文件) wo ...
- (转) POJO和javabean的异同
参考:http://blog.csdn.net/lushuaiyin/article/details/7436318 一:什么是POJOPOJO的名称有多种,pure old java object ...
- 造轮子:实现一个简易的 Spring IoC 容器
作者:DeppWang.原文地址 我通过实现一个简易的 Spring IoC 容器,算是入门了 Spring 框架.本文是对实现过程的一个总结提炼,需要配合源码阅读,源码地址. 结合本文和源码,你应该 ...
- Ajax 简述与基础语法
目录 Ajax 1. 原生 JS 实现 Ajax 2. 使用 Ajax 实现异步通信 a. Ajax 的基础语法 b. 用 Ajax 传递数据 i. 传递字符串数据 ii. 传递 JSON 数据 3. ...
- Python基础:按位异或 ^ ,按位或 | ,按位与 &
前言文的文字及图片来源于网络,仅供学习.交流使用,不具有任何商业用途,版权归原作者所有,如有问题请及时联系我们以作处理. PS:如有需要Python学习资料的小伙伴可以加点击下方链接自行获取http: ...
- G - GCD and LCM 杭电
Given two positive integers G and L, could you tell me how many solutions of (x, y, z) there are, sa ...