cisco-GNS3-pix防火墙基本配置实操(持续更新)
一、ASA和PIX基础配置
1、ASA防火墙配置
1、GNS配置
因为使用的GNS3的版本可能不同,gns配置asa防火墙的步骤可能不同
在低版本的gns中直接在qemu选项里可以直接配置,参考:https://blog.51cto.com/dldxzjr/1905682
在高版本的gns中配置可以参考:https://wenku.baidu.com/view/8934accc48649b6648d7c1c708a1284ac850059c.html
2、简单的防火墙设置命令
show version

show running-config

show activation-key			查看激活秘钥

activation-key key-values		设置激活秘钥

write mem					将配置保存到非易失flash,重启或断电都不会对配置产生影响

no shutdown					使借口处于启用

show interface ip breif			提供接口的简短概要

interface 接口

nameif inside/outside/dmz

ip address ip地址 掩码

speed auto					#连接速度,有10/100/1000Mbps等

duplex auto					#双工模式,有Half/Full为半双工/全双工模式

						   #一般网卡都为Auto/Auto适配出来的情况一般为100M全双工模式

#防火墙上设置静态路由,最多可以配置3个不同的默认路由

例:

指向外部接口上的网关192.168.1.1的路由	route outside 0.0.0.0 0.0.0.0 192.168.1.1 1

可通过内部接口上的网关192.168.254.2找到网络172.21.0.0/16		route inside 172.21.0.0 255.255.0.0 192.168.254.2 1

删除则直接加一个no

show route

#

show xlate

show conn
实例:
###配置ASA防火墙

ciscoasa# show int ip b

Interface                  IP-Address      OK? Method Status                Protocol

GigabitEthernet0           unassigned      YES unset  administratively down up

GigabitEthernet1           unassigned      YES unset  administratively down up

GigabitEthernet2           unassigned      YES unset  administratively down up

GigabitEthernet3           unassigned      YES unset  administratively down up

ciscoasa# conf t

ciscoasa(config)# int g0

ciscoasa(config-if)# nameif inside

INFO: Security level for "inside" set to 100 by default.

ciscoasa(config-if)# ip address 13.0.1.1 255.255.255.0

ciscoasa(config-if)# no sh

ciscoasa(config-if)# show int ip b

Interface                  IP-Address      OK? Method Status                Protocol

GigabitEthernet0           13.0.1.1        YES manual up                    up

GigabitEthernet1           unassigned      YES unset  administratively down up

GigabitEthernet2           unassigned      YES unset  administratively down up

GigabitEthernet3           unassigned      YES unset  administratively down up

###配置pc1的ip

PC1> show ip

NAME        : PC1[1]

IP/MASK     : 0.0.0.0/0

GATEWAY     : 0.0.0.0

DNS         :

MAC         : 00:50:79:66:68:00

LPORT       : 10012

RHOST:PORT  : 127.0.0.1:10011

MTU:        : 1500

PC1> ip 13.0.1.2 13.0.1.1 24

Checking for duplicate address...

PC1 : 13.0.1.2 255.255.255.0 gateway 13.0.1.1

PC1> show ip

NAME        : PC1[1]

IP/MASK     : 13.0.1.2/24

GATEWAY     : 13.0.1.1

DNS         :

MAC         : 00:50:79:66:68:00

LPORT       : 10012

RHOST:PORT  : 127.0.0.1:10011

MTU:        : 1500

PC1>
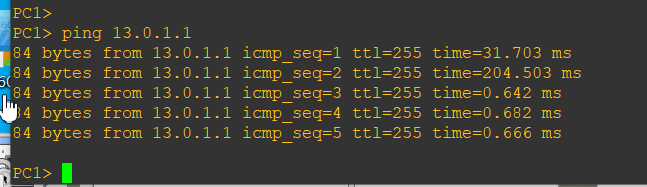
ping测试:

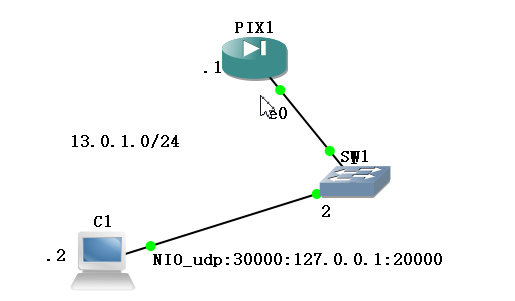
2、pix防火墙配置
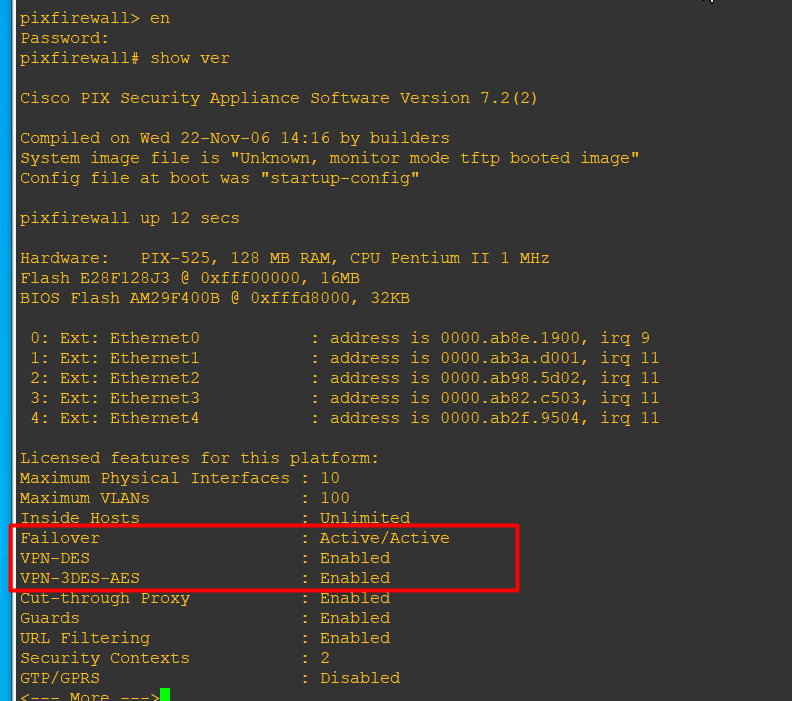
安装时有一步需要激活

activation-key key
关闭重启pix防火墙:
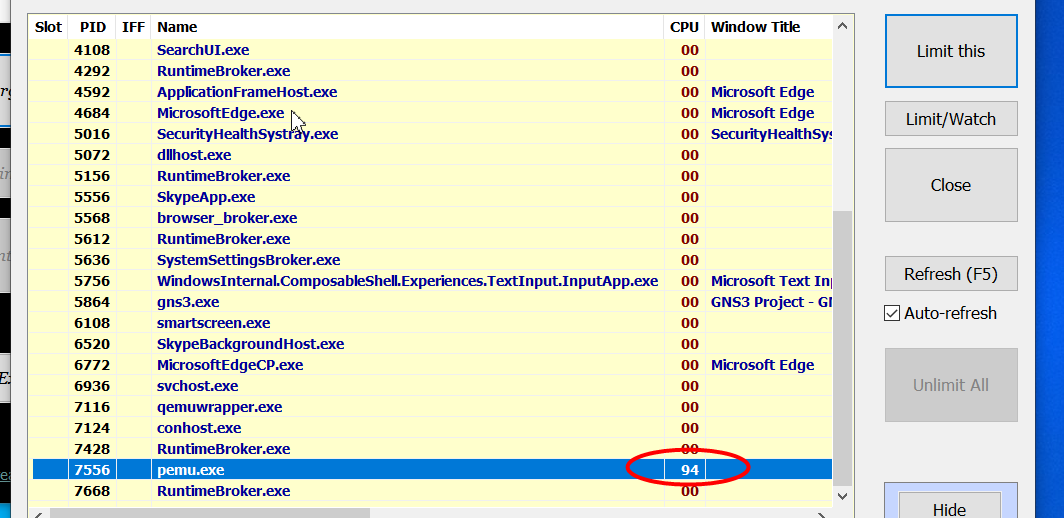
还有一点需要注意,就是pix运行时有一个进程pemu会占用大量的cpu资源,导致很卡,可以使用BES对它进行限制:
实例
pix:
pixfirewall> en

Password:

pixfirewall# conf t

pixfirewall(config)# exit

pixfirewall# show int ip b

Interface                  IP-Address      OK? Method Status                Protocol

Ethernet0                  unassigned      YES unset  administratively down down

Ethernet1                  unassigned      YES unset  administratively down down

Ethernet2                  unassigned      YES unset  administratively down down

Ethernet3                  unassigned      YES unset  administratively down down

Ethernet4                  unassigned      YES unset  administratively down down

pixfirewall# conf t

pixfirewall(config)# int e0

pixfirewall(config-if)# ip address 13.0.1.1 255.255.255.0

pixfirewall(config-if)# no sh

pixfirewall(config-if)# show int ip b

Interface                  IP-Address      OK? Method Status                Protocol

Ethernet0                  unassigned      YES manual up                    up

Ethernet1                  unassigned      YES unset  administratively down down

Ethernet2                  unassigned      YES unset  administratively down down

Ethernet3                  unassigned      YES unset  administratively down down

Ethernet4                  unassigned      YES unset  administratively down down

pixfirewall(config-if)# nameif inside

INFO: Security level for "inside" set to 100 by default.

pixfirewall(config-if)# show int ip b

Interface                  IP-Address      OK? Method Status                Protocol

Ethernet0                  13.0.1.1        YES manual up                    up

Ethernet1                  unassigned      YES unset  administratively down down

Ethernet2                  unassigned      YES unset  administratively down down

Ethernet3                  unassigned      YES unset  administratively down down

Ethernet4                  unassigned      YES unset  administratively down down
pc1
VPCS[1]> ip 13.0.1.2 13.0.1.1 24

Checking for duplicate address...

PC1 : 13.0.1.2 255.255.255.0 gateway 13.0.1.1

VPCS[1]> show ip

NAME        : VPCS[1]

IP/MASK     : 13.0.1.2/24

GATEWAY     : 13.0.1.1

DNS         :

MAC         : 00:50:79:66:68:00

LPORT       : 20000

RHOST:PORT  : 127.0.0.1:30000

MTU:        : 1500

VPCS[1]>
ping

二、PIX-NAT
1、pix配置动态NAT

基础命令举例:
show int ip b

hostname

ip address

nameif

security number

show conn					显示所有的活动连接

show conn detail

show local-host

show xlate					显示翻译(xlate)槽位的内容

show xlate detail

#添加acl,访问规则

1)创建标准访问列表

access-list [list-number] [permit|deny] [source-address] [wildcard mask] [log]

access-group list-number in int 接口名

#静态NAT

static [(internal_if_name, external_if_name)] global_ip local_ip[netmask network_mask][max_conns

[em_limit]] [norandomseq]

例:static (inside,outside) 13.0.1.3 192.168.1.2 				将本地地址192.168.1.2转换为全局地址13.0.1.3

#static PAT

static [(real_interface, mapped_interface)] {tcp | udp} {mapped_ip | interface}

mapped_port {real_ip real_port [netmask mask]

例:dmz:172.16.1.9  outside:192.168.0.9

static (dmz,outside) tcp 192.168.0.9 ftp 172.16.1.9 ftp netmask 255.255.255.255

#动态NAT

nat (inside) 1 192.168.1.0 255.255.255.0

global (outside) 1 12.0.1.0-12.0.1.9 netmask 255.255.255.0

#PAT

nat (inside) 1 192.168.1.0 255.255.255.0

global (outside) 1 12.0.1.9 netmask 255.255.255.0

#nat 0

nat (dmz) 0 192.168.0.9 255.255.255.255

#

no global (outside) 1 12.0.1.0-12.0.1.9 netmask 255.255.255.0

route if_name ip_address netmask gateway_ip [metric]			为接口口if_name定义一条静态或缺省路由

#

debug icmp trace

no debug icmp trace

#

logging on

show logging

no logging on

show capture inside

#

show users

show run nat-control

show conn detail

show xlate
pix配置
pixfirewall> en

Password:

pixfirewall# conf t

pixfirewall(config)# int e0

pixfirewall(config-if)# ip address 192.168.1.1 255.255.255.0

pixfirewall(config-if)# no sh

pixfirewall(config-if)# int e1

pixfirewall(config-if)# ip address 13.0.1.1 255.255.255.0

pixfirewall(config-if)# no sh

pixfirewall(config-if)# exit

pixfirewall(config)# exit

pixfirewall# show int ip b

Interface                  IP-Address      OK? Method Status                Protocol

Ethernet0                  unassigned      YES manual up                    up

Ethernet1                  unassigned      YES manual up                    up

Ethernet2                  unassigned      YES unset  administratively down down

Ethernet3                  unassigned      YES unset  administratively down down

Ethernet4                  unassigned      YES unset  administratively down down

pixfirewall# conf t

pixfirewall(config)# int e0

pixfirewall(config-if)# nameif inside

INFO: Security level for "inside" set to 100 by default.

pixfirewall(config-if)# int e1

pixfirewall(config-if)# nameif outside

INFO: Security level for "outside" set to 0 by default.

pixfirewall(config-if)# exit

pixfirewall(config)# exit

pixfirewall# show int ip b

Interface                  IP-Address      OK? Method Status                Protocol

Ethernet0                  192.168.1.1     YES manual up                    up

Ethernet1                  13.0.1.1        YES manual up                    up

Ethernet2                  unassigned      YES unset  administratively down down

Ethernet3                  unassigned      YES unset  administratively down down

Ethernet4                  unassigned      YES unset  administratively down down

pixfirewall# conf t

pixfirewall(config)# access-list test1 permit icmp any any

pixfirewall(config)# access-group test1 in int outside

pixfirewall(config)# nat (inside) 1 192.168.1.0 255.255.255.0

pixfirewall(config)# global (outside) 1 13.0.1.4-13.0.1.6 netmask 255.255.255.0
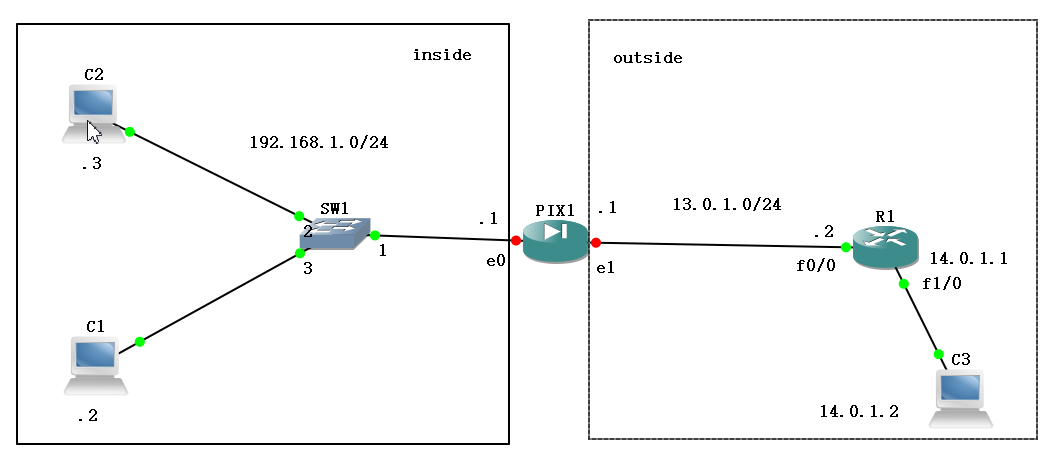
R1
R1#ip route 0.0.0.0 0.0.0.0 192.168.1.1

!因为我们是用路由器R1模拟的主机,所以要么关闭路由功能,配置网关;要么添加一条路由让路由器发出的消息从192.168.1.1出去
2、static NAT
pix配置
pixfirewall> en

Password:

pixfirewall# conf t

pixfirewall(config)# int e0

pixfirewall(config-if)# ip address 192.168.1.1 255.255.255.0

pixfirewall(config-if)# no sh

pixfirewall(config-if)# int e1

pixfirewall(config-if)# ip address 13.0.1.1 255.255.255.0

pixfirewall(config-if)# no sh

pixfirewall(config-if)# int e0

pixfirewall(config-if)# nameif inside

INFO: Security level for "inside" set to 100 by default.

pixfirewall(config-if)# int e1

pixfirewall(config-if)# nameif outside

INFO: Security level for "outside" set to 0 by default.

pixfirewall(config-if)# exit

pixfirewall(config)# show running-config static

pixfirewall(config)# static (inside,outside) 13.0.1.3 192.168.1.2

pixfirewall(config)# static (inside,outside) 13.0.1.4 192.168.1.3

pixfirewall(config)# route outside 0 0 13.0.1.2

pixfirewall(config)# exit

pixfirewall# show int ip b

Interface                  IP-Address      OK? Method Status                Protocol

Ethernet0                  192.168.1.1     YES manual up                    up

Ethernet1                  13.0.1.1        YES manual up                    up

Ethernet2                  unassigned      YES unset  administratively down down

Ethernet3                  unassigned      YES unset  administratively down down

Ethernet4                  unassigned      YES unset  administratively down down

pixfirewall(config)# access-l

pixfirewall(config)# access-list acl-outside permit icmp any any

pixfirewall(config)# access-g

pixfirewall(config)# access-group acl-outside in int outside

pixfirewall(config)# exit

pixfirewall# show int ip b

Interface                  IP-Address      OK? Method Status                Protocol

Ethernet0                  192.168.1.1     YES manual up                    up

Ethernet1                  13.0.1.1        YES manual up                    up

Ethernet2                  unassigned      YES unset  administratively down down

Ethernet3                  unassigned      YES unset  administratively down down

Ethernet4                  unassigned      YES unset  administratively down down

测试:

pixfirewall# ping 13.0.1.2

Type escape sequence to abort.

Sending 5, 100-byte ICMP Echos to 13.0.1.2, timeout is 2 seconds:

!!!!!

Success rate is 100 percent (5/5), round-trip min/avg/max = 10/14/20 ms

pixfirewall# ping 192.168.1.2

Type escape sequence to abort.

Sending 5, 100-byte ICMP Echos to 192.168.1.2, timeout is 2 seconds:

!!!!!

Success rate is 100 percent (5/5), round-trip min/avg/max = 10/10/10 ms

pixfirewall# show running-config

: Saved

:

PIX Version 7.2(2)

!

hostname pixfirewall

enable password 8Ry2YjIyt7RRXU24 encrypted

names

!

interface Ethernet0

 nameif inside

 security-level 100

 ip address 192.168.1.1 255.255.255.0

!

interface Ethernet1

 nameif outside

 security-level 0

 ip address 13.0.1.1 255.255.255.0

!

interface Ethernet2

 shutdown

 no nameif

 no security-level

 no ip address

!

interface Ethernet3

 shutdown

 no nameif

 no security-level

 no ip address

!

interface Ethernet4

 shutdown

 no nameif

 ...

pixfirewall#
R1配置
R1#en

R1#conf t

Enter configuration commands, one per line.  End with CNTL/Z.

R1(config)#int f0/0

R1(config-if)#ip address 13.0.1.2 255.255.255.0

R1(config-if)#no sh

R1(config-if)#

*Mar  1 00:19:52.959: %LINK-3-UPDOWN: Interface FastEthernet0/0, changed state to up

*Mar  1 00:19:53.959: %LINEPROTO-5-UPDOWN: Line protocol on Interface FastEthernet0/0, changed state to up

R1(config-if)#int f1/0

R1(config-if)#ip address 14.0.1.1 255.255.255.0

R1(config-if)#no sh

R1(config-if)#

*Mar  1 00:25:10.991: %LINK-3-UPDOWN: Interface FastEthernet1/0, changed state to up

*Mar  1 00:25:11.991: %LINEPROTO-5-UPDOWN: Line protocol on Interface FastEthernet1/0, changed state to up

R1(config-if)#
pc1\pc2\pc3配置

ping测试
192.168.1.2 ping 13.0.1.2
192.168.1.3 ping 14.0.1.2

14.0.1.2 ping 192.168.1.2

3、PAT
类似于动态NAT,只不过外部地址池里只有一个公网ip,主要是通过网络套接字(ip+端口的方式)实现地址转换
4、pix防火墙----二接口测试(inside,outside)
。。好几天没有打开GNS3,发现前面的ios配置全没了。老老实实又重新配置了一遍
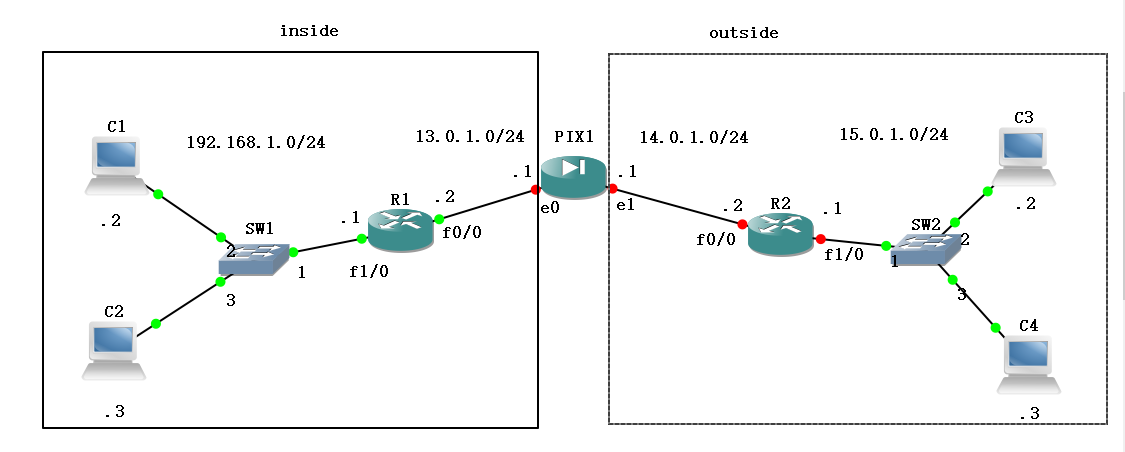
R1配置
R1#conf t

Enter configuration commands, one per line.  End with CNTL/Z.

R1(config)#int f1/0

R1(config-if)#ip address 192.168.1.1 255.255.255.0

R1(config-if)#no sh

R1(config-if)#

*Mar  1 00:01:04.391: %LINK-3-UPDOWN: Interface FastEthernet1/0, changed state to up

*Mar  1 00:01:05.391: %LINEPROTO-5-UPDOWN: Line protocol on Interface FastEthernet1/0, changed state to up

R1(config-if)#int f0/0

R1(config-if)#ip address 13.0.1.2 255.255.255.0

R1(config-if)#no sh

R1(config-if)#

*Mar  1 00:01:42.527: %LINK-3-UPDOWN: Interface FastEthernet0/0, changed state to up

*Mar  1 00:01:43.527: %LINEPROTO-5-UPDOWN: Line protocol on Interface FastEthernet0/0, changed state to up

R1(config-if)#exit

R1(config)#ip route 14.0.1.0 255.255.255.0 13.0.1.1

R1(config)#ip route 15.0.1.0 255.255.255.0 13.0.1.1
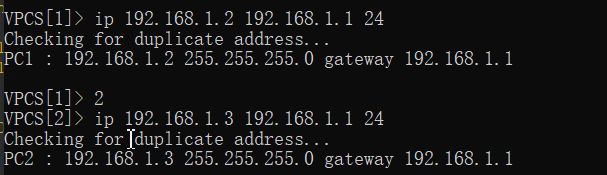
PC1、PC2、PC3、PC4配置
VPCS[1]> ip 192.168.1.2 192.168.1.1 24

Checking for duplicate address...

PC1 : 192.168.1.2 255.255.255.0 gateway 192.168.1.1

VPCS[1]> 2

VPCS[2]> ip 192.168.1.3 192.168.1.1 24

Checking for duplicate address...

PC2 : 192.168.1.3 255.255.255.0 gateway 192.168.1.1

VPCS[2]> 3

VPCS[3]> ip 15.0.1.2 15.0.1.1 24

Checking for duplicate address...

PC3 : 15.0.1.2 255.255.255.0 gateway 15.0.1.1

VPCS[3]> 4

VPCS[4]> ip 15.0.1.3 15.0.1.1 24

Checking for duplicate address...

PC4 : 15.0.1.3 255.255.255.0 gateway 15.0.1.1

VPCS[4]>
R2配置
R2#conf t
Enter configuration commands, one per line. End with CNTL/Z.
R2(config)#int f0/0
R2(config-if)#ip address 14.0.1.2 255.255.255.0
R2(config-if)#no sh
R2(config-if)#
*Mar 1 00:00:51.907: %LINK-3-UPDOWN: Interface FastEthernet0/0, changed state to up
*Mar 1 00:00:52.907: %LINEPROTO-5-UPDOWN: Line protocol on Interface FastEthernet0/0, changed state to up
R2(config-if)#int f1/0
R2(config-if)#ip address 15.0.1.1 255.255.255.0
R2(config-if)#no sh
R2(config-if)#exit
R2(config)#ip route 13.0.1.0 255.255.255.0 14.0.1.1
R2(config)#ip route 192.168.1.0 255.255.255.0 14.0.1.1
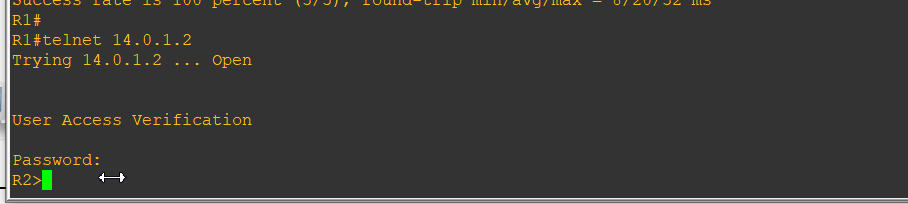
#可以给路由器配置远程终端,用telnet来丰富一下测试
R2#conf t
Enter configuration commands, one per line. End with CNTL/Z.
R2(config)#line vty 0 4
R2(config-line)#password zwish
R2(config-line)#end
R2#
*Mar 1 01:35:20.871: %SYS-5-CONFIG_I: Configured from console by console
R2#
PIX配置
pixfirewall# conf t

pixfirewall(config)# int e0

pixfirewall(config-if)# ip address 13.0.1.1 255.255.255.0

pixfirewall(config-if)# no sh

pixfirewall(config-if)# nameif inside

INFO: Security level for "inside" set to 100 by default.

pixfirewall(config-if)# int e1

pixfirewall(config-if)# ip address 14.0.1.1 255.255.255.0

pixfirewall(config-if)# no sh

pixfirewall(config-if)# nameif outside

INFO: Security level for "outside" set to 0 by default.
pc1、R1先ping一下pix的e0,看一下能不能通,可以再继续

pixfirewall(config-if)# access

pixfirewall(config-if)# access-

pixfirewall(config-if)# access-l

pixfirewall(config-if)# access-list acl-1 permit icmp any any

pixfirewall(config)# access-g

pixfirewall(config)# access-group acl-1 in int

pixfirewall(config)# access-group acl-1 in interface outside

pixfirewall(config)# nat (inside) 1 0 0

pixfirewall(config)# global (outside) 1 14.0.1.3-14.0.1.6 netmask 255.255.255.0

#下面是配置回程路由

pixfirewall(config)# route inside 192.168.1.0 255.255.255.0 13.0.1.2

pixfirewall(config)# route outside 15.0.1.0 255.255.255.0 14.0.1.2

pixfirewall(config)#
测试
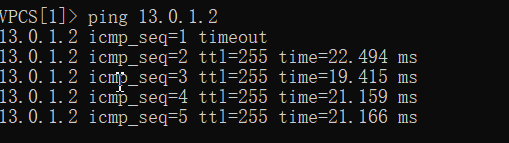
pc1 ping R2

pc1 ping pc3

pc3 ping pc1

R1 telnet 登录R2 (因为我没有用路由器模拟主机,所以用的R1,如果是路由器模拟的主机,则直接用PC1进行telnet登录)
cisco-GNS3-pix防火墙基本配置实操(持续更新)的更多相关文章
- Arch Linux + KDE 配置&美化(持续更新~)
Arch Linux + KDE 配置&美化(持续更新~) 这篇文章着重记录archlinux + KDE的一个基本的配置过程.不包括安装过程(使用archInstall.sh).内容大概有以 ...
- Mysql MHA(GTID)配置(实操)
实现环境 centos6.7 MYSQL5.6.36 主:192.168.1.191 从1:192.168.1.145 从2:192.168.1.146 监测:放在从2上 192.168.1.146 ...
- 思科CISCO ASA 5521 防火墙 Ipsec 配置详解
版本信息: Cisco Adaptive Security Appliance Software Version 9.9(2) Firepower Extensible Operating Syste ...
- Linux下nginx反向代理服务器安装与配置实操
1.我们只要实现访问nginx服务器能跳转到不同的服务器即可,我本地测试是这样的, 在nginx服务器里面搭建了2个tomcat,2个tomcat端口分别是8080和8081,当我输入我nginx服务 ...
- PHP编译参数configure配置详解(持续更新中)
编译参数-使用 ./configure -h在源代码目录中,该命令可以查看所有编译参数以及对应的英文解释 编译参数-说明 --prefix=/opt/php //指定 php 安装目录--with-a ...
- IntelliJ IDEA入门之常用配置以及问题解决(持续更新中)
软件版本: IntelliJ IDEA 2019.1.1(Ultimate Edition) 运行环境: JDK1.8, Tomcat8.0, Maven3.6 我们在学习新的无论是jar包, 框架, ...
- fedora27安装后的配置工作(持续更新)
换源 没什么可说的,安装后更换国内软件源是必须做的事,推荐更换阿里的镜像源.换源教程 添加epel源 EPEL (Extra Packages for Enterprise Linux)是基于Fedo ...
- [linux环境配置]个人用持续更新ing~
alias ll='ls -la' export PATH=$PATH:~/Desktop/myscript alias gpush='git push origin HEAD:refs/for/ma ...
- PIX 防火墙
---恢复内容开始--- 一 , PIX 防火墙的认识 PIX 是cisco 的硬件防火墙 硬件防火墙的工作速度快,使用方便. PIX 有很多型号,并发连接数是PIX防火墙的重要参数 PIX 25 ...
随机推荐
- js怎么删除数组元素,有哪些删除元素方法
JavaScript删除元素方法 1.根据索引删除数组元素 delete 数组[索引] *注意delete 后面是空格 var arr1=["aa","bb" ...
- 模块(类)之间解耦利器:EventPublishSubscribeUtils 事件发布订阅工具类
如果熟悉C#语言的小伙伴们一般都会知道委托.事件的好处,只需在某个类中提前定义好公开的委托或事件(委托的特殊表现形式)变量,然后在其它类中就可以很随意的订阅该委托或事件,当委托或事件被触发执行时,会自 ...
- 第一行Kotlin系列(一)kotlin按钮点击事件
按钮findViewBuId <Button android:id="@+id/mButton4" android:layout_width="wrap_conte ...
- java中"no enclosing instance of type * is accessible"的解决方法
这种情况一般发生在“在静态方法里面使用内部类” 测试代码: public class Test { public static void main(String[] args) { A a = new ...
- [CodeForces 300D Painting Square]DP
http://codeforces.com/problemset/problem/300/D 题意:每一次操作可以选一个正方形,令边长为n,如果n为奇数那么可以从中间画一个十字,分成4个大小相等的边长 ...
- JS的数据类型判断函数、数组对象结构处理、日期转换函数,浏览器类型判断函数合集
工具地址:https://github.com/BothEyes1993/bes-jstools bes-jstools 100多个基础常用JS函数和各种数据转换处理集合大全,此工具包是在 outil ...
- 如何在一台计算机上安装多个 JDK 版本
前言 对于使用 Java 语言开发的朋友可能会遇到这种情况,有时想学习和探索 Java 的最新版本提供的一些新特性,比如 Java 11,但你无法将其安装在自己的计算机上,因为你的团队正在使用比这个旧 ...
- 黑马程序员_毕向东_Java基础视频教程——转义字符(随笔)
转义字符 转义字符 通过 \ 来转变后面的字母或符号的含义 \n :换行 \b :退格.相当于 backspace \r : 相当于回车键. Windows系统中,回车是由两个字符来表示 \r \n. ...
- 系统学习scala--基础
scala基础 安装scala(不推荐使用最新版本,2.11.x够用了) scala官网 2.11.12版本下载页面 这里我选择2.11.12版本,在下载页面往下拉,选择scala-2.11.12.m ...
- MySQL数据库回表与索引
目录 回表的概念 1.stu_info表案例 2.查看刚刚建立的表结构 3.插入测试数据 4.分析过程 5.执行计划 回表的概念 先得出结论,根据下面的实验.如果我要获得['liu','25']这条记 ...