
MySQL默认隔离级别为什么是RR
曾多次听到“MySQL为什么选择RR为默认隔离级别”的问题,其实这是个历史遗留问题,当前以及解决,但是MySQL的各个版本沿用了原有习惯。历史版本中的问题是什么,本次就通过简单的测试来说明一下。
1、 准备工作
1.1 部署主从
部署一套主从架构的集群,创建过程较简单,可以参考历史文章部署 MySQL主从复制搭建 部署一主一从即可。
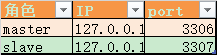
1.2 创建测试表及数据
在主库中创建表及测试数据
mysql> create table users(id int primary key auto_increment,user_name varchar(20),c_id tinyint(4),c_note varchar(50),key c_id(c_id)) engine=innodb;

Query OK, 0 rows affected (0.01 sec)

mysql> insert into users values(1,'刘备',2,null),(2,'曹操',1,null),(3,'孙权',3,null),(4,'关羽',2,null),(5,'司马懿',1,null);

Query OK, 5 rows affected (0.00 sec)

Records: 5  Duplicates: 0  Warnings: 0

mysql> create table  class(c_id int primary key ,c_name  varchar(1),c_note varchar(50)) engine=innodb;

Query OK, 0 rows affected (0.00 sec)

mysql> insert into class values(1,'魏',null),(2,'蜀',null),(3,'吴',null),(4,'晋','');

Query OK, 4 rows affected (0.00 sec)

Records: 4  Duplicates: 0  Warnings: 0
2、 RR隔离级别
MySQL默认的隔离级别为 RR(Repeatable Read),在此隔离级别下,对比binlog格式为ROW、STATEMENT是否会造成主从数据不一致
2.1 ROW格式
其实不用测试大家也应该对RR级别下ROW格式的binlog有信心,但是,万事皆需实践检验。
步骤说明如下:
- 步骤1 - 分别查看两个会话中的事务隔离级别及binlog格式(隔离级别均为RR,binlog为ROW格式)
- 步骤2 - SESSION A 开启事务,更新users 表中c_id字段存在于class表中的记录,结果为5条记录均更新,并将c_note内容更新为 t1
- 步骤3- SESSION B 开启事务,准备删除class表中 c_id等于2的记录,此时无法更新,处于阻塞状态,因为在RR级别下需要保证重复读。达到所等待超时时间后将会报错。
- 步骤4- SESSION A 提交事务(此步骤也可以在步骤3时操作,结果不一样,后续步骤中将采用此方式)
- 步骤5- SESSION B 重启事务,再次删除class表中 c_id等于2的记录,此时提交可以成功了,成功删除了一条记录
- 步骤6- SESSION A 开启事务,更新users 表中c_id字段存在于class表中的记录,结果为3条记录更新成功,并将c_note内容更新为 t2,有2条记录因为c_id不存在与class表中,因此不会更新
- 步骤7- 分别在SESSON A和SESSION B查看users表中的内容,结果一致
- 步骤8- 在从库查看users表中的内容,数据与主库一致
具体步骤如下:
| 步骤 | SESSION A |
SESSION B |
| 1 |
mysql>show variables like '%iso%'; +-----------------------+-----------------+ | Variable_name | Value | +-----------------------+-----------------+ | transaction_isolation | REPEATABLE-READ | | tx_isolation | REPEATABLE-READ | +-----------------------+-----------------+ 2 rows in set (0.00 sec) mysql>show variables like '%binlog_format%'; +---------------+-------+ | Variable_name | Value | +---------------+-------+ | binlog_format | ROW | +---------------+-------+ 1 row in set (0.00 sec) |
mysql>show variables like '%iso%'; +-----------------------+-----------------+ | Variable_name | Value | +-----------------------+-----------------+ | transaction_isolation | REPEATABLE-READ | | tx_isolation | REPEATABLE-READ | +-----------------------+-----------------+ 2 rows in set (0.00 sec) mysql>show variables like '%binlog_format%'; +---------------+-------+ | Variable_name | Value | +---------------+-------+ | binlog_format | ROW | +---------------+-------+ 1 row in set (0.01 sec) |
| 2 |
mysql>set autocommit=0; mysql>update users set c_note='t1' where c_id in (select c_id from class); Query OK, 5 rows affected (0.00 sec) Rows matched: 5 Changed: 5 Warnings: 0 |
|
| 3 |
mysql>set autocommit=0; Query OK, 0 rows affected (0.00 sec) mysql>delete from class where c_id=2; ERROR 1205 (HY000): Lock wait timeout exceeded; try restarting transaction |
|
| 4 |
mysql>commit; Query OK, 0 rows affected (0.00 sec) |
|
| 5 |
mysql>set autocommit=0; Query OK, 0 rows affected (0.00 sec) mysql>delete from class where c_id=2; Query OK, 1 row affected (0.00 sec) mysql>commit; Query OK, 0 rows affected (0.00 sec) |
|
| 6 |
mysql>update users set c_note='t2' where c_id in (select c_id from class); Query OK, 3 rows affected (0.00 sec) Rows matched: 3 Changed: 3 Warnings: 0 mysql>commit; Query OK, 0 rows affected (0.00 sec) |
|
| 7 |
mysql>select * from users; +----+-----------+------+--------+ | id | user_name | c_id | c_note | +----+-----------+------+--------+ | 1 | 刘备 | 2 | t1 | | 2 | 曹操 | 1 | t2 | | 3 | 孙权 | 3 | t2 | | 4 | 关羽 | 2 | t1 | | 5 | 司马懿 | 1 | t2 | +----+-----------+------+--------+ 5 rows in set (0.00 sec) |
mysql>select * from users; +----+-----------+------+--------+ | id | user_name | c_id | c_note | +----+-----------+------+--------+ | 1 | 刘备 | 2 | t1 | | 2 | 曹操 | 1 | t2 | | 3 | 孙权 | 3 | t2 | | 4 | 关羽 | 2 | t1 | | 5 | 司马懿 | 1 | t2 | +----+-----------+------+--------+ 5 rows in set (0.00 sec) |
| 8 |
在从库查看数据 root@testdb:3307 12:02:20>select * from users; +----+-----------+------+--------+ | id | user_name | c_id | c_note | +----+-----------+------+--------+ | 1 | 刘备 | 2 | t1 | | 2 | 曹操 | 1 | t2 | | 3 | 孙权 | 3 | t2 | | 4 | 关羽 | 2 | t1 | | 5 | 司马懿 | 1 | t2 | +----+-----------+------+--------+ 5 rows in set (0.00 sec) |
|
2.2 STATEMENT格式
为了和之前的步骤一致,先初始化数据
root@testdb:3306 12:14:27>truncate table  users;

Query OK, 0 rows affected (0.08 sec)

root@testdb:3306 12:14:29>truncate table  class;

Query OK, 0 rows affected (0.04 sec)

root@testdb:3306 12:14:50>insert into users values(1,'刘备',2,null),(2,'曹操',1,null),(3,'孙 权',3,null),(4,'关羽',2,null),(5,'司马懿',1,null);

Query OK, 5 rows affected (0.00 sec)

Records: 5  Duplicates: 0  Warnings: 0

root@testdb:3306 12:15:10>insert into class values(1,'魏',null),(2,'蜀',null),(3,'吴',null),(4,'晋','');

Query OK, 4 rows affected (0.00 sec)

Records: 4  Duplicates: 0  Warnings: 0
再将binlog日志格式改为STATAMENT格式(全局及会话级都改一下,或者修改全局变量后重新登录也行,当然 只改会话级别的也可以测试),然后 再次进行测试。
步骤说明如下:
- 步骤1 - 分别查看两个会话中的事务隔离级别及binlog格式(隔离级别均为RR,binlog为STATENENT格式)
- 步骤2 - SESSION A 开启事务,更新users 表中c_id字段存在于class表中的记录,结果为5条记录均更新,并将c_note内容更新为 t1
- 步骤3- SESSION B 开启事务,准备删除class表中 c_id等于2的记录,此时无法更新,处于阻塞状态,立即进行步骤4
- 步骤4- SESSION A 在SESSION B执行commit的动作,则SESSION B的删除操作可以执行通过,但注意class表的数据两个SESSION中查看到的是不一样的
- 步骤5- 此时SESSION B执行commit,否则后面session A 更新数据时也会阻塞。此时如果SESSION A不执行commit,查看class表的结果也是不一样的,如步骤中的情况
- 步骤6- SESSION A 开启事务,更新users 表中c_id字段存在于class表中的记录,结果为3条记录更新成功,并将c_note内容更新为 t2,另外2条记录虽然本此时查看class表中存在对应的c_id,但是不会更新,此时提交事务,然后再次查看class的内容,结果和SESSION B 查看的结果一致了(幻读)
- 步骤7- 在从库查看users、class表中的内容,数据与主库一致
| 步 骤 | SESSION A | SESSION B |
| 1 |
mysql>show variables like '%iso%'; +-----------------------+-----------------+ | Variable_name | Value | +-----------------------+-----------------+ | transaction_isolation | REPEATABLE-READ | | tx_isolation | REPEATABLE-READ | +-----------------------+-----------------+ 2 rows in set (0.01 sec) mysql>show variables like '%binlog_format%'; +---------------+-----------+ | Variable_name | Value | +---------------+-----------+ | binlog_format | STATEMENT | +---------------+-----------+ 1 row in set (0.01 sec) |
mysql>show variables like '%iso%'; +-----------------------+-----------------+ | Variable_name | Value | +-----------------------+-----------------+ | transaction_isolation | REPEATABLE-READ | | tx_isolation | REPEATABLE-READ | +-----------------------+-----------------+ 2 rows in set (0.01 sec) mysql>show variables like '%binlog_format%'; +---------------+-----------+ | Variable_name | Value | +---------------+-----------+ | binlog_format | STATEMENT | +---------------+-----------+ 1 row in set (0.01 sec) |
| 2 |
root@testdb:3306 12:37:04>set autocommit=0; Query OK, 0 rows affected (0.00 sec) root@testdb:3306 12:37:17>update users set c_note='t1' where c_id in (select c_id from class); Query OK, 5 rows affected, 1 warning (0.00 sec) Rows matched: 5 Changed: 5 Warnings: 1 |
|
| 3 |
root@testdb:3306 12:28:25>set autocommit=0; Query OK, 0 rows affected (0.00 sec) root@testdb:3306 12:38:06>delete from class where c_id=2; Query OK, 1 row affected (4.74 sec) |
|
| 4 |
root@testdb:3306 12:38:09>commit; Query OK, 0 rows affected (0.00 sec) root@testdb:3306 12:38:13>select * from users; +----+-----------+------+--------+ | id | user_name | c_id | c_note | +----+-----------+------+--------+ | 1 | 刘备 | 2 | t1 | | 2 | 曹操 | 1 | t1 | | 3 | 孙 权 | 3 | t1 | | 4 | 关羽 | 2 | t1 | | 5 | 司马懿 | 1 | t1 | +----+-----------+------+--------+ 5 rows in set (0.00 sec) root@testdb:3306 12:39:07>select * from class; +------+--------+--------+ | c_id | c_name | c_note | +------+--------+--------+ | 1 | 魏 | NULL | | 2 | 蜀 | NULL | | 3 | 吴 | NULL | | 4 | 晋 | | +------+--------+--------+ 4 rows in set (0.00 sec) |
|
| 5 |
root@testdb:3306 12:38:13>commit; Query OK, 0 rows affected (0.00 sec) root@testdb:3306 12:39:56>select * from class ; +------+--------+--------+ | c_id | c_name | c_note | +------+--------+--------+ | 1 | 魏 | NULL | | 3 | 吴 | NULL | | 4 | 晋 | | +------+--------+--------+ 3 rows in set (0.00 sec) |
|
| 6 |
root@testdb:3306 12:52:23>update users set c_note='t2' where c_id in (select c_id from class); Query OK, 3 rows affected, 1 warning (0.00 sec) Rows matched: 3 Changed: 3 Warnings: 1 root@testdb:3306 12:52:45>select * from class; +------+--------+--------+ | c_id | c_name | c_note | +------+--------+--------+ | 1 | 魏 | NULL | | 2 | 蜀 | NULL | | 3 | 吴 | NULL | | 4 | 晋 | | +------+--------+--------+ 4 rows in set (0.00 sec) root@testdb:3306 12:52:49>select * from users; +----+-----------+------+--------+ | id | user_name | c_id | c_note | +----+-----------+------+--------+ | 1 | 刘备 | 2 | t1 | | 2 | 曹操 | 1 | t2 | | 3 | 孙 权 | 3 | t2 | | 4 | 关羽 | 2 | t1 | | 5 | 司马懿 | 1 | t2 | +----+-----------+------+--------+ 5 rows in set (0.01 sec) root@testdb:3306 12:53:03>commit; Query OK, 0 rows affected (0.00 sec) root@testdb:3306 12:53:06>select * from users; +----+-----------+------+--------+ | id | user_name | c_id | c_note | +----+-----------+------+--------+ | 1 | 刘备 | 2 | t1 | | 2 | 曹操 | 1 | t2 | | 3 | 孙 权 | 3 | t2 | | 4 | 关羽 | 2 | t1 | | 5 | 司马懿 | 1 | t2 | +----+-----------+------+--------+ 5 rows in set (0.00 sec) root@testdb:3306 12:53:11>select * from class; +------+--------+--------+ | c_id | c_name | c_note | +------+--------+--------+ | 1 | 魏 | NULL | | 3 | 吴 | NULL | | 4 | 晋 | | +------+--------+--------+ 3 rows in set (0.00 sec) |
|
| 7 |
查看从库数据 root@testdb:3307 12:44:22>select * from class; +------+--------+--------+ | c_id | c_name | c_note | +------+--------+--------+ | 1 | 魏 | NULL | | 3 | 吴 | NULL | | 4 | 晋 | | +------+--------+--------+ 3 rows in set (0.01 sec) root@testdb:3307 12:57:07>select * from users; +----+-----------+------+--------+ | id | user_name | c_id | c_note | +----+-----------+------+--------+ | 1 | 刘备 | 2 | t1 | | 2 | 曹操 | 1 | t2 | | 3 | 孙 权 | 3 | t2 | | 4 | 关羽 | 2 | t1 | | 5 | 司马懿 | 1 | t2 | +----+-----------+------+--------+ 5 rows in set (0.00 sec) |
|
也就是此时主从结果也是一致的,原因在于,binlog里存储的语句顺序如下:
| binlog里的顺序 | 语句内容 |
| 1 |
update users set c_note='t1' where c_id in (select c_id from class); |
| 2 | delete from class where c_id=2; |
| 3 | update users set c_note='t2' where c_id in (select c_id from class); |
与主库执行的顺序是一致的,因此,主从的结果是一致的。
3、 RC隔离级别
3.1 ROW格式
为了和之前的步骤一致,先初始化数据
root@testdb:3306 12:14:27>truncate table  users;

Query OK, 0 rows affected (0.08 sec)

root@testdb:3306 12:14:29>truncate table  class;

Query OK, 0 rows affected (0.04 sec)

root@testdb:3306 12:14:50>insert into users values(1,'刘备',2,null),(2,'曹操',1,null),(3,'孙 权',3,null),(4,'关羽',2,null),(5,'司马懿',1,null);

Query OK, 5 rows affected (0.00 sec)

Records: 5  Duplicates: 0  Warnings: 0

root@testdb:3306 12:15:10>insert into class values(1,'魏',null),(2,'蜀',null),(3,'吴',null),(4,'晋','');

Query OK, 4 rows affected (0.00 sec)

Records: 4  Duplicates: 0  Warnings: 0
再将binlog日志格式改为STATAMENT格式(全局及会话级都改一下,或者修改全局变量后重新登录也行,当然 只改会话级别的也可以测试),然后 再次进行测试。
步骤说明如下:
- 步骤1 - 分别查看两个会话中的事务隔离级别及binlog格式(隔离级别均为RC,binlog为ROW格式)
- 步骤2 - SESSION A 开启事务,更新users 表中c_id字段存在于class表中的记录,结果为5条记录均更新,并将c_note内容更新为 t1
- 步骤3- SESSION B 开启事务,准备删除class表中 c_id等于2的记录,此时不会像RR事务隔离级别那样处于阻塞状态,而是可以直接执行通过
- 步骤4- 此时SESSION A查看class数据还是删除前的,因为session B 暂未提交
- 步骤5- SESSION B 提交事务,
- 步骤6- 更新users 表中c_id字段存在于class表中的记录,结果为3条记录更新成功,并将c_note内容更新为 t2
- 步骤7- 在从库查看users、class表中的内容,数据与主库一致
| 步 骤 | SESSION A | SESSION B |
| 1 |
root@testdb:3306 01:25:24>show variables like '%iso%'; +-----------------------+----------------+ | Variable_name | Value | +-----------------------+----------------+ | transaction_isolation | READ-COMMITTED | | tx_isolation | READ-COMMITTED | +-----------------------+----------------+ 2 rows in set (0.01 sec) root@testdb:3306 01:25:36>show variables like '%binlog_format%'; +---------------+-------+ | Variable_name | Value | +---------------+-------+ | binlog_format | ROW | +---------------+-------+ 1 row in set (0.01 sec) |
root@testdb:3306 01:24:57>show variables like '%iso%'; +-----------------------+----------------+ | Variable_name | Value | +-----------------------+----------------+ | transaction_isolation | READ-COMMITTED | | tx_isolation | READ-COMMITTED | +-----------------------+----------------+ 2 rows in set (0.01 sec) root@testdb:3306 01:25:39>show variables like '%binlog_format%'; +---------------+-------+ | Variable_name | Value | +---------------+-------+ | binlog_format | ROW | +---------------+-------+ 1 row in set (0.00 sec) |
| 2 |
root@testdb:3306 01:27:55>set autocommit=0; Query OK, 0 rows affected (0.00 sec) root@testdb:3306 01:28:27>update users set c_note='t1' where c_id in (select c_id from class); Query OK, 5 rows affected (0.00 sec) Rows matched: 5 Changed: 5 Warnings: 0 |
|
| 3 |
root@testdb:3306 01:26:07>set autocommit=0; Query OK, 0 rows affected (0.00 sec) root@testdb:3306 01:28:37>delete from class where c_id=2; Query OK, 1 row affected (0.00 sec) |
|
| 4 |
root@testdb:3306 01:28:27>select * from class; +------+--------+--------+ | c_id | c_name | c_note | +------+--------+--------+ | 1 | 魏 | NULL | | 2 | 蜀 | NULL | | 3 | 吴 | NULL | | 4 | 晋 | | +------+--------+--------+ 4 rows in set (0.00 sec) |
|
| 5 |
root@testdb:3306 01:28:41>commit; Query OK, 0 rows affected (0.00 sec) |
|
| 6 |
root@testdb:3306 01:28:59>select * from class; +------+--------+--------+ | c_id | c_name | c_note | +------+--------+--------+ | 1 | 魏 | NULL | | 3 | 吴 | NULL | | 4 | 晋 | | +------+--------+--------+ 3 rows in set (0.01 sec) root@testdb:3306 01:29:13>update users set c_note='t2' where c_id in (select c_id from class); Query OK, 3 rows affected (0.00 sec) Rows matched: 3 Changed: 3 Warnings: 0 root@testdb:3306 01:29:26>select * from class; +------+--------+--------+ | c_id | c_name | c_note | +------+--------+--------+ | 1 | 魏 | NULL | | 3 | 吴 | NULL | | 4 | 晋 | | +------+--------+--------+ 3 rows in set (0.00 sec) root@testdb:3306 01:29:31>select * from users; +----+-----------+------+--------+ | id | user_name | c_id | c_note | +----+-----------+------+--------+ | 1 | 刘备 | 2 | t1 | | 2 | 曹操 | 1 | t2 | | 3 | 孙 权 | 3 | t2 | | 4 | 关羽 | 2 | t1 | | 5 | 司马懿 | 1 | t2 | +----+-----------+------+--------+ 5 rows in set (0.00 sec) root@testdb:3306 01:29:38>commit; |
|
| 7 |
查看从库数据 root@testdb:3307 01:40:32>select * from users; +----+-----------+------+--------+ | id | user_name | c_id | c_note | +----+-----------+------+--------+ | 1 | 刘备 | 2 | t1 | | 2 | 曹操 | 1 | t2 | | 3 | 孙 权 | 3 | t2 | | 4 | 关羽 | 2 | t1 | | 5 | 司马懿 | 1 | t2 | +----+-----------+------+--------+ 5 rows in set (0.00 sec) root@testdb:3307 01:40:35>select * from class; +------+--------+--------+ | c_id | c_name | c_note | +------+--------+--------+ | 1 | 魏 | NULL | | 3 | 吴 | NULL | | 4 | 晋 | | +------+--------+--------+ 3 rows in set (0.00 sec) |
|
也就是此时主从结果也是一致的。
3.2 STATEMENT格式
因为当前版本已经不支持RC+STATEMENT组合下数据的操作,否则将报如下错误:
Cannot execute statement: impossible to write to binary log since BINLOG_FORMAT = STATEMENT and at least one table uses a storage engine limited to row-based logging. InnoDB is limited to row-logging when transaction isolation level is READ COMMITTED or READ UNCOMMITTED.
因此单纯根据步骤讲解
| 步骤 | SESSION A | SESSION B |
| 1 |
mysql>set autocommit=0; mysql>update users set c_note='t1' where c_id in (select c_id from class); |
|
| 2 |
mysql>set autocommit=0; mysql>delete from class where c_id=2; mysql>commit; |
|
| 3 | mysql>update users set c_note='t2' where c_id in (select c_id from class); | |
| 4 | commit; |
因为binlog是按照commit时间的顺序保存,因此上述步骤在binlog里会以如下顺序存储:
| binlog里的顺序 | 语句内容 |
| 1 |
delete from class where c_id=2; |
| 2 | update users set c_note='t1' where c_id in (select c_id from class); |
| 3 | update users set c_note='t2' where c_id in (select c_id from class); |
从库通过binlog应用后,最终的结果将导致主库的数据不一样(具体案例后续安装低版本后演示)。
因而,此种场景下很容易导致数据不一样。
4、总结
通过上述的实践,可以发现在RR级别下,binlog为任何格式均不会造成主从数据不一致的情况出现,但是当低版本MySQL使用RC+STATEMENT组合时(MySQL5.1.5前只有statement格式)将会导致主从数据不一致。当前这个历史遗漏问题以及解决,大家可以将其设置为RC+ROW组合的方式(例如ORACLE等数据库隔离级别就是RC),而不是必须使用RR(会带来更多的锁等待),具体可以视情况选择。
reapeatable read
MySQL默认隔离级别为什么是RR的更多相关文章
- MySQL 中隔离级别 RC 与 RR 的区别
1. 数据库事务ACID特性 数据库事务的4个特性: 原子性(Atomic): 事务中的多个操作,不可分割,要么都成功,要么都失败: All or Nothing. 一致性(Consistency): ...
- InnoDB在MySQL默认隔离级别下解决幻读
1.结论 在RR的隔离级别下,Innodb使用MVVC和next-key locks解决幻读,MVVC解决的是普通读(快照读)的幻读,next-key locks解决的是当前读情况下的幻读. 2.幻读 ...
- mysql事务隔离级别和MVCC
一.三种问题: 脏读(Drity Read):事务A更新记录但未提交,事务B查询出A未提交记录. 不可重复读(Non-repeatable read):在一个事务的两次查询之中数据不一致,这可能是两次 ...
- 查询mysql事务隔离级别
查询mysql事务隔离级别 查询mysql事务隔离级别 分类: DB2011-11-26 13:12 2517人阅读 评论(0) 收藏 举报 mysqlsessionjava 1.查看当前会话隔离 ...
- mysql 数据库隔离级别
select @@tx_isolation; 4种隔离级别 1.read uncommitted 2.read committed 3.repeatable read(MySQL默认隔离级别) 4. ...
- 查询和设置mysql事务隔离级别
1.查看当前会话隔离级别 select @@tx_isolation; 2.查看系统当前隔离级别 select @@global.tx_isolation; 3.设置当前会话隔离级别 set sess ...
- Mysql事务隔离级别和锁机制
一.Spring支持四种事务隔离级别: 1.ISOLATION_READ_UNCOMMITTED(读未提交):这是事务最低的隔离级别,它充许令外一个事务可以看到这个事务未提交的数据. 2.ISOLAT ...
- 【不错】MySQL 事务隔离级别
一.事务描述 1.事务的四个特性 ACID 1. A:原子性 = 一个事务或者都成功.或者都失败: 2. C:一致性 = 在整个事务的生命周期里面,查询到的数据是一致的: MVCC多版本并发控制:利用 ...
- mysql的默认隔离级别
原文:https://www.cnblogs.com/rjzheng/p/10510174.html 知识点总结 ------------------------------------------- ...
随机推荐
- JZOJ 5329. 【NOIP2017提高A组模拟8.22】时间机器
5329. [NOIP2017提高A组模拟8.22]时间机器 (File IO): input:machine.in output:machine.out Time Limits: 2000 ms M ...
- Ubuntu 系统下如何安装pip3工具
一.[导读]Ubuntu 系统内置了 Python2 和 Python3 两个版本的开发环境,却没有内置相应的 pip3 管理工具,本文将介绍如何在Ubuntu下如何快速安装 pip3 工具,并升级到 ...
- 牛客网剑指offer第34题——找到第一个只出现一次的字符
题目如下: 在一个字符串(0<=字符串长度<=10000,全部由字母组成)中找到第一个只出现一次的字符,并返回它的位置, 如果没有则返回 -1(需要区分大小写). 先上代码: class ...
- python学习(二)之turtle库绘图
今天是三月七号,也就是女生节,或者女神节.不知道你是不是有自己喜欢的女孩子,在这里你可以用turtle库绘制一朵玫瑰花,送给你喜欢的姑娘.(拉到最后有惊喜哦)但在画这朵玫瑰花之前,先来一个基础的图形, ...
- 设计模式-15命令模式(Command Pattern)
1.模式动机 在软件设计中,我们经常需要向某些对象发送请求,但是并不知道请求的接收者是谁,也不知道被请求的操作是哪个,我们只需在程序运行时指定具体的请求接收者即可,此时,可以使用命令模式来进行设计,使 ...
- 手写Promise原理
我的promise能实现什么? 1:解决回调地狱,实现异步 2:可以链式调用,可以嵌套调用 3:有等待态到成功态的方法,有等待态到失败态的方法 4:可以衍生出周边的方法,如Promise.resolv ...
- flask 设置https请求 访问flask服务器
学习过程中想要学教程中一样,做个假的微信公众号推送,不过去了微信开发文档怎么一直说需要https的请求(教学中没有说需要https,一直是http) 但是我的服务器只能使用http请求访问,如果硬是要 ...
- Falsk 路由简析
添加路由 我们熟知添加路由的方式是装饰器: @app.route('/') def hello_world(): return 'Hello World!' #访问web得到 'Hello World ...
- 部署nginx后无法访问数据库,查看www-error.log日志报错Class 'mysqli' not found in /usr/local/nginx/html/mysql.php on line 2
检查你的php-mysql包是否安装 [root@localhost nginx]# rpm -qa php-mysql 没有任何输出则没有安装,接下来用yum安装php-mysql yum -y i ...
- 深入理解Java内存模型(摘)
--摘自 周志明<深入理解Java虚拟机> 转自 https://www.jianshu.com/p/15106e9c4bf3 深入理解Java内存模型(摘) java内存模型(Java ...