maven高级笔记
Maven高级
1.maven基础知识回顾
1.1 maven介绍
maven 是一个项目管理工具,主要作用是在项目开发阶段对Java项目进行依赖管理和项目构建。
依赖管理:就是对jar包的管理。通过导入maven坐标,就相当于将仓库中的jar包导入了当前项目中。
项目构建:通过maven的一个命令就可以完成项目从清理、编译、测试、报告、打包,部署整个过程。

1.2 maven的仓库类型
1.本地仓库
2.远程仓库
①maven中央仓库(地址:http://repo2.maven.org/maven2/)
②maven私服(公司局域网内的仓库,需要自己搭建)
③其他公共远程仓库(例如apache提供的远程仓库,地址:http://repo.maven.apache.org/maven2/)
1.3 maven常用命令
clean: 清理
compile:编译
test: 测试
package:打包
install: 安装
1.4 maven坐标书写规范
1.5 maven的依赖范围
| 依赖范围 | 对于编译classpath有效 | 对于测试classpath有效 | 对于运行时classpath有效 | 例子 |
|---|---|---|---|---|
| compile | Y | Y | Y | spring-core |
| test | - | Y | - | Junit |
| provided | Y | Y | - | servlet-api |
| runtime | - | Y | Y | JDBC驱动 |
| system | Y | Y | - | 本地的,maven仓库之外的类库 |
2. maven的依赖传递
2.1 什么是依赖传递
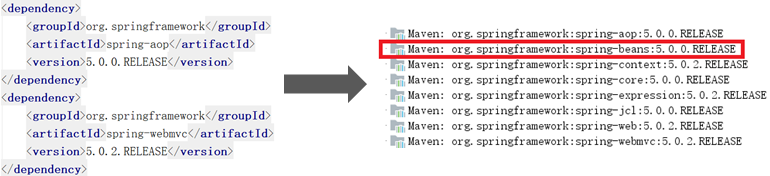
在maven中,依赖是可以传递的,假设存在三个项目,分别是项目A,项目B以及项目C。假设C依赖B,B依赖A,那么我们可以根据maven项目依赖的特征不难推出项目C也依赖A。
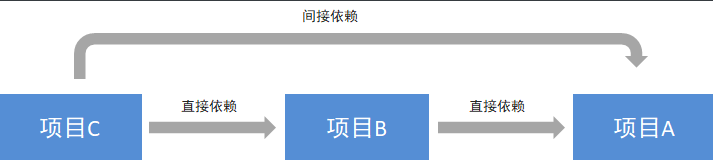
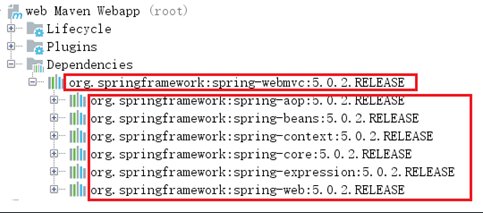
通过上面的图可以看到,我们的web项目直接依赖了spring-webmvc,而spring-webmvc依赖了sping-aop、spring-beans等。最终的结果就是在我们的web项目中间接依赖了spring-aop、spring-beans等。
2.2 什么是依赖冲突
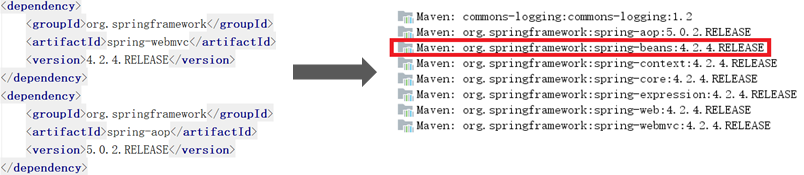
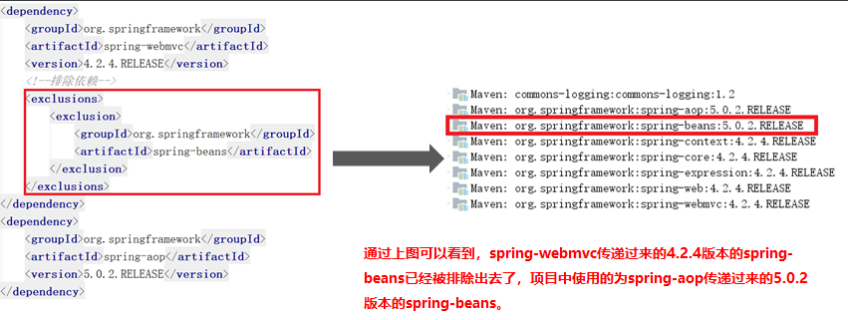
由于依赖传递现象的存在, spring-webmvc 依赖 spirng-beans-4.2.4,spring-aop 依赖 spring-beans-5.0.2,但是发现 spirng-beans-4.2.4 加入到了工程中,而我们希望 spring-beans-5.0.2 加入工程。这就造成了依赖冲突。
2.3 如何解决依赖冲突
1.使用maven提供的依赖调解原则
第一声明者优先原则
路径近者优先原则
2.排除依赖
3.锁定版本
2.4 依赖调节原则——第一声明者优先原则
在 pom 文件中定义依赖,以先声明的依赖为准。其实就是根据坐标导入的顺序来确定最终使用哪个传递过来的依赖。
结论:通过上图可以看到,spring-aop和spring-webmvc都传递过来了spring-beans,但是因为spring-aop在前面,所以最终使用的spring-beans是由spring-aop传递过来的,而spring-webmvc传递过来的spring-beans则被忽略了。
2.5 排除依赖
可以使用exclusions标签将传递过来的依赖排除出去。
2.6 版本锁定
采用直接锁定版本的方法确定依赖jar包的版本,版本锁定后则不考虑依赖的声明顺序或依赖的路径,以锁定的版本为准添加到工程中,此方法在企业开发中经常使用。
版本锁定的使用方式:
第一步:在dependencyManagement标签中锁定依赖的版本
第二步:在dependencies标签中声明需要导入的maven坐标
①在dependencyManagement标签中锁定依赖的版本

②在dependencies标签中声明需要导入的maven坐标

3.基于maven构建SSM工程案例
3.1 需求描述
本案例基于maven构建 SSM(Spring+SpringMVC+Mybatis)工程,通过maven坐标进行依赖管理。最终实现根据 id 查询商品信息的功能。
3.2 构建maven工程
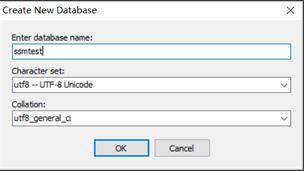
1.数据库环境搭建
①创建数据库ssmtest
②创建商品表item
CREATE TABLE `item` (

  `id` int(11) NOT NULL auto_increment,

  `name` varchar(255) default NULL,

  `price` float default NULL,

  `createtime` datetime default NULL,

  `detail` varchar(255) default NULL,

  PRIMARY KEY  (`id`)

) ENGINE=InnoDB DEFAULT CHARSET=utf8
2.maven项目构建
①创建maven web项目
②配置pom.xml文件
③实现spring+mybatis整合
创建POJO类
public class Item {

private Integer id;

private String name;

private Float price;

private Date createtime;

private String detail;

//省略setter、getter

}
持久层DAO接口编写
public interface ItemMapper {

       public Item findById(int id);

}
Mapper映射文件编写
<?xml version="1.0" encoding="UTF-8" ?>

<!DOCTYPE mapper PUBLIC "-//mybatis.org//DTD Mapper 3.0//EN"

"http://mybatis.org/dtd/mybatis-3-mapper.dtd">

<mapper namespace="com.itheima.ssm.dao.ItemMapper">

<select id="findById" parameterType="int" resultType="item">

         select * from item where id=#{id}</select>

</mapper>
业务层Service编写
package com.itheima.ssm.service;

import com.itheima.ssm.pojo.Item;

public interface ItemService {

    public Items findById(int id);

}
@Service

@Transactional

public class ItemServiceImpl implements ItemService {

@Autowired

private ItemMapper itemMapper;

public Item findById(int id) {

return itemMapper.findById(id);

}

}
spring配置文件applicationContext-dao.xml编写
<?xml version="1.0" encoding="UTF-8"?>

<beans xmlns="http://www.springframework.org/schema/beans"      xmlns:context="http://www.springframework.org/schema/context"   xmlns:p="http://www.springframework.org/schema/p"       xmlns:aop="http://www.springframework.org/schema/aop"       xmlns:tx="http://www.springframework.org/schema/tx"       xmlns:xsi="http://www.w3.org/2001/XMLSchema-instance"       xsi:schemaLocation="http://www.springframework.org/schema/bean       http://www.springframework.org/schema/beans/spring-beans-4.0.xsd       http://www.springframework.org/schema/context      http://www.springframework.org/schema/context/spring-context-4.0.xsd      http://www.springframework.org/schema/aop   http://www.springframework.org/schema/aop/spring-aop-4.0.xsd     http://www.springframework.org/schema/tx  http://www.springframework.org/schema/tx/spring-tx-4.0.xsd      http://www.springframework.org/schema/util http://www.springframework.org/schema/util/spring-util-4.0.xsd">

<!-- 数据库连接池 -->

<bean id="dataSource" class="com.alibaba.druid.pool.DruidDataSource">

<!-- 驱动 -->

<property name="driverClassName" value="com.mysql.jdbc.Driver"/>

<!-- url -->

<property name="url" value="jdbc:mysql://localhost:3306/ssmtest"/>

<!-- 用户名 -->

<property name="username" value="root"/>

<!-- 密码 -->

<property name="password" value="root"/></bean>

<!-- mapper配置 --> <!-- 让spring管理sqlsessionfactory 使用mybatis和spring整合包中的 -->    <bean id="sqlSessionFactory" class="org.mybatis.spring.SqlSessionFactoryBean">        <!-- 数据库连接池 -->

<property name="dataSource" ref="dataSource"/>

<!--为指定包下的所有实体类创建别名-->

<property name="typeAliasesPackage" value="com.itheima.ssm.pojo"/></bean>

<!-- mapper扫描器 :用来产生代理对象-->

<bean class="org.mybatis.spring.mapper.MapperScannerConfigurer">

<property name="basePackage" value="com.itheima.ssm.dao"></property>

</bean>

</beans>
spring配置文件applicationContext-service.xml编写
④加入springmvc相关配置
表现层Controller编写
@Controller

@RequestMapping("/item")

public class ItemController {

   @Autowired

   private ItemService itemService;

  @RequestMapping("/showItem/{id}")

  public String showItem(@PathVariable("id") int id, Model model){

        Item item = itemService.findById(id);

        model.addAttribute("item",item);

        return "item";

  }

}
springmvc.xml文件编写
<?xml version="1.0" encoding="UTF-8"?><beans xmlns="http://www.springframework.org/schema/beans"       xmlns:context="http://www.springframework.org/schema/context"       xmlns:xsi="http://www.w3.org/2001/XMLSchema-instance"      xsi:schemaLocation="http://www.springframework.org/schema/beans       http://www.springframework.org/schema/beans/spring-beans-4.0.xsd       http://www.springframework.org/schema/context      http://www.springframework.org/schema/context/spring-context-4.0.xsd">    <context:component-scan base-package="com.itheima.ssm.controller"/>

<!--  配置视图解析器的前缀和后缀 -->

<bean class="org.springframework.web.servlet.view.InternalResourceViewResolver">           <property name="prefix“ value="/WEB-INF/jsp/"></property>

    <property name="suffix" value=".jsp"></property>

</bean>

</beans>
jsp页面编写
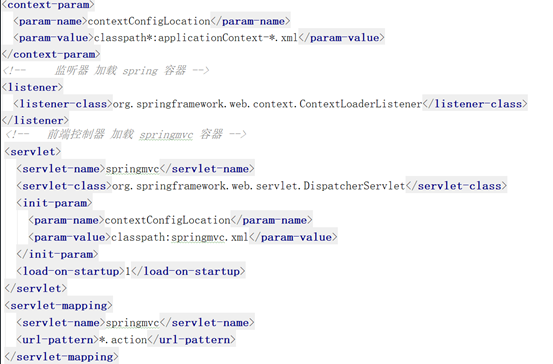
配置web.xml文件
4.分模块构建maven工程
4.1 分模块构建maven工程分析
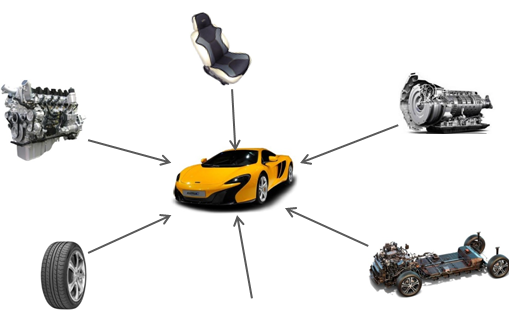
在现实生活中,汽车厂家进行汽车生产时,由于整个生产过程非常复杂和繁琐,工作量非常大,所以车场都会将整个汽车的部件分开生产,最终再将生产好的部件进行组装,形成一台完整的汽车。
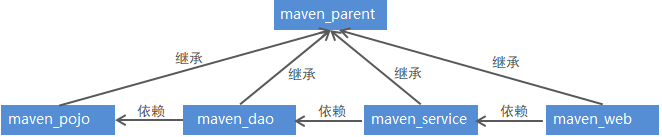
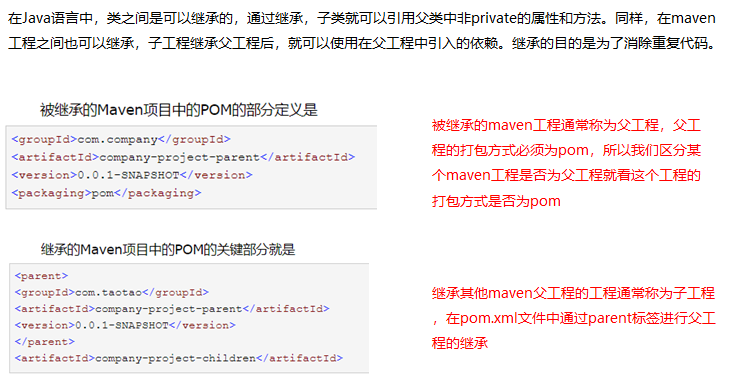
4.2 maven工程的继承
在Java语言中,类之间是可以继承的,通过继承,子类就可以引用父类中非private的属性和方法。同样,在maven工程之间也可以继承,子工程继承父工程后,就可以使用在父工程中引入的依赖。继承的目的是为了消除重复代码。
4.3 maven工程的聚合
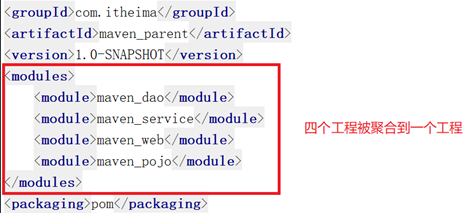
在maven工程的pom.xml文件中可以使用标签将其他maven工程聚合到一起,聚合的目的是为了进行统一操作。
例如拆分后的maven工程有多个,如果要进行打包,就需要针对每个工程分别执行打包命令,操作起来非常繁琐。这时就可以使用标签将这些工程统一聚合到maven工程中,需要打包的时候,只需要在此工程中执行一次打包命令,其下被聚合的工程就都会被打包了。
4.4 分模块构建maven工程具体实现
①父工程maven_parent构建
 <properties>

        <spring.version>5.0.5.RELEASE</spring.version>

        <springmvc.version>5.0.5.RELEASE</springmvc.version>

        <mybatis.version>3.4.5</mybatis.version>

    </properties>

    <!--锁定jar版本-->

    <dependencyManagement>

        <dependencies>

            <!-- Mybatis -->

            <dependency>

                <groupId>org.mybatis</groupId>

                <artifactId>mybatis</artifactId>

                <version>${mybatis.version}</version>

            </dependency>

            <!-- springMVC -->

            <dependency>

                <groupId>org.springframework</groupId>

                <artifactId>spring-webmvc</artifactId>

                <version>${springmvc.version}</version>

            </dependency>

            <!-- spring -->

            <dependency>

                <groupId>org.springframework</groupId>

                <artifactId>spring-context</artifactId>

                <version>${spring.version}</version>

            </dependency>

            <dependency>

                <groupId>org.springframework</groupId>

                <artifactId>spring-core</artifactId>

                <version>${spring.version}</version>

            </dependency>

            <dependency>

                <groupId>org.springframework</groupId>

                <artifactId>spring-aop</artifactId>

                <version>${spring.version}</version>

            </dependency>

            <dependency>

                <groupId>org.springframework</groupId>

                <artifactId>spring-web</artifactId>

                <version>${spring.version}</version>

            </dependency>

            <dependency>

                <groupId>org.springframework</groupId>

                <artifactId>spring-expression</artifactId>

                <version>${spring.version}</version>

            </dependency>

            <dependency>

                <groupId>org.springframework</groupId>

                <artifactId>spring-beans</artifactId>

                <version>${spring.version}</version>

            </dependency>

            <dependency>

                <groupId>org.springframework</groupId>

                <artifactId>spring-aspects</artifactId>

                <version>${spring.version}</version>

            </dependency>

            <dependency>

                <groupId>org.springframework</groupId>

                <artifactId>spring-context-support</artifactId>

                <version>${spring.version}</version>

            </dependency>

            <dependency>

                <groupId>org.springframework</groupId>

                <artifactId>spring-test</artifactId>

                <version>${spring.version}</version>

            </dependency>

            <dependency>

                <groupId>org.springframework</groupId>

                <artifactId>spring-jdbc</artifactId>

                <version>${spring.version}</version>

            </dependency>

            <dependency>

                <groupId>org.springframework</groupId>

                <artifactId>spring-tx</artifactId>

                <version>${spring.version}</version>

            </dependency>

        </dependencies>

    </dependencyManagement>

    <build>

        <plugins>

            <plugin>

                <groupId>org.apache.maven.plugins</groupId>

                <artifactId>maven-compiler-plugin</artifactId>

                <version>3.1</version>

                <configuration>

                    <source>1.8</source>

                    <target>1.8</target>

                    <encoding>UTF-8</encoding>

                </configuration>

            </plugin>

        </plugins>

    </build>
②子工程maven_pojo构建
pom.xml
<dependencies>

    <dependency>

        <groupId>log4j</groupId>

        <artifactId>log4j</artifactId>

        <version>1.2.12</version>

    </dependency>

    <dependency>

        <groupId>c3p0</groupId>

        <artifactId>c3p0</artifactId>

        <version>0.9.1.2</version>

    </dependency>

</dependencies>
③3.1子工程maven_dao构建
3.2 配置maven_dao工程的pom.xml文件
<dependencies>
<dependency>
<groupId>com.itheima</groupId>
<artifactId>maven_pojo</artifactId>
<version>1.0-SNAPSHOT</version>
</dependency>
<!-- Mybatis和mybatis与spring的整合 -->
<dependency>
<groupId>org.mybatis</groupId>
<artifactId>mybatis</artifactId>
</dependency>
<dependency>
<groupId>org.mybatis</groupId>
<artifactId>mybatis-spring</artifactId>
<version>1.3.1</version>
</dependency>
<!-- MySql驱动 -->
<dependency>
<groupId>mysql</groupId>
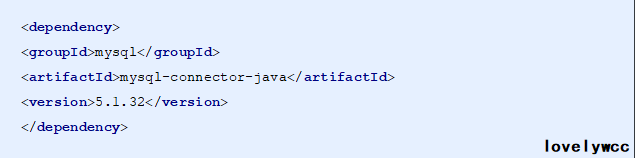
<artifactId>mysql-connector-java</artifactId>
<version>5.1.32</version>
</dependency>
<!-- druid数据库连接池 -->
<dependency>
<groupId>com.alibaba</groupId>
<artifactId>druid</artifactId>
<version>1.0.9</version>
</dependency>
<!-- spring相关 -->
<dependency>
<groupId>org.springframework</groupId>
<artifactId>spring-context</artifactId>
</dependency>
<dependency>
<groupId>org.springframework</groupId>
<artifactId>spring-core</artifactId>
</dependency>
<dependency>
<groupId>org.springframework</groupId>
<artifactId>spring-aop</artifactId>
</dependency>
<dependency>
<groupId>org.springframework</groupId>
<artifactId>spring-expression</artifactId>
</dependency>
<dependency>
<groupId>org.springframework</groupId>
<artifactId>spring-beans</artifactId>
</dependency>
<dependency>
<groupId>org.springframework</groupId>
<artifactId>spring-aspects</artifactId>
</dependency>
<dependency>
<groupId>org.springframework</groupId>
<artifactId>spring-context-support</artifactId>
</dependency>
<dependency>
<groupId>org.springframework</groupId>
<artifactId>spring-test</artifactId>
</dependency>
<dependency>
<groupId>org.springframework</groupId>
<artifactId>spring-jdbc</artifactId>
</dependency>
<dependency>
<groupId>org.springframework</groupId>
<artifactId>spring-tx</artifactId>
</dependency>
<!-- junit测试 -->
<dependency>
<groupId>junit</groupId>
<artifactId>junit</artifactId>
<version>4.12</version>
</dependency>
</dependencies>
3.3 创建DAO接口和Mapper映射文件
package com.itheima.ssm.dao;

import com.itheima.ssm.pojo.Item;

public interface ItemMapper {

    public Item findById(int id);

}
<?xml version="1.0" encoding="UTF-8" ?>

<!DOCTYPE mapper PUBLIC "-//mybatis.org//DTD Mapper 3.0//EN"

        "http://mybatis.org/dtd/mybatis-3-mapper.dtd">

<mapper namespace="com.itheima.ssm.dao.ItemMapper">

    <select id="findById" parameterType="int" resultType="Item">

        select * from item where id = #{id}

    </select>

</mapper>
3.4 在resources目录下创建spring配置文件applicationContext-dao.xml
<?xml version="1.0" encoding="UTF-8"?>

<beans xmlns="http://www.springframework.org/schema/beans"

       xmlns:context="http://www.springframework.org/schema/context"

       xmlns:p="http://www.springframework.org/schema/p"

       xmlns:aop="http://www.springframework.org/schema/aop"

       xmlns:tx="http://www.springframework.org/schema/tx"

       xmlns:xsi="http://www.w3.org/2001/XMLSchema-instance"

       xsi:schemaLocation="http://www.springframework.org/schema/beans

						   http://www.springframework.org/schema/beans/spring-beans.xsd

						   http://www.springframework.org/schema/context

						   http://www.springframework.org/schema/context/spring-context.xsd

						   http://www.springframework.org/schema/aop

						   http://www.springframework.org/schema/aop/spring-aop.xsd

						   http://www.springframework.org/schema/tx

						   http://www.springframework.org/schema/tx/spring-tx.xsd">

    <!--配置数据源信息,使用druid连接池-->

    <bean id="dataSource" class="com.alibaba.druid.pool.DruidDataSource">

        <property name="driverClassName" value="com.mysql.jdbc.Driver"/>

        <property name="url" value="jdbc:mysql://localhost:3306/ssmtest"/>

        <property name="username" value="root"/>

        <property name="password" value="root"/>

    </bean>

    <!--配置spring整合mybatis框架的SQLSessionFactoryBean-->

    <bean id="sqlSessionFactory" class="org.mybatis.spring.SqlSessionFactoryBean">

        <property name="dataSource" ref="dataSource"/>

        <!--扫描pojo包,为实体类创建别名-->

        <property name="typeAliasesPackage" value="com.itheima.ssm.pojo"/>

    </bean>

    <!--mapper扫描器,用于产生代理对象-->

    <bean class="org.mybatis.spring.mapper.MapperScannerConfigurer">

        <property name="basePackage" value="com.itheima.ssm.dao"/>

    </bean>

</bean
④子工程maven_service构建
第一步:创建maven_service工程
第二步:配置maven_service工程的pom.xml文件
<dependencies>

    <dependency>

        <groupId>com.itheima</groupId>

        <artifactId>maven_dao</artifactId>

        <version>1.0-SNAPSHOT</version>

    </dependency>

</dependencies>
第三步:创建Service接口和实现类
package com.itheima.ssm.service;

import com.itheima.ssm.pojo.Item;

public interface ItemService {

    public Item findById(int id);

}
package com.itheima.ssm.service;

import com.itheima.ssm.dao.ItemMapper;

import com.itheima.ssm.pojo.Item;

import org.springframework.beans.factory.annotation.Autowired;

import org.springframework.stereotype.Service;

import org.springframework.transaction.annotation.Transactional;

@Service

@Transactional

public class ItemServiceImpl implements ItemService {

    @Autowired

    private ItemMapper itemMapper;

    public Item findById(int id) {

        return itemMapper.findById(id);

    }

}
第四步:创建spring配置文件applicationContext-service.xml
<?xml version="1.0" encoding="UTF-8"?>

<beans xmlns="http://www.springframework.org/schema/beans"

       xmlns:context="http://www.springframework.org/schema/context"

       xmlns:p="http://www.springframework.org/schema/p"

       xmlns:aop="http://www.springframework.org/schema/aop"

       xmlns:tx="http://www.springframework.org/schema/tx"

       xmlns:xsi="http://www.w3.org/2001/XMLSchema-instance"

       xsi:schemaLocation="http://www.springframework.org/schema/beans

						   http://www.springframework.org/schema/beans/spring-beans.xsd

						   http://www.springframework.org/schema/context

						   http://www.springframework.org/schema/context/spring-context.xsd

						   http://www.springframework.org/schema/aop

						   http://www.springframework.org/schema/aop/spring-aop.xsd

						   http://www.springframework.org/schema/tx

						   http://www.springframework.org/schema/tx/spring-tx.xsd">

    <!--配置扫描器,扫描Service-->

    <context:component-scan base-package="com.itheima.ssm.service"/>

    <!--事务管理器-->

    <bean id="transactionManager" class="org.springframework.jdbc.datasource.DataSourceTransactionManager">

        <property name="dataSource" ref="dataSource"/>

    </bean>

    <!--事物注解驱动-->

    <tx:annotation-driven transaction-manager="transactionManager"/>

</beans>
⑤子工程maven_web构建
第一步:创建maven_web工程,注意打包方式为war
第二步:配置maven_web工程的pom.xml文件
UTF-8
1.8
1.8
<dependencies>

    <dependency>

        <groupId>com.itheima</groupId>

        <artifactId>maven_service</artifactId>

        <version>1.0-SNAPSHOT</version>

    </dependency>

    <dependency>

        <groupId>org.springframework</groupId>

        <artifactId>spring-webmvc</artifactId>

    </dependency>

</dependencies>

<build>

    <finalName>maven_web</finalName>

    <pluginManagement><!-- lock down plugins versions to avoid using Maven defaults (may be moved to parent pom) -->

        <plugins>

            <plugin>

                <artifactId>maven-clean-plugin</artifactId>

                <version>3.1.0</version>

            </plugin>

            <!-- see http://maven.apache.org/ref/current/maven-core/default-bindings.html#Plugin_bindings_for_war_packaging -->

            <plugin>

                <artifactId>maven-resources-plugin</artifactId>

                <version>3.0.2</version>

            </plugin>

            <plugin>

                <artifactId>maven-compiler-plugin</artifactId>

                <version>3.8.0</version>

            </plugin>

            <plugin>

                <artifactId>maven-surefire-plugin</artifactId>

                <version>2.22.1</version>

            </plugin>

            <plugin>

                <artifactId>maven-war-plugin</artifactId>

                <version>3.2.2</version>

            </plugin>

            <plugin>

                <artifactId>maven-install-plugin</artifactId>

                <version>2.5.2</version>

            </plugin>

            <plugin>

                <artifactId>maven-deploy-plugin</artifactId>

                <version>2.8.2</version>

            </plugin>

        </plugins>

    </pluginManagement>

</build>
第三步:创建Controller
package com.itheima.ssm.controller;

import com.itheima.ssm.pojo.Item;

import com.itheima.ssm.service.ItemService;

import org.springframework.beans.factory.annotation.Autowired;

import org.springframework.stereotype.Controller;

import org.springframework.ui.Model;

import org.springframework.web.bind.annotation.PathVariable;

import org.springframework.web.bind.annotation.RequestMapping;

@Controller

@RequestMapping("/item")

public class ItemController {

    @Autowired

    private ItemService itemService;

    @RequestMapping("/showItem/{id}")

    public String findById(@PathVariable("id") int id, Model model){

        Item item = itemService.findById(id);

        model.addAttribute("item",item);

        return "item";

    }

}
第四步:创建jsp页面
第五步:配置web.xml
 <!--指定Spring配置文件位置-->

  <context-param>

    <param-name>contextConfigLocation</param-name>

    <param-value>classpath*:applicationContext*.xml</param-value>

  </context-param>

  <!--配置Spring框架启动时使用的监听器-->

  <listener>

    <listener-class>org.springframework.web.context.ContextLoaderListener</listener-class>

  </listener>

  <!--配置SpringMVC的前端控制器-->

  <servlet>

    <servlet-name>springmvc</servlet-name>

    <servlet-class>org.springframework.web.servlet.DispatcherServlet</servlet-class>

    <init-param>

      <param-name>contextConfigLocation</param-name>

      <param-value>classpath:springmvc.xml</param-value>

    </init-param>

  </servlet>

  <servlet-mapping>

    <servlet-name>springmvc</servlet-name>

    <url-pattern>*.do</url-pattern>

  </servlet-mapping>
第六步:创建springmvc配置文件springmvc.xml
<?xml version="1.0" encoding="UTF-8"?>

<beans xmlns="http://www.springframework.org/schema/beans"

       xmlns:context="http://www.springframework.org/schema/context"

       xmlns:p="http://www.springframework.org/schema/p"

       xmlns:aop="http://www.springframework.org/schema/aop"

       xmlns:tx="http://www.springframework.org/schema/tx"

       xmlns:xsi="http://www.w3.org/2001/XMLSchema-instance"

       xsi:schemaLocation="http://www.springframework.org/schema/beans

						   http://www.springframework.org/schema/beans/spring-beans.xsd

						   http://www.springframework.org/schema/context

						   http://www.springframework.org/schema/context/spring-context.xsd

						   http://www.springframework.org/schema/aop

						   http://www.springframework.org/schema/aop/spring-aop.xsd

						   http://www.springframework.org/schema/tx

						   http://www.springframework.org/schema/tx/spring-tx.xsd">

    <!--配置扫描器,扫描Controller-->

    <context:component-scan base-package="com.itheima.ssm.controller"/>

    <!--视图解析器-->

    <bean class="org.springframework.web.servlet.view.InternalResourceViewResolver">

        <property name="prefix" value="/WEB-INF/jsp/"/>

        <property name="suffix" value=".jsp"/>

    </bean>

</beans>
项目整体结构如下:
1)maven_parent为父工程,其余工程为子工程,都继承父工程maven_parent
2)maven_parent工程将其子工程都进行了聚合
3)子工程之间存在依赖关系,比如maven_dao依赖, maven_pojo、maven_service依赖maven_dao、 maven_web依赖maven_service
5. maven私服
5.1 私服说明
maven仓库分为本地仓库和远程仓库,而远程仓库又分为maven中央仓库、其他远程仓库和私服(私有服务器)。其中,中央仓库是由maven官方提供的,而私服就需要我们自己搭建了。
maven私服就是公司局域网内的maven远程仓库,每个员工的电脑上安装maven软件并且连接maven私服,程序员可以将自己开发的项目打成jar并发布到私服,其它项目组成员就可以从私服下载所依赖的jar。私服还充当一个代理服务器的角色,当私服上没有jar包时会从maven中央仓库自动下载。
nexus 是一个maven仓库管理器(其实就是一个软件),nexus可以充当maven私服,同时nexus还提供强大的仓库管理、构件搜索等功能。
5.2 搭建maven私服
①下载nexus
https://help.sonatype.com/repomanager2/download/download-archives---repository-manager-oss
②安装nexus
将下载的压缩包进行解压,进入bin目录
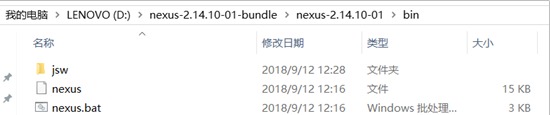
打开cmd窗口并进入上面bin目录下,执行nexus.bat install命令安装服务(注意需要以管理员身份运行cmd命令)

③启动nexus
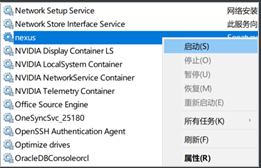
经过前面命令已经完成nexus的安装,可以通过如下两种方式启动nexus服务:
在Windows系统服务中启动nexus
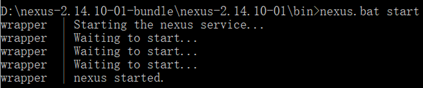
在命令行执行nexus.bat start命令启动nexus
④访问nexus
启动nexus服务后,访问http://localhost:8081/nexus
点击右上角LogIn按钮,进行登录。使用默认用户名admin和密码admin123登录系统
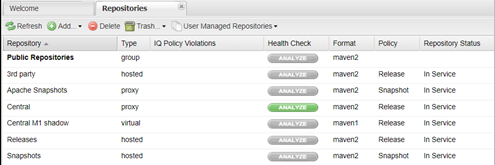
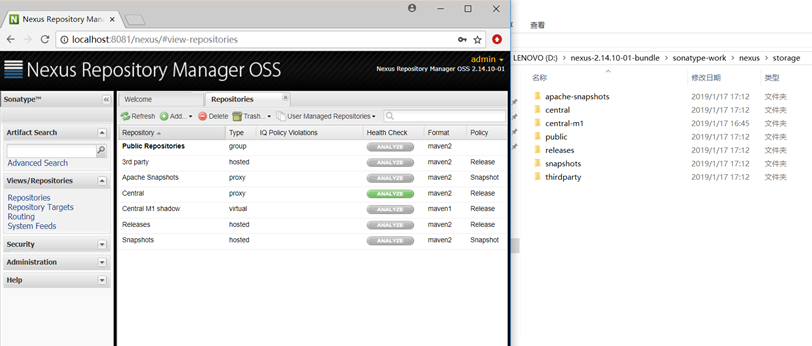
登录成功后点击左侧菜单Repositories可以看到nexus内置的仓库列表(如下图)
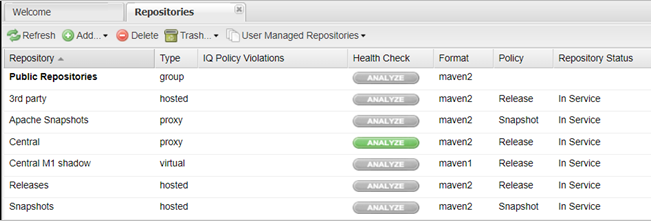
nexus仓库类型
通过前面的仓库列表可以看到,nexus默认内置了很多仓库,这些仓库可以划分为4种类型,每种类型的仓库用于存放特定的jar包,具体说明如下:
①hosted,宿主仓库,部署自己的jar到这个类型的仓库,包括Releases和Snapshots两部分,Releases为公司内部发布版本仓库、 Snapshots为公司内部测试版本仓库
②proxy,代理仓库,用于代理远程的公共仓库,如maven中央仓库,用户连接私服,私服自动去中央仓库下载jar包或者插件
③group,仓库组,用来合并多个hosted/proxy仓库,通常我们配置自己的maven连接仓库组
④virtual(虚拟):兼容Maven1版本的jar或者插件
nexus仓库类型与安装目录对应关系
5.3 将项目发布到maven私服
maven私服是搭建在公司局域网内的maven仓库,公司内的所有开发团队都可以使用。例如技术研发团队开发了一个基础组件,就可以将这个基础组件打成jar包发布到私服,其他团队成员就可以从私服下载这个jar包到本地仓库并在项目中使用。
将项目发布到maven私服操作步骤如下:
- 配置maven的settings.xml文件
<server>

<id>releases</id>

<username>admin</username>

<password>admin123</password>

</server>

<server>

<id>snapshots</id>

<username>admin</username>

<password>admin123</password>

</server>
注意:一定要在idea工具中引入的maven的settings.xml文件中配置
- 配置项目的pom.xml文件
<distributionManagement>

<repository>

   <id>releases</id>

   <url>http://localhost:8081/nexus/content/repositories/releases/</url>

</repository>

<snapshotRepository>

   <id>snapshots</id>               <url>http://localhost:8081/nexus/content/repositories/snapshots/</url>    </snapshotRepository>

</distributionManagement>
- 执行mvn deploy命令
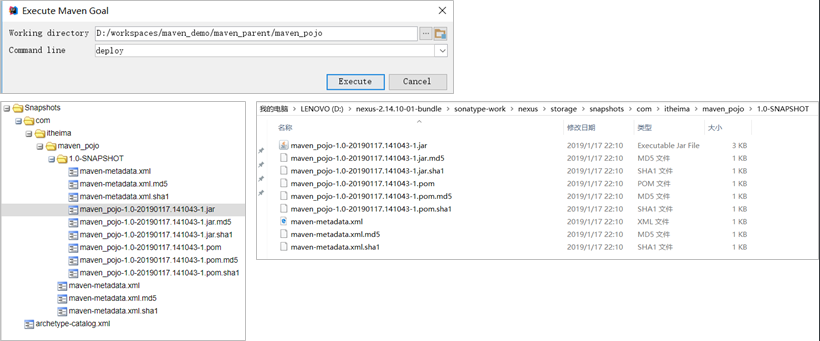
5.4 从私服下载jar到本地仓库
前面我们已经完成了将本地项目打成jar包发布到maven私服,下面我们就需要从maven私服下载jar包到本地仓库。
具体操作步骤如下:
在maven的settings.xml文件中配置下载模板
<profile>

	<id>dev</id>

		<repositories>

		<repository>

			<id>nexus</id>

		<!--仓库地址,即nexus仓库组的地址-->

			<url>

			http://localhost:8081/nexus/content/groups/public/</url>

		<!--是否下载releases构件-->

			<releases>

			<enabled>true</enabled>

			</releases>

		<!--是否下载snapshots构件-->

			<snapshots>

				<enabled>true</enabled>

			</snapshots>

		</repository>

		</repositories>

<pluginRepositories>

	<!-- 插件仓库,maven的运行依赖插件,也需要从私服下载插件 -->

	<pluginRepository>

		<id>public</id>

		<name>Public Repositories</name>

		<url>

		http://localhost:8081/nexus/content/groups/public/</url>

		</pluginRepository>

		</pluginRepositories>

</profile>
在maven的settings.xml文件中配置激活下载模板
<activeProfiles>

	<activeProfile>dev</activeProfile>

</activeProfiles>
6. 将第三方jar安装到本地仓库和maven私服
在maven工程的pom.xml文件中配置某个jar包的坐标后,如果本地的maven仓库不存在这个jar包,maven工具会自动到配置的maven私服下载,如果私服中也不存在,maven私服就会从maven中央仓库进行下载。
但是并不是所有的jar包都可以从中央仓库下载到,比如常用的Oracle数据库驱动的jar包在中央仓库就不存在。此时需要到Oracle的官网下载驱动jar包,然后将此jar包通过maven命令安装到我们本地的maven仓库或者maven私服中,这样在maven项目中就可以使用maven坐标引用到此jar包了。
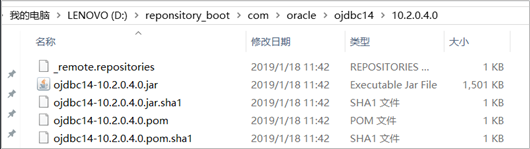
6.1 将第三方jar安装到本地仓库
①下载Oracle的jar包(略)
②mvn install命令进行安装
mvn install:install-file -Dfile=ojdbc14-10.2.0.4.0.jar -DgroupId=com.oracle -DartifactId=ojdbc14 –
Dversion=10.2.0.4.0 -Dpackaging=jar
③查看本地maven仓库,确认安装是否成功
6.2 将第三方jar安装到maven私服
①下载Oracle的jar包(略)
②在maven的settings.xml配置文件中配置第三方仓库的server信息
<server>

  <id>thirdparty</id>

  <username>admin</username>

  <password>admin123</password>

</server>
③执行mvn deploy命令进行安装
mvn deploy:deploy-file -Dfile=ojdbc14-10.2.0.4.0.jar -DgroupId=com.oracle -DartifactId=ojdbc14 –
Dversion=10.2.0.4.0 -Dpackaging=jar –
Durl=http://localhost:8081/nexus/content/repositories/thirdparty/ -DrepositoryId=thirdparty
maven高级笔记的更多相关文章
- Maven学习笔记—仓库
Maven仓库 1 什么是Maven仓库 在Maven中,任何一个依赖.插件或者项目构建的输出,都可以成为构件,而Maven通常在某个位置统一的存储所有Maven项目共享的构件,这个统一的位置就是Ma ...
- Maven学习笔记-03-Eclipse下maven项目在Tomcat7和Jetty6中部署调试
现在最新的Eclipse Luna Release 已经内置了Maven插件,这让我们的工作简洁了不少,只要把项目直接导入就可以,不用考虑插件什么的问题,但是导入之后的项目既可以部署在Tomcat也可 ...
- Maven学习笔记-04-Eclipse下maven项目在Tomcat7和Jetty6中部署调试
现在最新的Eclipse Luna Release 已经内置了Maven插件,这让我们的工作简洁了不少,只要把项目直接导入就可以,不用考虑插件什么的问题,但是导入之后的项目既可以部署在Tomcat也可 ...
- MAVEN学习笔记之Maven插件的应用(4)
MAVEN学习笔记之Maven插件的应用(4) <build> <pluginManagement> <plugins> <plugin> <gr ...
- MAVEN学习笔记之Maven生命周期和插件简介(3)
MAVEN学习笔记之Maven生命周期和插件简介(3) clean compile site三套生命周期相互独立. clean pre-clean 执行清理前的工作 clean 清理上一次构建生成的所 ...
- MAVEN学习笔记之私服Nexus(2)
MAVEN学习笔记之私服Nexus(2) 私有服务器搭建 Nexus www.snatype.org下载 snatype-work 是默认nexus存储nexus a:将bin添加到环境中 Admin ...
- MAVEN学习笔记之基础(1)
MAVEN学习笔记之基础(1) 0.0 maven文件结构 pom.xml src main java package resource test java package resource targ ...
- Maven 学习笔记(二)
前面一文——Maven 学习笔记(一)中已经提到了 pom 的大部分配置,Maven 本质上是一个插件框架,它的核心并不执行任何具体的构建任务,所有这些任务都交给创建来完成,每一个任务都会对应一个插件 ...
- javascript高级笔记——内含事件,DOM,BOM等
JavaScript高级笔记 1,DOM的简单学习 1.1,功能:用于控制HTML文档的内容: 1.2,获取页面标签对象:Element *document.getElementById(" ...
随机推荐
- 每日一个linux命令5 -- rm
rm命令.rm是常用的命令,该命令的功能为删除一个目录中的一个或多个文件或目录,它也可以将某个目录及其下的所有文件及子目录均删除.对于链接文件,只是删除了链接,原有文件均保持不变. rm是一个危险的命 ...
- c3p0连接池使用:使用c3p0数据源步骤以及完成jdbcUtills类
1.使用c3p0数据源步骤): a.下载c3p0jar,官网下载:https://sourceforge.net/projects/c3p0/: b.导入jar包时,应该导入下面两个包: c.编写c3 ...
- 数据仓库组件:HBase集群环境搭建和应用案例
本文源码:GitHub || GitEE 一.Hbase简介 1.基础描述 Hadoop原生的特点是解决大规模数据的离线批量处理场景,HDFS具备强大存储能力,但是并没有提供很强的数据查询机制.HBa ...
- Nginx配置请求头
最近发现一个问题: IOS访问后台接口是,总是application/json;charset=utf-8 但是后台接口只支持大写的UTF-8,修改了Nginx的请求头之后正常. proxy_set_ ...
- Loadrunner与kylinPET的能力对比测试--web动态请求
概述 在<性能测试工具选择策略--仿真度对比测评分析报告>一文详细分析了使用相同的web页面,分别使用LoadRunner,Jmeter,kylinTOP工具进行录制脚本并执行得出在静态请 ...
- Java 基于mail.jar 和 activation.jar 封装的邮件发送工具类
准备工作 发送邮件需要获得协议和支持! 开启服务 POP3/SMTP 服务 如何开启 POP3/SMTP 服务:https://www.cnblogs.com/pojo/p/14276637.html ...
- 腾讯QQ,人人都是高手
今天,腾讯果然给出了官方回应,具体表述如下: 可能你看不太懂,其实我也看的不太懂,不过这就是公关的能力体现,就像我"人人都是高手"的大连车务组微机室小编一样,把一个降级flash描 ...
- P1140 相似基因(字符串距离,递推)
题目链接: https://www.luogu.org/problemnew/show/P1140 题目背景 大家都知道,基因可以看作一个碱基对序列.它包含了44种核苷酸,简记作A,C,G,TA,C, ...
- 私有镜像仓库Harbor基础介绍与部署
企业级私有镜像仓库Harbor 一:介绍 Harbor,是一个英文单词,意思是港湾,港湾是干什么的呢,就是停放货物的,而货物呢,是装在集装箱中的,说到集装箱,就不得不提到Docker容器,因为dock ...
- Pandas的数据分组-aggregate聚合
在对数据进行分组之后,可以对分组后的数据进行聚合处理统计. agg函数,agg的形参是一个函数会对分组后每列都应用这个函数. import pandas as pd import numpy as n ...