
webpack源码-打包资源输出到本地
webpack收集完依赖是怎么打包资源的呢?
入口compiler.js:
this.applyPluginsParallel("make", compilation, err => {

    if(err) return callback(err);

    compilation.finish();

    compilation.seal(callback);

});
执行seal方法,createChunkAssets方法(compilation.js)
在createChunkAssets方法的时候做如下判断:
if(chunk.hasRuntime()) {

   source = this.mainTemplate.render(this.hash, chunk, this.moduleTemplate, this.dependencyTemplates);

} else {

    source = this.chunkTemplate.render(chunk, this.moduleTemplate, this.dependencyTemplates);

}
根据是否是entrypoints,进行资源打包(chunk.js)。
上面的mainTemplate.render方法:
render(hash, chunk, moduleTemplate, dependencyTemplates) {

    const buf = [];

    buf.push(this.applyPluginsWaterfall("bootstrap", "", chunk, hash, moduleTemplate, dependencyTemplates));

    buf.push(this.applyPluginsWaterfall("local-vars", "", chunk, hash));

    buf.push("");

    buf.push("// The require function");

    buf.push(`function ${this.requireFn}(moduleId) {`);

    buf.push(this.indent(this.applyPluginsWaterfall("require", "", chunk, hash)));

    buf.push("}");

    buf.push("");

    buf.push(this.asString(this.applyPluginsWaterfall("require-extensions", "", chunk, hash)));

    buf.push("");

    buf.push(this.asString(this.applyPluginsWaterfall("startup", "", chunk, hash)));

    let source = this.applyPluginsWaterfall("render", new OriginalSource(this.prefix(buf, " \t") + "\n", `webpack/bootstrap ${hash}`), chunk, hash, moduleTemplate, dependencyTemplates);

    if(chunk.hasEntryModule()) {

        source = this.applyPluginsWaterfall("render-with-entry", source, chunk, hash);

    }

    if(!source) throw new Error("Compiler error: MainTemplate plugin 'render' should return something");

    chunk.rendered = true;

    return new ConcatSource(source, ";");

}
buf中保存了webpackBootstrap中的主体代码:
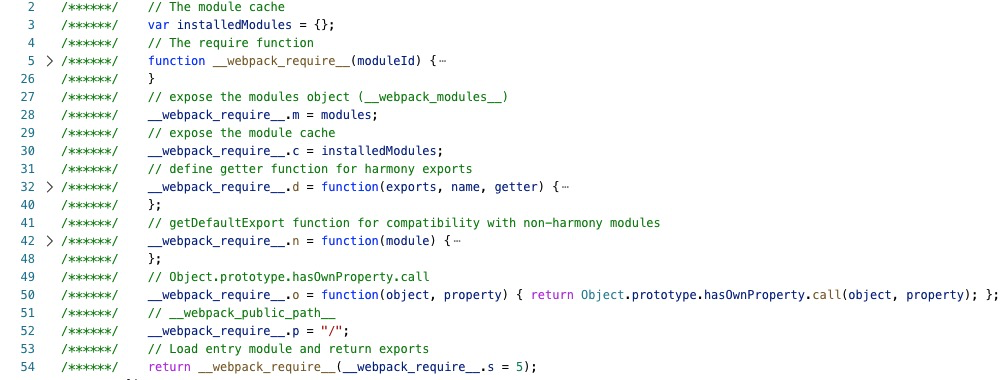 

render钩子(MainTemplate.js)
 const source = new ConcatSource();

    source.add("/******/ (function(modules) { // webpackBootstrap\n"); // 添加头部包裹体

    source.add(new PrefixSource("/******/", bootstrapSource)); // 添加bootstrap主体

    source.add("/******/ })\n");  // 结束

    source.add("/*****************************  *******************************************/\n");

    source.add("/******/ (");

    const modules = this.renderChunkModules(chunk, moduleTemplate, dependencyTemplates, "/******/ ");  // 返回一个concatSource的一个实例,包含了需要打包的所有内容

    source.add(this.applyPluginsWaterfall("modules", modules, chunk, hash, moduleTemplate, dependencyTemplates));

    source.add(")");

    return source;   // 返回一个concatSource实例
主要做了两件事:
1.生成webpackBootstrap中的主体代码
2.添加所有的代码到concatSource中
最后,执行compiler.run的回调函数 onCompiled(null, compilation)
执行 emitAssets方法
this.outputFileSystem.mkdirp(this.outputFileSystem.join(outputPath, dir), writeOut);// 创建dist目录

const targetPath = this.outputFileSystem.join(outputPath, targetFile);

const source = compilation.assets[file]; // createChunkAssets中有这样的处理this.assets[file] = source;

......

let content = source.source();

if(!Buffer.isBuffer(content)) {

    content = new Buffer(content, "utf8");

}

......

this.outputFileSystem.writeFile(targetPath, content, callback);// 输出到本地文件系统
至此打包资源,然后就基本结束了。
webpack源码-打包资源输出到本地的更多相关文章
- RPMBUILD源码打包资源汇总(转)
http://mattshma.github.io/2015/11/04/rpm%E6%89%93%E5%8C%85/ http://400053.blog.51cto.com/390053/7210 ...
- 从Webpack源码探究打包流程,萌新也能看懂~
简介 上一篇讲述了如何理解tapable这个钩子机制,因为这个是webpack程序的灵魂.虽然钩子机制很灵活,而然却变成了我们读懂webpack道路上的阻碍.每当webpack运行起来的时候,我的心态 ...
- .3-浅析webpack源码之预编译总览
写在前面: 本来一开始想沿用之前vue源码的标题:webpack源码之***,但是这个工具比较巨大,所以为防止有人觉得我装逼跑来喷我(或者随时鸽),加上浅析二字,以示怂. 既然是浅析,那么案例就不必太 ...
- .30-浅析webpack源码之doResolve事件流(1)
这里所有的插件都对应着一个小功能,画个图整理下目前流程: 上节是从ParsePlugin中出来,对'./input.js'入口文件的路径做了处理,返回如下: ParsePlugin.prototype ...
- .17-浅析webpack源码之compile流程-入口函数run
本节流程如图: 现在正式进入打包流程,起步方法为run: Compiler.prototype.run = (callback) => { const startTime = Date.now( ...
- .30-浅析webpack源码之doResolve事件流(2)
这里所有的插件都对应着一个小功能,画个图整理下目前流程: 上节是从ParsePlugin中出来,对'./input.js'入口文件的路径做了处理,返回如下: ParsePlugin.prototype ...
- Spring源码分析——资源访问利器Resource之实现类分析
今天来分析Spring的资源接口Resource的各个实现类.关于它的接口和抽象类,参见上一篇博文——Spring源码分析——资源访问利器Resource之接口和抽象类分析 一.文件系统资源 File ...
- maven源码打包
1.打包时附加外部Jar包 <!--编译+外部 Jar打包--> <plugin> <artifactId>maven-co ...
- 使用 maven 自动将源码打包并发布
1.maven-source-plugin 访问地址 在 pom.xml 中添加 下面的 内容,可以 使用 maven 生成 jar 的同时 生成 sources 包 <plugin> & ...
随机推荐
- Rust 数据类型
Rust中的每个值都具有特定的数据类型. 基础类型: 整数,浮点数,布尔值和字符 i8,i16,i32,i64,i64,i128,isize, u8,u16,u32,u64,u64,u128,usiz ...
- 4.WebPack-Loader
一.什么是Loader WebPack默认只"认识"以*.js结尾的文件,如果想处理其他类型的文件,就必须添加Loader,有各种各样的Loader,每个Loader可处理不同类型 ...
- 上海开发票/v电13543443967
关于事项:Iㄋ5一★4З44一★ㄋ9.б7开发票的准备资料必须要公司名称个人的话就用个人名字和身份证去税务柜台申请办理!公司的话要提供公司全称就是营业执照上的名称,纳税人税号,如果是开普通增值税发票的 ...
- js中.bind()和.call()用法讲解
var option = { ti : 8, it(){ return this.ti; } } 这里又一个option对象,it()方法里的this指的就是option对象的上下文. console ...
- 【原创】Linux中断子系统(四)-Workqueue
背景 Read the fucking source code! --By 鲁迅 A picture is worth a thousand words. --By 高尔基 说明: Kernel版本: ...
- PID各环节的意义和功能,自带PID的matlab编程实例
这是PID的标准形式包括比例/积分/微分三部分,e为偏差 下面我们分析三个环节的作用,设:当前系统状态A,目标状态B, e=B-A,初始状态e>0 (以下是个人的理解,欢迎读者评论) 1 比例环 ...
- 堆、栈、数据区、bss、代码段
一个程序的运行是需要内存的,那么我们平常写的程序的内存都是怎么分配的呢 (1)首先我们要知道,内存是真实存在的,内存是一个物理器件.它时由操作系统管理的,我们平常只要使用它就行了,为了方便管理.操作系 ...
- 几个常见CSS错误和解决办法
1.IE6下,当float存在时,margin双倍的问题 解决方法:加display:inline; 例: #content { float: left; width: 500px; ...
- python 批量重命名文件
# -*- coding: utf-8 -*- import os import sys def rename(): path = input("路径(例如D:\\\\picture):&q ...
- Write a program to copy its input to its output, replacing each string of one or more blanks by a single blank.
#include <stdio.h> void main() { int c,c_BCN; while((c=getchar())!=EOF) { if(c!=' ') c_BCN=; i ...