毕业设计之LNP+DISCUZ +分离的数据库操作
环境介绍:
CentOS6.9最小化安装
https://nginx.org/download/nginx-1.16.1.tar.gz
https://www.php.net/distributions/php-7.3.14.tar.gz
https://cdn.mysql.com//Downloads/MySQL-5.7/mysql-boost-5.7.29.tar.gz
nginx+php主机:192.168.111.141
mysql主机:192.168.111.151
nginx install 192.168.111.141
yum install -y gcc gcc-c++ autoconf automake zlib zlib-devel openssl openssl-devel pcre* make gd-devel libjpeg-devel
 libpng-devel libxml2-devel bzip2-devel libcurl-devel wget unzip

[root@webtwo.quan.bbs ~]$cd /data/packages/

[root@webtwo.quan.bbs packages]$wget https://nginx.org/download/nginx-1.16.1.tar.gz

[root@webtwo.quan.bbs packages]$tar -xvzf nginx-1.16.1.tar.gz

[root@webtwo.quan.bbs packages]$cd nginx-1.16.1

[root@webtwo.quan.bbs nginx-1.16.1]$./configure --prefix=/usr/local/software/nginx1.16.1 \

> --user=nginx \

> --group=nginx \

> --with-http_ssl_module \

> --with-http_v2_module \

> --with-http_stub_status_module \

> --with-pcre

[root@webtwo.quan.bbs nginx-1.16.1]$make &&make install
建立软连接,便于命令和软件的升级
[root@webtwo.quan.bbs nginx-1.16.1]$ ln -s /usr/local/software/nginx1.16.1 /usr/local/nginx

[root@webtwo.quan.bbs nginx-1.16.1]$ln -s /usr/local/software/nginx1.16.1/sbin/nginx  /usr/local/sbin/
编写启动脚本(官网:https://www.nginx.com/resources/wiki/start/topics/examples/redhatnginxinit/)
我们只需要修改几个地方
vim /etc/init.d/nginx
#!/bin/sh

#

# nginx - this script starts and stops the nginx daemon

#

# chkconfig:   - 85 15

# description:  NGINX is an HTTP(S) server, HTTP(S) reverse \

#               proxy and IMAP/POP3 proxy server

# processname: nginx

# config:      /usr/local/nginx/conf/nginx.conf

# config:      /etc/sysconfig/nginx

# pidfile:     /var/run/nginx.pid

# Source function library.

. /etc/rc.d/init.d/functions

# Source networking configuration.

. /etc/sysconfig/network

# Check that networking is up.

[ "$NETWORKING" = "no" ] && exit 0

##########修改nginx执行文件的路径##########

nginx="/usr/local/nginx/sbin/nginx"

prog=$(basename $nginx)

###########修改nginx配置文件路径########

NGINX_CONF_FILE="/usr/local/nginx/conf/nginx.conf"

[ -f /etc/sysconfig/nginx ] && . /etc/sysconfig/nginx

lockfile=/var/lock/subsys/nginx

make_dirs() {

   # make required directories

   user=`$nginx -V 2>&1 | grep "configure arguments:.*--user=" | sed 's/[^*]*--user=\([^ ]*\).*/\1/g' -`

   if [ -n "$user" ]; then

      if [ -z "`grep $user /etc/passwd`" ]; then

         useradd -M -s /bin/nologin $user

      fi

      options=`$nginx -V 2>&1 | grep 'configure arguments:'`

      for opt in $options; do

          if [ `echo $opt | grep '.*-temp-path'` ]; then

              value=`echo $opt | cut -d "=" -f 2`

              if [ ! -d "$value" ]; then

                  # echo "creating" $value

                  mkdir -p $value && chown -R $user $value

              fi

          fi

       done

    fi

}

start() {

    [ -x $nginx ] || exit 5

    [ -f $NGINX_CONF_FILE ] || exit 6

    make_dirs

    echo -n $"Starting $prog: "

    daemon $nginx -c $NGINX_CONF_FILE

    retval=$?

    echo

    [ $retval -eq 0 ] && touch $lockfile

    return $retval

}

stop() {

    echo -n $"Stopping $prog: "

    killproc $prog -QUIT

    retval=$?

    echo

    [ $retval -eq 0 ] && rm -f $lockfile

    return $retval

}

restart() {

    configtest || return $?

    stop

    sleep 1

    start

}

reload() {

    configtest || return $?

    echo -n $"Reloading $prog: "

    killproc $nginx -HUP

    RETVAL=$?

    echo

}

force_reload() {

    restart

}

configtest() {

  $nginx -t -c $NGINX_CONF_FILE

}

rh_status() {

    status $prog

}

rh_status_q() {

    rh_status >/dev/null 2>&1

}

case "$1" in

    start)

        rh_status_q && exit 0

        $1

        ;;

    stop)

        rh_status_q || exit 0

        $1

        ;;

    restart|configtest)

        $1

        ;;

    reload)

        rh_status_q || exit 7

        $1

        ;;

    force-reload)

        force_reload

        ;;

    status)

        rh_status

        ;;

    condrestart|try-restart)

        rh_status_q || exit 0

            ;;

    *)

        echo $"Usage: $0 {start|stop|status|restart|condrestart|try-restart|reload|force-reload|configtest}"

        exit 2

esac
设置自启动nginx
[root@webone.quan.bbs tmp]$chmod 755 /etc/init.d/nginx

[root@webone.quan.bbs tmp]$chkconfig --add nginx

[root@webone.quan.bbs tmp]$chkconfig nginx on

[root@webone.quan.bbs tmp]$service nginx start

[root@webone.quan.bbs tmp]$ps aux |grep nginx

nginx     96581  0.0  1.2 123832 12360 ?        S    00:00   0:03 php-fpm: pool www

nginx     96582  0.0  0.9 121444  9624 ?        S    00:00   0:03 php-fpm: pool www

root      98610  0.0  0.1  46972  1228 ?        Ss   20:37   0:00 nginx: master process /usr/local/nginx/sbin/nginx -c /usr/local/nginx/conf/nginx.conf

nginx     98612  0.0  0.2  47436  2288 ?        S    20:37   0:00 nginx: worker process
测试nginx是否成功:
客服端访问出现nginx首页即可
PHP install 192.168.111.141
[root@webone.quan.bbs packages]$tar -zvxf php-7.3.14.tar.gz

[root@webone.quan.bbs packages]$cd php-7.3.14
./configure --prefix=/usr/local/software/php7.3.14 \
--with-fpm-user=nginx \
--with-fpm-group=nginx \
--with-curl \
--with-freetype-dir \
--with-gd \
--with-png-dir \
--with-jpeg-dir \
--with-gettext \
--with-iconv-dir \
--with-kerberos \
--with-libdir=lib64 \
--with-libxml-dir \
--with-mysqli \
--with-openssl \
--with-pcre-regex \
--with-pdo-mysql \
--with-pdo-sqlite \
--with-pear \
--with-xmlrpc \
--with-xsl \
--with-zlib \
--with-bz2 \
--with-mhash \
--enable-fpm \
--enable-bcmath \
--enable-libxml \
--enable-inline-optimization \
--enable-mbregex \
--enable-mbstring \
--enable-opcache \
--enable-pcntl \
--enable-shmop \
--enable-soap \
--enable-sockets \
--enable-sysvsem \
--enable-sysvshm \
--enable-xml \
--enable-zip \
--enable-ctype\
--enable-fpm
编译可能出现的问题
1111
错误

checking for XSL support... yes

configure: error: xslt-config not found. Please reinstall the libxslt >= 1.1.0 distribution

解决:

yum -y install libxslt libxslt-devel
2222
错误

checking for libzip... not found

configure: error: Please reinstall the libzip distribution

解决:

这里不能这样子安装yum install -y libzip libzip-devel  yum安装的版本低,不能用yum安装
下载 libzip-1.4.0.tar.gz (需要cmake 3.0以上) yum install cmake yum安装的版本低,不能用yum安装
先安装cmake高版本:卸载原有的yum -y remove cmake
下载包:

[root@webone.quan.bbs packages]$ curl -O https://cmake.org/files/v3.6/cmake-3.6.0-Linux-x86_64.tar.gz

[root@webone.quan.bbs packages]$tar -zxvf cmake-3.6.0-Linux-x86_64.tar.gz -C /usr/local/software/cmake

[root@webone.quan.bbs packages]$ln -s /usr/local/software/cmake/cmake-3.6.0-Linux-x86_64/bin/cmake  /usr/bin/

注意:这个压缩包不是源码包,解压后直接用。
2222的第二步:正式安装libzip
[root@webtwo.quan.bbs packages]$wget https://libzip.org/download/libzip-1.4.0.tar.gz

[root@webtwo.quan.bbs packages]$tar -zxvf libzip-1.4.0.tar.gz

[root@webtwo.quan.bbs packages]$cd libzip-1.4.0

[root@webtwo.quan.bbs packages]$mkdir build

[root@webtwo.quan.bbs packages]$cd build

[root@webtwo.quan.bbs packages]$cmake ..

[root@webtwo.quan.bbs packages]$make && make install
33333
错误:

error: off_t undefined; check your library configuration

解决:

[root@webtwo.quan.bbs packages]$ vim /etc/ld.so.conf

添加以下内容:

/usr/local/lib64

/usr/local/lib

/usr/lib

/usr/lib64

[root@webtwo.quan.bbs packages]$ldconfig -v  立即生效
4444
错误:

 file included from /root/download/php-7.3.0/ext/zip/php_zip.h:31:0,

                 from /root/download/php-7.3.0/ext/zip/php_zip.c:36:

/usr/local/include/zip.h:59:21: fatal error: zipconf.h: No such file or directory

 #include <zipconf.h>

                     ^

compilation terminated.

make: *** [ext/zip/php_zip.lo] Error 1

解决:

cp /usr/local/lib/libzip/include/zipconf.h /usr/local/include/zipconf.h
编译成功后
[root@webtwo.quan.bbs packages]$make && make install
建立软连接+复制配置文件:
[root@webtwo.quan.bbs packages]$ ln -s /usr/local/software/php7.3.14 /usr/local/php

[root@webtwo.quan.bbs packages]$cp /usr/local/php/etc/php-fpm.conf.default /usr/local/php/etc/php-fpm.conf

[root@webtwo.quan.bbs packages]$cp /usr/local/php/etc/php-fpm.d/www.conf.default /usr/local/php/etc/php-fpm.d/www.conf

[root@webtwo.quan.bbs packages]$cd php-7.3.14

[root@webtwo.quan.bbs php-7.3.14]$cp php.ini-production /usr/local/php/lib/php.ini

由于编译的时候没有设置默认配置文件路径

/usr/local/php/lib 默认配置文件路径

cp php.ini-production /usr/local/php/lib/php.ini

# 拷贝php-fpm进程服务的配置文件和扩展配置文件

 cp /usr/local/php/etc/php-fpm.conf.default /usr/local/php/etc/php-fpm.conf

 cp /usr/local/php/etc/php-fpm.d/www.conf.default /usr/local/php/etc/php-fpm.d/www.conf
建立软连接 使命令支持
[root@webone.quan.bbs packages]$ ln -s /usr/local/php/bin/php /usr/bin/
加入服务,开机自启动:
[root@webone.quan.bbs packages]$cp /data/packages/php-7.3.14/sapi/fpm/init.d.php-fpm /etc/init.d/php-fpm

[root@webone.quan.bbs packages]$chmod +x /etc/init.d/php-fpm

[root@webone.quan.bbs packages]$service php-fpm start

[root@webone.quan.bbs packages]$chkconfig php-fpm on
检测:
[root@webone.quan.bbs tmp]$ps aux |grep nginx

nginx     96581  0.0  1.2 123832 12360 ?        S    00:00   0:03 php-fpm: pool www

nginx     96582  0.0  0.9 121444  9624 ?        S    00:00   0:03 php-fpm: pool www

root      98610  0.0  0.1  46972  1228 ?        Ss   20:37   0:00 nginx: master process /usr/local/nginx/sbin/nginx -c /usr/local/nginx/conf/nginx.conf

nginx     98612  0.0  0.2  47436  2288 ?        S    20:37   0:00 nginx: worker process
nginx 和php 结合:
phpinfo()出现的问题:
1111

发现Loaded Configuration File => (none) ,表明没有载入php.ini文件
使用strace 追踪:
strace /usr/local/php7/sbin/php-fpm -i 2>1.log
vim 1.log 查看php.ini
发现
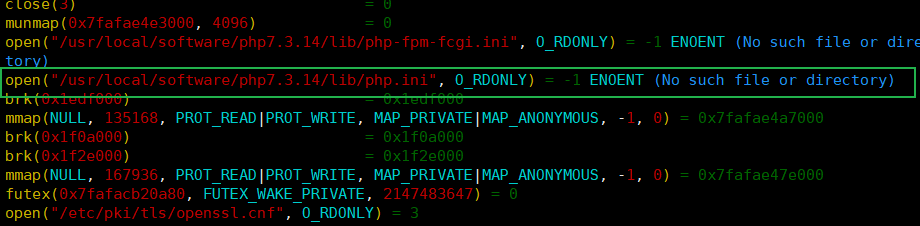
[root@webone.quan.bbs tmp]$php -i |grep php.ini
Configuration File (php.ini) Path => /usr/local/software/php7.3.14/lib
Loaded Configuration File => /usr/local/software/php7.3.14/lib/php.ini
将php.ini拷贝过去就行了
Mysql install 在主机192.168.111.151上操作
yum install openssl-devel -y

yum install -y ncurses-devel

先建立文件目录

mkdir -p /usr/local/software/mysql-5.7.29

mkdir -p /data/mysql/data

mkdir -p /data/mysql/logs

mkdir -p /data/mysql/pids

[root@mysql.quan.bbs packages]$tar -zxvf mysql-boost-5.7.29.tar.gz

[root@mysql.quan.bbs packages]$cd mysql-5.7.29

[root@mysql.quan.bbs mysql-5.7.29]$cmake \
-DCMAKE_INSTALL_PREFIX=/usr/local/software/mysql-5.7.29 \
-DMYSQL_DATADIR=/data/mysql/data \
-DMYSQL_UNIX_ADDR=/data/mysql/mysql.sock \
-DMYSQL_TCP_PORT=3306 \
-DSYSCONFDIR=/usr/local/software/mysql-5.7.29/etc \
-DMYSQL_USER=mysql \
-DWITH_MYISAM_STORAGE_ENGINE=1 \
-DWITH_INNOBASE_STORAGE_ENGINE=1 \
-DWITH_ARCHIVE_STORAGE_ENGINE=1 \
-DWITH_BLACKHOLE_STORAGE_ENGINE=1 \
-DWITH_FEDERATED_STORAGE_ENGINE=1 \
-DWITH_MEMORY_STORAGE_ENGINE=1 \
-DENABLED_LOCAL_INFILE=1 \
-DWITH_EMBEDDED_SERVER=1 \
-DWITH_EDITLINE=bundled \
-DWITH_READLINE=1 \
-DENABLE_DOWNLOADS=1 \
-DWITH_PARTITION_STORAGE_ENGINE=1 \
-DEXTRA_CHARSETS=all \
-DDEFAULT_CHARSET=utf8 \
-DDEFAULT_COLLATION=utf8_general_ci \
-DWITH_DEBUG=0 \
-DENABLE_DTRACE=0 \
-DMYSQL_MAINTAINER_MODE=0 \
-DWITH_ZLIB:STRING=bundled \
-DDOWNLOAD_BOOST=1 \
-DWITH_BOOST=./boost\
-DWITH_SSL=system
编译成功后:
[root@mysql.quan.bbs mysql-5.7.29]$ make &&make install
安装成功后,一如既往的建立软连接:
ln -s /usr/local/software/mysql-5.7.29 /usr/local/mysql
编写配置文件my,cnf
注意:再mysql5.7.18之后就源码包里面就没有mysql 配置文件的模板了
官网:https://dev.mysql.com/doc/refman/5.7/en/server-configuration-defaults.html
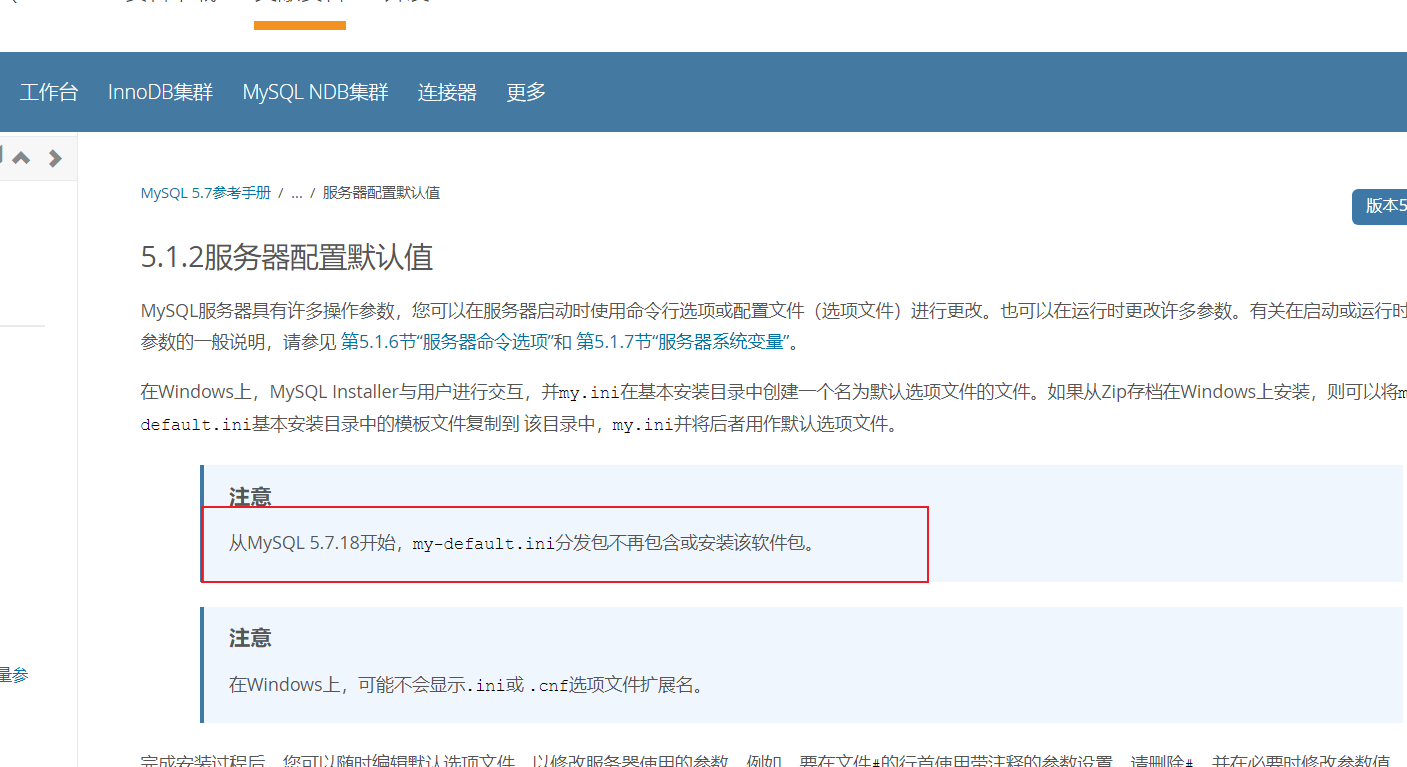
可以yum 安装一个mysql ,将/etc/my.cnf复制来修改即可(记得卸载mysql)
vim /usr/local/software/mysql-5.7.29/etc/my.cnf(因为编译安装的时候指定配置文件目录)
[client]

port = 3306

socket = /data/mysql/data/mysql.sock

default-character-set = utf8

[mysqld]

port = 3306

socket = /data/mysql/data/mysql.sock

basedir = /usr/local/mysql

datadir = /data/mysql/data

pid-file = /data/mysql/pids/mysql.pid

user = mysql

bind-address = 0.0.0.0

server-id = 1

init-connect = 'SET NAMES utf8'

character-set-server = utf8

#skip-name-resolve

#skip-networking

back_log = 300

max_connections = 1000

max_connect_errors = 6000

open_files_limit = 65535

table_open_cache = 128

max_allowed_packet = 4M

binlog_cache_size = 1M

max_heap_table_size = 8M

tmp_table_size = 16M

read_buffer_size = 2M

read_rnd_buffer_size = 8M

sort_buffer_size = 8M

join_buffer_size = 8M

key_buffer_size = 4M

thread_cache_size = 8

query_cache_type = 1

query_cache_size = 8M

query_cache_limit = 2M

ft_min_word_len = 4

ft_min_word_len = 4

log_bin = mysql-bin

binlog_format = mixed

expire_logs_days = 30

log_error = /data/mysql/logs/mysql-error.log

slow_query_log = 1

long_query_time = 1

slow_query_log_file = /data/mysql/logs/mysql-slow.log

performance_schema = 0

explicit_defaults_for_timestamp

#lower_case_table_names = 1

skip-external-locking

default_storage_engine = InnoDB

#default-storage-engine = MyISAM

innodb_file_per_table = 1

innodb_open_files = 500

innodb_buffer_pool_size = 64M

innodb_write_io_threads = 4

innodb_read_io_threads = 4

innodb_thread_concurrency = 0

innodb_purge_threads = 1

innodb_flush_log_at_trx_commit = 2

innodb_log_buffer_size = 2M

innodb_log_file_size = 32M

innodb_log_files_in_group = 3

innodb_max_dirty_pages_pct = 90

innodb_lock_wait_timeout = 120

bulk_insert_buffer_size = 8M

myisam_sort_buffer_size = 8M

myisam_max_sort_file_size = 10G

myisam_repair_threads = 1

interactive_timeout = 28800

wait_timeout = 28800

[mysqldump]

quick

max_allowed_packet = 16M

[myisamchk]

key_buffer_size = 8M

sort_buffer_size = 8M

read_buffer = 4M

write_buffer = 4M
加入服务,开机自启动:
[root@mysql.quan.bbs mysql-5.7.29]$

cp /usr/local/mysql/support-files/mysql.server /etc/init.d/mysqld

[root@mysql.quan.bbs mysql-5.7.29]$chmod +x /etc/init.d/mysqld

[root@mysql.quan.bbs mysql-5.7.29]$chkconfig --add mysqld

[root@mysql.quan.bbs mysql-5.7.29]$chkconfig mysqld on

[root@mysql.quan.bbs mysql-5.7.29]$chkconfig --list | grep mysqld

mysqld             0:off    1:off    2:on    3:on    4:on    5:on    6:off
修改数据库数据目录权限
[root@mysql.quan.bbs mysql-5.7.29]$chown -R mysql:mysql /data/mysql

数据库初始化:

[root@mysql.quan.bbs mysql-5.7.29]$/usr/local/mysql/bin/mysqld --initialize-insecure --user=mysql --basedir=/usr/local/mysql --datadir=/data/mysql/data

[root@mysql.quan.bbs mysql-5.7.29]$service mysqld start

Starting MySQL. SUCCESS!

测试

[root@mysql.quan.bbs mysql-5.7.29]$netstat -tunlp |grep mysql

tcp        0      0 0.0.0.0:3306                0.0.0.0:*                   LISTEN      90317/mysqld
第一次登陆,修改root密码并设计论坛所需的数据库和权限
[root@mysql.quan.bbs pids]$/usr/local/mysql/bin/mysql -u root

Welcome to the MySQL monitor.  Commands end with ; or \g.

Your MySQL connection id is 2

Server version: 5.7.29-log Source distribution

Copyright (c) 2000, 2020, Oracle and/or its affiliates. All rights reserved.

Oracle is a registered trademark of Oracle Corporation and/or its

affiliates. Other names may be trademarks of their respective

owners.

Type 'help;' or '\h' for help. Type '\c' to clear the current input statement.

mysql> show databases;

+--------------------+

| Database           |

+--------------------+

| information_schema |

| mysql              |

| performance_schema |

| sys                |

+--------------------+

4 rows in set (0.00 sec)

mysql> use mysql

Reading table information for completion of table and column names

You can turn off this feature to get a quicker startup with -A

Database changed

mysql> select host,user,authentication_string from user;

+-----------+---------------+-------------------------------------------+

| host      | user          | authentication_string                     |

+-----------+---------------+-------------------------------------------+

| localhost | root          |                                           |

| localhost | mysql.session | *THISISNOTAVALIDPASSWORDTHATCANBEUSEDHERE |

| localhost | mysql.sys     | *THISISNOTAVALIDPASSWORDTHATCANBEUSEDHERE |

+-----------+---------------+-------------------------------------------+

3 rows in set (0.00 sec)

mysql> UPDATE user SET authentication_string=PASSWORD('2004') WHERE user='root';

Query OK, 1 row affected, 1 warning (0.00 sec)

Rows matched: 1  Changed: 1  Warnings: 1

mysql> flush privileges;

Query OK, 0 rows affected (0.01 sec)

mysql> quit
[root@mysql.quan.bbs pids]$/usr/local/mysql/bin/mysql -u root -p

Enter password:

Welcome to the MySQL monitor.  Commands end with ; or \g.

Your MySQL connection id is 4

Server version: 5.7.29-log Source distribution

Copyright (c) 2000, 2020, Oracle and/or its affiliates. All rights reserved.

Oracle is a registered trademark of Oracle Corporation and/or its

affiliates. Other names may be trademarks of their respective

owners.

Type 'help;' or '\h' for help. Type '\c' to clear the current input statement.

mysql> create databases quanbbs;

ERROR 1064 (42000): You have an error in your SQL syntax; check the manual that corresponds to your MySQL server version for the right syntax to use near 'databases quanbbs' at line 1

mysql> create database quanbbs;

Query OK, 1 row affected (0.00 sec)

mysql> grant all on quanbbs.* to bbsquan@'%' identified by '2004quan';

Query OK, 0 rows affected, 1 warning (0.01 sec)

mysql> flush privileges;

Query OK, 0 rows affected (0.00 sec)

mysql> exit
数据库为quanbbs
用户为bbsquan
密码为2004quan
安装mysql可能出现的问题:
1111问题:
[root@ansz.quan.bbs etc]$service mysqld start

Starting MySQL... ERROR! The server quit without updating PID file (/data/mysql/pids/mysql.pid).

[root@ansz.quan.bbs etc]$service mysqld status

 ERROR! MySQL is not running, but lock file (/var/lock/subsys/mysql) exists

[root@ansz.quan.bbs etc]$service mysqld stop

 ERROR! MySQL server PID file could not be found!
解决:
第一步建议查看/etc/my.cnf 因为我的编译的配置文件路径不是默认路径

以防万一,把他删了

第二部:建议查看系统是否自带安装了mysql ,卸载掉即可

第三步:系统可能已经存在正在运行的mysql 相关的程序,将其关掉

[root@ansz.quan.bbs etc]$ps aux |grep mysql

root       1280  0.0  0.1 108320  1660 ?        S    21:37   0:00 /bin/sh /usr/local/mysql/bin/mysqld_safe --datadir=/data/mysql/data --pid-file=/data/mysql/pids/mysql.pid

mysql      2197  0.0  4.9 929780 49432 ?        Sl   21:37   0:00 /usr/local/mysql/bin/mysqld --basedir=/usr/local/mysql --datadir=/data/mysql/data --plugin-dir=/usr/local/mysql/lib/plugin --user=mysql --log-error=/var/log/mysqld.log --open-files-limit=65535 --pid-file=/data/mysql/pids/mysql.pid --socket=/data/mysql/data/mysql.sock --port=3306

root       5932  0.0  0.0 103328   892 pts/0    S+   21:46   0:00 grep mysql

[root@ansz.quan.bbs etc]$kill -9 1280

[root@ansz.quan.bbs etc]$ps aux |grep mysql

mysql      2197  0.0  4.9 929780 49432 ?        Sl   21:37   0:00 /usr/local/mysql/bin/mysqld --basedir=/usr/local/mysql --datadir=/data/mysql/data --plugin-dir=/usr/local/mysql/lib/plugin --user=mysql --log-error=/var/log/mysqld.log --open-files-limit=65535 --pid-file=/data/mysql/pids/mysql.pid --socket=/data/mysql/data/mysql.sock --port=3306

root       5934  0.0  0.0 103328   892 pts/0    S+   21:46   0:00 grep mysql

[root@ansz.quan.bbs etc]$kill -9 2197

[root@ansz.quan.bbs etc]$ps aux |grep mysql

root       5936  0.0  0.0 103324   884 pts/0    S+   21:46   0:00 grep mysql

kill -9表示强制杀死该进程,这个信号不能被捕获也不能被忽略!!!
22222问题:
可能编译的时候,因为有参数:-DDOWNLOAD_BOOST=1 \

所以会在线下载文件boost_1_59_0.tar.gz

而这个文件的源有时载率是很低的,根本下载不了,所以只能大家多试几次了
解决:
其实因为我下载的myql版本是自带的,所以不需要加上面的参数-DDOWNLOAD_BOOST=1
然后直接编译就行了,哈哈哈哈哈哈哈哈哈哈哈
333问题:
[root@ansz.quan.bbs mysql]$/usr/local/mysql/bin/mysqld --initialize-insecure --user=mysql --basedir=/usr/local/mysql --datadir=/data/mysql/data

2020-02-10T13:30:23.930494Z 0 [Warning] TIMESTAMP with implicit DEFAULT value is deprecated. Please use --explicit_defaults_for_timestamp server option (see documentation for more details).

2020-02-10T13:30:24.132226Z 0 [Warning] InnoDB: New log files created, LSN=45790

2020-02-10T13:30:24.163758Z 0 [Warning] InnoDB: Creating foreign key constraint system tables.

2020-02-10T13:30:24.233165Z 0 [Warning] No existing UUID has been found, so we assume that this is the first time that this server has been started. Generating a new UUID: 7e1aeab8-4c09-11ea-b242-000c2914182e.

2020-02-10T13:30:24.235679Z 0 [Warning] Gtid table is not ready to be used. Table 'mysql.gtid_executed' cannot be opened.

2020-02-10T13:30:24.577125Z 0 [Warning] CA certificate ca.pem is self signed.

2020-02-10T13:30:24.608491Z 1 [Warning] root@localhost is created with an empty password ! Please consider switching off the --initialize-insecure option.
解决:
此处是因为我的配置文件建立的路径错误,导致初始化出现警告

但是是成功初始化的,因为i我的/etc/my.cnf是存在的,所以只警告

将/etc/my.cnf删除在,建立对的配置文件

注意:将数据库相关目录进行清空在初始化

本案例中包括/data/mysql/data 的文件

                /data/mysql/logs的文件

                /data/mysql/pids的文件
discuz install 192.168.111.141
 wget https://files.gitee.com/group1/M00/0A/98/wKgCNF3jszaAR3zfALQPsgJPd6k089.zip?token=ee59878992389b345910fdafae2c1ad2&ts=1581158202&attname=Discuz_X3.4_SC_UTF8%E3%80%9020191201%E3%80%91.zip&disposition=attachment

建立网址目录

[apps@webone.quan.bbs etc]$cd /usr/local/nginx/html/

[apps@webone.quan.bbs html]$mkdir bbs

解压:

[root@webone.quan.bbs Discuz]$unzip Discuz_X3.4_SC_UTF8【20191201】.zip

将upload目录下的所有文件上传到bbs中

[root@webone.quan.bbs packages]$

cp -r /data/packages/Discuz/upload/* /usr/local/nginx/html/bbs/

修改nginx配置文件:
user  nginx nginx;

worker_processes  1;

#error_log  logs/error.log;

#error_log  logs/error.log  notice;

#error_log  logs/error.log  info;

#pid        logs/nginx.pid;

events {

    worker_connections  1024;

}

http {

    include       mime.types;

    default_type  application/octet-stream;

    #log_format  main  '$remote_addr - $remote_user [$time_local] "$request" '

    #                  '$status $body_bytes_sent "$http_referer" '

    #                  '"$http_user_agent" "$http_x_forwarded_for"';

    #access_log  logs/access.log  main;

    sendfile        on;

    #tcp_nopush     on;

    #keepalive_timeout  0;

    keepalive_timeout  65;

    #gzip  on;

    server {

        listen       80;

        server_name  localhost;

        #charset koi8-r;

        #access_log  logs/host.access.log  main;

        ####修改这里,原来的location 可以不要了

        index  index.html index.htm index.php;

    root        /usr/local/nginx/html/bbs;

        #error_page  404              /404.html;

        # redirect server error pages to the static page /50x.html

        #

        error_page   500 502 503 504  /50x.html;

        location = /50x.html {

            root   html;

        }

        # proxy the PHP scripts to Apache listening on 127.0.0.1:80

        #

        #location ~ \.php$ {

        #    proxy_pass   http://127.0.0.1;

        #}

        # pass the PHP scripts to FastCGI server listening on 127.0.0.1:9000

        #

        location ~ \.php$ {

            fastcgi_pass   127.0.0.1:9000;

            fastcgi_index  index.php;

            ####修改这里

            fastcgi_param  SCRIPT_FILENAME   /usr/local/nginx/html/bbs/$fastcgi_script_name;

            include        fastcgi_params;

        }

        # deny access to .htaccess files, if Apache's document root

        # concurs with nginx's one

        #

        #location ~ /\.ht {

        #    deny  all;

        #}

    }

    # another virtual host using mix of IP-, name-, and port-based configuration

    #

    #server {

    #    listen       8000;

    #    listen       somename:8080;

    #    server_name  somename  alias  another.alias;

    #    location / {

    #        root   html;

    #        index  index.html index.htm;

    #    }

    #}

    # HTTPS server

    #

    #server {

    #    listen       443 ssl;

    #    server_name  localhost;

    #    ssl_certificate      cert.pem;

    #    ssl_certificate_key  cert.key;

    #    ssl_session_cache    shared:SSL:1m;

    #    ssl_session_timeout  5m;

    #    ssl_ciphers  HIGH:!aNULL:!MD5;

    #    ssl_prefer_server_ciphers  on;

    #    location / {

    #        root   html;

    #        index  index.html index.htm;

    #    }

    #}

}
重启生效:
service nginx restart
总体测试
访问http://192.168.111.141/进行可视化安装即可
数据库配置阶段(需结合刚才数据库设置填写)
如下:
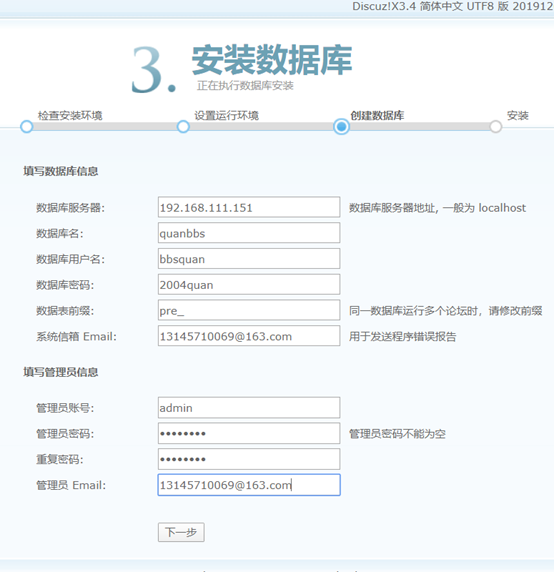
管理密码QQQQ2004
最后成功啦:

毕业设计之LNP+DISCUZ +分离的数据库操作的更多相关文章
- Entity Framework 实体框架的形成之旅--几种数据库操作的代码介绍(9)
本篇主要对常规数据操作的处理和实体框架的处理代码进行对比,以便更容易学习理解实体框架里面,对各种数据库处理技巧,本篇介绍几种数据库操作的代码,包括写入中间表操作.联合中间表获取对象集合.递归操作.设置 ...
- yii2 数据库操作(转)
开始使用数据库首先需要配置数据库连接组件,通过添加 db 组件到应用配置实现("基础的" Web 应用是 config/web.php),DSN( Data Source Name ...
- C#简单构架之EF进行读写分离+多数据库(Mysql/SqlService)
最近因为项目需要,研究了下EF的读写分离,所以做了一个demo进行测试,下面是项目的结构 表现层view 主要提供Web.WebApi等表现层的解决方案 公共层public 主要提供项目公共类库,数据 ...
- ThinkPHP 数据库操作(一) : 连接数据库
ThinkPHP内置了抽象数据库访问层,把不同的数据库操作封装起来,我们只需要使用公共的Db类进行操 作,而无需针对不同的数据库写不同的代码和底层实现,Db类会自动调用相应的数据库驱动来处理.采用 P ...
- yii2 数据库操作详解(转载)
开始使用数据库首先需要配置数据库连接组件,通过添加 db 组件到应用配置实现("基础的" Web 应用是 config/web.php),DSN( Data Source Name ...
- tp数据库操作
1.常见的数据库操作//插入记录// $insert=Db::execute("insert into tp_user (username,password) values ('dome', ...
- 数据库操作语句大全(sql)
一.基础 1.说明:创建数据库CREATE DATABASE database-name 2.说明:删除数据库drop database dbname3.说明:备份sql server--- 创建 备 ...
- thinkphp实现多数据库操作
这篇文章主要介绍了ThinkPHP实现多数据库连接的解决方法,需要的朋友可以参考下 ThinkPHP实现连接多个数据的时候,如果数据库在同一个服务器里的话只需要这样定义模型: ? 1 2 3 cl ...
- Spring学习总结(16)——Spring AOP实现执行数据库操作前根据业务来动态切换数据源
深刻讨论为什么要读写分离? 为了服务器承载更多的用户?提升了网站的响应速度?分摊数据库服务器的压力?就是为了双机热备又不想浪费备份服务器?上面这些回答,我认为都不是错误的,但也都不是完全正确的.「读写 ...
随机推荐
- Beta-功能规格说明书
项目 内容 这个作业属于哪个课程 2021春季软件工程(罗杰 任健) 这个作业的要求在哪里 团队项目-计划-功能规格说明书 一.引言 1. 项目简介 项目团队:删库跑路对不队 项目名称:题士 项目内容 ...
- UltraSoft - Beta - Scrum Meeting 7
Date: May 23rd, 2020. Scrum 情况汇报 进度情况 组员 负责 今日进度 q2l PM.后端 暂无 Liuzh 前端 编写忘记密码界面 Kkkk 前端 暂无 王fuji 前端 ...
- “介绍一下自己吧”——记2020BUAA软工团队介绍和采访
写在前面 项目 内容 这个作业属于哪个课程 2020春季计算机学院软件工程(罗杰 任建) 这个作业的要求在哪里 团队作业-团队介绍和采访 团队介绍 团队名称 我们是 BUAA软软软件工程小队 ,简称 ...
- [软工顶级理解组] 团队任务拆解(Alpha)
一.任务概述 在alpha阶段,我们需要完成功能规格说明书中所提到的所有功能,在一个阶段的开发周期内,交付最小可行的可用版本. 二.任务分配及时长 分组&成员 具体任务 预计时长(小时) 前端 ...
- Github Actions 实践
Github Actions 实践 Github Actions 是 Github 的持续集成服务,通过在 repo 发生特定的行为时执行指定的命令实现自动测试.自动部署等功能. 基本术语 workf ...
- CSP踩被记
本来想起个清新脱俗的标题,但碍于语文功底不行,于是光明正大嫖了LiBoyi的高端创意,把这篇博客命名为踩被记. Day -6 用假暴力把真正解拍没了,伤心.Rp有点低 Day -4 信息学考,\(py ...
- UVA-1498 Activation
UVA-1498 DP应该是肯定的,设 f [ i ] [ j ] 表示现在对中共有 i 人,Tomato在第 j 个,出现所求情况的概率,我们可以很(简单的)艰难的列出下列方程: f[i][1] = ...
- stm32中的串口通信你了解多少
在基础实验成功的基础上,对串口的调试方法进行实践.硬件代码顺利完成之后,对日后调试需要用到的printf重定义进行调试,固定在自己的库函数中. b) 初始化函数定义: void USART_Confi ...
- Verdi UVM Debug Mode 简单使用
转载:Verdi UVM Debug Mode 简单使用_Holden_Liu的博客-CSDN博客 文档与源码: User Guide: UVMDebugUserGuide.pdf in $VERD ...
- ffmpeg第7篇:数据流选择神器-map指令
自动选择规则 ffmpeg在处理视频时,如果只提供了输入和输出参数,ffmpeg会自动地去选择相应的视频流和音频流来合成文件 自动选择的方式根据如下规则: 视频流:选分辨率最高的,比如有两个视频,一个 ...