netty源码解解析(4.0)-11 Channel NIO实现-概览
结构设计
Channel的NIO实现位于io.netty.channel.nio包和io.netty.channel.socket.nio包中,其中io.netty.channel.nio是抽象实现,io.netty.channel.socket.nio最终实现。下面是Channel NIO相关类的派生图:
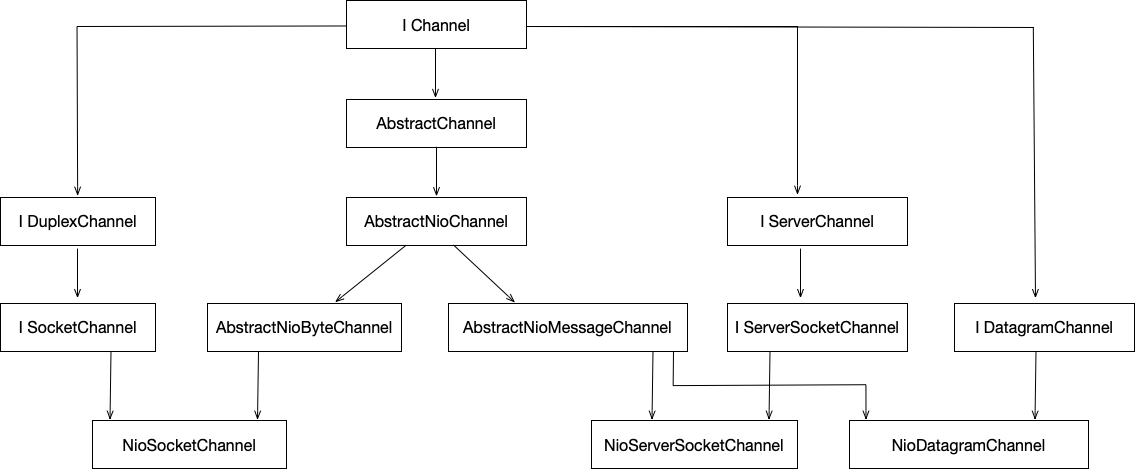
NIO实现最终派生出3个类型NioServerSocketChannel实现了tcp server, NioSocketChannel实现了tcp client, NioDatagramChannel实现了udp socket。
整个NIO实现分为三个层次:
AbstractNioChannel抽象层
对channel进行基本的初始化工作,把channel设置成非阻塞模式。
实现Channel.Unsafe的connect方法框架,提供给了doConnection, doFinishConnect两个抽象方法,把真正的连接操作交给子类实现。
覆盖了AbstractChannel的doRegister,doDeregister方法,正两个方法实现了Channel的selectionKey的注册和注销。
实现AbstractChannel的doClose, 这个方法并没有真正关闭channel动作。
形如doXXX的方法是,AbstractChannel提供的扩展点,在<<netty源码解解析(4.0)-3 Channel的抽象实现>>的末尾,给出了这些扩展点的详细列表。
AbstractNioByteChannel, AbstractNioMessageChannel抽象层
这两个类主要实现read和write的框架,它们的实现大致相同AbstractNioByteChannel读写的是byte array,而AbstractNioMessageChannel读的时候会把byte array转换成结构化的对象,写的时候把结构化对象序列化成byte array。
AbstractNioByteChannel定义了3个抽象方法用来实现真正的读写操作: doReadBytes, doWriteBytes, doWriteFileRegion。
AbstractNioMessageChannel第了两个2个抽象方法用来实现真正的结构化数据类型的读写: doReadMessages, doWriteMessage。
NioServerSocketChannel, NioSocketChannel, NioDatagramChannel最终实现
封装NIO API调用,真正的I/O操操作和socket相关的api调用都在这一层实现。
使用方式
使用过netty的人都知道,netty提供了ServerBootstrap和Bootstrap类帮助用户方便地创建服务器端和客户端应用,但这不是必须的。仅仅使用NioServerSocketChannel, NioSocketChannel, NioDatagramChannel和NioEventLoopGroup就可以用开发tcp的server和client, 及udp应用。
为了能让读者能够更清晰地理解NioEventLoopGroup和Channel直接的关系,下面给出了最原始的使用使用netty框架的代码。
tcp server实现
 import io.netty.buffer.ByteBuf;

 import io.netty.channel.*;

 import io.netty.channel.nio.NioEventLoopGroup;

 import io.netty.channel.socket.nio.NioServerSocketChannel;

 import java.net.InetSocketAddress;

 import java.nio.charset.Charset;

 public class TcpServer {

     private NioEventLoopGroup group = new NioEventLoopGroup();

     public static void main(String[] argc){

         TcpServer server = new TcpServer();

         server.start();

         while(true){

             try{

                 Thread.sleep(1000);

             }catch (Exception e){

                 break;

             }

         }

         server.stop();

     }

     public void start(){

         NioServerSocketChannel server = new NioServerSocketChannel();

         ChannelPipeline pipleline = server.pipeline();

         pipleline.addFirst(new ServerHandler());

         group.register(server).addListener(new ChannelFutureListener() {

             @Override

             public void operationComplete(ChannelFuture future) throws Exception {

                 server.bind(new InetSocketAddress(9001));

                 System.out.println("server listen add:"+9001);

             }

         });

     }

     public void stop(){

         group.shutdownGracefully();

     }

     private class ServerHandler extends ChannelInboundHandlerAdapter{

         @Override

         public void channelRead(ChannelHandlerContext ctx, Object msg) throws Exception{

             Channel child = (Channel)msg;

             child.pipeline().addLast(new ChildHandler());

             group.register(child);

         }

     }

     private class ChildHandler extends ChannelInboundHandlerAdapter{

         @Override

         public void channelActive(ChannelHandlerContext ctx) throws Exception {

             System.out.println("connected");

         }

         @Override

         public void channelInactive(ChannelHandlerContext ctx) throws Exception {

             System.out.println("closed");

         }

         @Override

         public void channelRead(ChannelHandlerContext ctx, Object msg) throws Exception{

             Channel chnl = ctx.channel();

             ByteBuf data = (ByteBuf)msg;

             System.out.println("recv: "+data.toString(Charset.forName("utf-8")));

             chnl.write(msg);

         }

         @Override

         public void channelReadComplete(ChannelHandlerContext ctx) throws Exception {

             ctx.channel().flush();

         }

     }

 }
一个channel创建之后,首先要做的事就是向pipleline中添加handler,然后才是把它注册到NioEventLoopGroup中(第31,33行)。这个顺序不能错,否则,handler的handlerAdded,channelRegistered和channelActive将不会被调用。当NioServerSocketChannel收到一个连接时,ServerHandler的的channelRead方法将会被调用,的新建好的连接当成参数传递进来,第49-53行是对新连接的初始化代码。
tcp client实现
import io.netty.buffer.ByteBuf;

import io.netty.channel.*;

import io.netty.channel.nio.NioEventLoopGroup;

import io.netty.channel.socket.nio.NioSocketChannel;

import java.net.InetSocketAddress;

import java.nio.charset.Charset;

public class TcpClient {

    public static void main(String[] args){

        NioEventLoopGroup group = new NioEventLoopGroup();

        NioSocketChannel client = new NioSocketChannel();

        client.pipeline().addLast(new ClientInboundHandler());

        group.register(client);

        client.connect(new InetSocketAddress(9001));

        try{

            Thread.sleep(3000);

        }catch (Exception e){

        }

        group.shutdownGracefully();

    }

    private static class ClientInboundHandler extends ChannelInboundHandlerAdapter{

        @Override

        public void channelActive(ChannelHandlerContext ctx) throws Exception {

            System.out.println("connected");

            Channel chnl = ctx.channel();

            ByteBuf buf = chnl.alloc().buffer();

            buf.writeBytes( "this is test".getBytes());

            chnl.writeAndFlush(buf);

        }

        @Override

        public void channelInactive(ChannelHandlerContext ctx) throws Exception {

            System.out.println("closed");

        }

        @Override

        public void channelRead(ChannelHandlerContext ctx, Object msg) throws Exception{

            ByteBuf data = (ByteBuf)msg;

            System.out.println("recv: "+data.toString(Charset.forName("utf-8")));

            ctx.channel().close();

        }

    }

}
client的实现比server实现相对简单,添加handler,register顺序和server一致。只有把一个channel注册到gruop中之后才能调用它的方法,应为channel的大多数方法都需要通过pipleline调用,而pipleline需要在eventLoop中执行。
udp没有server和client的区别,这里为了使代码更加清晰,把server和client代码区分开来。
udp server
import io.netty.buffer.ByteBuf;

import io.netty.channel.*;

import io.netty.channel.nio.NioEventLoopGroup;

import io.netty.channel.socket.DatagramPacket;

import io.netty.channel.socket.nio.NioDatagramChannel;

import java.net.InetSocketAddress;

import java.nio.charset.Charset;

public class UdpServer {

    public static void main(String[] args){

        NioEventLoopGroup group = new NioEventLoopGroup();

        NioDatagramChannel chnl = new NioDatagramChannel();

        chnl.pipeline().addLast(new UdpHandler());

        group.register(chnl).addListener(new ChannelFutureListener() {

            @Override

            public void operationComplete(ChannelFuture future) throws Exception {

                chnl.bind(new InetSocketAddress(9002));

                System.out.println("udp bind at:"+9002);

            }

        });

        while(true){

            try{

                Thread.sleep(1000);

            }catch (Exception e){

                break;

            }

        }

        group.shutdownGracefully();

    }

    private static class UdpHandler extends ChannelInboundHandlerAdapter {

        @Override

        public void channelActive(ChannelHandlerContext ctx) throws Exception {

            System.out.print("udp channel active");

        }

        @Override

        public void channelRead(ChannelHandlerContext ctx, Object msg) throws Exception{

            Channel chnl = ctx.channel();

            DatagramPacket pkg = (DatagramPacket)msg;

            ByteBuf content = pkg.content();

            InetSocketAddress from = pkg.sender();

            System.out.println("recv: "+content.toString(Charset.forName("utf-8"))+" from:"+from.toString());

            pkg = new DatagramPacket(content, from);

            chnl.write(pkg);

        }

        @Override

        public void channelReadComplete(ChannelHandlerContext ctx) throws Exception {

            ctx.channel().flush();

        }

    }

}
udp client
import io.netty.buffer.ByteBuf;

import io.netty.channel.*;

import io.netty.channel.nio.NioEventLoopGroup;

import io.netty.channel.socket.DatagramPacket;

import io.netty.channel.socket.nio.NioDatagramChannel;

import java.net.InetSocketAddress;

import java.nio.charset.Charset;

public class UdpClient {

    public static void main(String[] args){

        NioEventLoopGroup group = new NioEventLoopGroup();

        NioDatagramChannel chnl = new NioDatagramChannel();

        chnl.pipeline().addLast(new UdpHandler());

        group.register(chnl).addListener(new ChannelFutureListener() {

            @Override

            public void operationComplete(ChannelFuture future) throws Exception {

                chnl.bind(new InetSocketAddress(0));

            }

        });

        try{

            Thread.sleep(3000);

        }catch (Exception e){

        }

        group.shutdownGracefully();

    }

    private static class UdpHandler extends ChannelInboundHandlerAdapter {

        @Override

        public void channelActive(ChannelHandlerContext ctx) throws Exception {

            System.out.print("udp channel active");

            Channel chnl = ctx.channel();

            ByteBuf content = chnl.alloc().buffer();

            content.writeBytes("udp message".getBytes());

            chnl.writeAndFlush(new DatagramPacket(content, new InetSocketAddress("127.0.0.1", 9002)));

            System.out.println("send message");

        }

        @Override

        public void channelRead(ChannelHandlerContext ctx, Object msg) throws Exception{

            DatagramPacket pkg = (DatagramPacket)msg;

            ByteBuf content = pkg.content();

            InetSocketAddress from = pkg.sender();

            System.out.println("recv: "+content.toString(Charset.forName("utf-8"))+" from:"+from.toString());

        }

    }

}
NioDatagramChannel和NioSocketChannel的初始化过程大致相同。它们的不同点是,NioSocketChannel在connect之后处于active状态,NioDatagramChannel是在bind之后处于才处于active状态。
netty源码解解析(4.0)-11 Channel NIO实现-概览的更多相关文章
- netty源码解解析(4.0)-14 Channel NIO实现:读取数据
本章分析Nio Channel的数据读取功能的实现. Channel读取数据需要Channel和ChannelHandler配合使用,netty设计数据读取功能包括三个要素:Channel, Eve ...
- netty源码解解析(4.0)-12 Channel NIO实现:channel初始化
创建一个channel实例,并把它register到eventLoopGroup中之后,这个channel然后处于inactive状态,仍然是不可用的.只有在bind或connect方法调用成功之后才 ...
- netty源码解解析(4.0)-15 Channel NIO实现:写数据
写数据是NIO Channel实现的另一个比较复杂的功能.每一个channel都有一个outboundBuffer,这是一个输出缓冲区.当调用channel的write方法写数据时,这个数据被一系列C ...
- netty源码解解析(4.0)-13 Channel NIO实现: 关闭和清理
Channel提供了3个方法用来实现关闭清理功能:disconnect,close,deregister.本章重点分析这个3个方法的功能的NIO实现. disconnect实现: 断开连接 disco ...
- netty源码解解析(4.0)-3 Channel的抽象实现
AbstractChannel和AbstractUnsafe抽象类 io.netty.channel.AbstractChannel 从本章开始,会有大量的篇幅涉及到代码分析.为了能够清晰简洁的地说明 ...
- netty源码解解析(4.0)-17 ChannelHandler: IdleStateHandler实现
io.netty.handler.timeout.IdleStateHandler功能是监测Channel上read, write或者这两者的空闲状态.当Channel超过了指定的空闲时间时,这个Ha ...
- netty源码解解析(4.0)-18 ChannelHandler: codec--编解码框架
编解码框架和一些常用的实现位于io.netty.handler.codec包中. 编解码框架包含两部分:Byte流和特定类型数据之间的编解码,也叫序列化和反序列化.不类型数据之间的转换. 下图是编解码 ...
- netty源码解解析(4.0)-10 ChannelPipleline的默认实现--事件传递及处理
事件触发.传递.处理是DefaultChannelPipleline实现的另一个核心能力.在前面在章节中粗略地讲过了事件的处理流程,本章将会详细地分析其中的所有关键细节.这些关键点包括: 事件触发接口 ...
- netty源码解解析(4.0)-20 ChannelHandler: 自己实现一个自定义协议的服务器和客户端
本章不会直接分析Netty源码,而是通过使用Netty的能力实现一个自定义协议的服务器和客户端.通过这样的实践,可以更深刻地理解Netty的相关代码,同时可以了解,在设计实现自定义协议的过程中需要解决 ...
随机推荐
- 分布式锁三种实现方式(DB,redis,zookeeper)比较
先贴出看到的一篇博客,后续补充自己总结分析的. https://blog.csdn.net/u010963948/article/details/79006572
- IoGetRelatedDeviceObject学习
PDEVICE_OBJECT IoGetRelatedDeviceObject( IN PFILE_OBJECT FileObject ) /*++ Routine Description: This ...
- vue中的import、export、requre的区别
在es6之前js一直没有自己的模块语法,为了解决这种尴尬就有了require.js的出现.在es6发布之后js又引入了import的概念使得不清楚两者之间的区别的同学在实际使用过程中造成了自己的误解, ...
- javascript Date对象扩展相关function
本篇均以es5为主: 1,月份加减来推日期 // 根据所给月份往后推出日期 function getMonth(count) { var date = new Date(); var year = d ...
- myeclipse 自动部署web项目(自动编译)
打开自动编译:project->build automatically; 注:以下两种方法适用tomcat配置在myeclipse中的情况. 1.如果在myeclipse中tomcat是以deb ...
- poj 3087 Shuffle'm Up (模拟过程)
Description A common pastime for poker players at a poker table is to shuffle stacks of chips. Shuff ...
- C++顺序容器之list初探
C++顺序容器之list初探 双向链表,支持双向顺序访问.在list中任何位置进行插入和删除速度都很快. list不支持随机访问,为了访问一个元素,必须遍历整个容器. #include<iost ...
- 通过HPS控制FPGA的GPIO
1.学习目的 本例程主要是让 SoC FPGA 初学者了解 HPS/ARM 如何跟 FPGA 交互.“My First HPS-FPGA”工程演示了实现方法的细节.这个工程包括 Quartus II ...
- WPF触发器(Trigger) - DataTrigger
官方文档中对DataTrigger的介绍 Represents a trigger that applies property values or performs actions when the ...
- Javascript高级编程学习笔记(7)—— 函数
前几天有事耽搁了,今天继续更新 今天的主要内容是JS中的函数 这一篇主要讲函数的定义等内容,至于变量提升.执行环境.闭包.内存回收等内容在后面讲,高玩们可以不用看下面的正文了. 函数 首先来讲,函数对 ...