spark streaming之三 rdd,job的动态生成以及动态调度
前面一篇讲到了,DAG静态模板的生成。那么spark streaming会在每一个batch时间一到,就会根据DAG所形成的逻辑以及物理依赖链(dependencies)动态生成RDD以及由这些RDD组成的job,并形成一个job集合提交到集群当中执行。那么下面我们具体分析这三个步骤。
首先从JobScheduler讲起。在本节所需要了解的是JobScheduler的两个重要对象。jobExecutor与JobHandler。jobExecutor是一个名为streaming-job-executor的线程池,JobHandler是一个继承自Runnable的线程类。提交过来的JOB将提交到到这里执行。
private val jobExecutor =

    ThreadUtils.newDaemonFixedThreadPool(numConcurrentJobs, "streaming-job-executor")
 private class JobHandler(job: Job) extends Runnable with Logging {

    import JobScheduler._

    def run() {

      val oldProps = ssc.sparkContext.getLocalProperties

      try {

        ssc.sparkContext.setLocalProperties(SerializationUtils.clone(ssc.savedProperties.get()))

        val formattedTime = UIUtils.formatBatchTime(

          job.time.milliseconds, ssc.graph.batchDuration.milliseconds, showYYYYMMSS = false)

        val batchUrl = s"/streaming/batch/?id=${job.time.milliseconds}"

        val batchLinkText = s"[output operation ${job.outputOpId}, batch time ${formattedTime}]"

        ssc.sc.setJobDescription(

          s"""Streaming job from <a href="$batchUrl">$batchLinkText</a>""")

        ssc.sc.setLocalProperty(BATCH_TIME_PROPERTY_KEY, job.time.milliseconds.toString)

        ssc.sc.setLocalProperty(OUTPUT_OP_ID_PROPERTY_KEY, job.outputOpId.toString)

        // Checkpoint all RDDs marked for checkpointing to ensure their lineages are

        // truncated periodically. Otherwise, we may run into stack overflows (SPARK-6847).

        ssc.sparkContext.setLocalProperty(RDD.CHECKPOINT_ALL_MARKED_ANCESTORS, "true")

        // We need to assign `eventLoop` to a temp variable. Otherwise, because

        // `JobScheduler.stop(false)` may set `eventLoop` to null when this method is running, then

        // it's possible that when `post` is called, `eventLoop` happens to null.

        var _eventLoop = eventLoop

        if (_eventLoop != null) {

          _eventLoop.post(JobStarted(job, clock.getTimeMillis()))

          // Disable checks for existing output directories in jobs launched by the streaming

          // scheduler, since we may need to write output to an existing directory during checkpoint

          // recovery; see SPARK-4835 for more details.

          PairRDDFunctions.disableOutputSpecValidation.withValue(true) {

            job.run()

          }

          _eventLoop = eventLoop

          if (_eventLoop != null) {

            _eventLoop.post(JobCompleted(job, clock.getTimeMillis()))

          }

        } else {

          // JobScheduler has been stopped.

        }

      } finally {

        ssc.sparkContext.setLocalProperties(oldProps)

      }

    }

  }

}
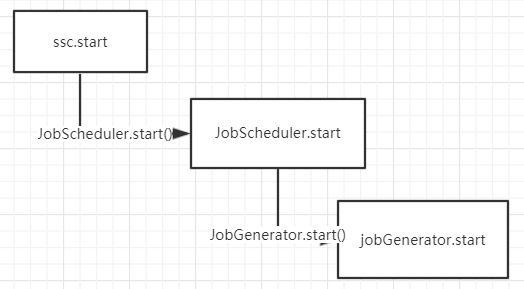
另外两个需要了解的对象,jobGenerator以及receiverTracker。jobGenerator负责job的动态生成,receiverTracker负责数据源的接收以及接收以后的transformation,以及根据这些转换形成DAG模板。随着JobScheduler启动的时候,jobGenerator以及receiverTracker也将启动。
 def start(): Unit = synchronized {

    if (eventLoop != null) return // scheduler has already been started

    logDebug("Starting JobScheduler")

    eventLoop = new EventLoop[JobSchedulerEvent]("JobScheduler") {

      override protected def onReceive(event: JobSchedulerEvent): Unit = processEvent(event)

      override protected def onError(e: Throwable): Unit = reportError("Error in job scheduler", e)

    }

    eventLoop.start()

    // attach rate controllers of input streams to receive batch completion updates

    for {

      inputDStream <- ssc.graph.getInputStreams

      rateController <- inputDStream.rateController

    } ssc.addStreamingListener(rateController)

    listenerBus.start()

    receiverTracker = new ReceiverTracker(ssc)

    inputInfoTracker = new InputInfoTracker(ssc)

    val executorAllocClient: ExecutorAllocationClient = ssc.sparkContext.schedulerBackend match {

      case b: ExecutorAllocationClient => b.asInstanceOf[ExecutorAllocationClient]

      case _ => null

    }

    executorAllocationManager = ExecutorAllocationManager.createIfEnabled(

      executorAllocClient,

      receiverTracker,

      ssc.conf,

      ssc.graph.batchDuration.milliseconds,

      clock)

    executorAllocationManager.foreach(ssc.addStreamingListener)

    receiverTracker.start()//

    jobGenerator.start()//

    executorAllocationManager.foreach(_.start())

    logInfo("Started JobScheduler")

  }
JobGenerator 启动
本节先按下 receiverTracker不表。先说jobGenerator。我们首先来看看它的start函数。首先启动一个待命的线程。然后根据上次的spark streaming任务是否执行了checkpoint来决定是执行restart()还是startFirstTime()。
/** Start generation of jobs */

  def start(): Unit = synchronized {

    ......

    eventLoop.start()

    if (ssc.isCheckpointPresent) {

      restart()

    } else {

      startFirstTime()

    }

  }
因为只为弄清流程原理,我们只看第一次启动的情况。
 /** Starts the generator for the first time */

  private def startFirstTime() {

    val startTime = new Time(timer.getStartTime())

    graph.start(startTime - graph.batchDuration)

    timer.start(startTime.milliseconds)

    logInfo("Started JobGenerator at " + startTime)

  }
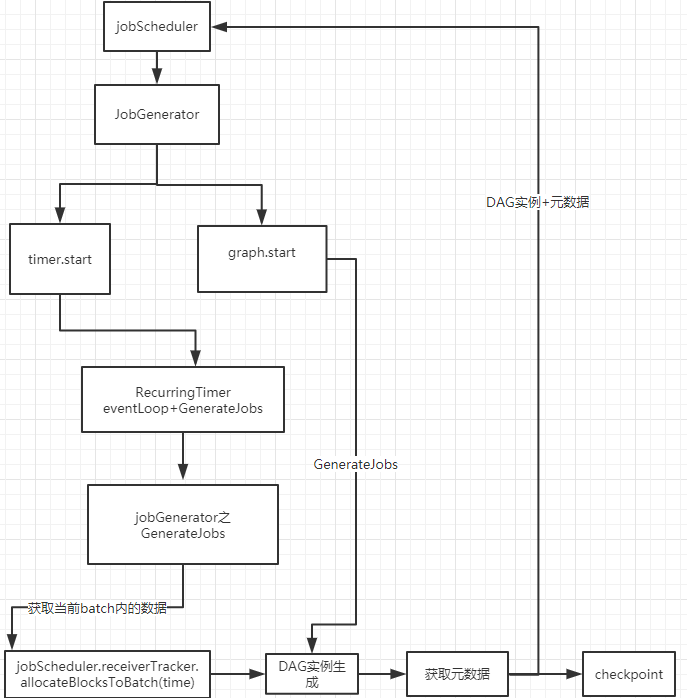
首先graph.start(startTime - graph.batchDuration)传递一个时间参数给DStreamGraph,告知其batch启动时间,并初始化相关参数。然后启动定时器。
RecurringTimer
代码如下
private val timer = new RecurringTimer(clock, ssc.graph.batchDuration.milliseconds,

    longTime => eventLoop.post(GenerateJobs(new Time(longTime))), "JobGenerator")
其实就是往eventLoop线程里加入GenerateJobs。即定时根据DAG模板生成当前batch的DAG实例。注意这里是jobGenerator的GenerateJobs。
jobGenerator之GenerateJobs
/** Generate jobs and perform checkpointing for the given `time`. */
private def generateJobs(time: Time) {

  SparkEnv.set(ssc.env)

  Try {

    jobScheduler.receiverTracker.allocateBlocksToBatch(time)

    graph.generateJobs(time)

  } match {

    case Success(jobs) =>

      val streamIdToInputInfos = jobScheduler.inputInfoTracker.getInfo(time)

      jobScheduler.submitJobSet(JobSet(time, jobs, streamIdToInputInfos))

    case Failure(e) =>

      jobScheduler.reportError("Error generating jobs for time " + time, e)

  }

  eventLoop.post(DoCheckpoint(time, clearCheckpointDataLater = false))

}
它做了五件事情。
首先,通知jobScheduler获取当前batch需要处理的数据。
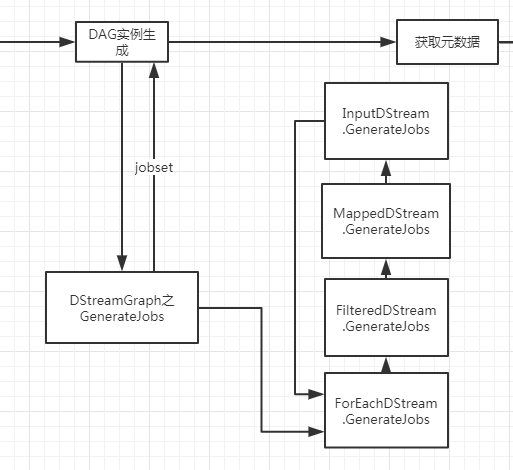
然后调用DStreamGraph的GenerateJobs函数真正去执行操作。
第三,将第一步获取到的数据保存在inputInfoTracker中。这部份被称之为元数据。什么叫元数据,就是最开始没有经过各种转换的数据。
第四,将生成的RDD实例以及元数据一同提交给jobScheduler。这部份是提交到jobExecutor这个线程池里异步执行的。
再然后后将一个checkpoint任务异步交给eventLoop去执行。
InputinfoTracker
可能有人会发现上面的表述中,第一和第三步有点雷同。但其实它们是不一样的。
我们追踪jobScheduler.receiverTracker.allocateBlocksToBatch(time)最终得到的数据结构为:
private[streaming] case class ReceivedBlockInfo(
streamId: Int,
numRecords: Option[Long],
metadataOption: Option[Any],
blockStoreResult: ReceivedBlockStoreResult
)
jobScheduler.inputInfoTracker.getInfo(time)最终得到的数据结构为:
case class StreamInputInfo(

    inputStreamId: Int, numRecords: Long, metadata: Map[String, Any] = Map.empty) {

  require(numRecords >= 0, "numRecords must not be negative")

  def metadataDescription: Option[String] =

    metadata.get(StreamInputInfo.METADATA_KEY_DESCRIPTION).map(_.toString)

}
对比发现,两种数据结构都有streamId(inputStreamId),numRecords,metadataOption,区别在于blockStoreResult。而且第三步获取到的元数据有句注释:Map to track all the InputInfo related to specific batch time and input stream。意为跟踪所有输入流信息和处理记录号的跟踪器。
// Map to track all the InputInfo related to specific batch time and input stream.

private val batchTimeToInputInfos =

new mutable.HashMap[Time, mutable.HashMap[Int, StreamInputInfo]]
InputInfoTracker的注释是This class manages all the input streams as well as their input data statistics. The information will be exposed through StreamingListener for monitoring.还有,StreamInputInfo注解为@DeveloperAPI。
我的理解是第一步所做的是获取到数据。第三步所做的是给这些数据加上属性,提供给开发者查询展示监控。
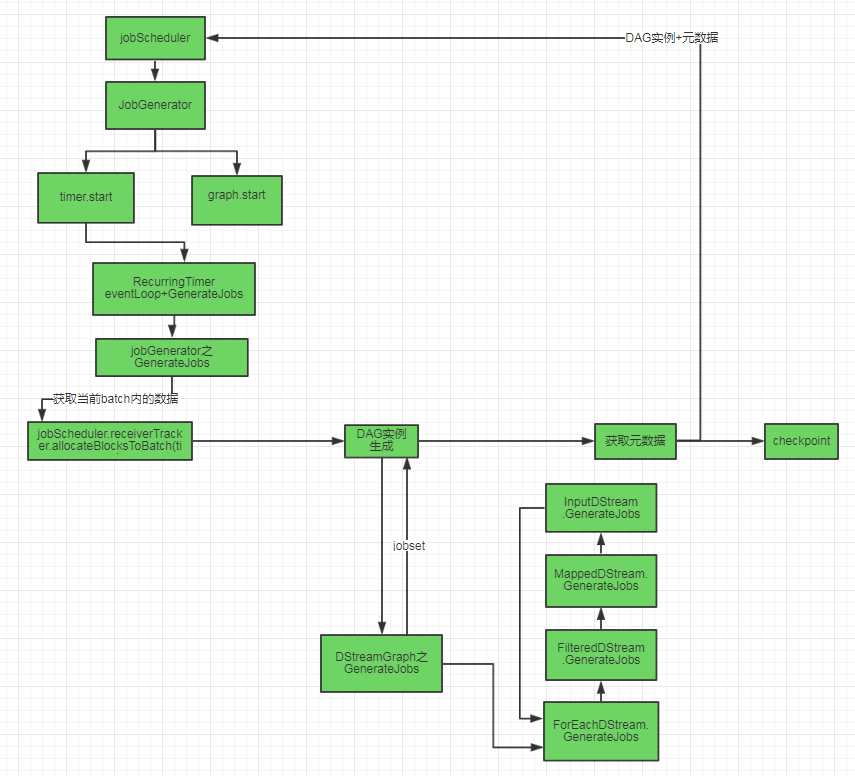
到目前为止,我们分析了动态调度的流程,整个流程如图:
DAG实例生成
上面仅仅是分析了动态调度的问题,而DAG实例究竟是怎样生成的?
总结
到这里为止,我们根据DAG模板拿到了DAG实例,以及数据。那么接下来,会根据DAGScheduler划分task,stage。
spark streaming之三 rdd,job的动态生成以及动态调度的更多相关文章
- Spark streaming技术内幕6 : Job动态生成原理与源码解析
原创文章,转载请注明:转载自 周岳飞博客(http://www.cnblogs.com/zhouyf/) Spark streaming 程序的运行过程是将DStream的操作转化成RDD的操作,S ...
- Spark Streaming中空RDD处理及流处理程序优雅的停止
本期内容 : Spark Streaming中的空RDD处理 Spark Streaming程序的停止 由于Spark Streaming的每个BatchDuration都会不断的产生RDD,空RDD ...
- Spark Streaming之三:DStream解析
DStream 1.1基本说明 1.1.1 Duration Spark Streaming的时间类型,单位是毫秒: 生成方式如下: 1)new Duration(milli seconds) 输入毫 ...
- Spark Streaming源码解读之Receiver生成全生命周期彻底研究和思考
本期内容 : Receiver启动的方式设想 Receiver启动源码彻底分析 多个输入源输入启动,Receiver启动失败,只要我们的集群存在就希望Receiver启动成功,运行过程中基于每个Tea ...
- IDEA Spark Streaming 操作(RDD队列流)
import org.apache.spark.SparkConf import org.apache.spark.rdd.RDD import org.apache.spark.streaming. ...
- 解读Spark Streaming RDD的全生命周期
本节主要内容: 一.DStream与RDD关系的彻底的研究 二.StreamingRDD的生成彻底研究 Spark Streaming RDD思考三个关键的问题: RDD本身是基本对象,根据一定时间定 ...
- Spark Streaming 实现思路与模块概述
一.基于 Spark 做 Spark Streaming 的思路 Spark Streaming 与 Spark Core 的关系可以用下面的经典部件图来表述: 在本节,我们先探讨一下基于 Spark ...
- 大数据技术之_19_Spark学习_04_Spark Streaming 应用解析 + Spark Streaming 概述、运行、解析 + DStream 的输入、转换、输出 + 优化
第1章 Spark Streaming 概述1.1 什么是 Spark Streaming1.2 为什么要学习 Spark Streaming1.3 Spark 与 Storm 的对比第2章 运行 S ...
- 2.Spark Streaming运行机制和架构
1 解密Spark Streaming运行机制 上节课我们谈到了技术界的寻龙点穴.这就像过去的风水一样,每个领域都有自己的龙脉,Spark就是龙脉之所在,它的龙穴或者关键点就是SparkStreami ...
随机推荐
- 小妖精的完美游戏教室——人工智能,A*算法,引言
今天也要直播魔法,求科学的! 欢迎来到小妖精Balous的完美游戏教室! 经过前两周的学习,相信米娜桑已经对状态机有所了解了呢~虽然状态机能够实现几乎所有的人工智能,但是,在实践中,你们有没有发现,自 ...
- php 获得汇率(解析页面内容获得指定数据)
首先贴出原文链接:https://jingyan.baidu.com/article/922554465bf115851748f45f.html 方法如下: function getRate($fro ...
- 创建java类并实例化类对象
创建java类并实例化类对象例一1.面向对象的编程关注于类的设计2.设计类实际上就是设计类的成员3.基本的类的成员,属性(成员变量)&方法 面向对象思想的落地法则一:1.设计类,并设计类的成员 ...
- 汉语言处理工具pyhanlp的简繁转换
繁简转换 HanLP几乎实现了所有我们需要的繁简转换方式,并且已经封装到了HanLP中,使得我们可以轻松的使用,而分词器中已经默认支持多种繁简格式或者混合.这里我们不再做过多描述. 说明: ·Ha ...
- Hanlp汉字转拼音使用python调用详解
1.hanlp简介 HanLP是一系列模型与算法组成的NLP工具包,由大快搜索主导并完全开源,目标是普及自然语言处理在生产环境中的应用.HanLP具备功能完善.性能高效.架构清晰.语料时新.可自定义的 ...
- 使用Intellij搭建Servlet开发环境
https://blog.csdn.net/yhao2014/article/details/45740111 使用Tomcat 9时,必须使用jre 1.8,否则会出现Unable to ping ...
- VUE 进行微信支付,解决 微信支付URL未注册
使用history方式 比较坑吧就不吐槽了,说下实现方式 需要解决问题: 1.因为我的微信支付授权路由是:m.xxxx.com,this.$router.push('xxx')之后经常出现 [微信支付 ...
- <Numerical Analysis>(by Timothy Sauer) Notes
2ed, by Timothy Sauer DEFINITION 1.3A solution is correct within p decimal places if the error is l ...
- jsp 进度条
<html> <head> <title>进度条</title> <style type="text/css"> ...
- Scrapy实战篇(二)之爬取链家网成交房源数据(下)
在上一小节中,我们已经提取到了房源的具体信息,这一节中,我们主要是对提取到的数据进行后续的处理,以及进行相关的设置. 数据处理 我们这里以把数据存储到mongo数据库为例.编写pipelines.py ...