快速搭建ssm框架
快速搭建SSM框架
因为最近有很多朋友问我自己的项目搭建的不够完善,并且经常出现一些小问题,那么今天我又整理了一下文档教大家如何快速搭建SSM框架我是用 eclipse搭建的,如果想用idear的话我过段时间再出一个
第一步:创建web项目

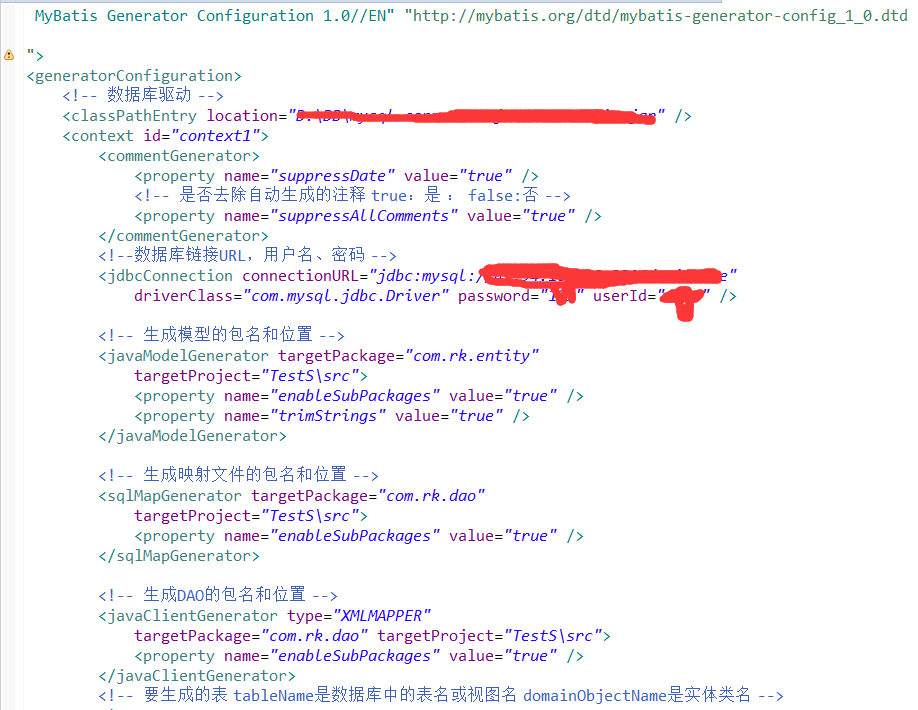
第二步:使用小黑鸟工具生成实体类,mapper接口,以及mapper.xml 不需要接口实现类(需要装插件)

第三步:创建service接口,创建service接口实现类,在类上添加@Service(需要提前引入SSM所需lib架包)


然后:调用***mapper dao 并且需要添加@注解共有两种 1:@Autowried 2:@Resource 一种按类型一种按名称

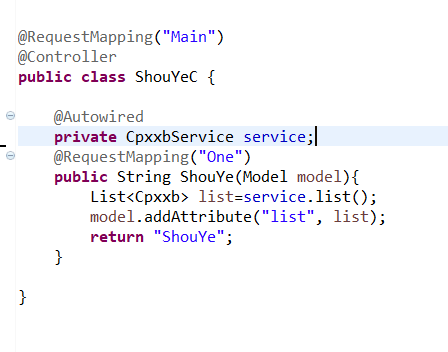
第四步:创建controller 类名上添加@Controller注解 声明这个是个控制器可以根据需求加@RequestMapping
第五步:添加配置文件 applicationContext database.propert mybatis-config springmvc-servlet
给大家附上我的配置文件,可能每个人和每个人的都不一样仅供参考哦
applicationContext.xml内容
 <?xml version="1.0" encoding="UTF-8"?>

 <beans xmlns="http://www.springframework.org/schema/beans"

     xmlns:xsi="http://www.w3.org/2001/XMLSchema-instance"

     xmlns:context="http://www.springframework.org/schema/context"

     xmlns:aop="http://www.springframework.org/schema/aop"

     xmlns:tx="http://www.springframework.org/schema/tx"

     xsi:schemaLocation="http://www.springframework.org/schema/beans

     http://www.springframework.org/schema/beans/spring-beans-3.0.xsd

     http://www.springframework.org/schema/aop

     http://www.springframework.org/schema/aop/spring-aop-3.0.xsd

     http://www.springframework.org/schema/tx

     http://www.springframework.org/schema/tx/spring-tx-3.1.xsd

     http://www.springframework.org/schema/context

     http://www.springframework.org/schema/context/spring-context-3.2.xsd">

      <!-- 开启自动扫包 -->

     <context:component-scan base-package="com.mai.dao,com.mai.Service" />

      <!-- 读取数据库配置文件 -->

     <context:property-placeholder location="classpath:database.properties"/>

     <!-- JNDI获取数据源(使用dbcp连接池) -->

     <bean id="dataSource" class="org.apache.commons.dbcp.BasicDataSource" destroy-method="close" scope="singleton">

             <property name="driverClassName" value="${driver}" />

             <property name="url" value="${url}" />

             <property name="username" value="${name}" />

             <property name="password" value="${pwd}" />

     </bean>

     <bean id="sqlSessionFactory" class="org.mybatis.spring.SqlSessionFactoryBean">

        <property name="dataSource" ref="dataSource"></property>

        <property name="configLocation" value="classpath:mybatis-config.xml"></property>

     </bean>

     <!-- 自动扫描所有的Mapper接口与文件 -->

     <bean class="org.mybatis.spring.mapper.MapperScannerConfigurer">

         <property name="basePackage" value="com.mai.dao"></property>

     </bean>

     <!-- 配置事务管理器 -->

     <bean id="txManager"

         class="org.springframework.jdbc.datasource.DataSourceTransactionManager">

         <property name="dataSource" ref="dataSource"></property>

     </bean>

     <!-- 定义个通知,指定事务管理器 -->

     <tx:advice id="txAdvice" transaction-manager="txManager">

         <tx:attributes>

             <tx:method name="delete*" propagation="REQUIRED" />

             <tx:method name="add*" propagation="REQUIRED" />

             <tx:method name="update*" propagation="REQUIRED" />

             <tx:method name="get*" propagation="SUPPORTS" read-only="true"/>

             <tx:method name="*" propagation="SUPPORTS" />

         </tx:attributes>

     </tx:advice>

     <aop:config>

         <!-- 配置一个切入点 -->

         <aop:pointcut id="serviceMethods" expression="execution(* com.mai.Service..*(..))" />

         <aop:advisor advice-ref="txAdvice" pointcut-ref="serviceMethods" />

     </aop:config>

 </beans>
mybatis-config.xmlneirong
<?xml version="1.0" encoding="UTF-8"?>

    <!DOCTYPE configuration

        PUBLIC "-//mybatis.org//DTD Config 3.0//EN"

        "http://mybatis.org/dtd/mybatis-3-config.dtd">

<configuration>

      <settings>

          <!-- changes from the defaults -->

          <setting name="lazyLoadingEnabled" value="false" />

      </settings>

     <typeAliases>

         <!--这里给实体类取别名,方便在mapper配置文件中使用-->

         <package name="com.mai.entity"/>

     </typeAliases>

</configuration>
springmvc-servlet.xml的内容
<?xml version="1.0" encoding="UTF-8"?>

<beans xmlns="http://www.springframework.org/schema/beans"

    xmlns:xsi="http://www.w3.org/2001/XMLSchema-instance"

    xmlns:mvc="http://www.springframework.org/schema/mvc"

    xmlns:p="http://www.springframework.org/schema/p"

    xmlns:context="http://www.springframework.org/schema/context"

    xsi:schemaLocation="

        http://www.springframework.org/schema/beans

        http://www.springframework.org/schema/beans/spring-beans.xsd

        http://www.springframework.org/schema/context

        http://www.springframework.org/schema/context/spring-context.xsd

        http://www.springframework.org/schema/mvc

        http://www.springframework.org/schema/mvc/spring-mvc.xsd">

    <context:component-scan base-package="com.mai.controller"/>

    <mvc:annotation-driven conversion-service="myConvertService">

        <mvc:message-converters>

            <bean class="org.springframework.http.converter.StringHttpMessageConverter">

                <property name="supportedMediaTypes">

                    <list>

                        <value>application/json;charset=UTF-8</value>

                    </list>

                </property>

            </bean>

            <bean class="com.alibaba.fastjson.support.spring.FastJsonHttpMessageConverter">

                <property name="supportedMediaTypes">

                    <list>

                        <value>text/html;charset=UTF-8</value>

                        <value>application/json</value>

                    </list>

                </property>

                <property name="features">

                    <list>

                     <!--   Date的日期转换器 -->

                      <value>WriteDateUseDateFormat</value>

                    </list>

                </property>

            </bean>

        </mvc:message-converters>

    </mvc:annotation-driven>

    </bean>

    <mvc:resources mapping="/statics/**" location="/statics/" />

    <!-- 完成视图的对应 -->

    <!-- 对转向页面的路径解析。prefix:前缀, suffix:后缀 -->

    <bean class="org.springframework.web.servlet.view.ContentNegotiatingViewResolver">

      <property name="favorParameter" value="true"></property>

      <property name="mediaTypes">

         <map>

            <entry key="html" value="text/html;charset=UTF-8"></entry>

            <entry key="json" value="application/json;charset=UTF-8"></entry>

         </map>

       </property>

       <property name="viewResolvers">

         <list>

           <bean class="org.springframework.web.servlet.view.InternalResourceViewResolver" >

            <property name="prefix" value="/WEB-INF/jsp/"/>

             <property name="suffix" value=".jsp"/>

          </bean>

         </list>

       </property>

    </bean>

    <!-- 配置MultipartResolver,用于上传文件,使用spring的CommonsMultipartResolver -->

    <bean id="multipartResolver" class="org.springframework.web.multipart.commons.CommonsMultipartResolver">

            <property name="maxUploadSize" value="5000000"/>

            <property name="defaultEncoding" value="UTF-8"/>

    </bean>

</beans>
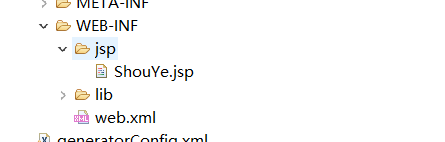
第六步:配置完成后在web-inf 下创建一个jsp文件夹 里面放我们的jsp页面
配置web.xml 告诉tomcat我们先扫描那个再扫描哪个 编码集什么的
第七部:web.xml内容
<?xml version="1.0" encoding="UTF-8"?>

<web-app xmlns:xsi="http://www.w3.org/2001/XMLSchema-instance" xmlns="http://java.sun.com/xml/ns/javaee" xsi:schemaLocation="http://java.sun.com/xml/ns/javaee http://java.sun.com/xml/ns/javaee/web-app_3_0.xsd" version="3.0">

  <display-name>TestS</display-name>

  <context-param>

  <param-name>contextConfigLocation</param-name>

  <param-value>classpath:applicationContext.xml</param-value>

  </context-param>

  <filter>

    <filter-name>encodingFilter</filter-name>

    <filter-class>

          org.springframework.web.filter.CharacterEncodingFilter

      </filter-class>

    <init-param>

      <param-name>encoding</param-name>

      <param-value>UTF-8</param-value>

    </init-param>

    <init-param>

      <param-name>forceEncoding</param-name>

      <param-value>true</param-value>

    </init-param>

  </filter>

  <filter-mapping>

    <filter-name>encodingFilter</filter-name>

    <url-pattern>/*</url-pattern>

  </filter-mapping>

   <servlet>

    <servlet-name>spring</servlet-name>

    <servlet-class>org.springframework.web.servlet.DispatcherServlet</servlet-class>

    <init-param>

      <param-name>contextConfigLocation</param-name>

      <param-value>classpath:springmvc-servlet.xml</param-value>

    </init-param>

    <load-on-startup>1</load-on-startup>

  </servlet>

  <servlet-mapping>

    <servlet-name>spring</servlet-name>

    <url-pattern>/</url-pattern>

  </servlet-mapping>

  <listener>

     <listener-class>org.springframework.web.context.ContextLoaderListener</listener-class>

  </listener>

  <welcome-file-list>

    <welcome-file>index.html</welcome-file>

    <welcome-file>index.htm</welcome-file>

    <welcome-file>index.jsp</welcome-file>

    <welcome-file>default.html</welcome-file>

    <welcome-file>default.htm</welcome-file>

    <welcome-file>default.jsp</welcome-file>

  </welcome-file-list>

</web-app>
然后 taomcat debug运行 然后 ping路径 localhost:端口/项目名/哪个控制器的/那个方法。buling~页面出来了 也就是配置成功了
可以试试看
快速搭建ssm框架的更多相关文章
- 使用Springboot快速搭建SSM框架
Spring Boot设计目的是用来简化Spring应用的初始搭建以及开发过程.该框架使用了特定的方式来进行配置,从而使开发人员不再需要定义样板化的配置. 一.环境准备 Idea 2017 或 201 ...
- maven项目快速搭建SSM框架(一)创建maven项目,SSM框架整合,Spring+Springmvc+Mybatis
首先了解服务器开发的三层架构,分配相应的任务,这样就能明确目标,根据相应的需求去编写相应的操作. 服务器开发,大致分为三层,分别是: 表现层 业务层 持久层 我们用到的框架分别是Spring+Spri ...
- 快速搭建SSM框架环境开发项目【配置】
maven在线仓库https://mvnrepository.com/ maven构建项目 pom.xml <project xmlns="http://maven.apache.or ...
- 快速搭建springboot框架以及整合ssm+shiro+安装Rabbitmq和Erlang、Mysql下载与配置
1.快速搭建springboot框架(在idea中): file–>new project–>Spring Initializr–>next–>然后一直下一步. 然后复制一下代 ...
- 详解intellij idea搭建SSM框架(spring+maven+mybatis+mysql+junit)(上)
SSM(Spring+SpringMVC+MyBatis)框架集由Spring.SpringMVC.MyBatis三个开源框架整合而成,常作为数据源较简单的web项目的框架. 其中spring是一个轻 ...
- 快速搭建SSM基本项目
快速搭建SSM项目基本手脚架 Maven构建项目 一般我们使用Maven来管理我们的项目: 导入相关依赖配置pom.xml: <?xml version="1.0" enco ...
- MyEclipse8.5快速搭建SSH框架
来源于:http://jingyan.baidu.com/article/a378c960a78125b3282830cc.html MyEclipse8.5快速搭建SSH框架 使用版本: Strut ...
- 脚手架快速搭建springMVC框架项目
apid-framework脚手架快速搭建springMVC框架项目 rapid-framework介绍: 一个类似ruby on rails的java web快速开发脚手架,本着不重复发明轮 ...
- Maven项目搭建(二):Maven搭建SSM框架
上一章给大家讲解了如何使用Maven搭建web项目. 这次给大家介绍一下怎么使用Maven搭建SSM框架项目. 首先我们来看一下pom.xml的属性介绍: project: pom的xml根元素. p ...
随机推荐
- 项目角度谈矢量切片运用以及Geoserver处理自定义规格矢量切片方案
文章版权由作者李晓晖和博客园共有,若转载请于明显处标明出处:http://www.cnblogs.com/naaoveGIS/. 1. 背景 矢量切图方案目前已经是很常见的一个方案,在2016年时团队 ...
- Java集合框架(二)
原文 http://www.jianshu.com/p/2070cb32accb List接口 查阅API,看 List 的介绍.有序的 collection (也称为序列).此接口的用户可以对列表 ...
- Javascript的那些硬骨头:作用域、回调、闭包、异步……
终于到了神话破灭的时刻-- 这注定是一篇"自取其辱"的博客,飞哥,你们眼中的大神,Duang,这次脸朝下摔地上了. 故事得从这个求助开始:e.returnValue 报错:未定义, ...
- Jenkins 部署 jmeter + Ant
安装Jenkins: 到jenkins官网下载相应的jenkins版本: 双击jenkins.msi启动安装,安装目录选择D:\Progrom Files\Jenkins,然后启动成功. Jenkin ...
- Win 及 Linux 查找mac地址的方法
1. Windows系统中 - 调出cmd命令行 - 运行Getmac命令.命令行中输入: getmac /v /fo list 并按下回车键 - 查找物理地址.这是MAC地址的另一种描述方式.因为在 ...
- 使用nodegrass简单封装http请求例子
1.项目中经常性的使用http发送请求处理数据.而大部分请求方式为get和post,于是对http请求进行封装,提供代码的利用率. 2.nodegress是nodejs的一个请求工具. 具体步骤及代码 ...
- 笔记:Struts2 国际化
视图页面的国际化 在JSP页面中指定国际化资源需要借助<s:i18n-/>标签,如果把<s:i18n-/>标签作为<s:test-/>标签的父标签,则会直接加载父标 ...
- js前端读写文件的方法(json、excel)
1.前端读取文件的实现 关键:利用文件上传对话框预览本地文件.利用FileReader读取文件 前端预览本地文件 <input tabindex="-1" id=" ...
- 多线程&定时器Timer&同步&线程通信&ThreadLocal
1.多线程 线程状态分为:新建状态.就绪状态.运行状态.阻塞状态.死亡状态 对象等待池的阻塞状态:运行状态执行了wait方法 对向锁池的阻塞状态:试图获得某个同步锁,已经被其他线程占用,就会放到对象的 ...
- 在Anacoda中管理多个版本Python
win10. 在cmd窗口中输入 conda info --envs 或者 conda env list 查看已经安装的环境,当前活动的环境前会加*号. 在cmd窗口(终端窗口)或anaconda p ...