[转载] hessian学习
转载自http://www.cnblogs.com/yjmyzz/p/hessian-helloworld.html
hessian是一个采用二进制格式传输的服务框架,相对传统soap web service,更轻量,更快速。官网地址:http://hessian.caucho.com/
目前已经支持N多语言,包括:java/c#/flex/php/ruby...
maven的依赖项如下:
1 <dependency>

2     <groupId>com.caucho</groupId>

3     <artifactId>hessian</artifactId>

4     <version>4.0.37</version>

5 </dependency>
入门示例:
一、服务端开发
1.1 先建服务接口

1 package yjmyzz.cnblogs.com.service;

2

3 public interface HelloService {

4

5     public String helloWorld(String message);

6 }
1.2 提供服务实现
 1 package yjmyzz.cnblogs.com.service.impl;

 2

 3 import yjmyzz.cnblogs.com.service.HelloService;

 4

 5 public class HelloServiceImpl implements HelloService {

 6

 7     @Override

 8     public String helloWorld(String message) {

 9         return "hello," + message;

10     }

11

12 }
1.3 修改web.xml
 1 <!DOCTYPE web-app PUBLIC

 2  "-//Sun Microsystems, Inc.//DTD Web Application 2.3//EN"

 3  "http://java.sun.com/dtd/web-app_2_3.dtd" >

 4

 5 <web-app>

 6     <display-name>hessian-showcase</display-name>

 7

 8     <welcome-file-list>

 9         <welcome-file>index.jsp</welcome-file>

10     </welcome-file-list>

11

12     <servlet>

13         <servlet-name>hessian-service</servlet-name>

14

15         <servlet-class>

16             com.caucho.hessian.server.HessianServlet

17         </servlet-class>

18

19         <init-param>

20             <param-name>home-class</param-name>

21             <param-value>

22                 <!-- 服务实现类 -->

23                 yjmyzz.cnblogs.com.service.impl.HelloServiceImpl

24             </param-value>

25         </init-param>

26

27         <init-param>

28             <param-name>home-api</param-name>

29             <!-- 服务接口 -->

30             <param-value>yjmyzz.cnblogs.com.service.HelloService</param-value>

31         </init-param>

32

33     </servlet>

34

35     <servlet-mapping>

36         <servlet-name>hessian-service</servlet-name>

37         <url-pattern>/hessian</url-pattern>

38     </servlet-mapping>

39

40 </web-app>
部署到tomcat或其它web容器中即可。
1.4 导出服务接口jar包
最终服务是提供给客户端调用的,客户端必须知道服务的接口信息(包括接口方法中的传输dto定义),所以得将这些java文件导出成jar,提供给调用方。
方法很简单:eclipse中在接口package(包括dto对应的package)上右击,选择Export
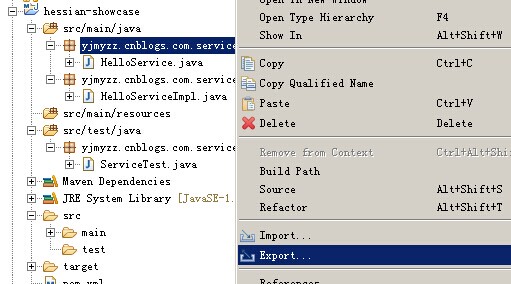
再选择Jar File

二、客户端调用
同样先添加maven的hessian依赖项,同时引入上一步导出的服务接口jar包,然后参考下面的示例代码:
 1 import java.net.MalformedURLException;

 2 import org.junit.Test;

 3 import yjmyzz.cnblogs.com.service.HelloService;

 4 import com.caucho.hessian.client.HessianProxyFactory;

 5

 6

 7 public class ServiceTest {

 8     @Test

 9     public void testService() throws MalformedURLException {

10

11         String url = "http://localhost:8080/hessian-showcase/hessian";

12         System.out.println(url);

13

14         HessianProxyFactory factory = new HessianProxyFactory();

15         HelloService helloService = (HelloService) factory.create(HelloService.class, url);

16         System.out.println(helloService.helloWorld("jimmy"));

17

18     }

19 }
三、与Spring的整合
spring-web包里提供的org.springframework.remoting.caucho.HessianServiceExporter类,可以将普通方法导出成hessian服务。关键是解决org.springframework.web.servlet.DispatcherServlet的url访问路径问题,一般情况下,我们是这样配置的
 1     <!-- spring mvc -->

 2     <servlet>

 3         <servlet-name>appServlet</servlet-name>

 4         <servlet-class>org.springframework.web.servlet.DispatcherServlet</servlet-class>

 5         <init-param>

 6             <param-name>contextConfigLocation</param-name>

 7             <param-value>classpath:servlet-context.xml</param-value>

 8         </init-param>

 9         <load-on-startup>1</load-on-startup>

10         <async-supported>true</async-supported>

11     </servlet>

12

13     <servlet-mapping>

14         <servlet-name>appServlet</servlet-name>

15         <url-pattern>/</url-pattern>

16     </servlet-mapping>
这是spring mvc的入口,拦截所有访问路径,可以把这一节再复制一份,追加在后面,只不过url-pattern指定成特定的规则
 1 <!-- spring mvc -->

 2     <servlet>

 3         <servlet-name>appServlet</servlet-name>

 4         <servlet-class>org.springframework.web.servlet.DispatcherServlet</servlet-class>

 5         <init-param>

 6             <param-name>contextConfigLocation</param-name>

 7             <param-value>classpath:servlet-context.xml</param-value>

 8         </init-param>

 9         <load-on-startup>1</load-on-startup>

10         <async-supported>true</async-supported>

11     </servlet>

12

13     <servlet-mapping>

14         <servlet-name>appServlet</servlet-name>

15         <url-pattern>/</url-pattern>

16     </servlet-mapping>

17

18

19     <!-- hessian -->

20     <servlet>

21         <servlet-name>hessianServlet</servlet-name>

22         <servlet-class>org.springframework.web.servlet.DispatcherServlet</servlet-class>

23         <init-param>

24             <param-name>contextConfigLocation</param-name>

25             <param-value>classpath:hessian-context.xml</param-value>

26         </init-param>

27         <load-on-startup>1</load-on-startup>

28     </servlet>

29

30     <servlet-mapping>

31         <servlet-name>hessianServlet</servlet-name>

32         <url-pattern>/hessian/*</url-pattern>

33     </servlet-mapping>
这样,所有以/hessian/开头的访问路径,约定成hessian服务地址,详细配置在hessian-context.xml中,内容如下:
 1 <?xml version="1.0" encoding="UTF-8"?>

 2 <beans xmlns="http://www.springframework.org/schema/beans"

 3     xmlns:xsi="http://www.w3.org/2001/XMLSchema-instance" xmlns:mvc="http://www.springframework.org/schema/mvc"

 4     xmlns:context="http://www.springframework.org/schema/context"

 5     xsi:schemaLocation="http://www.springframework.org/schema/mvc http://www.springframework.org/schema/mvc/spring-mvc.xsd

 6         http://www.springframework.org/schema/beans http://www.springframework.org/schema/beans/spring-beans.xsd

 7         http://www.springframework.org/schema/context http://www.springframework.org/schema/context/spring-context.xsd">

 8

 9

10     <bean id="helloServiceImpl" class="com.cnblogs.yjmyzz.service.hessian.support.HelloServiceImpl" />

11

12     <!-- 使用HessianServiceExporter 将普通bean导出成Hessian服务 -->

13     <bean name="/service"

14         class="org.springframework.remoting.caucho.HessianServiceExporter">

15         <property name="service" ref="helloServiceImpl" />

16         <!-- Hessian服务的接口 -->

17         <property name="serviceInterface" value="com.cnblogs.yjmyzz.service.hessian.HelloService" />

18     </bean>

19

20 </beans>
这样,就能直接以http://localhost:8080/spring-mvc4-rest/hessian/service 发布hessian服务了
再来看看客户端如何整合,类似的,我们需要一个配置文件,比如:hessian-client.xml,内容如下:
 1 <?xml version="1.0" encoding="UTF-8"?>

 2 <beans xmlns="http://www.springframework.org/schema/beans"

 3     xmlns:xsi="http://www.w3.org/2001/XMLSchema-instance" xmlns:context="http://www.springframework.org/schema/context"

 4     xsi:schemaLocation="http://www.springframework.org/schema/beans

 5         http://www.springframework.org/schema/beans/spring-beans.xsd

 6         http://www.springframework.org/schema/context

 7         http://www.springframework.org/schema/context/spring-context.xsd">

 8

 9     <bean id="hessianClient"

10         class="org.springframework.remoting.caucho.HessianProxyFactoryBean">

11         <property name="serviceUrl">

12             <value>http://localhost:8080/spring-mvc4-rest/hessian/service</value>

13         </property>

14         <property name="serviceInterface">

15             <value>com.cnblogs.yjmyzz.service.hessian.HelloService</value>

16         </property>

17     </bean>

18

19 </beans>
调用示例:
 1 package com.cnblogs.yjmyzz.test;

 2 import java.net.MalformedURLException;

 3

 4 import org.junit.Test;

 5 import org.springframework.context.ApplicationContext;

 6 import org.springframework.context.support.ClassPathXmlApplicationContext;

 7

 8 import com.cnblogs.yjmyzz.service.hessian.HelloService;

 9

10 public class HessianServiceTest {

11     @SuppressWarnings("resource")

12     @Test

13     public void testService() throws MalformedURLException {

14         ApplicationContext context = new ClassPathXmlApplicationContext(

15                 "hessian-client.xml");

16         HelloService hello = (HelloService) context.getBean("hessianClient");

17         System.out.println(hello.helloWorld("jimmy.yang"));

18     }

19 }
[转载] hessian学习的更多相关文章
- [转载] Java学习之Hessian通信基础
转载自http://blog.sina.com.cn/s/blog_7f73e06d0100xn9j.html 一.首先先说Hessian是什么? Hessian:hessian是一个轻量级的r ...
- 【转载】学习资料存档:jQuery的deferred对象详解
我在以前的文章里提到promise和deferred,这两个东西其实是对回调函数的一种写法,javascript的难点之一是回调函数,但是我们要写出优秀的javascript代码又不得不灵活运用回调函 ...
- 转载:学习Entity Framework 中的Code First
看完觉得不错,适合作为学习资料,就转载过来了 原文链接:http://www.cnblogs.com/Wayou/archive/2012/09/20/EF_CodeFirst.html 这是上周就写 ...
- 转载-python学习笔记之输入输出功能读取和写入数据
读取.写入和 Python 在 “探索 Python” 系列以前的文章中,学习了基本的 Python 数据类型和一些容器数据类型,例如tuple.string 和 list.其他文章讨论了 Pytho ...
- 转载-Python学习笔记之文件读写
Python 文件读写 Python内置了读写文件的函数,用法和C是兼容的.本节介绍内容大致有:文件的打开/关闭.文件对象.文件的读写等. 本章节仅示例介绍 TXT 类型文档的读写,也就是最基础的文件 ...
- 轻量级远程调用框架-Hessian学习笔记-Demo实现
Hessian是一个轻量级的remoting onhttp工具,使用简单的方法提供了RMI的功能. 相比WebService,Hessian更简单.快捷.采用的是二进制RPC协议,因为采用的是二进制协 ...
- 转载——JavaScript学习笔记:取数组中最大值和最小值
转载自:http://www.w3cplus.com/javascript/calculate-the-max-min-value-from-an-array.html. 取数组中最大值 可以先把思路 ...
- Java学习之路-Hessian学习
Hessian是基于HTTP的轻量级远程服务解决方案,Hessian像Rmi一样,使用二进制消息进行客户端和服务器端交互.但与其他二进制远程调用技术(例如Rmi)不同的是,它的二进制消息可以移植其他非 ...
- 转载OPENCV学习随笔
转载自 亦轩Dhc http://www.cnblogs.com/daihengchen/p/5492729.html 学习笔记:使用opencv做双目测距(相机标定+立体匹配+测距). 最近在做 ...
随机推荐
- sqlserver游标使用和循环
/*** 游标的使用 讲了这个多游标的优点,现在我们就亲自来揭开游标的神秘的面纱. 使用游标的顺序: 声名游标.打开游标.读取数据.关闭游标.删除游标. 1.3.1声明游标 最简单游标声明:DECLA ...
- scala PartialFunction
1.orElse和andThen的区别 源码如下,区别很明显,orElse是并列的关系,而andThen是调用者的结果作为k的输入. trait PartialFunction[-A, +B] ext ...
- jquery事件使用方法总结
jquery提供了许多的事件处理函数,学习前端一段时间了,下面对其总结一下,梳理一下知识点. 一.鼠标事件 1. click():鼠标单击事件 $div = $("div") $d ...
- win10 uwp 打电话
UWP可以使用打电话功能,在PC是用Skype,在手机是直接使用电话功能. UWP可以通过Skype打电话,那么如何通过应用间通讯,很简单使用Launcher. Skype电话使用Skype:(电话号 ...
- 创建UWP通用应用程序
一,下载VS2015,下载地址:https://www.visualstudio.com/zh-hans/downloads/ VS2015下载地址 二,选择UWP开发工具并安装 VS2015配置 三 ...
- 本地连接 vmware服务器
在本机中装载虚拟机,安装redhat.需要调试使用redhat可以与Windows进行通讯. 分为多步,在此前提下,默认你已经安装好且可以vm 和虚拟机 1:点击虚拟机>设置>添加网络适配 ...
- Jenkins项目部署使用教程-----02视图及项目添加
注意:此以我公司为例,以svn上传代码 一.添加视图 1.点击右上角”+”号,新建新视图 勾选在该视图下显示的项目或者在该视图新建项目,点保存即可. 二.新建项目 1.点击左上角的新建,创建新项目. ...
- 在 ASP.NET Core 中使用 SignalR
https://weblogs.asp.net/ricardoperes/signalr-in-asp-net-core 作者:Ricardo Peres 译者:oopsguy.com 介绍 Sign ...
- 初识.Net IL
1.IL基本资料 1.IL概述 IL是.NET框架中中间语言(Intermediate Language)的缩写.使用.NET框架提供的编译器可以直接将源程序编译为.exe或.dll文件,但此时编译出 ...
- Spring-SpringMVC-Mybatis整合的步骤
1.导入jar包 1.1 spring面向切面jar包 com.springsource.net.sf.cglib-2.2.0.jar com.springsource.org.aopallianc ...