
google gtest框架入门使用案例
通过本文可以收获:google gtest急速入门、google gtest资源网站。
google gtest是什么
google gtest是谷歌开源的c++单元测试框架,非常的好用。
起码个人感觉和spring boot自带的测试框架功能差不太多。
安装
略过,请参考:GitHub - google/googletest: GoogleTest - Google Testing and Mocking Framework或网上资料
使用案例分析
本文重点。
目前版本样例位于:googletest/googletest/samples at main · google/googletest中。
断言
与spring boot的测试框架类似,gtest判断样例是否出错用的也是断言。
断言使用(ASSERT或EXPECT)和配合上具体内容,下面案例应该是一看就懂。
ASSERT和EXPECT的区别只在于一个函数中,如果有多个断言,ASSERT断言失败后当前函数后续部分不会执行了,EXPECT断言失败后当前函数的后续部分会继续执行。
因此两种具体用哪一个需要看 当前断言失败后函数后续还有无意义。
基础的断言
| Fatal assertion | Nonfatal assertion | Verifies |
|---|---|---|
| ASSERT_TRUE(condition); | EXPECT_TRUE(condition); | condition is true |
| ASSERT_FALSE(condition); | EXPECT_FALSE(condition); | condition is false |
数值比较
| Fatal assertion | Nonfatal assertion | Verifies |
|---|---|---|
| ASSERT_EQ(val1, val2); | EXPECT_EQ(val1, val2); | val1 == val2 |
| ASSERT_NE(val1, val2); | EXPECT_NE(val1, val2); | val1 != val2 |
| ASSERT_LT(val1, val2); | EXPECT_LT(val1, val2); | val1 < val2 |
| ASSERT_LE(val1, val2); | EXPECT_LE(val1, val2); | val1 <= val2 |
| ASSERT_GT(val1, val2); | EXPECT_GT(val1, val2); | val1 > val2 |
| ASSERT_GE(val1, val2); | EXPECT_GE(val1, val2); | val1 >= val2 |
字符串比较
| Fatal assertion | Nonfatal assertion | Verifies |
|---|---|---|
| ASSERT_STREQ(str1, str2); | EXPECT_STREQ(str1, _str_2); | the two C strings have the same content |
| ASSERT_STRNE(str1, str2); | EXPECT_STRNE(str1, str2); | the two C strings have different content |
| ASSERT_STRCASEEQ(str1, str2); | EXPECT_STRCASEEQ(str1, str2); | the two C strings have the same content, ignoring case |
| ASSERT_STRCASENE(str1, str2); | EXPECT_STRCASENE(str1, str2); | the two C strings have different content, ignoring case |
上面内容并不完整,gtest还有些厉害的功能,比如
ASSERT_NEAR(ASSERT_NEAR(res, 3.0, 1.0e-11);)用于断言数字的接近程度,当然这种功能已经可以由基础的组合而成了。
个人样例分析
在配置好环境后来一个最简单的入门吧。
公司这边使用的是集成的插件,具体配置vscode + gtest请自行探索。
/*

* Copyright (c) Huawei Technologies Co., Ltd. 2019-2020. All rights reserved.

*/

#include "gtest/gtest.h"

#include "leetcode24.h" //要测试的函数的头文件,其中有要测试的函数

int main(int argc, char** argv)

{

    ::testing::InitGoogleTest(&argc, argv);

    return RUN_ALL_TESTS();

}

TEST(leetcode24, add1)

{

    double res = AddNumbers(1.0, 2.0);

    ASSERT_NEAR(res, 3.0, 1.0e-11);

}
编译后点击测试即可:
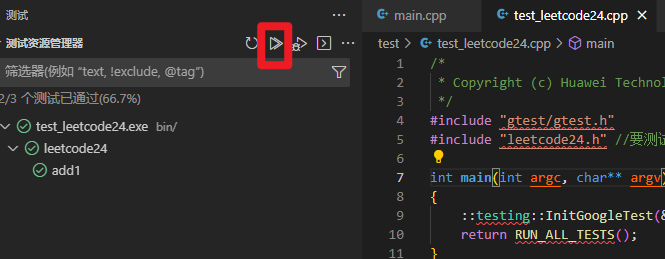
可以观察到左边名字和右边
TEST宏中有对应,TEST的传入的参数只是名字,没有其他含义。
这里是已经测试成功了,除了图形化也可以在命令行进行测试:
正在执行任务: cd build && cmake --build . --target all && ctest -j14 -C Debug -T test --verbose

[2/2] Linking CXX executable ..\bin\test_leetcode24.exe

UpdateCTestConfiguration  from :C:/Users/cWX1274913/Desktop/self/leetcode/leetcode24/build/DartConfiguration.tcl

Parse Config file:C:/Users/cWX1274913/Desktop/self/leetcode/leetcode24/build/DartConfiguration.tcl

   Site: P_CDTFC3-N64RRS

   Build name: Win32-ninja

UpdateCTestConfiguration  from :C:/Users/cWX1274913/Desktop/self/leetcode/leetcode24/build/DartConfiguration.tcl

Parse Config file:C:/Users/cWX1274913/Desktop/self/leetcode/leetcode24/build/DartConfiguration.tcl

Test project C:/Users/cWX1274913/Desktop/self/leetcode/leetcode24/build

Constructing a list of tests

Done constructing a list of tests

Updating test list for fixtures

Added 0 tests to meet fixture requirements

Checking test dependency graph...

Checking test dependency graph end

test 1

    Start 1: test

1: Test command: C:\Users\cWX1274913\Desktop\self\leetcode\leetcode24\bin\test_leetcode24.exe

1: Test timeout computed to be: 1500

1: [==========] Running 1 test from 1 test case.

1: [----------] Global test environment set-up.

1: [----------] 1 test from leetcode24

1: [ RUN      ] leetcode24.add1

1: [       OK ] leetcode24.add1 (0 ms)

1: [----------] 1 test from leetcode24 (0 ms total)

1:

1: [----------] Global test environment tear-down

1: [==========] 1 test from 1 test case ran. (0 ms total)

1: [  PASSED  ] 1 test.

1/1 Test #1: test .............................   Passed    0.10 sec

100% tests passed, 0 tests failed out of 1

Total Test time (real) =   0.12 sec

 *  终端将被任务重用,按任意键关闭。
可以看到测试已经成功了,来个失败的案例吧。
增加两个test案例,分别是ASSERT和EXPECT的失败案例。
TEST(leetcode24, assertFail)

{

    double res = AddNumbers2(1.0, 2.0);

    // EXPECT_NEAR(res, 4.0, 1.0e-11);

    ASSERT_NEAR(res, 4.0, 1.0e-11);

    res = 3;

    EXPECT_NEAR(res, 3.0, 1.0e-11);

}

TEST(leetcode24, expextFail)

{

    double res = AddNumbers2(1.0, 2.0);

    EXPECT_NEAR(res, 4.0, 1.0e-11);

    res = 3;

    EXPECT_NEAR(res, 3.0, 1.0e-11);

}
运行后的命令行:
test 1

    Start 1: test

1: Test command: C:\Users\cWX1274913\Desktop\self\leetcode\leetcode24\bin\test_leetcode24.exe

1: Test timeout computed to be: 1500

1: [==========] Running 3 tests from 1 test case.

1: [----------] Global test environment set-up.

1: [----------] 3 tests from leetcode24

1: [ RUN      ] leetcode24.add1

1: [       OK ] leetcode24.add1 (0 ms)

1: [ RUN      ] leetcode24.assertFail

1: ../test/test_leetcode24.cpp:23: Failure

1: The difference between res and 4.0 is 1, which exceeds 1.0e-11, where

1: res evaluates to 3,

1: 4.0 evaluates to 4, and

1: 1.0e-11 evaluates to 9.9999999999999994e-12.

1: [  FAILED  ] leetcode24.assertFail (0 ms)

1: [ RUN      ] leetcode24.expextFail

1: ../test/test_leetcode24.cpp:32: Failure

1: The difference between res and 4.0 is 1, which exceeds 1.0e-11, where

1: res evaluates to 3,

1: 4.0 evaluates to 4, and

1: 1.0e-11 evaluates to 9.9999999999999994e-12.

1: ../test/test_leetcode24.cpp:34: Failure

1: The difference between res and 4.0 is 1, which exceeds 1.0e-11, where

1: res evaluates to 3,

1: 4.0 evaluates to 4, and

1: 1.0e-11 evaluates to 9.9999999999999994e-12.

1: [  FAILED  ] leetcode24.expextFail (0 ms)

1: [----------] 3 tests from leetcode24 (0 ms total)

1:

1: [----------] Global test environment tear-down

1: [==========] 3 tests from 1 test case ran. (0 ms total)

1: [  PASSED  ] 1 test.

1: [  FAILED  ] 2 tests, listed below:

1: [  FAILED  ] leetcode24.assertFail

1: [  FAILED  ] leetcode24.expextFail

1:

1:  2 FAILED TESTS

1/1 Test #1: test .............................***Failed    0.04 sec

0% tests passed, 1 tests failed out of 1

Total Test time (real) =   0.06 sec
可以看到leetcode24.assertFail有一处失败,而leetcode24.expextFail有两处失败。这 验证 ASSERT断言失败后续不会再执行,而EXCEPT断言失败后续还会继续执行。
TEST_F宏
TEST_F宏的作用在于帮助很多类似的处理进行批量测试。如果我们使用的测试集需要使用一些相似的数据呢?或者有些相似的检查方法?这时就需要用到测试夹具和TEST_F宏配合了。
测试夹具和TEST_F宏 的最大的作用就在于测试开始之前和测试完成之后可以执行对应的函数,
SetUp和TearDown两个虚函数。
#include "sample3-inl.h"

#include "gtest/gtest.h"

// To use a test fixture, derive a class from testing::Test.

class QueueTest : public testing::Test {

 protected:  // You should make the members protected s.t. they can be

             // accessed from sub-classes.

  // virtual void SetUp() will be called before each test is run.  You

  // should define it if you need to initialize the varaibles.

  // Otherwise, this can be skipped.

  virtual void SetUp() {

    q1_.Enqueue(1);

    q2_.Enqueue(2);

    q2_.Enqueue(3);

  }

  // virtual void TearDown() will be called after each test is run.

  // You should define it if there is cleanup work to do.  Otherwise,

  // you don't have to provide it.

  //

  // virtual void TearDown() {

  // }

  // A helper function that some test uses.

  static int Double(int n) {

    return 2*n;

  }

  // A helper function for testing Queue::Map().

  void MapTester(const Queue<int> * q) {

    // Creates a new queue, where each element is twice as big as the

    // corresponding one in q.

    const Queue<int> * const new_q = q->Map(Double);

    // Verifies that the new queue has the same size as q.

    ASSERT_EQ(q->Size(), new_q->Size());

    // Verifies the relationship between the elements of the two queues.

    for ( const QueueNode<int> * n1 = q->Head(), * n2 = new_q->Head();

          n1 != NULL; n1 = n1->next(), n2 = n2->next() ) {

      EXPECT_EQ(2 * n1->element(), n2->element());

    }

    delete new_q;

  }

  // Declares the variables your tests want to use.

  Queue<int> q0_;

  Queue<int> q1_;

  Queue<int> q2_;

};

// When you have a test fixture, you define a test using TEST_F

// instead of TEST.

// Tests the default c'tor.

TEST_F(QueueTest, DefaultConstructor) {

  // You can access data in the test fixture here.

  EXPECT_EQ(0u, q0_.Size());

}

// Tests Dequeue().

TEST_F(QueueTest, Dequeue) {

  int * n = q0_.Dequeue();

  EXPECT_TRUE(n == NULL);

  n = q1_.Dequeue();

  ASSERT_TRUE(n != NULL);

  EXPECT_EQ(1, *n);

  EXPECT_EQ(0u, q1_.Size());

  delete n;

  n = q2_.Dequeue();

  ASSERT_TRUE(n != NULL);

  EXPECT_EQ(2, *n);

  EXPECT_EQ(1u, q2_.Size());

  delete n;

}

// Tests the Queue::Map() function.

TEST_F(QueueTest, Map) {

  MapTester(&q0_);

  MapTester(&q1_);

  MapTester(&q2_);

}
可以看到我们首先需要从 testing::Test 来派生一个自己的测试类QueueTest,在这个类里你可以定义一些必要的成员变量或者辅助函数,还可以定义 SetUp 和 TearDown 两个虚函数,来指定每个测试集运行前和运行后应该做什么。后面测试用例的每个测试集应该使用 TEST_F 宏,第一个参数是我们定义的类名,第二个是测试集的名称。
这样就可以避免在很多重复的测试的时候需要不断重复初始化相同的内容了,以及可以利用类的函数来写一些复杂的运行逻辑。
参考:
https://github.com/google/googletest/blob/main/googletest/samples/sample6_unittest.cc
https://github.com/AngryHacker/articles/blob/master/src/open_source_components/google_gtest.md
我的博客园:https://www.cnblogs.com/swx123
我的github(代码一般都放在这里):https://github.com/578223592
google gtest框架入门使用案例的更多相关文章
- Google单元测试框架gtest之官方sample笔记2--类型参数测试
gtest 提供了类型参数化测试方案,可以测试不同类型的数据接口,比如模板测试.可以定义参数类型列表,按照列表定义的类型,每个测试case都执行一遍. 本例中,定义了2种计算素数的类,一个是实时计算, ...
- Google单元测试框架gtest之官方sample笔记3--值参数化测试
1.7 sample7--接口测试 值参数不限定类型,也可以是类的引用,这就可以实现对类接口的测试,一个基类可以有多个继承类,那么可以测试不同的子类功能,但是只需要写一个测试用例,然后使用参数列表实现 ...
- Google单元测试框架gtest之官方sample笔记4--事件监控之内存泄漏测试
sample 10 使用event listener监控Water类的创建和销毁.在Water类中,有一个静态变量allocated,创建一次值加一,销毁一次值减一.为了实现这个功能,重载了new和d ...
- gtest框架使用
gtest文档说明: 由于公司单元测试的需要,自己花了大半天时间下载了一个gtest框架,使用了一些测试例子,总览了coderzh的玩转gtest测试框架,又看了几篇gtest博客,写下了以下内容,作 ...
- gtest框架
解析gtest框架运行机制 1.前言 Google test是一款开源的白盒单元测试框架,据说目前在Google内部已在几千个项目中应用了基于该框架的白盒测试. 最近的工作是在搞一个基于gtest ...
- 解析gtest框架运行机制
前言 Google test是一款开源的白盒单元测试框架,据说目前在Google内部已在几千个项目中应用了基于该框架的白盒测试. 最近的工作是在搞一个基于gtest框架搭建的自动化白盒测试项目,该项目 ...
- JavaWeb框架_Struts2_(一)----->Struts2 框架入门
1. 框架入门 2.1 Struts2简介 (1). Struts2是一种基于MVC模式的的轻量级Web开发框架. MVC模式:MVC全名是Model View Controller,是模型(mo ...
- 【原创】NIO框架入门(四):Android与MINA2、Netty4的跨平台UDP双向通信实战
概述 本文演示的是一个Android客户端程序,通过UDP协议与两个典型的NIO框架服务端,实现跨平台双向通信的完整Demo. 当前由于NIO框架的流行,使得开发大并发.高性能的互联网服务端成为可能. ...
- 02SpringMvc_springmvc快速入门小案例(XML版本)
这篇文章中,我们要写一个入门案例,去整体了解整个SpringMVC. 先给出整个项目的结构图:
- 【转载】google搜索从入门到精通
原文地址:http://www.cnblogs.com/helloIT/articles/5095668.html /***************************************** ...
随机推荐
- 国产数据库oceanBbase,达梦,金仓与mysql数据库的性能对比 四、python读mysql写入达梦数据库
一.说明 安装达梦的驱动 pip install dmPython==2.5.5 参数接收那里,其他数据库都是用%,达梦要用? 二.源码 #coding=utf-8 import pymysql im ...
- MySQL8.0新特性之增强版逻辑备份恢复
前言关于MySQL库表逻辑备份恢复,我们主要有以下几种常用的工具: 1.mysqldump:MySQL原生自带的逻辑备份恢复工具,支持整个实例.单个数据库.单张表等的备份与恢复,对于1-10个G的数据 ...
- 读书笔记-C#8.0本质论-05
18.3 基于任务的异步编程模式 18.3.1 使用任务并行库(TPL)实现异步执行高延迟操作 using System; using System.Net.Http; using System.Th ...
- Java并发基础构建模块简介
在实际并发编程中,可以利用synchronized来同步线程对于共享对象的访问,用户需要显示的定义synchronized代码块或者方法.为了加快开发,可以使用Java平台一些并发基础模块来开发. 注 ...
- Apache Tomcat AJP 实现负载均衡
大部分一开始接触WEB服务器的人可能和我一样对为什么有Apache又有Tomcat服务器感到奇怪(它们还都是Apache开发的呵呵),其实他们不是冗余的服务器,虽然他们都能对外提供WEB服务器,但总的 ...
- MySQL底层概述—9.ACID与事务
大纲 1.ACID之原子性 2.ACID之持久性 3.ACID之隔离性 4.ACID之一致性 5.ACID的关系 6.事务控制演进之排队 7.事务控制演进之排它锁 8.事务控制演进之读写锁 9.事务控 ...
- .NET Core 锁(Lock)底层原理浅谈
CPU原子操作 原子操作,指一段逻辑要么全部成功,要么全部失败.概念上类似数据库事物(Transaction). CPU能够保证单条汇编的原子性,但不保证多条汇编的原子性 那么在这种情况下,那么CPU ...
- 2023 秋季学期 六周集训 Misc方向
by 高鹏鸿.密语 写在前面,记录和交流是一个很好的习惯,建议可以自己先搭建一个博客用于存储自己的做题记录以及方便交流.还有,对于Misc方向,灵活应对十分重要,一定要善用搜索引擎. 还有一点,给大家 ...
- Mysql之myisam引擎
这里是早起整理的myisam优势,因为当时刚毕业那会web1.0时代还没过时,很多的门户网站实际上就只是内容展示的时候,或者发布文章公告的场景.所以对于这样的读多写少的场景,大多数使用的还是myisa ...
- ArkTs布局入门05——栅格布局(GridRow/GridCol)
1.概述 栅格布局是一种通用的辅助定位工具,对移动设备的界面设计有较好的借鉴作用.主要优势包括: 提供可循的规律:栅格布局可以为布局提供规律性的结构,解决多尺寸多设备的动态布局问题.通过将页面划分为等 ...