Nginx + Lets'encrypt 实现HTTPS访问七牛空间资源
上一篇文章 为七牛云存储空间绑定自定义域名,并使用七牛云提供的免费SSL证书,将自定义加名升级为HTTPS 我们提到利用七牛的免费SSL证书,将自定义加名升级为HTTPS的方法。
不知道有没有小伙伴会像我一样担心一年七牛的SSL证书不免费了怎么办?每个域名每年都要几千块的支出对于个人和小企业来说还是一笔不小的数目。
如果绑定七牛云空间的域名能使用 lets‘encrypt 等这类免费的网址那么就完美了。
然而七牛目前并不支持 lets'encrypt 这类短期的免费证书。
下面我教大家一种利用 Nginx + lets'encrypt 实现以https的方式访问七牛资源的方法。
一、准备工作
- 首先声明,使用这种方法相当于主动放弃了七牛云存储的CDN优势,只适合访问量不高的个人和小公司。
- 要有一个域名。
- 七牛云空间应该已经绑定了自定义的域名,不懂如何绑定的请查看前一篇文章。笔者绑定的域名是 md.ws65535.top。
- 有一台带公网IP的Linux服务器。笔者服务器IP为 54.191.48.61,Linux环境为 ubuntu14.04。其他发行版原理相同,只不过软件安装方式和目录结构略有不同。
二、安装 Nginx
1. 安装nginx
ubuntu@ip-172-31-27-111:~$ sudo apt-get install nginx
2. 查看nginx版本
ubuntu@ip-172-31-27-111:~$ nginx -v

nginx version: nginx/1.4.6 (Ubuntu)
3. 启动nginx
ubuntu@ip-172-31-27-111:~$ sudo service nginx start

ubuntu@ip-172-31-27-111:~$ ss -tln

State      Recv-Q Send-Q               Local Address:Port                 Peer Address:Port

LISTEN     0      128                              *:80                    *:*

LISTEN     0      128                              *:22                    *:*

LISTEN     0      128                             :::80                    :::*

LISTEN     0      128                             :::22                    :::*
4. 查看nginx是否安装成功
ubuntu@ip-172-31-27-111:~$ curl http://54.191.48.61

<!DOCTYPE html>

<html>

<head>

<title>Welcome to nginx!</title>

<style>

    body {

        width: 35em;

        margin: 0 auto;

        font-family: Tahoma, Verdana, Arial, sans-serif;

    }

</style>

</head>

<body>

<h1>Welcome to nginx!</h1>

<p>If you see this page, the nginx web server is successfully installed and

working. Further configuration is required.</p>

<p>For online documentation and support please refer to

<a href="http://nginx.org/">nginx.org</a>.<br/>

Commercial support is available at

<a href="http://nginx.com/">nginx.com</a>.</p>

<p><em>Thank you for using nginx.</em></p>

</body>

</html>
三、配置Nginx反向代理,将所有访问 qiniu-ssl.ws65535.top 的请求全部转发到 md.ws65535.top
1. sudo vim /etc/nginx/sites-enabled/qiniu-ssl
server {

    server_name qiniu-ssl.ws65535.top;

    location / {

        proxy_pass http://md.ws65535.top;

    }

}
编辑完成后使用 nginx -s reload 重新载入Nginx配置文件。
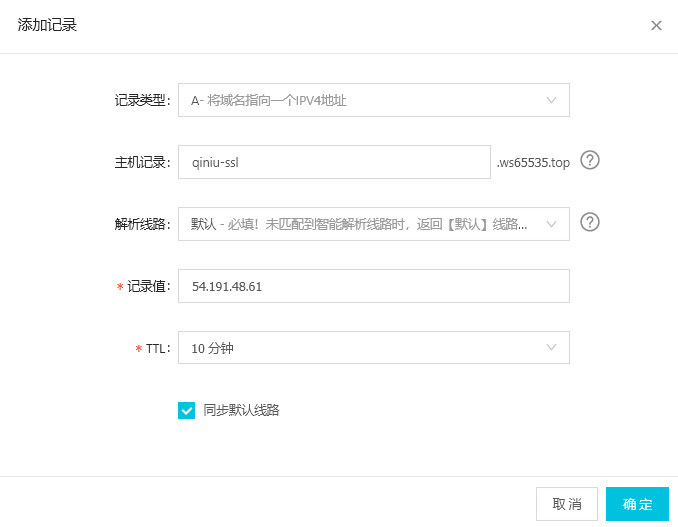
2. 登录域名服务商(这里以阿里云为例)的控制台,添加域名解析。
记录类型为 A,主机记录为 qiniu-ssl.ws65535.top,服务器IP为 54.191.48.61
3. 此时可以使用 qiniu-ssl.ws65535.top 替换 md.ws65535.top 来访问七牛空间资源
例如http://qiniu-ssl.ws65535.top/xsj/2018_8_6_2018-08-06_181854.jpg
可以访问到下面的资源http://md.ws65535.top/xsj/2018_8_6_2018-08-06_181854.jpg
四、安装 HTTPS 证书 【参考】
此处只记录ubuntu14.04安装方法
1. 安装 Certbot
$ sudo apt-get update

$ sudo apt-get install software-properties-common

$ sudo add-apt-repository ppa:certbot/certbot

$ sudo apt-get update

$ sudo apt-get install python-certbot-nginx
2. 安装HTTPS证书
$ sudo certbot --nginx
实例
ubuntu@ip-172-31-27-111:~$ sudo certbot --nginx

Saving debug log to /var/log/letsencrypt/letsencrypt.log

Plugins selected: Authenticator nginx, Installer nginx

Which names would you like to activate HTTPS for?

-------------------------------------------------------------------------------

1: agency.ws65535.xyz

2: qiniu-ssl.ws65535.top

-------------------------------------------------------------------------------

Select the appropriate numbers separated by commas and/or spaces, or leave input

blank to select all options shown (Enter 'c' to cancel): 2 #此处选择将 qiniu-ssl.ws65535.top 设为https

Obtaining a new certificate

Performing the following challenges:

http-01 challenge for qiniu-ssl.ws65535.top

Waiting for verification...

Cleaning up challenges

Deploying Certificate to VirtualHost /etc/nginx/sites-enabled/qiniu-ssl

Please choose whether or not to redirect HTTP traffic to HTTPS, removing HTTP access.

-------------------------------------------------------------------------------

1: No redirect - Make no further changes to the webserver configuration.

2: Redirect - Make all requests redirect to secure HTTPS access. Choose this for

new sites, or if you're confident your site works on HTTPS. You can undo this

change by editing your web server's configuration.

-------------------------------------------------------------------------------

Select the appropriate number [1-2] then [enter] (press 'c' to cancel): 2 #是否强制将http方式访问的请求跳转到以HTTPS方式访问

Redirecting all traffic on port 80 to ssl in /etc/nginx/sites-enabled/qiniu-ssl

-------------------------------------------------------------------------------

Congratulations! You have successfully enabled https://qiniu-ssl.ws65535.top

You should test your configuration at:

https://www.ssllabs.com/ssltest/analyze.html?d=qiniu-ssl.ws65535.top

-------------------------------------------------------------------------------

IMPORTANT NOTES:

 - Congratulations! Your certificate and chain have been saved at:

   /etc/letsencrypt/live/qiniu-ssl.ws65535.top/fullchain.pem

   Your key file has been saved at:

   /etc/letsencrypt/live/qiniu-ssl.ws65535.top/privkey.pem

   Your cert will expire on 2018-11-04. To obtain a new or tweaked

   version of this certificate in the future, simply run certbot again

   with the "certonly" option. To non-interactively renew *all* of

   your certificates, run "certbot renew"

 - If you like Certbot, please consider supporting our work by:

   Donating to ISRG / Let's Encrypt:   https://letsencrypt.org/donate

   Donating to EFF:                    https://eff.org/donate-le
3. 此时再查看 配置文件 /etc/nginx/sites-enabled/qiniu-ssl,已经被 certbot 做了修改
ubuntu@ip-172-31-27-111:~$ cat /etc/nginx/sites-enabled/qiniu-ssl

server {

    server_name qiniu-ssl.ws65535.top;

    location / {

        proxy_pass http://md.ws65535.top;

    }

    listen 443 ssl; # managed by Certbot

    ssl_certificate /etc/letsencrypt/live/qiniu-ssl.ws65535.top/fullchain.pem; # managed by Certbot

    ssl_certificate_key /etc/letsencrypt/live/qiniu-ssl.ws65535.top/privkey.pem; # managed by Certbot

    include /etc/letsencrypt/options-ssl-nginx.conf; # managed by Certbot

    ssl_dhparam /etc/letsencrypt/ssl-dhparams.pem; # managed by Certbot

}

server {

    if ($host = qiniu-ssl.ws65535.top) {

        return 301 https://$host$request_uri;

    } # managed by Certbot

    server_name qiniu-ssl.ws65535.top;

    listen 80;

    return 404; # managed by Certbot

}
4. 此时再使用 http://qiniu-ssl.ws65535.top/xsj/2018_8_6_2018-08-06_181854.jpg 访问七牛云空间的资源,会被强制跳转到 https://qiniu-ssl.ws65535.top/xsj/2018_8_6_2018-08-06_181854.jpg
原文地址:https://segmentfault.com/a/1190000015921213
Nginx + Lets'encrypt 实现HTTPS访问七牛空间资源的更多相关文章
- Windows下Nginx配置SSL实现Https访问(包含证书生成)
Vincent.李 Windows下Nginx配置SSL实现Https访问(包含证书生成) Windows下Nginx配置SSL实现Https访问(包含证书生成) 首先要说明为什么要实现https ...
- 阿里云Ubuntu 14.04 + Nginx + let's encrypt 搭建https访问
参考页面: https://certbot.eff.org/#ubuntutrusty-nginx http://bbs.qcloud.com/thread-12059-1-1.html http:/ ...
- ubuntu安装nginx和设置网站https访问
安装nginx 在控制台 输入 sudo apt-get install nginx 等待安装成功之后.可以打开浏览器.输入你的域名或者ip地址会出现"Welcome to nginx!&q ...
- docker安装nginx并配置通过https访问
1. 下载最新的nginx的docker image docker pull nginx:latest 创建挂载路径 2.准备nginx需要的文件 nginx的配置文件 首先是nginx.conf文件 ...
- Nginx配置SSL实现HTTPS访问
nginx配置文件如下: server { listen 443 ssl; server_name www.domain.com; root /www/web; index index.html in ...
- Chrome插件-把网页图片上传到七牛空间一
功能:图片上右键,点击上传图片到七牛,把图片上传的指定空间并返回图片URL. Chrome插件本质就是js代码,但是里面有一些限制,比如事件绑定等和普通js的绑定是有区别的,主要是为了安全性考虑. 做 ...
- nginx修改nginx.conf配置可以https访问
修改nginx.conf,参照如下更改配置server { listen 443; server_name abc.com; // 访问域名 ssl on; root /var/www/bjubi.c ...
- LInux基于nginx与OpenSSL实现https访问
注意!!首先在nginx安装时添加--with-http_ssl_module模块,否则将会报错,只能从头开始了 自建证书: 通过openssl命令(软件包:openssl :openssl-deve ...
- Centos7.2下Nginx配置SSL支持https访问(站点是基于.Net Core2.0开发的WebApi)
准备工作 1.基于nginx部署好的站点(本文站点是基于.Net Core2.0开发的WebApi,有兴趣的同学可以跳http://www.cnblogs.com/GreedyL/p/7422796. ...
随机推荐
- Java 过滤器、监听器、拦截器的区别
原文:http://www.360doc.com/content/10/0601/09/495229_30616324.shtml 1.过滤器 Servlet中的过滤器Filter是实现了ja ...
- Mysql建表出现1005错误
转自:http://blog.sina.com.cn/s/blog_757807f30100vz23.html 当在创建一个表时提示1005错误无法创建时,注意检查一下几点: 1.当此表有外键时,检查 ...
- bzoj 1704: [Usaco2007 Mar]Face The Right Way 自动转身机【贪心+差分】
首先O(n^3)的贪心很好想,就是枚举k然后从前往后扫,扫到反就翻转区间 然后考虑优化掉翻转区间维,就是搞成差分的形式,在翻转区间的尾部打上标记,再用一个变量维护当前的翻转次数,加到当前状态上来判断是 ...
- P4244 [SHOI2008]仙人掌图 II
传送门 仙人掌直径,以前好像模拟赛的时候做到过一道基环树的直径,打了个很麻烦的然而还错了--今天才发现那就是这个的弱化版啊-- 如果是树的话用普通的dp即可,记\(f[u]\)表示\(u\)往下最长能 ...
- DFS BestCoder Round #49 ($) 1001 Untitled
题目传送门 /* DFS:从大到小取模,因为对比自己大的数取模没意义,可以剪枝.但是我从小到大也过了,可能没啥大数据 */ /************************************* ...
- Q - Euclid in Manhattan(欧几里德距离==曼哈顿距离?)
Desciption Consider a set of n points in a 2-D plane with integer coordinates. There are various way ...
- ViewPager(2)FragmentStatePagerAdapter示例
FragmentStatePagerAdapter适用于数量比较大的viewPager,只会存在 前1个fragment 当前fragment 和下1个fragment,其他销毁,适合加载多数据.本例 ...
- C# 相关概念
解决方案 在磁盘上由 .sln 文件表示,是一个或多个相关项目的容器. 例如,如果为 Python 应用程序编写 C++ 扩展,该 C++ 项目可以驻留在同一解决方案中. 解决方案还可以包含 Web ...
- Scala-基础-函数(2)
import junit.framework.TestCase //函数(2) //知识点-默认参数,带名参数,变长参数,过程 class Demo1 extends TestCase { //测试方 ...
- mac当你有多个版本的命令存在是怎么使用最新版本
例如你安装了一个最新的git.然而系统中由于xcode等自带的git的存在.使得/usr/bin/git 是xcode的版本. 只需要再 ~/.bash_profile 中添加一行优先path即可 e ...