mybatis 源码分析(八)ResultSetHandler 详解
本篇博客就是 myabtis 系列的最后一篇了,还剩 ResultSetHandler 没有分析;作为整个 mybatis 最复杂最繁琐的部分,我不打算按步骤一次详解,因为里面的主要内容就是围绕 resultMap 按层次结构依次解析的,其中运用最多的就是反射,所以我这里将围绕延迟加载重点分析,另外本文使用的测试代码都是源码的测试案例;
一、ResultSetHandler 主体结构
public interface ResultSetHandler {

  // 负责结果集处理,完成映射返回结果对象

  <E> List<E> handleResultSets(Statement stmt) throws SQLException;

  // 负责游标对象处理

  <E> Cursor<E> handleCursorResultSets(Statement stmt) throws SQLException;

  // 负责存储过程的输出参数

  void handleOutputParameters(CallableStatement cs) throws SQLException;

}
以上就是 ResultSetHandler 的接口方法(mybatis 中只提供了唯一的实现类 DefaultResultSetHandler),在本篇博客中将主要以 handleResultSets 结果集处理作为主线分析;
在分析之前首先要清楚 handleResultSets 方法的处理流程就是围绕 resultMap 依次解析的,这里先看一个比较复杂的 resultMap 映射:
<resultMap id="detailedBlogResultMap" type="Blog">

  <constructor>

    <idArg column="blog_id" javaType="int"/>

  </constructor>

  <result property="title" column="blog_title"/>

  <association property="author" javaType="Author">

    <id property="id" column="author_id"/>

    <result property="username" column="author_username"/>

    <result property="password" column="author_password"/>

  </association>

  <collection property="posts" ofType="Post">

    <id property="id" column="post_id"/>

    <result property="subject" column="post_subject"/>

    <association property="author" javaType="Author"/>

    <collection property="comments" ofType="Comment">

      <id property="id" column="comment_id"/>

    </collection>

    <discriminator javaType="int" column="draft">

      <case value="1" resultType="DraftPost"/>

    </discriminator>

  </collection>

  <association property="author" column="id" select="**.selectAuthorForBlog" fetchType="eager"/>

  <collection property="posts" javaType="ArrayList" column="id" ofType="Post" select="**.selectPostsForBlog" fetchType="lazy"/>

</resultMap>
当 mybatis 初始化完成后上面的配置都放到 MappedStatement.resultMaps 里面,在解析的时候就是通过 resultMap.id 取到对应的 resultMap 然后逐次解析;
1. 嵌套查询
这里之所以说 ResultSetHandler 是整个 mybatis 里面最复杂的,主要是嵌套查询的解析(association 一对一,collection 一对多),值得注意的是这里的嵌套查询是有两种方式的:
内部嵌套
<association property="author" javaType="Author">

  <id property="id" column="author_id"/>

  <result property="username" column="author_username"/>

  <result property="password" column="author_password"/>

</association>

<collection property="posts" ofType="Post">

  <id property="id" column="post_id"/>

  <result property="subject" column="post_subject"/>

  <association property="author" javaType="Author"/>

  <collection property="comments" ofType="Comment">

    <id property="id" column="comment_id"/>

  </collection>

  <discriminator javaType="int" column="draft">

    <case value="1" resultType="DraftPost"/>

  </discriminator>

</collection>
像这种嵌套查询是直接在同一个 resultMap 依次映射对应结果的,使用的是 SQL 多表连接,例如:
<select id="selectBlogDetails" resultMap="detailedBlogResultMap">

  select

       B.id as blog_id,

       B.title as blog_title,

       B.author_id as blog_author_id,

       A.id as author_id,

       A.username as author_username,

       ...

       P.id as post_id,

       P.blog_id as post_blog_id,

       ...

       C.id as comment_id,

       C.post_id as comment_post_id,

       ...

       T.id as tag_id,

       T.name as tag_name

  from Blog B

       left outer join Author A on B.author_id = A.id

       left outer join Post P on B.id = P.blog_id

       left outer join Comment C on P.id = C.post_id

       left outer join Post_Tag PT on PT.post_id = P.id

       left outer join Tag T on PT.tag_id = T.id

  where B.id = #{id}

</select>
这里还有一种分离的内部嵌套:
<resultMap id="blogResult" type="Blog">

  <id property="id" column="blog_id" />

  <result property="title" column="blog_title"/>

  <association property="author" column="blog_author_id" javaType="Author" resultMap="authorResult"/>

</resultMap>

<resultMap id="authorResult" type="Author">

  <id property="id" column="author_id"/>

  <result property="username" column="author_username"/>

  <result property="password" column="author_password"/>

  <result property="email" column="author_email"/>

  <result property="bio" column="author_bio"/>

</resultMap>
<select id="selectBlog" resultMap="blogResult">

  select

    B.id            as blog_id,

    B.title         as blog_title,

    B.author_id     as blog_author_id,

    A.id            as author_id,

    A.username      as author_username,

    A.password      as author_password,

    A.email         as author_email,

    A.bio           as author_bio

  from Blog B left outer join Author A on B.author_id = A.id

  where B.id = #{id}

</select>
这中写法只是将 association、collection 部分分离出来,其实质都是一样的,都是一条多表连接的 SQL;
外部嵌套
还有另外一种是将多表连接的 SQL 拆分,每个属性单独发一条 SQL:
<resultMap id="blogResult" type="Blog">

  <collection property="posts" javaType="ArrayList" column="id" ofType="Post" select="selectPostsForBlog"/>

</resultMap>

<select id="selectBlog" resultMap="blogResult">

  SELECT * FROM BLOG WHERE ID = #{id}

</select>

<select id="selectPostsForBlog" resultType="Post">

  SELECT * FROM POST WHERE BLOG_ID = #{id}

</select>
像这样在 association、collection 中使用 select 属性指定外部 SQL,其查询结果也是发两条 SQL,这里之所以没有详细写出每个属性的映射,是因为指定了 type 和 ofType,并开启的自动映射,mybatis 在执行的时候使用反射推断出来的;
这里的两种嵌套查询在初始化的时候就进行了单独的区分:
// org.apache.ibatis.builder.xml.XMLMapperBuilder

String nestedResultMap = context.getStringAttribute("resultMap", processNestedResultMappings(context, Collections.emptyList(), resultType));

// org.apache.ibatis.submitted.nestedresulthandler.Mapper.mapper_resultMap[personResult]_collection[items]

private String processNestedResultMappings(XNode context, List<ResultMapping> resultMappings, Class<?> enclosingType) throws Exception {

  if ("association".equals(context.getName())

      || "collection".equals(context.getName())

      || "case".equals(context.getName())) {

    if (context.getStringAttribute("select") == null) {

      validateCollection(context, enclosingType);

      ResultMap resultMap = resultMapElement(context, resultMappings, enclosingType);

      return resultMap.getId();

    }

  }

  return null;

}

// org.apache.ibatis.mapping.ResultMap

// resultMap.hasNestedResultMaps = resultMap.hasNestedResultMaps || (resultMapping.getNestedResultMapId() != null && resultMapping.getResultSet() == null);
这里代码代码比较多所以只放了关键代码,其最终结果是内部嵌套由 ResultMap.hasNestedResultMaps 标识;
// org.apache.ibatis.builder.xml.XMLMapperBuilder

private ResultMapping buildResultMappingFromContext(XNode context, Class<?> resultType, List<ResultFlag> flags) throws Exception {

  ...

  String nestedSelect = context.getStringAttribute("select");

  String nestedResultMap = context.getStringAttribute("resultMap",

      processNestedResultMappings(context, Collections.emptyList(), resultType));

  ...

}
外部查询的最终结果是由 ResultMapping.nestedQueryId 保存的,之所以这里强调这些是因为在 ResultSetHandler 解析的时候是分了内外部嵌套两种大的情况的;
2. 多结果集
此外分析之前首先还要知道 CallableStatement 调用存储过程的时候,会有多结果集的情况,例如:
create procedure sptest.getnamesanditemsbyid(in nameId integer)

modifies sql data

dynamic result sets 2

BEGIN ATOMIC

  declare cur1 cursor for select * from sptest.names where id = nameId;

  declare cur2 cursor for select * from sptest.items where name_id in (select id from sptest.names where id = nameId);

  open cur1;

  open cur2;

END
<resultMap type="org.apache.ibatis.submitted.sptests.Name" id="nameResultLinkedNoMatchingInfo">

  <result column="ID" property="id"/>

  <result column="FIRST_NAME" property="firstName"/>

  <result column="LAST_NAME" property="lastName"/>

  <collection property="items" resultSet="items" resultMap="itemResult"/>

</resultMap>

<select id="getNamesAndItemsLinkedById" statementType="CALLABLE" resultSets="names,items" resultMap="nameResultLinkedNoMatchingInfo">

  {call sptest.getnamesanditemsbyid(#{id,jdbcType=INTEGER,mode=IN})}

</select>
2. 整体流程
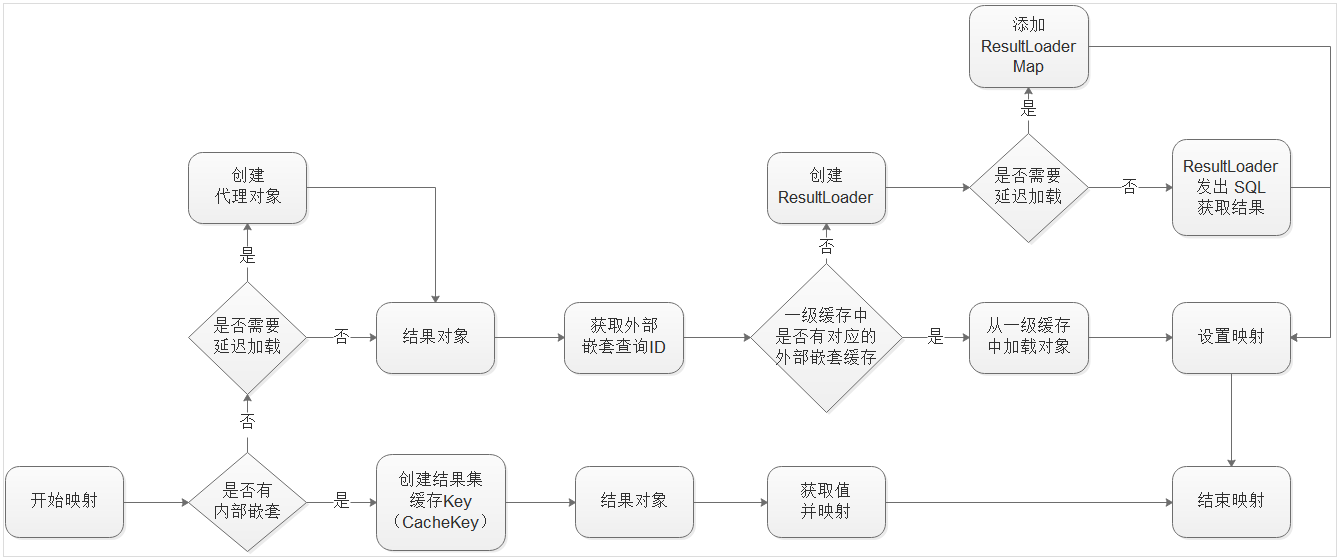
上图就是 ResultSetHandler.handleResultSet 的主要流程,这里只保留了重要的部分:
- 内外部嵌套查询的分支;
- 外部嵌套查询与一级缓存;
- 外部嵌套查询的延迟加载,主要是代理对象、ResultLoader、ResultLoaderMap三个对象;
其余的部分这里就不再详细分析了,一下将主要讲解外部嵌套查询的延迟加载;
二、cglib 和 javassisit 动态代理
在讲解延迟加载之前,需要首先简单了解一下动态代理,因为普通的 JavaBean 对象一般都没有实现接口,所以不能使用 java.lang.reflect.Proxy,在 mybatis 中提供了另外两种动态代理 cglib 和 javassisit;
1. cglib
public class Car {

  String name;

  public String getName() { return name; }

  public void setName(String name) { this.name = name; }

}

@Test

public void test() {

  Enhancer enhancer = new Enhancer();

  enhancer.setSuperclass(Car.class);

  enhancer.setCallback((MethodInterceptor) (obj, method, args, proxy) -> {

    System.out.println("代理开始");

    Object object = proxy.invokeSuper(obj, args);

    System.out.println("result: " + object);

    System.out.println("代理结束");

    return object;

  });

  Car car = (Car) enhancer.create();

  car.setName("Test");

  car.getName();

}
打印:
代理开始
result: null
代理结束
代理开始
result: Test
代理结束
2. javassist
public class Car {

  String name;

  public String getName() { return name; }

  public void setName(String name) { this.name = name; }

}

@Test

public void test() throws IllegalAccessException, InstantiationException {

  ProxyFactory proxyFactory = new ProxyFactory();

  proxyFactory.setSuperclass(Car.class);

  // 设置拦截目标

  proxyFactory.setFilter(m -> m.getName().startsWith("get") || m.getName().startsWith("set"));

  proxyFactory.setHandler((self, thisMethod, proceed, arg) -> {

    System.out.println("代理开始");

    Object object = proceed.invoke(self, arg);

    System.out.println("result: " + object);

    System.out.println("代理结束");

    return object;

  });

  Class clazz = proxyFactory.createClass();

  Car car = (Car) clazz.newInstance();

  car.setName("Test");

  car.getName();

}
打印:
代理开始
result: null
代理结束
代理开始
result: Test
代理结束
三、延迟加载
通过上面的讲解大家应该清楚只有外部嵌套查询才有延迟加载功能;此外和延迟加载相关的配置:
- proxyFactory:(CGLIB | JAVASSIST-默认)指定 mybatis 延迟加载的代理工具;
- lazyLoadingEnabled:(true | false-默认)延迟加载的全局开关。可使用 association、collection 的 fetchType (lazy|eager)属性覆盖;
- aggressiveLazyLoading:(false| true-默认)当开启时,任何方法的调用都会加载该对象的所有属性。 否则每个属性会按需加载;
1. demo
<setting name="proxyFactory" value="JAVASSIST"/>

<setting name="lazyLoadingEnabled" value="true"/>

<setting name="aggressiveLazyLoading" value="false"/>
<resultMap id="user" type="org.apache.ibatis.submitted.lazy_properties.User">

  <id property="id" column="id"/>

  <result property="name" column="name"/>

</resultMap>

<resultMap id="userWithLazyProperties" type="org.apache.ibatis.submitted.lazy_properties.User" extends="user">

  <association property="lazy1" column="id" select="getLazy1" fetchType="lazy"/>

  <association property="lazy2" column="id" select="getLazy2" fetchType="eager"/>

  <collection property="lazy3" column="id" select="getLazy3" fetchType="lazy"/>

</resultMap>

<select id="getUser" resultMap="userWithLazyProperties">

  select * from users where id = #{id}

</select>
public class User {

  private Integer id;

  private String name;

  private User lazy1;

  private User lazy2;

  private List<User> lazy3;

  ...

 }

@Test

void test() {

  try (SqlSession sqlSession = sqlSessionFactory.openSession()) {

    Mapper mapper = sqlSession.getMapper(Mapper.class);

    User user = mapper.getUser(1);

    System.out.println("----getLazy1: " + user.getLazy1());

    System.out.println("----getLazy2: " + user.getLazy2());

    System.out.println("----getLazy3: " + user.getLazy3());

  }

}
打印:
DEBUG [main] - ==> Preparing: select * from users where id = ?
DEBUG [main] - ==> Parameters: 1(Integer)
DEBUG [main] - ==> Preparing: select 12 id, 'lazy2' name from (values(0))
DEBUG [main] - > Parameters:
DEBUG [main] - < Total: 1
DEBUG [main] - < Total: 1
DEBUG [main] - ==> Preparing: select 11 id, 'lazy1' name from (values(0))
DEBUG [main] - > Parameters:
DEBUG [main] - < Total: 1
----getLazy1: User{id=11, name='lazy1'}
----getLazy2: User{id=12, name='lazy2'}
DEBUG [main] - ==> Preparing: select 13 id, 'lazy3' name from (values(0))
DEBUG [main] - > Parameters:
DEBUG [main] - < Total: 1
----getLazy3: [User{id=13, name='lazy3'}]
从打印的顺序可以看出当 mapper.getUser(1) 的时候,就已经获取了 user 和 lazy2,而 lazy1 和 lazy3 则是在 get 的时候才加载;这里在看一下 aggressiveLazyLoading = true 的效果:
打印:
DEBUG [main] - ==> Preparing: select * from users where id = ?
DEBUG [main] - ==> Parameters: 1(Integer)
DEBUG [main] - ====> Preparing: select 12 id, 'lazy2' name from (values(0))
DEBUG [main] - > Parameters:
DEBUG [main] - < Total: 1
DEBUG [main] - ====> Preparing: select 11 id, 'lazy1' name from (values(0))
DEBUG [main] - > Parameters:
DEBUG [main] - < Total: 1
DEBUG [main] - ==> Preparing: select 13 id, 'lazy3' name from (values(0))
DEBUG [main] - > Parameters:
DEBUG [main] - < Total: 1
DEBUG [main] - < Total: 1
----getLazy1: User{id=11, name='lazy1'}
----getLazy2: User{id=12, name='lazy2'}
----getLazy3: [User{id=13, name='lazy3'}]
这里也能看到首先是获取 user 和 lazy2,然后在 user.getLazy1() 的时候同时加载了 lazy1 和 lazy3;
2. 创建代理
在上面已经讲过了,在使用延迟加载的时候:
- 首先判断是否有延迟加载属性,有就使用代理包装结果集对象;
- 然后判断一级缓存中时候有对应的外部嵌套,有就取缓存;如果没有就将外部嵌套包装为 ResultLoader 对象;
- 然后判断外部嵌套是否需要延迟加载,如果是就将 ResultLoader 加入到 ResultLoaderMap 中,如果不需要就直接加载 resultLoader.loadResult();
创建代理:首先获取代理工厂,然后创建代理类;
private Object createResultObject(ResultSetWrapper rsw, ResultMap resultMap, ResultLoaderMap lazyLoader, String columnPrefix) throws SQLException {

  this.useConstructorMappings = false; // reset previous mapping result

  final List<Class<?>> constructorArgTypes = new ArrayList<>();

  final List<Object> constructorArgs = new ArrayList<>();

  Object resultObject = createResultObject(rsw, resultMap, constructorArgTypes, constructorArgs, columnPrefix);

  if (resultObject != null && !hasTypeHandlerForResultObject(rsw, resultMap.getType())) {

    final List<ResultMapping> propertyMappings = resultMap.getPropertyResultMappings();

    for (ResultMapping propertyMapping : propertyMappings) {

      if (propertyMapping.getNestedQueryId() != null && propertyMapping.isLazy()) {

        resultObject = configuration.getProxyFactory().createProxy(resultObject, lazyLoader, configuration, objectFactory, constructorArgTypes, constructorArgs);

        break;

      }

    }

  }

  this.useConstructorMappings = resultObject != null && !constructorArgTypes.isEmpty();

  return resultObject;

}
3. 代理工厂
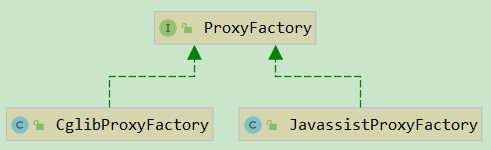
这里 CglibProxyFactory 和 JavassistProxyFactory 的流程都是一样的,所以我们就以 CglibProxyFactory 为例进行简单分析:
crateProxy:
static Object crateProxy(Class<?> type, Callback callback, List<Class<?>> constructorArgTypes, List<Object> constructorArgs) {

  Enhancer enhancer = new Enhancer();

  enhancer.setCallback(callback);

  enhancer.setSuperclass(type);

  try {

    type.getDeclaredMethod(WRITE_REPLACE_METHOD);

    // ObjectOutputStream will call writeReplace of objects returned by writeReplace

    if (LogHolder.log.isDebugEnabled()) {

      LogHolder.log.debug(WRITE_REPLACE_METHOD + " method was found on bean " + type + ", make sure it returns this");

    }

  } catch (NoSuchMethodException e) {

    enhancer.setInterfaces(new Class[]{WriteReplaceInterface.class});

  } catch (SecurityException e) {

    // nothing to do here

  }

  Object enhanced;

  if (constructorArgTypes.isEmpty()) {

    enhanced = enhancer.create();

  } else {

    Class<?>[] typesArray = constructorArgTypes.toArray(new Class[constructorArgTypes.size()]);

    Object[] valuesArray = constructorArgs.toArray(new Object[constructorArgs.size()]);

    enhanced = enhancer.create(typesArray, valuesArray);

  }

  return enhanced;

}
这里创建大致和上面给出的 demo 差不多,都是指定父类,设置回调;接下来我们继续看拦截的具体内容:
private final ResultLoaderMap lazyLoader;

public Object intercept(Object enhanced, Method method, Object[] args, MethodProxy methodProxy) throws Throwable {

  final String methodName = method.getName();

  try {

    // 锁定 ResultLoaderMap 对象

    synchronized (lazyLoader) {

      // 创建代理的时候设置的 WriteReplaceInterface 接口

      if (WRITE_REPLACE_METHOD.equals(methodName)) {

        Object original;

        if (constructorArgTypes.isEmpty()) {

          original = objectFactory.create(type);

        } else {

          original = objectFactory.create(type, constructorArgTypes, constructorArgs);

        }

        PropertyCopier.copyBeanProperties(type, enhanced, original);

        if (lazyLoader.size() > 0) {

          return new CglibSerialStateHolder(original, lazyLoader.getProperties(), objectFactory, constructorArgTypes, constructorArgs);

        } else {

          return original;

        }

      // 真正延迟加载的逻辑处理

      } else {

        // ResultLoaderMap 数量大于 0,就表示还有待加载的属性

        if (lazyLoader.size() > 0 && !FINALIZE_METHOD.equals(methodName)) {

          // aggressive = true,或者 equals、clone、hashCode、toString 之一,就加载全部方法

          if (aggressive || lazyLoadTriggerMethods.contains(methodName)) {

            lazyLoader.loadAll();

          // 调用某属性的 set 方法时,表示不需要从数据库再加载了,所以将其移除

          } else if (PropertyNamer.isSetter(methodName)) {

            final String property = PropertyNamer.methodToProperty(methodName);

            lazyLoader.remove(property);

          // 加载单个属性

          } else if (PropertyNamer.isGetter(methodName)) {

            final String property = PropertyNamer.methodToProperty(methodName);

            if (lazyLoader.hasLoader(property)) {

              lazyLoader.load(property);

            }

          }

        }

      }

    }

    return methodProxy.invokeSuper(enhanced, args);

  } catch (Throwable t) {

    throw ExceptionUtil.unwrapThrowable(t);

  }

}
4. 延迟加载属性加载
// org.apache.ibatis.executor.loader.ResultLoaderMap

public boolean load(String property) throws SQLException {

  // 先删除 key,防止第二次查询数据库

  LoadPair pair = loaderMap.remove(property.toUpperCase(Locale.ENGLISH));

  if (pair != null) {

    // 查数据库

    pair.load();

    return true;

  }

  return false;

}

public void load(final Object userObject) throws SQLException {

  if (this.metaResultObject == null || this.resultLoader == null) {

    ...

    this.metaResultObject = config.newMetaObject(userObject);

    this.resultLoader = new ResultLoader(config, new ClosedExecutor(), ms, this.mappedParameter,

            metaResultObject.getSetterType(this.property), null, null);

  }

  /* We are using a new executor because we may be (and likely are) on a new thread

   * and executors aren't thread safe. (Is this sufficient?)

   *

   * A better approach would be making executors thread safe. */

  if (this.serializationCheck == null) {

    final ResultLoader old = this.resultLoader;

    this.resultLoader = new ResultLoader(old.configuration, new ClosedExecutor(), old.mappedStatement,

                                         old.parameterObject, old.targetType, old.cacheKey, old.boundSql);

  }

  // 查询数据库,并反射设置属性

  this.metaResultObject.setValue(property, this.resultLoader.loadResult());

}
// org.apache.ibatis.executor.loader.ResultLoader

public Object loadResult() throws SQLException {

  // 查询结果

  List<Object> list = selectList();

  // 转换结果类型

  resultObject = resultExtractor.extractObjectFromList(list, targetType);

  return resultObject;

}

// 这里又是从 Executor 出发,再查数据库了

private <E> List<E> selectList() throws SQLException {

  Executor localExecutor = executor;

  if (Thread.currentThread().getId() != this.creatorThreadId || localExecutor.isClosed()) {

    localExecutor = newExecutor();

  }

  try {

    return localExecutor.<E> query(mappedStatement, parameterObject, RowBounds.DEFAULT, Executor.NO_RESULT_HANDLER, cacheKey, boundSql);

  } finally {

    if (localExecutor != executor) {

      localExecutor.close(false);

    }

  }

}
以上就是延迟加载的全部流程了,
5. 延迟加载与一级缓存
上面我们将了当一级缓存中有外部嵌套查询缓存的时候,会直接取缓存,而不是延迟加载:
private Object getNestedQueryMappingValue(ResultSet rs, MetaObject metaResultObject, ResultMapping propertyMapping, ResultLoaderMap lazyLoader, String columnPrefix)

    throws SQLException {

  final String nestedQueryId = propertyMapping.getNestedQueryId();

  final String property = propertyMapping.getProperty();

  final MappedStatement nestedQuery = configuration.getMappedStatement(nestedQueryId);

  final Class<?> nestedQueryParameterType = nestedQuery.getParameterMap().getType();

  final Object nestedQueryParameterObject = prepareParameterForNestedQuery(rs, propertyMapping, nestedQueryParameterType, columnPrefix);

  Object value = null;

  if (nestedQueryParameterObject != null) {

    final BoundSql nestedBoundSql = nestedQuery.getBoundSql(nestedQueryParameterObject);

    final CacheKey key = executor.createCacheKey(nestedQuery, nestedQueryParameterObject, RowBounds.DEFAULT, nestedBoundSql);

    final Class<?> targetType = propertyMapping.getJavaType();

    // 判断一级缓存

    if (executor.isCached(nestedQuery, key)) {

      executor.deferLoad(nestedQuery, metaResultObject, property, key, targetType);

      value = DEFERRED;

    } else {

      final ResultLoader resultLoader = new ResultLoader(configuration, executor, nestedQuery, nestedQueryParameterObject, targetType, key, nestedBoundSql);

      if (propertyMapping.isLazy()) {

        lazyLoader.addLoader(property, metaResultObject, resultLoader);

        value = DEFERRED;

      } else {

        value = resultLoader.loadResult();

      }

    }

  }

  return value;

}
下面我们就实验一下:
<setting name="proxyFactory" value="JAVASSIST"/>

<setting name="lazyLoadingEnabled" value="true"/>

<setting name="aggressiveLazyLoading" value="false"/>

<setting name="localCacheScope" value="SESSION"/>
<resultMap id="FatherMap" type="Father">

  <id property="id" column="id"/>

  <result property="name" column="name"/>

  <association property="grandFather" column="grand_father_id"

               select="org.apache.ibatis.submitted.lazyload_common_property.GrandFatherMapper.selectById"

               fetchType="lazy"/>

</resultMap>

<select id="selectById" resultMap="FatherMap" parameterType="int">

  	SELECT id, name, grand_father_id FROM Father WHERE id = #{id}

</select>
<resultMap id="GrandFatherMap" type="GrandFather">

  <id property="id" column="id"/>

  <result property="name" column="name"/>

</resultMap>

<select id="selectById" resultMap="GrandFatherMap" parameterType="int">

  	SELECT id, name FROM GrandFather WHERE id = #{id}

</select>
@Test

void test1() {

  try (SqlSession sqlSession = sqlSessionFactory.openSession()) {

    GrandFatherMapper grandFatherMapper = sqlSession.getMapper(GrandFatherMapper.class);

    FatherMapper fatherMapper = sqlSession.getMapper(FatherMapper.class);

    GrandFather grandFather = grandFatherMapper.selectById(1);

    System.out.println("----- get grandFather: " + grandFather);

    Father father = fatherMapper.selectById(1);

    System.out.println("----- get father: " + father.getName());

    System.out.println("----- get father.grandFather: " + father.getGrandFather());

  }

}
打印:
DEBUG [main] - ==> Preparing: SELECT id, name FROM GrandFather WHERE id = ?
DEBUG [main] - > Parameters: 1(Integer)
DEBUG [main] - < Total: 1
----- get grandFather: GrandFather{id=1, name='John Smith sen'}
DEBUG [main] - ==> Preparing: SELECT id, name, grand_father_id FROM Father WHERE id = ?
DEBUG [main] - > Parameters: 1(Integer)
DEBUG [main] - < Total: 1
----- get father: John Smith
----- get father.grandFather: GrandFather{id=1, name='John Smith sen'}
这里我们首先获取了一次 GrandFather,保证一级缓存中有,然后获取 Father,延迟加载 GrandFather;从上面的结果可以看到,确实延迟加载是从一级缓存中取的;
6. 延迟加载与二级缓存
上面我们讲过了外部嵌套查询的时候是从 Executor 开始的,那么必然有一级缓存和二级缓存;这里先说结论嵌套查询使用二级缓存一定要在同一个 namespace 里面,否则会出现脏读现象;下面举例说明:
<setting name="proxyFactory" value="JAVASSIST"/>

<setting name="lazyLoadingEnabled" value="true"/>

<setting name="aggressiveLazyLoading" value="false"/>

<setting name="localCacheScope" value="STATEMENT"/>

<setting name="cacheEnabled" value="true"/>
// org/apache/ibatis/submitted/lazyload_common_property/FatherMapper.xml

<mapper namespace="org.apache.ibatis.submitted.lazyload_common_property.FatherMapper">

  <cache/>

  <resultMap id="FatherMap" type="Father">

    <id property="id" column="id"/>

    <result property="name" column="name"/>

    <association property="grandFather" column="grand_father_id"

                 select="org.apache.ibatis.submitted.lazyload_common_property.GrandFatherMapper.selectById"

                 fetchType="lazy"/>

  </resultMap>

  <select id="selectById" resultMap="FatherMap" parameterType="int">

    	SELECT id, name, grand_father_id FROM Father WHERE id = #{id}

  </select>

  <update id="updateById" flushCache="true">

    update Father set name = #{name} where id = #{id}

  </update>

</mapper>
// org/apache/ibatis/submitted/lazyload_common_property/GrandFatherMapper.xml

<mapper namespace="org.apache.ibatis.submitted.lazyload_common_property.GrandFatherMapper">

  <cache/>

  <resultMap id="GrandFatherMap" type="GrandFather">

    <id property="id" column="id"/>

    <result property="name" column="name"/>

  </resultMap>

  <select id="selectById" resultMap="GrandFatherMap" parameterType="int">

    SELECT id, name FROM GrandFather WHERE id = #{id}

  </select>

  <update id="updateById" flushCache="true">

    update GrandFather set name = #{name} where id = #{id}

  </update>

</mapper>
@Test

void test2() {

  try (SqlSession sqlSession1 = sqlSessionFactory.openSession();

       SqlSession sqlSession2 = sqlSessionFactory.openSession();

  ) {

    GrandFatherMapper grandFatherMapper1 = sqlSession1.getMapper(GrandFatherMapper.class);

    GrandFatherMapper grandFatherMapper2 = sqlSession2.getMapper(GrandFatherMapper.class);

    FatherMapper fatherMapper1 = sqlSession1.getMapper(FatherMapper.class);

    FatherMapper fatherMapper2 = sqlSession2.getMapper(FatherMapper.class);

    Father father1 = fatherMapper1.selectById(1);

    System.out.println("----- session1 get father(put cache): " + father1);

    sqlSession1.commit();

    Father father2 = fatherMapper2.selectById(1);

    System.out.println("----- session2 get father(get cache): " + father2);

    // 测试重点

    // fatherMapper1.updateById(1, "TestName");

    grandFatherMapper1.updateById(1, "TestName");

    sqlSession1.commit();

    System.out.println("----- session1 update(put cache)");

    Father father3 = fatherMapper2.selectById(1);

    System.out.println("----- session2 get father(get cache): " + father3);

  }

}
测试流程:
- 首先 session1 查询并提交二级缓存
- 然后 session2 查询检查二级缓存是否生效
- 然后 session1 修改缓存,并提交
- 最后 session2 再查查询,看是否检查到缓存的修改
打印:
DEBUG [main] - ==> Preparing: SELECT id, name, grand_father_id FROM Father WHERE id = ?
DEBUG [main] - > Parameters: 1(Integer)
DEBUG [main] - < Total: 1
DEBUG [main] - Cache Hit Ratio [org.apache.ibatis.submitted.lazyload_common_property.GrandFatherMapper]: 0.0
DEBUG [main] - ==> Preparing: SELECT id, name FROM GrandFather WHERE id = ?
DEBUG [main] - > Parameters: 1(Integer)
DEBUG [main] - < Total: 1
----- session1 get father(put cache): Father{id=1, name='John Smith', grandFather=GrandFather{id=1, name='John Smith sen'}}
DEBUG [main] - Cache Hit Ratio [org.apache.ibatis.submitted.lazyload_common_property.FatherMapper]: 0.5
----- session2 get father(get cache): Father{id=1, name='John Smith', grandFather=GrandFather{id=1, name='John Smith sen'}}
DEBUG [main] - ==> Preparing: update GrandFather set name = ? where id = ?
DEBUG [main] - > Parameters: TestName(String), 1(Integer)
DEBUG [main] - < Updates: 1
DEBUG [main] - Committing JDBC Connection [org.hsqldb.jdbc.JDBCConnection@2f01783a]
----- session1 update(put cache)
DEBUG [main] - Cache Hit Ratio [org.apache.ibatis.submitted.lazyload_common_property.FatherMapper]: 0.6666666666666666
----- session2 get father(get cache): Father{id=1, name='John Smith', grandFather=GrandFather{id=1, name='John Smith sen'}}
注意看这里二级缓存生效了,但是出现了脏读:
然后我们将上面的注释打开:
DEBUG [main] - ==> Preparing: SELECT id, name, grand_father_id FROM Father WHERE id = ?
DEBUG [main] - > Parameters: 1(Integer)
DEBUG [main] - < Total: 1
DEBUG [main] - Cache Hit Ratio [org.apache.ibatis.submitted.lazyload_common_property.GrandFatherMapper]: 0.0
DEBUG [main] - ==> Preparing: SELECT id, name FROM GrandFather WHERE id = ?
DEBUG [main] - > Parameters: 1(Integer)
DEBUG [main] - < Total: 1
----- session1 get father(put cache): Father{id=1, name='John Smith', grandFather=GrandFather{id=1, name='John Smith sen'}}
DEBUG [main] - Cache Hit Ratio [org.apache.ibatis.submitted.lazyload_common_property.FatherMapper]: 0.5
----- session2 get father(get cache): Father{id=1, name='John Smith', grandFather=GrandFather{id=1, name='John Smith sen'}}
DEBUG [main] - ==> Preparing: update Father set name = ? where id = ?
DEBUG [main] - > Parameters: TestName(String), 1(Integer)
DEBUG [main] - < Updates: 1
DEBUG [main] - ==> Preparing: update GrandFather set name = ? where id = ?
DEBUG [main] - > Parameters: TestName(String), 1(Integer)
DEBUG [main] - < Updates: 1
DEBUG [main] - Committing JDBC Connection [org.hsqldb.jdbc.JDBCConnection@2f01783a]
----- session1 update(put cache)
DEBUG [main] - Cache Hit Ratio [org.apache.ibatis.submitted.lazyload_common_property.FatherMapper]: 0.3333333333333333
DEBUG [main] - ==> Preparing: SELECT id, name, grand_father_id FROM Father WHERE id = ?
DEBUG [main] - > Parameters: 1(Integer)
DEBUG [main] - < Total: 1
DEBUG [main] - Cache Hit Ratio [org.apache.ibatis.submitted.lazyload_common_property.GrandFatherMapper]: 0.0
DEBUG [main] - ==> Preparing: SELECT id, name FROM GrandFather WHERE id = ?
DEBUG [main] - > Parameters: 1(Integer)
DEBUG [main] - < Total: 1
----- session2 get father(get cache): Father{id=1, name='TestName', grandFather=GrandFather{id=1, name='TestName'}}
这次发现脏读消失了??其原因就是第一次之修改了 GrandFather,虽然 Father 中有 GrandFather 属性,但是刷新缓存的时候并不会刷新 Father,所以出现的脏读;其解决办法就是使用 将缓存放在同一个命名空间内;
这里再提醒一下本文中使用的测试案例都能在 mybatis 源码的单元测试用找到;
mybatis 源码分析(八)ResultSetHandler 详解的更多相关文章
- 【集合框架】JDK1.8源码分析之ArrayList详解(一)
[集合框架]JDK1.8源码分析之ArrayList详解(一) 一. 从ArrayList字表面推测 ArrayList类的命名是由Array和List单词组合而成,Array的中文意思是数组,Lis ...
- nginx源码分析线程池详解
nginx源码分析线程池详解 一.前言 nginx是采用多进程模型,master和worker之间主要通过pipe管道的方式进行通信,多进程的优势就在于各个进程互不影响.但是经常会有人问道,n ...
- vuex 源码分析(六) 辅助函数 详解
对于state.getter.mutation.action来说,如果每次使用的时候都用this.$store.state.this.$store.getter等引用,会比较麻烦,代码也重复和冗余,我 ...
- vuex 源码分析(五) action 详解
action类似于mutation,不同的是Action提交的是mutation,而不是直接变更状态,而且action里可以包含任意异步操作,每个mutation的参数1是一个对象,可以包含如下六个属 ...
- Golang源码分析之目录详解
开源项目「go home」聚焦Go语言技术栈与面试题,以协助Gopher登上更大的舞台,欢迎go home~ 导读 学习Go语言源码的第一步就是了解先了解它的目录结构,你对它的源码目录了解多少呢? 目 ...
- Tomcat源码分析 | 一文详解生命周期机制Lifecycle
目录 什么是Lifecycle? Lifecycle方法 LifecycleBase 增加.删除和获取监听器 init() start() stop() destroy() 模板方法 总结 前言 To ...
- Java 容器源码分析之集合类详解
集合类说明及区别 Collection ├List │├LinkedList │├ArrayList │└Vector │ └Stack └Set Map ├Hashtable ├HashMap └W ...
- Cloudera Impala源码分析: SimpleScheduler调度策略详解包括作用、接口及实现等
问题导读:1.Scheduler任务中Distributed Plan.Scan Range是什么?2.Scheduler基本接口有哪些?3.QuerySchedule这个类如何理解?4.Simple ...
- 精尽MyBatis源码分析 - SQL执行过程(三)之 ResultSetHandler
该系列文档是本人在学习 Mybatis 的源码过程中总结下来的,可能对读者不太友好,请结合我的源码注释(Mybatis源码分析 GitHub 地址.Mybatis-Spring 源码分析 GitHub ...
- MyBatis源码分析-MyBatis初始化流程
MyBatis 是支持定制化 SQL.存储过程以及高级映射的优秀的持久层框架.MyBatis 避免了几乎所有的 JDBC 代码和手动设置参数以及获取结果集.MyBatis 可以对配置和原生Map使用简 ...
随机推荐
- spark 源码分析之八--Spark RPC剖析之TransportContext和TransportClientFactory剖析
spark 源码分析之八--Spark RPC剖析之TransportContext和TransportClientFactory剖析 TransportContext 首先官方文档对Transpor ...
- Deque 和Queue
概述 接口,一个线性结合,支持在集合首尾add , remove , deque 是double ended queue 的缩写,意味双端队列,接口提供的方法有两种类型,如果失败,一种抛出异常,一种 ...
- SSM框架实现原理图(转)
- Reporting报表开发知识合并[个人原创]
[个人原创] ,转发请声明原文链接 了解 a) SSRS全称 SQL Server Reporting Services,是依赖于数据库运行的,是微软开发的重量级别的BI产品 b) ...
- [__NSCFString countByEnumeratingWithState:objects:count:]: unrecognized selector sent to instance 0x17deba00
还真是一波未平一波又起,又出现了这个问题,详情如下: -[__NSCFString countByEnumeratingWithState:objects:count:]: unrecognized ...
- Hive映射HBase表的几种方式
1.Hive内部表,语句如下 CREATE TABLE ods.s01_buyer_calllogs_info_ts( key string comment "hbase rowkey&qu ...
- Guitar Pro如何更改五线谱的符杆方向
可能有的小伙伴不知道Guitar Pro是什么软件,我先稍微给大家介绍一下~ Guitar Pro是专为帮助所有吉他爱好者学习.绘谱.创作的多功能软件.它包含所有吉他的现有指法和音色,可以帮助我们了解 ...
- Flink 从0到1学习 —— Flink 中如何管理配置?
前言 如果你了解 Apache Flink 的话,那么你应该熟悉该如何像 Flink 发送数据或者如何从 Flink 获取数据.但是在某些情况下,我们需要将配置数据发送到 Flink 集群并从中接收一 ...
- GStreamer流媒体知识介绍
GStreamer框架 1.GStreamer是什么? 众所周知,Microsoft's Windows和Apple's MacOS对多媒体设备.多媒体创作.播放和实时处理等方面都有很好的支持,而Li ...
- 初试kafka消息队列中间件一 (只适合初学者哈)
初试kafka消息队列中间件一 今天闲来有点无聊,然后就看了一下关于消息中间件的资料, 简单一点的理解哈,网上都说的太高大上档次了,字面意思都想半天: 也就是用作消息通知,比如你想告诉某某你喜欢他,或 ...