coco标注信息与labelme标注信息的详解、相互转换及可视化
引言
在做实例分割或语义分割的时候,我们通常要用labelme进行标注,labelme标注的json文件与coco数据集已经标注好的json文件的格式和内容有差异。如果要用coco数据集的信息,就要对json文件进行修改和转换。本博客提供两种格式的具体内容及含义以及两种格式相互转换的代码,并对两种格式的json标注信息进行可视化。
1.coco格式的json标注信息详解及可视化
从coco官网下载coco的数据集里面,关于实例的标注信息在“annotations_trainval2017.zip”压缩文件里面的“instances_train2017.json”和“instances_val2017.json”里面,分别是训练集和验证集的标注信息。
下载地址:
训练集图片:http://images.cocodataset.org/zips/train2017.zip

验证集图片:http://images.cocodataset.org/zips/val2017.zip

测试集图片:http://images.cocodataset.org/zips/test2017.zip

训练集、验证集标注信息:http://images.cocodataset.org/annotations/annotations_trainval2017.zip

http://images.cocodataset.org/annotations/stuff_annotations_trainval2017.zip

http://images.cocodataset.org/annotations/panoptic_annotations_trainval2017.zip
由于“instances_train2017.json”里面把所有训练集图片的标注信息整合到一个文件了,文件非常大,不太好查看内部具体内容。我从这个文件中提取出一张图片的信息保存成一个新的json文件。
json文件内主要字段:
代码如下:
# -*- coding: utf-8 -*-

from __future__ import print_function

"""

Created on Thu Aug 15 13:58:40 2019

@author: Taoting

"""

'''

从coco的标注文件里提取一张图片对应的json信息,并保存成新的json文件(以instance为例,其他的类似)。

'''

import matplotlib.pyplot as plt

import os, sys, zipfile

import urllib.request

import shutil

import numpy as np

import skimage.io as io

import pylab

import json

from pycocotools.coco import COCO

pylab.rcParams['figure.figsize'] = (8.0, 10.0)

json_file='../../../coco dataset/annotations_trainval2017/instances_val2017.json' # # Object Instance 类型的标注

# json_file='./annotations/person_keypoints_val2017.json'  # Object Keypoint 类型的标注格式

# json_file='./annotations/captions_val2017.json' # Image Caption的标注格式

data=json.load(open(json_file,'r'))

data_2={}

data_2['info']=data['info']

data_2['licenses']=data['licenses']

data_2['images']=[data['images'][0]] # 只提取第一张图片

data_2['categories']=data['categories']

annotation=[]

# 通过imgID 找到其所有instance

imgID=data_2['images'][0]['id']

#print(imgID)#397133

# initialize COCO api for instance annotations

coco=COCO(json_file)

img = coco.loadImgs([imgID])

#print(img)#[{'license': 4, 'file_name': '000000397133.jpg', 'coco_url': 'http://images.cocodataset.org/val2017/000000397133.jpg',

#            'height': 427, 'width': 640, 'date_captured': '2013-11-14 17:02:52', 'flickr_url': 'http://farm7.staticflickr.com/6116/6255196340_da26cf2c9e_z.jpg', 'id': 397133}]

#print(img['file_name'])

# load and display image

I = io.imread('../../../coco dataset/val2017/%s' % img[0]['file_name'])

# use url to load image

#I = io.imread(img['coco_url'])

#plt.axis('off')

#plt.imshow(I)

#plt.show()

for ann in data['annotations']:

    if ann['image_id']==imgID:

        annotation.append(ann)

data_2['annotations']=annotation

# 保存到新的json

json.dump(data_2,open('./{}.json'.format(str(img[0]['file_name']).split('.')[0]),'w'),indent=4)
从coco标注json中提取单张图片的标注信息
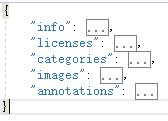
得到一张图片的标注信息如下,包含5大部分的字段信息。
"info"的value是一个dict,存储数据集的一些基本信息,我们不需要关注;
"licenses"的value是一个list,存储license信息,我们不需要关注;
"categories"的value是一个list,存储数据集的类别信息,包括类别的超类、类别id、类别名称;
“images”的value是一个list,存储这张图片的基本信息,包括图片名、长、宽、id等重要信息;
"annotations"的value是一个list,存储这张图片的标注信息,非常重要,list中的每一个元素是一个dict,也即一个标注对象(instance)的信息。包括的字段有"segmentation":标注点的坐标,从第一个的x,y坐标一直到最后一个点的x,y坐标;"area"是标注的闭合多边形的面积; "iscrowd"表示对象之间是否有重叠;"image_id"是图片的id;“bbox”是instance的边界框的左上角的x,y,边界框的宽和高;"category_id"是这个instance对应的类别id;"id"表示此instance标注信息在所有instance标注信息中的id。
{

    "info": {

        "description": "COCO 2017 Dataset",

        "url": "http://cocodataset.org",

        "version": "1.0",

        "year": 2017,

        "contributor": "COCO Consortium",

        "date_created": "2017/09/01"

    },

    "licenses": [

        {

            "url": "http://creativecommons.org/licenses/by-nc-sa/2.0/",

            "id": 1,

            "name": "Attribution-NonCommercial-ShareAlike License"

        },

        {

            "url": "http://creativecommons.org/licenses/by-nc/2.0/",

            "id": 2,

            "name": "Attribution-NonCommercial License"

        },

        ...(太长,省略)

    ],
    "categories": [
        {
            "supercategory": "person",
            "id": 1,
            "name": "person"
        },
        ...(太长,省略)
    ],

    "images": [

        {

            "license": 2,

            "file_name": "000000000049.jpg",

            "coco_url": "http://images.cocodataset.org/train2017/000000000049.jpg",

            "height": 500,

            "width": 381,

            "date_captured": "2013-11-14 20:00:23",

            "flickr_url": "http://farm4.staticflickr.com/3250/2883102207_bcba5527a7_z.jpg",

            "id": 49

        }

    ],

    "annotations": [

        {

            "segmentation": [

                [

                    181.59,

                    363.43,

                    ...(太长,省略)

                ]

            ],

            "area": 8451.22405,

            "iscrowd": 0,

            "image_id": 49,

            "bbox": [

                162.57,

                226.56,

                130.41,

                184.43

            ],

            "category_id": 19,

            "id": 56407

        },

         ...(太长,省略)

    ]

}
我们对这个新coco格式的json文件进行可视化:
# -*- coding: utf-8 -*-

"""

Created on Thu Aug 15 14:48:12 2019

@author: Taoting

"""

from __future__ import print_function

import matplotlib.pyplot as plt

# ~ from pycocotools.coco import COCO

from coco import COCO

import os, sys, zipfile

import urllib.request

import shutil

import numpy as np

import skimage.io as io

import pylab

pylab.rcParams['figure.figsize'] = (8.0, 10.0)

annFile='./modified_satisfied_json_train2017/000000000149.json'#json文件路径

coco=COCO(annFile)

cats = coco.loadCats(coco.getCatIds())

nms=[cat['name'] for cat in cats]

nms = set([cat['supercategory'] for cat in cats])

imgIds = coco.getImgIds()

img = coco.loadImgs(imgIds[0])[0]

dataType = './satisfied_images_train2017'

I = io.imread('%s/%s'%(dataType,img['file_name']))

plt.axis('off')

plt.imshow(I)

plt.show()

# 加载和可视化instance标注信息

catIds=[]

for ann in coco.dataset['annotations']:

    if ann['image_id']==imgIds[0]:

        catIds.append(ann['category_id'])

plt.imshow(I); plt.axis('off')

annIds = coco.getAnnIds(imgIds=img['id'], catIds=catIds, iscrowd=None)

anns = coco.loadAnns(annIds)

coco.showAnns(anns)

plt.show()
coco格式的json文件可视化instance的mask
可视化结果如下:

2.labelme格式的json标注信息详解及可视化
labelme标注工具标注的json格式与coco的格式有差异:
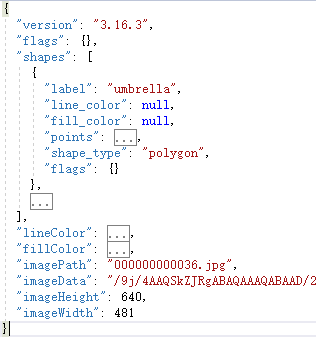
重点关注的是:
"shapes":存储标注instance的闭合多边形的信息,重点关注:label:类别名称;points:闭合多边形的每个点的x,y坐标;
"line_color":闭合多边形的边界线颜色;
"fill_color":闭合多边形的填充颜色;
"imagePath":图片名称;
"imageData":图片路径(加密后);
"imageHeight":图片高;
"imageWidth":图片宽;
利用labelme提供的接口将标注好的json进行可视化代码:
# -*- coding:utf-8 -*-

"""

@author: Taoting

将用labeime标注格式的json进行可视化

"""

import json

import matplotlib.pyplot as plt

import skimage.io as io

from labelme import utils

def main():

    json_path = './PATH/TO/JSON'

    data = json.load(open(json_path))

    img = io.imread('%s/%s'%('./PATH/TO/IMAGE',data['imagePath']))

    lab, lab_names = utils.labelme_shapes_to_label(img.shape, data['shapes'])

    captions = ['%d: %s' % (l, name) for l, name in enumerate(lab_names)]

    lab_ok = utils.draw_label(lab, img, captions)

    plt.subplot(121)

    plt.imshow(img)

    plt.subplot(122)

    plt.imshow(lab_ok)

    plt.show()

if __name__ == '__main__':

    main()
可视化结果:
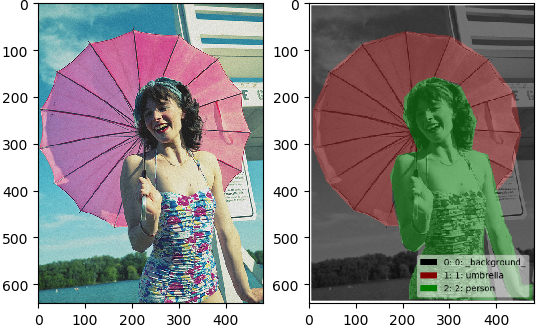
可以看到右图中的mask的可视化效果
结合1和2中的两种格式的json,我们只需要针对格式的差异对json文件做修改,就能将格式进行互相转换。
3.coco格式的json转labelme格式的json
直接上代码:
# -*- coding: utf-8 -*-

"""

@author: Taoting

将用coco格式的json转化成labeime标注格式的json

"""

import json

import cv2

import numpy as np

import os

#用一个labelme格式的json作为参考,因为很多信息都是相同的,不需要修改。

def reference_labelme_json():

    ref_json_path = 'reference_labelme.json'

    data=json.load(open(ref_json_path))

    return data

def labelme_shapes(data,data_ref):

    shapes = []

    label_num = {'person':0,'bicycle':0,'car':0,'motorcycle':0,'bus':0,'train':0,'truck':0}#根据你的数据来修改

    for ann in data['annotations']:

        shape = {}

        class_name = [i['name'] for i in data['categories'] if i['id'] == ann['category_id']]

        #label要对应每一类从_1开始编号

        label_num[class_name[0]] += 1

        shape['label'] = class_name[0] + '_' + str(label_num[class_name[0]])

        shape['line_color'] = data_ref['shapes'][0]['line_color']

        shape['fill_color'] = data_ref['shapes'][0]['fill_color']

        shape['points'] = []

        # ~ print(ann['segmentation'])

        if not type(ann['segmentation']) == list:

            continue

        else:

            x = ann['segmentation'][0][::2]#奇数个是x的坐标

            y = ann['segmentation'][0][1::2]#偶数个是y的坐标

            for j in range(len(x)):

                shape['points'].append([x[j], y[j]])

            shape['shape_type'] =  data_ref['shapes'][0]['shape_type']

            shape['flags'] = data_ref['shapes'][0]['flags']

            shapes.append(shape)

    return shapes

def Coco2labelme(json_path,data_ref):

    with open(json_path,'r') as fp:

        data = json.load(fp)  # 加载json文件

        data_labelme={}

        data_labelme['version'] = data_ref['version']

        data_labelme['flags'] = data_ref['flags']

        data_labelme['shapes'] = labelme_shapes(data,data_ref)

        data_labelme['lineColor'] = data_ref['lineColor']

        data_labelme['fillColor'] = data_ref['fillColor']

        data_labelme['imagePath'] = data['images'][0]['file_name']

        data_labelme['imageData'] = None

        # ~ data_labelme['imageData'] = data_ref['imageData']

        data_labelme['imageHeight'] = data['images'][0]['height']

        data_labelme['imageWidth'] = data['images'][0]['width']

        return data_labelme

if __name__ == '__main__':

    root_dir = './ROOT DIR'

    json_list = os.listdir(root_dir)

    #参考的json

    data_ref = reference_labelme_json()

    for json_path in json_list:

        if json_path.split('.')[-1] == 'json':

            print('当前文件: ', json_path)

            data_labelme= Coco2labelme(os.path.join(root_dir,json_path), data_ref)

            file_name = data_labelme['imagePath']

            # 保存json文件

            json.dump(data_labelme,open('./PATH/%s.json' % file_name.split('.')[0],'w'),indent=4)
用2中的可视化代码检验是否正确转换。
4.labelme格式的json转coco格式的json
直接上代码:
# -*- coding: utf-8 -*-

"""Created on Thu Aug 15 15:05:56 2019

@author: Taoting

将用labeime标注的json转化成coco格式的json

"""

import json

import cv2

import numpy as np

import os

#用闭包实现计数器

def counter():

    cnt = 1000000

    def increce():

        nonlocal cnt

        x = cnt

        cnt += 1

        return x

    return increce

def p_images(data,data_coco):

    images=[]

    image={}

    file_name=data['imagePath'].split('\\')[-1]

    image['file_name']=file_name

    image['id']=int(file_name.split('.')[0])

    image['height']=data['imageHeight']

    image['width']=data['imageWidth']

    img=None

    images.append(image)

    data_coco['images']=images

    return file_name

#用一个coco格式的json做参考

def modify_categories():

    ref_json_path = 'reference.json'

    data=json.load(open(ref_json_path))

    modified_categories = []

    catNms=['person','bicycle','car','motorcycle','truck','bus']#根据你的数据修改

    for i,cat in enumerate(data['categories']):

        if cat['name'] in catNms:

            modified_categories.append(cat)

        else:

            pass

    return modified_categories,data['info'],data['licenses']

def p_annotation(data,data_coco,cnt):

    # annotations

    annotations=[]

    for i in range(len(data['shapes'])):

        annotation={}

        annotation['segmentation']=[list(np.asarray(data['shapes'][i]['points']).flatten())]   # data['shapes'][0]['points']

        annotation['iscrowd']=0

        annotation['image_id']=data_coco['images'][0]['id']

        #找出标注点中的外接矩形的四个点

        x = annotation['segmentation'][0][::2]#奇数个是x的坐标

        y = annotation['segmentation'][0][1::2]#偶数个是y的坐标

        print(x,y)

        x_left = min(x)-1#往外扩展1个像素,也可以不扩展

        y_left = min(y)-1

        w = max(x) - min(x)+1

        h = max(y) - min(y)+1

        annotation['bbox']=[x_left,y_left,w,h] # [左上角x,y以及宽和高]

        cat_list_dict = [cat for cat in data_coco['categories'] if cat['name'] == data['shapes'][i]['label'].split('_')[1]]#注意这里是跟标注时填类别的方式有关

        annotation['category_id']=cat_list_dict[0]['id']

        annotation['id'] = cnt() # 第一个对象 这个ID也不能重复,如果下一张图,id不能取1,需从1 开始往下取

        #print('cnt', annotation['id'])

        #print('annotation',annotation)

        annotations.append(annotation)

        #print('annotations',annotations)

    data_coco['annotations']=annotations

    #print(data_coco['annotations'])

    #return data_coco

def Labelme2coco(json_path,cnt):

    with open(json_path,'r') as fp:

        data = json.load(fp)  # 加载json文件

        data_coco={}

        # images

        file_name = p_images(data,data_coco)

        # categories

        modified_categories, info, p_license = modify_categories()

        data_coco['categories'] = modified_categories

        #print(data_coco['categories'])

        # info

        data_coco['info'] = info

        # license

        data_coco['license'] = p_license

        # annotations

        p_annotation(data,data_coco,cnt)

        #print(data_coco['annotations'])

        return data_coco,file_name

if __name__ == '__main__':

    root_dir = './ROOT DIR'

    json_list = os.listdir(root_dir)

    cnt = counter()

    for json_path in json_list:

        if json_path.split('.')[-1] == 'json':

            data_coco,file_name = Labelme2coco(os.path.join(root_dir,json_path),cnt)

            # 保存json文件

            json.dump(data_coco,open('./PATH/%s.json' % file_name.split('.')[0],'w'),indent=4)
用1中的可视化代码检验是否正确转换。
coco标注信息与labelme标注信息的详解、相互转换及可视化的更多相关文章
- 【Linux 运维】查看网络连接状态信息之netstat和ss命令详解
一.netstat 常用命令详解 通过man netstat可以查看netstat的帮助信息: netstat 命令:用于显示各种网络相关信息,如网络连接,路由表,接口状态,无效连接,组播成员 等等. ...
- 一键获取linux内存、cpu、磁盘IO等信息脚本编写,及其原理详解
更多linux知识,请关注公众号:一口Linux 一.脚本 今天主要分享一个shell脚本,用来获取linux系统CPU.内存.磁盘IO等信息. #!/bin/bash # 获取要监控的本地服务器IP ...
- 百度地图Api详解之地图标注
标注概述 标注(Marker)是用来表示一个点位置的可见元素,每个标注自身都包含地理信息.比如你在西单商场位置添加了一个标注,不论地图移动.缩放,标注都会跟随一起移动,保证其始终指向正确的地理位置. ...
- HTTP协议的头信息详解
转载地址:http://blog.csdn.net/guoguo1980/article/details/2649658 HTTP(HyperTextTransferProtocol)是超文本传输协议 ...
- 【图文详解】scrapy爬虫与动态页面——爬取拉勾网职位信息(2)
上次挖了一个坑,今天终于填上了,还记得之前我们做的拉勾爬虫吗?那时我们实现了一页的爬取,今天让我们再接再厉,实现多页爬取,顺便实现职位和公司的关键词搜索功能. 之前的内容就不再介绍了,不熟悉的请一定要 ...
- linux dmesg命令参数及用法详解(linux显示开机信息命令)
linux dmesg命令参数及用法详解(linux显示开机信息命令) http://blog.csdn.net/zhongyhc/article/details/8909905 功能说明:显示开机信 ...
- yii2通过foreach循环遍历在一个用户组中取出id去另一表里查寻信息并且带着信息合并原数组信息---案例
yii2通过foreach循环遍历在一个用户组中取出id去另一表里查寻信息并且带着信息合并元数组信息---案例 public function actionRandomLists(){ //查询到了所 ...
- 网络编辑基础:对HTTP协议的头信息详解
HTTP(HyperTextTransferProtocol) 是超文本传输协议的缩写,它用于传送WWW方式的数据,关于HTTP 协议的详细内容请参 考RFC2616.HTTP协议采用了请求/响应模型 ...
- 百度地图Api之自定义标注:(获得标注的经纬度和中心经纬度即缩放度)
百度地图Api之自定义标注:(获得标注的经纬度和中心经纬度即缩放度) <%@ Page Language="C#" AutoEventWireup="true&qu ...
随机推荐
- python课堂整理15---map, filter,reduce函数
一.map函数 处理序列(可迭代对象)中的每一个元素,得到的结果是一个‘列表’(其实是个迭代器),该‘列表’元素个数及位置与原来一样 理解下面这段代码: num_l = [1, 2, 4, 6] de ...
- 牛客第三场 J LRU management
起初看到这道题的时候,草草就放过去了,开了另一道题,结果开题不顺利,总是感觉差一点就可以做出来,以至于一直到最后都没能看这道题qaq 题意:类似于操作系统上讲的LRU算法,有两个操作,0操作代表访问其 ...
- springBoot综合开发
作者:纯洁的微笑出处:www.ityouknow.com 版权所有,欢迎保留原文链接进行转载:) 上篇文章介绍了Spring boot初级教程:spring boot(一):入门篇,方便大家快速入门. ...
- 彻底搞懂Python切片操作
在利用Python解决各种实际问题的过程中,经常会遇到从某个对象中抽取部分值的情况,切片操作正是专门用于完成这一操作的有力武器.理论上而言,只要条件表达式得当,可以通过单次或多次切片操作实现任 ...
- DesignPattern系列__02接口隔离原则
介绍 客户端不应该依赖它不需要的接口,即一个类对另一个类的依赖应该建立在最小接口上. Demo引入 先来看一张图: interface MyInterface { void operation1(); ...
- 旁友数独会伐啦?python秒解数独了解下伐啦?
前几天和隔壁邻居玩斗地主被发现了,牌被没收了,斗地主是斗不了了,但我还想和邻居玩耍.如果你还想斗斗地主,戳:趁老王不在,和隔壁邻居斗斗地主,比比大小 想破脑袋终于让我想到一个游戏,数独!什么叫数独?数 ...
- Docker 架构原理及简单使用
提示:文中有些内容为大神的博客内容,就不统一标注那里引用,只是再最下面标注参考连接谢谢 一.简介 1.了解docker的前生LXC LXC为Linux Container的简写.可以提供轻量级的虚拟化 ...
- 【Java笔记】【Java核心技术卷1】chapter3 D1JavaStandard
package chapter3;/*有包名,命令行编译javac -d . 名字.java(注意空格)运行时用java chapter3.JavaStandard*/ public/*访问修饰符*/ ...
- 邻域保持嵌入(NPE)
传统的线性降维方法,如主成分分析(PCA).因子分析(FA)等,关注的是样本的方差,能学习线性流形的结构,却无法学习非线性流形.而经典的流形学习方法虽然能够学习非线性流形结构,但由于本身属于直推学习, ...
- NAS
NAS, Network Attached Storage, 网络附属存储, 简单来说就是连接在网络上, 可以存储资料的装置.可以用来做私有网盘,同步各种设备的照片.视频.音频和文件. 常见的 NAS ...