详谈springboot启动类的@SpringBootApplication注解
前几天我们学会了如何创建springboot项目今天我们说一下他是怎么运行的为什么不需要我们再去编写繁重的配置文件的
@SpringBootApplication
首先我们看一下这个注解,他是用来标注在主程序的,表明他是一个springboot项目
@Target({ElementType.TYPE})

  @Retention(RetentionPolicy.RUNTIME)

  @Documented

  @Inherited

  @SpringBootConfiguration

  @EnableAutoConfiguration

  @ComponentScan(

      excludeFilters = {

        @Filter(type = FilterType.CUSTOM,classes = {TypeExcludeFilter.class}),

        @Filter( type = FilterType.CUSTOM,classes = {AutoConfigurationExcludeFilter.class})

      }

  )

  public @interface SpringBootApplication {
}
点进@SpringBootApplication注解后我们重点关注最后三个注解
@ComponentScan(包扫描)
component是组件,scan是扫描,所以这个注解的含义就是用来扫描组件的,
componentScan就是扫描所标注的类所在包下的所有需要注入的组件,将其注入,这里他是在@SpringBootApplication 中体现的,所以这个注解会自动注入所有在主程序所在包下的组件
以前在ssm项目中我们需要去配置我们的包扫描
<context:component-scan base-package="com.xxx"></context:component-scan>
@EnableAutoConfiguration(开启自动装配)
@Target({ElementType.TYPE})
@Retention(RetentionPolicy.RUNTIME)
@Documented
@Inherited
@AutoConfigurationPackage
@Import({AutoConfigurationImportSelector.class})
public @interface EnableAutoConfiguration {
String ENABLED_OVERRIDE_PROPERTY = "spring.boot.enableautoconfiguration";
Class<?>[] exclude() default {};
String[] excludeName() default {};
}
这里我们关注两个注解
一、@AutoConfigurationPackage
 @Target({ElementType.TYPE})

  @Retention(RetentionPolicy.RUNTIME)

  @Documented

  @Inherited

  @Import({Registrar.class})

  public @interface AutoConfigurationPackage {

  }
在这个注解中,主要是获取我们注解所在包下的组件去进行注册
static class Registrar implements ImportBeanDefinitionRegistrar, DeterminableImports {
Registrar() {
}
//metadata是我们注解所在的元信息
public void registerBeanDefinitions(AnnotationMetadata metadata, BeanDefinitionRegistry registry) {
//看这里 将我们注解所在包下所有的组件去进行注册
AutoConfigurationPackages.register(registry, (new AutoConfigurationPackages.PackageImport(metadata)).getPackageName());
}
public Set<Object> determineImports(AnnotationMetadata metadata) {
return Collections.singleton(new AutoConfigurationPackages.PackageImport(metadata));
}
}
register方法:通过AutoConfigurationPackages去对包下的组件进行注册
private static final String BEAN = AutoConfigurationPackages.class.getName();
public static void register(BeanDefinitionRegistry registry, String... packageNames) {
//先判断整个BEAN有没有被注册
if (registry.containsBeanDefinition(BEAN)) {
//获取bean的定义
BeanDefinition beanDefinition = registry.getBeanDefinition(BEAN);
//通过bean获取构造函数的参数值
ConstructorArgumentValues constructorArguments = beanDefinition.getConstructorArgumentValues();
//添加参数值,
constructorArguments.addIndexedArgumentValue(0, addBasePackages(constructorArguments, packageNames));
} else {
//创建一个新的bean的定义
GenericBeanDefinition beanDefinition = new GenericBeanDefinition();
//设置bean的类型为AutoConfigurationPackages类型
beanDefinition.setBeanClass(AutoConfigurationPackages.BasePackages.class);
beanDefinition.getConstructorArgumentValues().addIndexedArgumentValue(0, packageNames);
beanDefinition.setRole(2);
//进行bean的注册
registry.registerBeanDefinition(BEAN, beanDefinition);
}
}
二、@Import({AutoConfigurationImportSelector.class})
装配我们的 自动配置导入选择器
我们点进去这个类,下面有一个方法getAutoConfigurationEntry 获取自动装配的入口、
protected AutoConfigurationImportSelector.AutoConfigurationEntry getAutoConfigurationEntry(AutoConfigurationMetadata autoConfigurationMetadata, AnnotationMetadata annotationMetadata) {

          if (!this.isEnabled(annotationMetadata)) {

              return EMPTY_ENTRY;

          } else {

              AnnotationAttributes attributes = this.getAttributes(annotationMetadata);

              List<String> configurations = this.getCandidateConfigurations(annotationMetadata, attributes);

              configurations = this.removeDuplicates(configurations);

              Set<String> exclusions = this.getExclusions(annotationMetadata, attributes);

              this.checkExcludedClasses(configurations, exclusions);

              configurations.removeAll(exclusions);

              configurations = this.filter(configurations, autoConfigurationMetadata);

              this.fireAutoConfigurationImportEvents(configurations, exclusions);

              return new AutoConfigurationImportSelector.AutoConfigurationEntry(configurations, exclusions);

          }

      }
这个方法他主要是获取了configurations的一个集合在这我们点进去getCandidateConfigurations方法
protected List<String> getCandidateConfigurations(AnnotationMetadata metadata, AnnotationAttributes attributes) {

          List<String> configurations = SpringFactoriesLoader.loadFactoryNames(this.getSpringFactoriesLoaderFactoryClass(), this.getBeanClassLoader());

          Assert.notEmpty(configurations, "No auto configuration classes found in META-INF/spring.factories. If you are using a custom packaging, make sure that file is correct.");

          return configurations;

      }
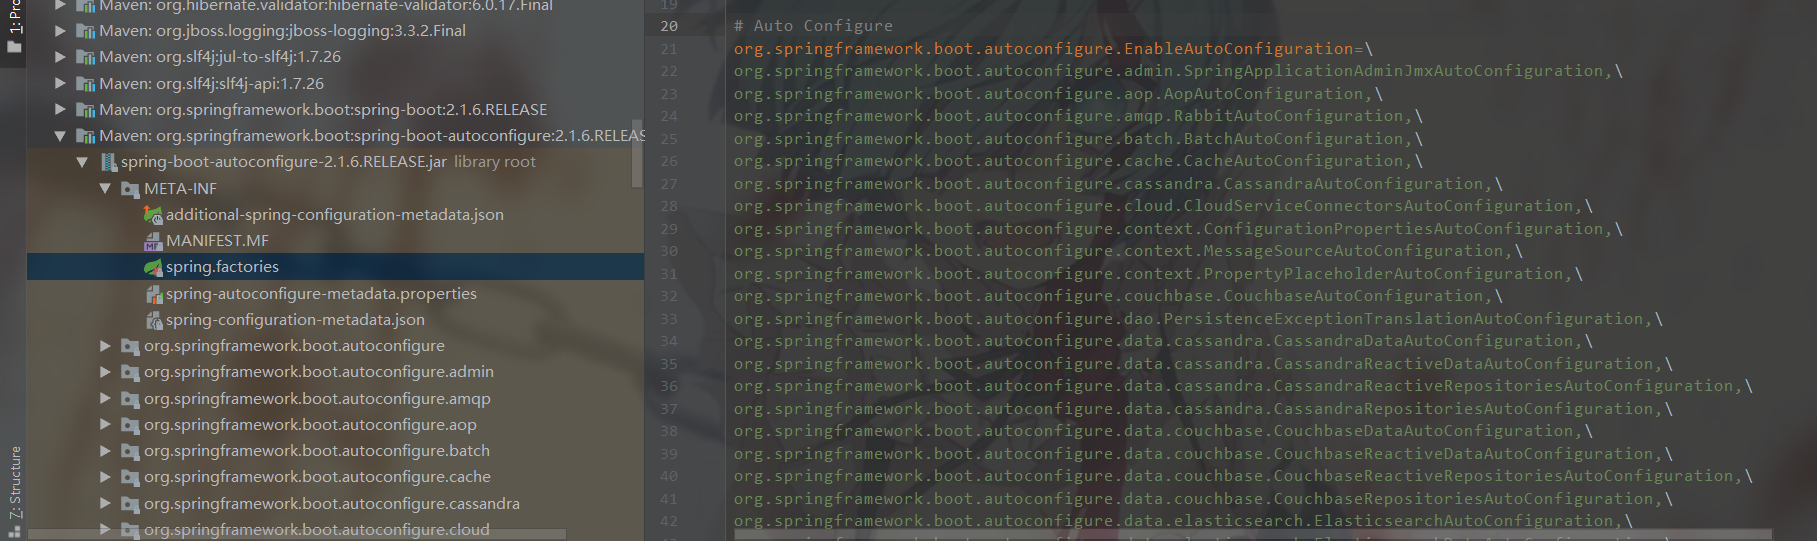
我们首先看他这个红色报错信息:在META-INF/spring.factories中没有找到自动配置类。根据他的错误信息我们可以得出他是从META-INF/spring.factories获取我们的自动配置信息的
我们也可以在点进这个loadFactoryNames这个方法
public static List<String> loadFactoryNames(Class<?> factoryClass, @Nullable ClassLoader classLoader) {
String factoryClassName = factoryClass.getName();
//调用了下面的方法loadSpringFactories
return (List)loadSpringFactories(classLoader).getOrDefault(factoryClassName, Collections.emptyList());
}
private static Map<String, List<String>> loadSpringFactories(@Nullable ClassLoader classLoader) {
MultiValueMap<String, String> result = (MultiValueMap)cache.get(classLoader);
if (result != null) {
return result;
} else {
try {
//根据类加载器去获取配置文件里的信息
Enumeration<URL> urls = classLoader != null ? classLoader.getResources("META-INF/spring.factories") : ClassLoader.getSystemResources("META-INF/spring.factories");
LinkedMultiValueMap result = new LinkedMultiValueMap();
while(urls.hasMoreElements()) {
URL url = (URL)urls.nextElement();
UrlResource resource = new UrlResource(url);
//配置信息经过多次转换最终成为properties形式
Properties properties = PropertiesLoaderUtils.loadProperties(resource);
Iterator var6 = properties.entrySet().iterator();
//循环获取所有的配置信息
while(var6.hasNext()) {
Entry<?, ?> entry = (Entry)var6.next();
String factoryClassName = ((String)entry.getKey()).trim();
String[] var9 = StringUtils.commaDelimitedListToStringArray((String)entry.getValue());
int var10 = var9.length;
for(int var11 = 0; var11 < var10; ++var11) {
String factoryName = var9[var11];
result.add(factoryClassName, factoryName.trim());
}
}
}
cache.put(classLoader, result);
return result;
} catch (IOException var13) {
throw new IllegalArgumentException("Unable to load factories from location [META-INF/spring.factories]", var13);
}
}
}
而这个配置文件在哪里呢
在我们项目的External Libraries中找到我们的spring-boot-autoconfigure中

这样就完成我们默认的一些自动装配了
@SpringBootConfiguration
这个方法就比较简单了,表明了这是一个配置类
  @Target({ElementType.TYPE})

  @Retention(RetentionPolicy.RUNTIME)

  @Documented

  @Configuration

  public @interface SpringBootConfiguration {

  }
到这我们三个注解就讲完了,有什么问题请大佬们指明谢谢。
有过挣扎,有过失败,但仍然会爬起来继续战斗
详谈springboot启动类的@SpringBootApplication注解的更多相关文章
- springboot系列(三) 启动类中关键注解作用解析
一.Springboot:请求入口 @SpringBootApplication @EnableAspectJAutoProxy @EnableScheduling @EnableTransactio ...
- springboot 启动类CommandLineRunner(转载)
在Spring boot项目的实际开发中,我们有时需要项目服务启动时加载一些数据或预先完成某些动作.为了解决这样的问题,Spring boot 为我们提供了一个方法:通过实现接口 CommandLin ...
- springboot 启动类启动跳转到前端网页404问题的两个解决方案
前段时间研究springboot 发现使用Application类启动的话, 可以进入Controller方法并且返回数据,但是不能跳转到WEB-INF目录下网页, 前置配置 server: port ...
- Springboot启动类及注解说明
Spring boot的启动是基于main方法的,其主要注解为: 1. @springBootApplication:项目的启动注解,是一个组合注解,包含@SpringbootConfiguratio ...
- Springboot测试类之@RunWith注解
@runWith注解作用: --@RunWith就是一个运行器 --@RunWith(JUnit4.class)就是指用JUnit4来运行 --@RunWith(SpringJUnit4ClassRu ...
- SpringBoot学习之@SpringBootApplication注解
下面是我们经常见到SpringBoot启动类代码: @SpringBootApplicationpublic class DemoApplication extends SpringBootServl ...
- SpringBoot启动tomcat源码解读
一.SpringBoot自动拉起Tomcat 原文链接:http://www.studyshare.cn/blog-front/blog/details/1136 SpringBoot框架是当前比较流 ...
- Springboot中使用自定义参数注解获取 token 中用户数据
使用自定义参数注解获取 token 中User数据 使用背景 在springboot项目开发中需要从token中获取用户信息时通常的方式要经历几个步骤 拦截器中截获token TokenUtil工具类 ...
- SpringBoot启动嵌入式tomcat源码解读
一.SpringBoot自动拉起Tomcat SpringBoot框架是当前比较流行的java后端开发框架,与maven结合大大简化了开发人员项目搭建的步骤,我们知道SpringBoot的启动类启动后 ...
随机推荐
- [ch02-00] 反向传播与梯度下降的通俗解释
系列博客,原文在笔者所维护的github上:https://aka.ms/beginnerAI, 点击star加星不要吝啬,星越多笔者越努力. 第2章 神经网络中的三个基本概念 2.0 通俗地理解三大 ...
- vue常用指令总结
一.vue指令 官网解释 指令 (Directives) 是带有 v- 前缀的特殊特性.指令特性的值预期是单个 JavaScript 表达式 (v-for 是例外情况).指令的职责是,当表达式的值改变 ...
- 万恶之源-与python的初识
1.计算机基础知识 1.cpu: 人类的大脑 运算和处理问题 2.内存: 临时存储数据 断电就消失了 3.硬盘: 永久 存储数据 4.操作系统:是一个软件 控制每个硬件之间数据交互 2 ...
- 性能测试专题:Locust工具实战之“蝗虫”降世
阅读全文需5分钟. 1. 前言 在上一篇文章中,我们已经为大家介绍了什么是Locust,具体可参照:性能专题:Locust工具实战之开篇哲学三问,简单来说,Locust 是基于 Python 语言下的 ...
- 【Luogu P2002&P2341】消息扩散/受欢迎的奶牛
Luogu P2002 Luogu P2341 使用强连通分量算法缩点 第一题统计入度为0的个数强连通分量数. 第二题的答案为当且仅当仅有一个强连通分量的出度为0时该强连通分量的节点数,原因如下:若一 ...
- 前端WEB编辑器最爱——webstrom
欲先善其事,必先利其器,如题.看到网上一篇介绍webstrom的文章,觉得功能确实强大,也知道为什么阿里巴巴的前端传到github上的文件为啥都有一个 .idea 文件,(传说淘宝内部推荐写js用we ...
- Python开发-实现Excel套打打印
一.目的 目前本人就职与甲方的工作,由于公司的ERP比较烂无法完美的设计套打,就想着自己用Python开发一个套打工具. 二.开发过程 刚开始我打算用Html的方式生成打印的文档,但是有两个无法解决的 ...
- Windows的定时任务(Schedule Task)设置
一.设置 1 点击“开始” 2 点击“控制面板” 3 双击“任务计划” 4 双击“添加任务计划” 5 到了“任务计划向导”界面,点击“下一步” 6 点击“浏览”选择需要定时运行的程序(exe文件,ba ...
- shell中的函数、shell中的数组、告警系统需求分析
7月16日任务 20.16/20.17 shell中的函数20.18 shell中的数组20.19 告警系统需求分析 20.16/20.17 shell中的函数 函数就是一个子shell就是一个代码段 ...
- expect脚本同步文件、expect脚本指定host和要同步的文件、构建文件分发系统、批量远程执行命令
7月20日任务 20.31 expect脚本同步文件20.32 expect脚本指定host和要同步的文件20.33 构建文件分发系统20.34 批量远程执行命令扩展:shell多线程 http:// ...