【python】-- web开发之DOM
DOM
文档对象模型(Document Object Model,DOM)是一种用于HTML和XML文档的编程接口。它给文档提供了一种结构化的表示方法,可以改变文档的内容和呈现方式。我们最为关心的是,DOM把网页和脚本以及其他的编程语言联系了起来。DOM属于浏览器,而不是JavaScript语言规范里的规定的核心内容。
一、查找元素
1、直接查找
ocument.getElementById             根据ID获取一个标签

document.getElementsByName          根据name属性获取标签集合

document.getElementsByClassName     根据class属性获取标签集合

document.getElementsByTagName       根据标签名获取标签集合
2、间接查找、
parentNode          // 父节点

childNodes          // 所有子节点

firstChild          // 第一个子节点

lastChild           // 最后一个子节点

nextSibling         // 下一个兄弟节点

previousSibling     // 上一个兄弟节点

parentElement           // 父节点标签元素

children                // 所有子标签

firstElementChild       // 第一个子标签元素

lastElementChild        // 最后一个子标签元素

nextElementtSibling     // 下一个兄弟标签元素

previousElementSibling  // 上一个兄弟标签元素
二、元素操作
1、文本内容
innerText   文本

outerText

innerHTML   HTML内容

innerHTML

value       值
2、属性
attributes                // 获取所有标签属性

setAttribute(key,value)   // 设置标签属性

getAttribute(key)         // 获取指定标签属性

/*

var atr = document.createAttribute("class");

atr.nodeValue="democlass";

document.getElementById('n1').setAttributeNode(atr);

*/
3、class操作
className                // 获取所有类名

classList.remove(value)    // 删除指定类

classList.add(value)       // 添加类
<!DOCTYPE html>

<html>

<head lang="en">

    <meta charset="UTF-8">

    <title></title>

</head>

<body>

    <input type="button" value="全选"  onclick="CheckAll();"/>

    <input type="button" value="取消" onclick="CancelAll();"/>

    <input type="button" value="反选" onclick="ReverseCheck();"/>

    <table border="1" >

        <thead>

        </thead>

        <tbody id="tb">

            <tr>

                <td><input type="checkbox" /></td>

                <td>111</td>

                <td>222</td>

            </tr>

            <tr>

                <td><input type="checkbox" /></td>

                <td>111</td>

                <td>222</td>

            </tr>

            <tr>

                <td><input type="checkbox" /></td>

                <td>111</td>

                <td>222</td>

            </tr>

            <tr>

                <td><input type="checkbox" /></td>

                <td>111</td>

                <td>222</td>

            </tr>

        </tbody>

    </table>

    <script>

        function CheckAll(ths){

            var tb = document.getElementById('tb');

            var trs = tb.childNodes;

            for(var i =0; i<trs.length; i++){

                var current_tr = trs[i];

                if(current_tr.nodeType==1){

                    var inp = current_tr.firstElementChild.getElementsByTagName('input')[0];

                    inp.checked = true;

                }

            }

        }

        function CancelAll(ths){

            var tb = document.getElementById('tb');

            var trs = tb.childNodes;

            for(var i =0; i<trs.length; i++){

                var current_tr = trs[i];

                if(current_tr.nodeType==1){

                    var inp = current_tr.firstElementChild.getElementsByTagName('input')[0];

                    inp.checked = false;

                }

            }

        }

        function ReverseCheck(ths){

            var tb = document.getElementById('tb');

            var trs = tb.childNodes;

            for(var i =0; i<trs.length; i++){

                var current_tr = trs[i];

                if(current_tr.nodeType==1){

                    var inp = current_tr.firstElementChild.getElementsByTagName('input')[0];

                    if(inp.checked){

                        inp.checked = false;

                    }else{

                        inp.checked = true;

                    }

                }

            }

        }

    </script>

</body>

</html>

demo
Demo-复选框全选/反选/取消
<!DOCTYPE html>

<html lang="en">

<head>

    <meta charset="UTF-8">

    <title>Title</title>

    <style>

        .hide{

            display: none;

        }

        .c1{

            position: fixed;

            top: 0;

            left: 0;

            right: 0;

            bottom: 0;

            background-color: black;

            opacity: 0.6;

            z-index: 9;

        }

        .c2{

            width: 500px;

            height: 400px;

            background-color: white;

            position: fixed;

            left: 50%;

            top: 50%;

            margin-left: -250px;

            margin-top: -200px;

            z-index: 10;

        }

    </style>

</head>

<body style="margin: 0;">

    <div>

        <input type="button" value="添加" onclick="showModel();"/>

        <table border="1">

            <thead>

                <tr>

                    <th>主机名</th>

                    <th>端口</th>

                </tr>

            </thead>

            <tbody>

                <tr>

                    <td>192.168.1.1</td>

                    <td>8080</td>

                </tr>

            </tbody>

        </table>

    </div>

    <!--遮罩层开始-->

    <div id="i1" class="c1 hide"></div>

    <!--遮罩层开始-->

    <!--弹框层开始-->

    <div id="i2" class="c2 hide">

        <p><input type="text"/></p>

        <p><input type="text"/></p>

        <p>

            <input type="button" value="取消" onclick="hideModel()"/>

            <input type="button" value="确定"/>

        </p>

    </div>

    <!--弹框层结束-->

    <script>

        function showModel(){

            document.getElementById("i1").classList.remove("hide");

            document.getElementById("i2").classList.remove("hide");

        }

        function hideModel(){

            document.getElementById("i1").classList.add("hide");

            document.getElementById("i2").classList.add("hide");

        }

    </script>

</body>

</html>
Demo-模拟对话框
<!DOCTYPE html>

<html lang="en">

<head>

    <meta charset="UTF-8">

    <title>Title</title>

    <style>

        .hide{

            display: none;

        }

        .item .header{

            height: 35px;

            background-color: #2459a2;

            color: white;

            line-height: 35px;

        }

    </style>

</head>

<body>

    <div style="height: 48px;"></div>

    <div style="width: 300px;">

        <div class="item">

            <div id="i1" class="header" onclick="ChangeMenu('i1');">菜单1</div>

            <div class="content">

                <div>内容1</div>

                <div>内容1</div>

                <div>内容1</div>

            </div>

        </div>

        <div class="item">

            <div id="i2" class="header" onclick="ChangeMenu('i2');">菜单2</div>

            <div class="content hide">

                <div>内容2</div>

                <div>内容2</div>

                <div>内容2</div>

            </div>

        </div>

        <div class="item">

            <div id="i3" class="header" onclick="ChangeMenu('i3');">菜单3</div>

            <div class="content hide">

                <div>内容3</div>

                <div>内容3</div>

                <div>内容3</div>

            </div>

        </div>

        <div class="item">

            <div id="i4" class="header" onclick="ChangeMenu('i4');">菜单4</div>

            <div class="content hide">

                <div>内容4</div>

                <div>内容4</div>

                <div>内容4</div>

            </div>

        </div>

    </div>

    <script>

        function ChangeMenu(hid){

            //当前菜单标题div

            var current_header = document.getElementById(hid);

            //获取所有item的数组

            var item_list = current_header.parentElement.parentElement.children;

            for(var i=0;i<item_list.length;i++){

                var current_item = item_list[i];

                //把所有的内容全部隐藏

                current_item.children[1].classList.add("hide");

            }

            //把菜单标题下的隐藏去掉

            current_header.nextElementSibling.classList.remove("hide");

        }

    </script>

</body>

</html>
Demo-后台左侧菜单
4、标签操作
4.1、创建标签
// 方式一

var tag = document.createElement('a')

tag.innerText = "wupeiqi"

tag.className = "c1"

tag.href = "http://www.baidu.com"

// 方式二

var tag = "<a class='c1' href='http://www.baidu.com'>百度</a>"
4.2、操作标签
// 方式一

var obj = "<input type='text' />";

xxx.insertAdjacentHTML("beforeEnd",obj);

xxx.insertAdjacentElement('afterBegin',document.createElement('p'))

//PS:第一个参数只能是'beforeBegin'、 'afterBegin'、 'beforeEnd'、 'afterEnd'

// 方式二

var tag = document.createElement('a')

xxx.appendChild(tag)

xxx.insertBefore(tag,xxx[1])
<!DOCTYPE html>

<html lang="en">

<head>

    <meta charset="UTF-8">

    <title>Title</title>

</head>

<body>

    <input type="button" onclick="AddEle1();" value="+" />

    <input type="button" onclick="AddEle2();" value="+" />

    <div id="i1">

        <p><input type="text" /></p>

    </div>

    <script>

        function AddEle1(){

            // 创建一个标签

            // 将标签添加到i1里面

            var tag = "<p><input type='text'/></p>";

            // 注意:第一个参数只能是'beforeBegin'、 'afterBegin'、 'beforeEnd'、 'afterEnd'

            document.getElementById('i1').insertAdjacentHTML("beforeEnd",tag);

        }

        function AddEle2(){

            // 创建一个标签

            // 将标签添加到i1里面

            var tag = document.createElement('input');

            tag.setAttribute('type', 'text');

            tag.style.fontSize = '16px';

            tag.style.color = 'red';

            var p = document.createElement('p');

            p.appendChild(tag);

            document.getElementById('i1').appendChild(p);

        }

    </script>

</body>

</html>
Demo-新增/减少表格
5、样式操作
var obj = document.getElementById('i1')

obj.style.fontSize = "32px";

obj.style.backgroundColor = "red";
6、位置操作
总文档高度

document.documentElement.offsetHeight

当前文档占屏幕高度

document.documentElement.clientHeight

自身高度

tag.offsetHeight

距离上级定位高度

tag.offsetTop

父定位标签

tag.offsetParent

滚动高度

tag.scrollTop

/*

    clientHeight -> 可见区域:height + padding

    clientTop    -> border高度

    offsetHeight -> 可见区域:height + padding + border

    offsetTop    -> 上级定位标签的高度

    scrollHeight -> 全文高:height + padding

    scrollTop    -> 滚动高度

    特别的:

        document.documentElement代指文档根节点

*/
<!DOCTYPE html>

<html>

<head lang="en">

    <meta charset="UTF-8">

    <title></title>

</head>

<body style="margin: 0;">

    <div style="height: 900px;">

    </div>

    <div style="padding: 10px;">

        <div id="i1" style="height:190px;padding: 2px;border: 1px solid red;margin: 8px;">

                <p>asdf</p>

                <p>asdf</p>

                <p>asdf</p>

                <p>asdf</p>

                <p>asdf</p>

        </div>

    </div>

    <script>

        var i1 = document.getElementById('i1');

        console.log(i1.clientHeight); // 可见区域:height + padding

        console.log(i1.clientTop);    // border高度

        console.log('=====');

        console.log(i1.offsetHeight); // 可见区域:height + padding + border

        console.log(i1.offsetTop);    // 上级定位标签的高度

        console.log('=====');

        console.log(i1.scrollHeight);   //全文高:height + padding

        console.log(i1.scrollTop);      // 滚动高度

        console.log('=====');

    </script>

</body>

</html>
demo
<!DOCTYPE html>

<html>

<head lang="en">

    <meta charset="UTF-8">

    <title></title>

</head>

<style>

    body{

        margin: 0px;

    }

    img {

        border: 0;

    }

    ul{

        padding: 0;

        margin: 0;

        list-style: none;

    }

    .clearfix:after {

        content: ".";

        display: block;

        height: 0;

        clear: both;

        visibility: hidden;

    }

    .wrap{

        width: 980px;

        margin: 0 auto;

    }

    .pg-header{

        background-color: #303a40;

        -webkit-box-shadow: 0 2px 5px rgba(0,0,0,.2);

        -moz-box-shadow: 0 2px 5px rgba(0,0,0,.2);

        box-shadow: 0 2px 5px rgba(0,0,0,.2);

    }

    .pg-header .logo{

        float: left;

        padding:5px 10px 5px 0px;

    }

    .pg-header .logo img{

        vertical-align: middle;

        width: 110px;

        height: 40px;

    }

    .pg-header .nav{

        line-height: 50px;

    }

    .pg-header .nav ul li{

        float: left;

    }

    .pg-header .nav ul li a{

        display: block;

        color: #ccc;

        padding: 0 20px;

        text-decoration: none;

        font-size: 14px;

    }

    .pg-header .nav ul li a:hover{

        color: #fff;

        background-color: #425a66;

    }

    .pg-body{

    }

    .pg-body .catalog{

        position: absolute;

        top:60px;

        width: 200px;

        background-color: #fafafa;

        bottom: 0px;

    }

    .pg-body .catalog.fixed{

        position: fixed;

        top:10px;

    }

    .pg-body .catalog .catalog-item.active{

        color: #fff;

        background-color: #425a66;

    }

    .pg-body .content{

        position: absolute;

        top:60px;

        width: 700px;

        margin-left: 210px;

        background-color: #fafafa;

        overflow: auto;

    }

    .pg-body .content .section{

        height: 500px;

    }

</style>

<body onscroll="ScrollEvent();">

<div class="pg-header">

    <div class="wrap clearfix">

        <div class="logo">

            <a href="#">

                <img src="http://core.pc.lietou-static.com/revs/images/common/logo_7012c4a4.pn">

            </a>

        </div>

        <div class="nav">

            <ul>

                <li>

                    <a  href="#">首页</a>

                </li>

                <li>

                    <a  href="#">功能一</a>

                </li>

                <li>

                    <a  href="#">功能二</a>

                </li>

            </ul>

        </div>

    </div>

</div>

<div class="pg-body">

    <div class="wrap">

        <div class="catalog">

            <div class="catalog-item" auto-to="function1"><a>第1张</a></div>

            <div class="catalog-item" auto-to="function2"><a>第2张</a></div>

            <div class="catalog-item" auto-to="function3"><a>第3张</a></div>

        </div>

        <div class="content">

            <div menu="function1" class="section">

                <h1>第一章</h1>

            </div>

            <div menu="function2" class="section">

                <h1>第二章</h1>

            </div>

            <div menu="function3" class="section">

                <h1>第三章</h1>

            </div>

        </div>

    </div>

</div>

    <script>

        function ScrollEvent(){

            var bodyScrollTop = document.body.scrollTop;

            if(bodyScrollTop>50){

                document.getElementsByClassName('catalog')[0].classList.add('fixed');

            }else{

                document.getElementsByClassName('catalog')[0].classList.remove('fixed');

            }

        }

    </script>

</body>

</html>
demo-滚动固定
<!DOCTYPE html>

<html>

<head lang="en">

    <meta charset="UTF-8">

    <title></title>

</head>

<style>

    body{

        margin: 0px;

    }

    img {

        border: 0;

    }

    ul{

        padding: 0;

        margin: 0;

        list-style: none;

    }

    h1{

        padding: 0;

        margin: 0;

    }

    .clearfix:after {

        content: ".";

        display: block;

        height: 0;

        clear: both;

        visibility: hidden;

    }

    .wrap{

        width: 980px;

        margin: 0 auto;

    }

    .pg-header{

        background-color: #303a40;

        -webkit-box-shadow: 0 2px 5px rgba(0,0,0,.2);

        -moz-box-shadow: 0 2px 5px rgba(0,0,0,.2);

        box-shadow: 0 2px 5px rgba(0,0,0,.2);

    }

    .pg-header .logo{

        float: left;

        padding:5px 10px 5px 0px;

    }

    .pg-header .logo img{

        vertical-align: middle;

        width: 110px;

        height: 40px;

    }

    .pg-header .nav{

        line-height: 50px;

    }

    .pg-header .nav ul li{

        float: left;

    }

    .pg-header .nav ul li a{

        display: block;

        color: #ccc;

        padding: 0 20px;

        text-decoration: none;

        font-size: 14px;

    }

    .pg-header .nav ul li a:hover{

        color: #fff;

        background-color: #425a66;

    }

    .pg-body{

    }

    .pg-body .catalog{

        position: absolute;

        top:60px;

        width: 200px;

        background-color: #fafafa;

        bottom: 0px;

    }

    .pg-body .catalog.fixed{

        position: fixed;

        top:10px;

    }

    .pg-body .catalog .catalog-item.active{

        color: #fff;

        background-color: #425a66;

    }

    .pg-body .content{

        position: absolute;

        top:60px;

        width: 700px;

        margin-left: 210px;

        background-color: #fafafa;

        overflow: auto;

    }

    .pg-body .content .section{

        height: 500px;

        border: 1px solid red;

    }

</style>

<body onscroll="ScrollEvent();">

<div class="pg-header">

    <div class="wrap clearfix">

        <div class="logo">

            <a href="#">

                <img src="http://core.pc.lietou-static.com/revs/images/common/logo_7012c4a4.pn">

            </a>

        </div>

        <div class="nav">

            <ul>

                <li>

                    <a  href="#">首页</a>

                </li>

                <li>

                    <a  href="#">功能一</a>

                </li>

                <li>

                    <a  href="#">功能二</a>

                </li>

            </ul>

        </div>

    </div>

</div>

<div class="pg-body">

    <div class="wrap">

        <div class="catalog" id="catalog">

            <div class="catalog-item" auto-to="function1"><a>第1张</a></div>

            <div class="catalog-item" auto-to="function2"><a>第2张</a></div>

            <div class="catalog-item" auto-to="function3"><a>第3张</a></div>

        </div>

        <div class="content" id="content">

            <div menu="function1" class="section">

                <h1>第一章</h1>

            </div>

            <div menu="function2" class="section">

                <h1>第二章</h1>

            </div>

            <div menu="function3" class="section">

                <h1>第三章</h1>

            </div>

        </div>

    </div>

</div>

    <script>

        function ScrollEvent(){

            var bodyScrollTop = document.body.scrollTop;

            if(bodyScrollTop>50){

                document.getElementsByClassName('catalog')[0].classList.add('fixed');

            }else{

                document.getElementsByClassName('catalog')[0].classList.remove('fixed');

            }

            var content = document.getElementById('content');

            var sections = content.children;

            for(var i=0;i<sections.length;i++){

                var current_section = sections[i];

                // 当前标签距离顶部绝对高度

                var scOffTop = current_section.offsetTop + 60;

                // 当前标签距离顶部,相对高度

                var offTop = scOffTop - bodyScrollTop;

                // 当前标签高度

                var height = current_section.scrollHeight;

                if(offTop<0 && -offTop < height){

                    // 当前标签添加active

                    // 其他移除 active

                    var menus = document.getElementById('catalog').children;

                    var current_menu = menus[i];

                    current_menu.classList.add('active');

                    for(var j=0;j<menus.length;j++){

                        if(menus[j] == current_menu){

                        }else{

                            menus[j].classList.remove('active');

                        }

                    }

                    break;

                }

            }

        }

    </script>

</body>

</html>
demo-滚动菜单
<!DOCTYPE html>

<html>

<head lang="en">

    <meta charset="UTF-8">

    <title></title>

</head>

<style>

    body{

        margin: 0px;

    }

    img {

        border: 0;

    }

    ul{

        padding: 0;

        margin: 0;

        list-style: none;

    }

    h1{

        padding: 0;

        margin: 0;

    }

    .clearfix:after {

        content: ".";

        display: block;

        height: 0;

        clear: both;

        visibility: hidden;

    }

    .wrap{

        width: 980px;

        margin: 0 auto;

    }

    .pg-header{

        background-color: #303a40;

        -webkit-box-shadow: 0 2px 5px rgba(0,0,0,.2);

        -moz-box-shadow: 0 2px 5px rgba(0,0,0,.2);

        box-shadow: 0 2px 5px rgba(0,0,0,.2);

    }

    .pg-header .logo{

        float: left;

        padding:5px 10px 5px 0px;

    }

    .pg-header .logo img{

        vertical-align: middle;

        width: 110px;

        height: 40px;

    }

    .pg-header .nav{

        line-height: 50px;

    }

    .pg-header .nav ul li{

        float: left;

    }

    .pg-header .nav ul li a{

        display: block;

        color: #ccc;

        padding: 0 20px;

        text-decoration: none;

        font-size: 14px;

    }

    .pg-header .nav ul li a:hover{

        color: #fff;

        background-color: #425a66;

    }

    .pg-body{

    }

    .pg-body .catalog{

        position: absolute;

        top:60px;

        width: 200px;

        background-color: #fafafa;

        bottom: 0px;

    }

    .pg-body .catalog.fixed{

        position: fixed;

        top:10px;

    }

    .pg-body .catalog .catalog-item.active{

        color: #fff;

        background-color: #425a66;

    }

    .pg-body .content{

        position: absolute;

        top:60px;

        width: 700px;

        margin-left: 210px;

        background-color: #fafafa;

        overflow: auto;

    }

    .pg-body .content .section{

        height: 500px;

        border: 1px solid red;

    }

</style>

<body onscroll="ScrollEvent();">

<div class="pg-header">

    <div class="wrap clearfix">

        <div class="logo">

            <a href="#">

                <img src="http://core.pc.lietou-static.com/revs/images/common/logo_7012c4a4.pn">

            </a>

        </div>

        <div class="nav">

            <ul>

                <li>

                    <a  href="#">首页</a>

                </li>

                <li>

                    <a  href="#">功能一</a>

                </li>

                <li>

                    <a  href="#">功能二</a>

                </li>

            </ul>

        </div>

    </div>

</div>

<div class="pg-body">

    <div class="wrap">

        <div class="catalog" id="catalog">

            <div class="catalog-item" auto-to="function1"><a>第1张</a></div>

            <div class="catalog-item" auto-to="function2"><a>第2张</a></div>

            <div class="catalog-item" auto-to="function3"><a>第3张</a></div>

        </div>

        <div class="content" id="content">

            <div menu="function1" class="section">

                <h1>第一章</h1>

            </div>

            <div menu="function2" class="section">

                <h1>第二章</h1>

            </div>

            <div menu="function3" class="section">

                <h1>第三章</h1>

            </div>

        </div>

    </div>

</div>

    <script>

        function ScrollEvent(){

            var bodyScrollTop = document.body.scrollTop;

            if(bodyScrollTop>50){

                document.getElementsByClassName('catalog')[0].classList.add('fixed');

            }else{

                document.getElementsByClassName('catalog')[0].classList.remove('fixed');

            }

            var content = document.getElementById('content');

            var sections = content.children;

            for(var i=0;i<sections.length;i++){

                var current_section = sections[i];

                // 当前标签距离顶部绝对高度

                var scOffTop = current_section.offsetTop + 60;

                // 当前标签距离顶部,相对高度

                var offTop = scOffTop - bodyScrollTop;

                // 当前标签高度

                var height = current_section.scrollHeight;

                if(offTop<0 && -offTop < height){

                    // 当前标签添加active

                    // 其他移除 active

                    var menus = document.getElementById('catalog').children;

                    var current_menu = menus[i];

                    current_menu.classList.add('active');

                    for(var j=0;j<menus.length;j++){

                        if(menus[j] == current_menu){

                        }else{

                            menus[j].classList.remove('active');

                        }

                    }

                    break;

                }

            }

        }

    </script>

</body>

</html>
demo-滚动高度
7、提交表单
document.geElementById('form').submit()
8、其他操作
console.log                 输出框

alert                       弹出框

confirm                     确认框

// URL和刷新

location.href               获取当前URL

location.href = "url"       重定向(赋值一个新的url)

location.reload()           重新加载(刷新 相当于location.herf=location.herf)

// 定时器

setInterval                 多次定时器

clearInterval               清除多次定时器

setTimeout                  单次定时器

clearTimeout                清除单次定时器
<!DOCTYPE html>

<html lang="en">

<head>

    <meta charset="UTF-8">

    <title>Title</title>

</head>

<body>

    <form id="f1" action="http://www.baidu.com">

        <input type="text" />

        <input type="submit" value="提交" />

        <a onclick="submitForm();">提交吧</a>

    </form>

    <script>

        function submitForm(){

            //document.getElementById('f1').submit()

            //alert(123);

            var v = confirm('真的要删除吗?');

            console.log(v);

        }

    </script>

</body>

</html>
Demo-确认框
<!DOCTYPE html>

<html lang="en">

<head>

    <meta charset="UTF-8">

    <title>Title</title>

</head>

<body>

    <script>

        // 定时器,一直执行

        var obj = setInterval(function(){

            console.log(1);

       //可设置条件语句进行清除定时器

            clearInterval(obj);

        }, 1000);

        // 定时器,只执行一次(到时间自动清除定时器,也可手动清除)

        setTimeout(function () {

            console.log('timeout');

        },15000);

    </script>

</body>

</html>
Demo-定时器
<!DOCTYPE html>

<html lang="en">

<head>

    <meta charset="UTF-8">

    <title>Title</title>

</head>

<body>

    <div id="status"></div>

    <input type="button" value="删除" onclick="DeleteEle();" />

    <script>

        function  DeleteEle(){

            document.getElementById('status').innerText = "已删除";

            setTimeout(function () {

                    document.getElementById('status').innerText = "";

            }, 50000);

        }

    </script>

</body>

</html>
Demo-单次定时器清除文本
三、事件
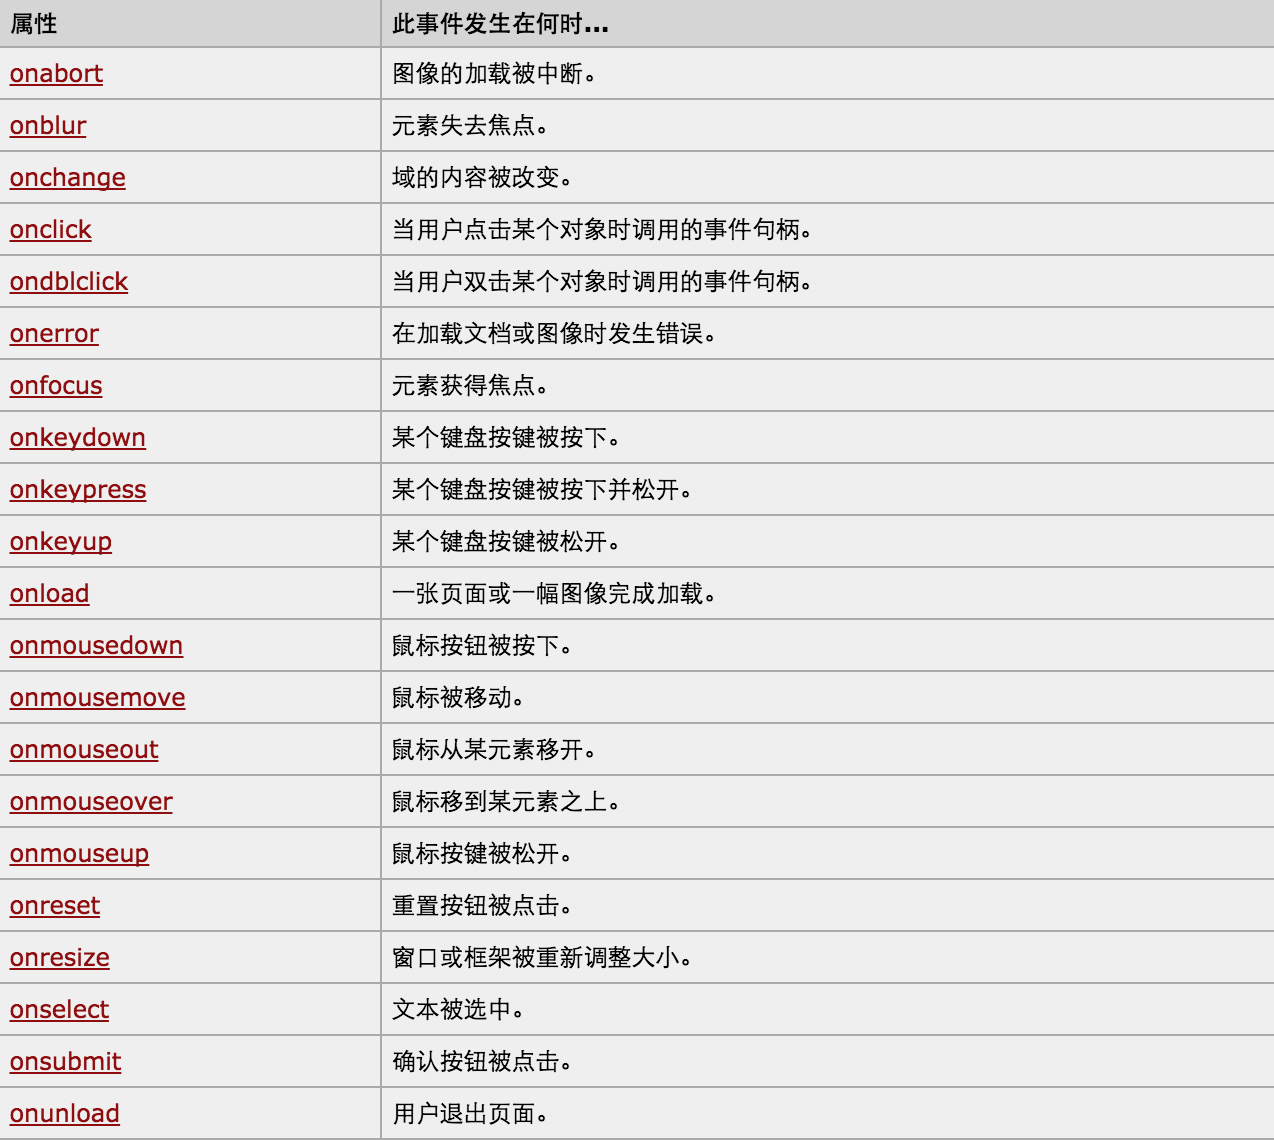
1、绑定事件两种方式:
- a. 直接标签绑定 onclick='xxx()' onfocus
- b. 先获取Dom对象,然后进行绑定document.getElementById('xx').onclick(document.getElementById('xx').onfocus)
2、this,当前触发事件的标签
- a. 第一种绑定触发方式
<input id='i1' type='button' onclick='ClickOn(this)'>

function ClickOn(self){

// self 当前点击的标签

}
- b. 第二种绑定触发方式
<input id='i1' type='button' >

document.getElementById('i1').onclick = function(){

           // this 代指当前点击的标签

}
- c.第三种绑定触发方式
//element.addEventListener(event, function, useCapture)

//event,指定事件名(字符串格式,不要使用 "on" 前缀。 例如,使用 "click" ,而不是使用 "onclick")

//function,指定要事件触发时执行的函数。

//useCapture,布尔值,指定事件是否在捕获或冒泡阶段执行

mymain.addEventListener("click",function({console.log("main")},true);
<!DOCTYPE html>

<html lang="en">

<head>

    <meta charset="UTF-8">

    <title>Title</title>

</head>

<style>

    #main{

        background-color: red;

        width:300px;

        height:400px;

    }

    #content{

        background-color: pink;

        width:150px;

        height:200px;

    }

</style>

<body>

    <div id="main">

        <div id="content"></div>

    </div>

    <script>

        var mymain = document.getElementById("main");

        var mycontent = document.getElementById("content");

        mymain.addEventListener("click",function(){console.log("main")},true); //Ture是捕获模式,先点击的标签就会被先被捕获到,从而展示出来,   False是冒泡模式,最低层绑定的事件先冒出来从而展示

        mycontent.addEventListener("click",function(){console.log("content")},true);

    </script>

</body>

</html>
Demo-捕获/冒泡示例
3、对于事件需要注意的要点:
- this
- event
- 事件链以及跳出
this标签当前正在操作的标签,event封装了当前事件的内容。
4、dom的demo示例:
<!DOCTYPE html>

<html>

    <head>

        <meta charset='utf-8' />

        <title></title>

        <style>

            .gray{

                color:gray;

            }

            .black{

                color:black;

            }

        </style>

        <script type="text/javascript">

            function Enter(){

               var id= document.getElementById("tip")

               id.className = 'black';

               if(id.value=='请输入关键字'||id.value.trim()==''){

                    id.value = ''

               }

            }

            function Leave(){

                var id= document.getElementById("tip")

                var val = id.value;

                if(val.length==0||id.value.trim()==''){

                    id.value = '请输入关键字'

                    id.className = 'gray';

                }else{

                    id.className = 'black';

                }

            }

        </script>

    </head>

    <body>

        <input type='text' class='gray' id='tip' value='请输入关键字' onfocus='Enter();'  onblur='Leave();'/>

    </body>

</html>
Demo-搜索框
<!DOCTYPE html>
<html>
<head>
<meta charset='utf-8' >
<title>欢迎上级单位莅临指导 </title>
<script type='text/javascript'>
function Go(){
var content = document.title;
var firstChar = content.charAt(0)
var sub = content.substring(1,content.length)
document.title = sub + firstChar;
}
setInterval('Go()',1000);
</script>
</head>
<body>
</body>
</html>
Demo-跑马灯
<!DOCTYPE html>

<html lang="en">

<head>

    <meta charset="UTF-8">

    <title>Title</title>

</head>

<style>

</style>

<body>

<table border="1" width="300px">

    <tr onmouseover="t1(0);" onmouseout="t2(0);"><td>1</td><td>2</td><td>2</td></tr>

    <tr onmouseover="t1(1);" onmouseout="t2(1);"><td>1</td><td>2</td><td>2</td></tr>

    <tr onmouseover="t1(2);" onmouseout="t2(2);"><td>1</td><td>2</td><td>2</td></tr>

</table>

    <script>

        function t1(n){

            var myTrs = document.getElementsByTagName("tr")[n];

//            console.log(myTrs);

            myTrs.style.backgroundColor = "red";

        }

        function t2(n){

            var myTrs = document.getElementsByTagName("tr")[n];

            myTrs.style.backgroundColor = "";

        }

    </script>

</body>

</html>
Demo-onmouseover+onmouseout表格换色
<!DOCTYPE html>

<html lang="en">

<head>

    <meta charset="UTF-8">

    <title>Title</title>

</head>

<style>

</style>

<body>

<table id="i1" border="1" width="300px">

    <tr><td>1</td><td>2</td><td>2</td></tr>

    <tr><td>1</td><td>2</td><td>2</td></tr>

    <tr><td>1</td><td>2</td><td>2</td></tr>

</table>

<table id='i2' border="1" width="300px">

    <tr><td>1</td><td>2</td><td>2</td></tr>

    <tr><td>1</td><td>2</td><td>2</td></tr>

    <tr><td>1</td><td>2</td><td>2</td></tr>

</table>

    <script>

        var myTrs = document.getElementsByTagName("tr");

        var len = myTrs.length;

        for(var i=0;i<len;i++){

            // i=0,i=1,i=2

            myTrs[i].onmouseover = function(){

                 this.style.backgroundColor = "red"; //这里不能写成myTrs[i],因为JavaScript作用域的关系,在for循环的时候i=0,i=1,i=2,这个时候function还在内存中没有编译运行

            };

            myTrs[i].onmouseout = function(){

             this.style.backgroundColor = "";

             }

        }

    </script>

</body>

</html>
Demo-表格换色之(行为、样式、结构相分离版)
更多更详细DOM资料:点击
【python】-- web开发之DOM的更多相关文章
- python Web开发之 WSGI & uwsgi & uWSGI
首先弄清下面几个概念: WSGI 全称是Web Server Gateway Interface,WSGI不是服务器,python模块,框架,API或者任何软件,只是一种规范,描述web server ...
- python web开发之django
上一篇介绍了python-web.py的开发,本节课我们详细说明django的开发与使用. 简介及可以学习到的内容: 1.Python下有许多款不同的 Web 框架.Django是重量级选手中最有代表 ...
- Python Web开发之Flask
PythonWEB框架之Flask 前言: Django:1个重武器,包含了web开发中常用的功能.组件的框架:(ORM.Session.Form.Admin.分页.中间件.信号.缓存.ContenT ...
- python web开发之flask框架学习(1) 创建flask项目
python 开发越来越火,作为菜鸟,也应该学习一下,感觉还可以,记录下来,方便学习参考. 不管做什么开发首先肯定是安装环境,这里我用的是pycharm,python3.如果不清楚怎么安装环境可以去网 ...
- Python Web开发之路
Flask相关 1.DBUtils数据库连接池 2.Flask之初体验 3.Flask之WTForms 4.Flask之信号 5.Flask之flask-session 6.Flask之flask-s ...
- python web开发之flask框架学习(2) 加载模版
上次学习了flask的helloword项目的创建,这次来学习flask项目的模版加载: 第一步:创建一个flask项目 第二步:在项目目录的templates文件夹下创建一个html文件 第三步: ...
- Vim下的Web开发之html,CSS,javascript插件
Vim下的Web开发之html,CSS,javascript插件 HTML 下载HTML.zip 解压HTML.zip,然后将里面的所有文件copy到C:\Program Files\Vim\vi ...
- Web开发之Tomcat&Servlet
<!doctype html>01 - JavaEE - Tomcat&Servlet figure:first-child { margin-top: -20px; } #wri ...
- 移动web开发之rem适配布局
移动web开发之rem适配布局 方案: 页面布局文字能否随着屏幕大小变化而变化 流式布局和flex布局主要针对于宽度布局,那高度如何布局? 怎样让屏幕发生变化的时候元素高度和宽度等比例缩放? 1. r ...
随机推荐
- 转: 初识Agile/CMMI/Scrum
转:http://www.cnblogs.com/maxwell/p/5093917.html 一.背景介绍 在朋友(aehyok)的建议下,初步去了解Visual Studio Online,简称V ...
- 2017.8.1 logstash基础语法学习
数据类型 bool:debug => true string:host => "hostname" int:port => 514 array:match =&g ...
- Material Design (二),TextInputLayout的使用
前言 一般登录注冊界面都须要EditText这个控件来让用户输入信息,同一时候我们通常会设置一个标签(使用TextView)和EditText的hint属性来提示用户输入的内容,而设计库中高级组件T ...
- 【Unity】脚本选择打勾的勾选框隐藏
这个问题事实上已经遇到过好几次了.但又没有特别的须要手动勾选,所以也一直都没在意. 今天研究了一下,原来是由于我删除了Start方法...... 所以.仅仅要脚本中没有Start方法,勾选框就会隐藏掉 ...
- Odoo many2many command
CREATE = lambda values: (0, False, values) // (0,False, Values) //创建 UPDATE = lambda id, values: (1, ...
- Nginx:HTTP框架是如何介入请求
参考资料 <深入理解Nginx>(陶辉) Nginx事件模块博客地址:http://www.cnblogs.com/runnyu/p/4914698.html Nginx是一个事件驱动构架 ...
- js 获取浏览器显示内容的宽度和高度
js获取浏览器显示内容的宽度和高度 CreateTime--2017年7月10日17:24:12Author:Marydon 1.获取浏览器屏幕显示d的网页宽度 /** * 得到浏览器显示的屏幕高 ...
- 【Java】Java_20 Scanner获取键盘输入
使用Scanner类可以很方便的获取用户的键盘输入,Scanner是一个基于正则表达式子的文本扫描器,他可以从文件.输入流.字符串中解析出基本类型值和字符串值. 例子示意: package com.o ...
- 51单片机 | 并行I/O口扩展实例(74LS244/74LS373/4071)
并行I/O口扩展实例 //<51单片机原理及应用(第二版)——基于Keil C与Proteus>第四章例4.4 I/O口不能完全用于输入/输出操作,当需要扩展外部存储器时,P0.P2口用作 ...
- Ubuntu 12.04 的IP 设置
通过访问 /etc/network/interfaces 实现动态IP 或者静态IP 的设置. vim /et/network/interfaces 1.设置动态IP auto lo iface ...