springboot之assembly的文件配置
一、在使用springboot框架的时候,存在一个问题。就是我们配置yaml文件,需要单独提出来做参数修改。当然这个是可以通过spring.profiles.active的方式来配置dev,prod等环境的激活。但是我们如果存在环境不确定,或者需要启动脚本,启动项目的时候,这样通过jar的方式后续会处理很多工作。所以前期的集成工作还是很有必要的。
二、这里有一个简单的例子,用于参数配置方式
1)目录结构
2)需要的依赖包(pom.xml)
  <parent>

        <groupId>org.springframework.boot</groupId>

        <artifactId>spring-boot-starter-parent</artifactId>

        <version>2.0.0.RELEASE</version>

    </parent>

    <dependencies>

        <dependency>

            <groupId>org.springframework.boot</groupId>

            <artifactId>spring-boot-starter-web</artifactId>

        </dependency>

    </dependencies>
3)maven的构建过程
   <build>

        <finalName>assembly</finalName>

        <plugins>

            <plugin>

                <groupId>org.springframework.boot</groupId>

                <artifactId>spring-boot-maven-plugin</artifactId>

                <configuration>

                    <includeSystemScope>true</includeSystemScope>

                </configuration>

            </plugin>

            <plugin>

                <!--主要使用的是maven提供的assembly插件完成-->

                <artifactId>maven-assembly-plugin</artifactId>

                <executions>

                    <execution>

                        <configuration>

                            <appendAssemblyId>false</appendAssemblyId>

                            <!--具体的配置文件-->

                            <descriptors>${project.basedir}/src/main/resources/assembly/package.xml</descriptors>

                        </configuration>

                        <id>make-assembly</id>

                        <!--绑定到maven操作类型上-->

                        <phase>package</phase>

                        <!--运行一次-->

                        <goals>

                            <goal>single</goal>

                        </goals>

                    </execution>

                </executions>

            </plugin>

        </plugins>

    </build>
4)集成过程(package.xml)
<?xml version='1.0' encoding='UTF-8'?>

<assembly xmlns="http://maven.apache.org/ASSEMBLY/2.0.0"

          xmlns:xsi="http://www.w3.org/2001/XMLSchema-instance"

          xsi:schemaLocation="http://maven.apache.org/ASSEMBLY/2.0.0 http://maven.apache.org/xsd/assembly-2.0.0.xsd">

    <!--打包名称,唯一标识-->

    <id>${project.build.finalName}</id>

    <!--打包格式,可以手动修改-->

    <formats>

        <format>tar.gz</format>

    </formats>

    <!--文件设置-->

    <fileSets>

        <fileSet>

            <!--目标目录,会处理目录里面的所有文件-->

            <directory>${project.basedir}/src/main/resources/config</directory>

            <!--相对于打包后的目录-->

            <outputDirectory>config</outputDirectory>

            <!--文件过滤-->

            <includes>

                <include>*.*</include>

            </includes>

        </fileSet>

        <fileSet>

            <directory>${project.basedir}/src/main/resources/script</directory>

            <outputDirectory>/</outputDirectory>

            <includes>

                <include>*.*</include>

            </includes>

            <!--文件权限-->

            <fileMode>0755</fileMode>

            <!--如果是脚本,一定要改为unix.如果是在windows上面编码,会出现dos编写问题-->

            <lineEnding>unix</lineEnding>

        </fileSet>

    </fileSets>

    <files>

        <!--包含打包后的jar文件,可以不加入<outputDirectory/>,默认打包的目录-->

        <file>

            <source>${project.build.directory}/${project.build.finalName}.jar</source>

        </file>

        <!--这种方式也可以进行文件处理,但是针对单文件-->

       <!-- <file>

            <source>${project.basedir}/src/main/resources/script/start.sh</source>

            <fileMode>0755</fileMode>

            <lineEnding>unix</lineEnding>

        </file>-->

    </files>

</assembly>
备注:具体的参数的意义可以参考官网:http://maven.apache.org/plugins/maven-assembly-plugin/assembly.html
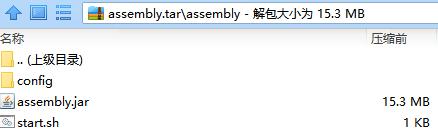
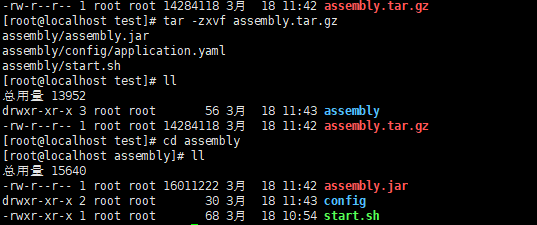
5)通过maven的package打包

三、源码:https://github.com/lilin409546297/springboot-assembly
springboot之assembly的文件配置的更多相关文章
- SpringBoot入门-多环境文件配置(二)
pom.xml <name>springboot-application</name> <description>A project for Spring Boot ...
- SpringBoot中自定义properties文件配置参数并带有输入提示
1. 创建配置类 在项目中创建一个参数映射类如下 @ConfigurationProperties(prefix = "user.info") public class MyPro ...
- 【2.0】SpringBoot多环境yml文件配置
一.使用Spring Boot Profiles 1. 使用yml文件 首先,我们先创建一个名为 application.yml的属性文件,如下: server: port: 8080 my: nam ...
- Spring-Boot注入自定义properties文件配置
创建wzq.properties wzq.properties注入User实体类中 @PropertySource(value = "classpath:wzq.properties&quo ...
- SpringBoot 项目打包分开lib,配置和资源文件
原文地址:https://blog.csdn.net/u012811805/article/details/80878848 1 jar启动分离依赖lib和配置 先前发布boot项目的时候,改动一点东 ...
- ******可用 SpringBoot 项目打包分开lib,配置和资源文件
spring-boot多模块打包后,无法找到其他模块中的类https://blog.csdn.net/Can96/article/details/96172172 关于SpringBoot项目打包没有 ...
- 在springboot pom文件配置过程,`spring-boot-maven-plugin`配置出错的问题解决及配置过程出现问题的一些思考
在springboot pom文件配置过程,spring-boot-maven-plugin配置出错的问题解决及配置过程出现问题的一些思考 解决方法一: 也是最简单的方法,可能是maven没有来得及导 ...
- SpringBoot多重属性文件配置方案笔记
SpringBoot多重属性文件配置方案笔记 需要重写PropertyPlaceholderConfigurer 同时要忽略DataSourceAutoConfiguration @SpringBoo ...
- Springboot多属性文件配置
Springboot 多属性文件配置 配置文件后缀有两种: .properties和.yml 要完成多属性配置需要自定义PropertySourcesPlaceholderConfigurer 这个B ...
随机推荐
- ORACLE 参数设置绑定变量
使用 CURSOR_SHARING 参数 EXACT 默认,不替换 SIMIAR 当替换不会影响到执行计划时,才会将字面量替换成绑定变量 FORCE 只要有可能,字面量会被替换为绑定变量
- linux something
使用的UbuntuKylin source error e1:apt-get update提示没有证书 e2:访问不了阿里云源服务器 e3:GPG 错误:http://download.mono-p ...
- 教你使用Paw解析http请求
教你使用Paw解析http请求 软件下载地址: 链接: http://pan.baidu.com/s/1gdzmjq7 密码: 3mpb 这款应用的图片像极了百度,哈哈. 支持的请求方式: 完整的显示 ...
- [EffectiveC++]item44:将与参数无关的代码抽离templates
- Spring 读取配置文件的俩种方式
读取配置可通过 org.springframework.core.env.Environment 类来获取, 也可以通过@Value的方式来获取 注解形式: @PropertySource({&quo ...
- 1260. [CQOI2007]涂色【区间DP】
Description 假设你有一条长度为5的木版,初始时没有涂过任何颜色.你希望把它的5个单位长度分别涂上红.绿.蓝.绿.红色,用一个长度为5的字符串表示这个目标:RGBGR. 每次你可以把一段连续 ...
- 1055. [HAOI2008]玩具取名【区间DP】
Description 某人有一套玩具,并想法给玩具命名.首先他选择WING四个字母中的任意一个字母作为玩具的基本名字.然后 他会根据自己的喜好,将名字中任意一个字母用“WING”中任意两个字母代替, ...
- virtualbox+vagrant学习-2(command cli)-22-vagrant validate命令
Validate 格式: vagrant validate [options] 该命令用于验证你的Vagrantfile文件 userdeMacBook-Pro:~ user$ vagrant val ...
- centos安装swoole
编译安装swoole: cd && wget https://github.com/swoole/swoole-src/archive/1.8.6-stable.tar.gz ...
- mongodb启动与运用
在操作前需要启动mongodb数据库服务 1.首先打开dos窗口,然后选择路径到你的安装路径下的bin目录(我的路径是的D:mongo\mongodb\bin) 2.然后输入启动命令(D:mongo\ ...