在Linux上安装Chef工作站
| 导读 | Chef是一个IT基础设施自动化软件,它可以管理你组织中所有的服务器和网络设备。当我们想与Chef服务器、任何物理节点(服务器、网络设备等)的基础设施进行交互时,我们需要一个Chef工作站。本教程解释如何安装和配置Linux服务器上Chef工作站。 |

ChefDK是Chef Development Kit的缩写,它几乎用于所有的平台,包括基于Debian发行版、Ubuntu、RedHat、CentOS、Mac OS X和Windows。当前ChefDK的稳定版本是0.11.2,对于基于RHEL的系统,它可用于版本 6 和 7(如: CentOS 6 和 CentOS 7),RPM版本只有64位版本。
使用以下命令下载ChefDK
在CentOS 7上
cd ~

wget https://packages.chef.io/stable/el/7/chefdk-0.11.2-1.el7.x86_64.rpm
在CentOS 6上
cd ~

wget https://packages.chef.io/stable/el/6/chefdk-0.11.2-1.el6.x86_64.rpm
使用RPM安装刚刚下载的ChefDK
# rpm -ivh chefdk-0.11.2-1.el7.x86_64.rpm

Preparing...                          ################################# [100%]

Updating / installing...

   1:chefdk-0.11.2-1.el7              ################################# [100%]

Thank you for installing Chef Development Kit!
ChefDK默认安装到/opt/chefdk目录下,如下所示
# ls -l /opt/chefdk/

drwxr-xr-x. 2 root root  4096 Mar  3 13:50 bin

drwxr-xr-x. 7 root root    62 Mar  3 13:50 embedded

-rw-r--r--. 1 root root 13249 Feb 22 14:26 version-manifest.json

-rw-r--r--. 1 root root  8233 Feb 22 14:26 version-manifest.txt
执行chef verify,验证所有来自ChefDK的不同组件,确保他们都工作正常,没有任何问题
# chef verify

Running verification for component 'berkshelf'

Running verification for component 'test-kitchen'

Running verification for component 'tk-policyfile-provisioner'

Running verification for component 'chef-client'

Running verification for component 'chef-dk'

Running verification for component 'chef-provisioning'

Running verification for component 'chefspec'

Running verification for component 'generated-cookbooks-pass-chefspec'

Running verification for component 'rubocop'

Running verification for component 'fauxhai'

Running verification for component 'knife-spork'

Running verification for component 'kitchen-vagrant'

Running verification for component 'package installation'

Running verification for component 'openssl'

Running verification for component 'inspec'

.......

---------------------------------------------

Verification of component 'test-kitchen' succeeded.

Verification of component 'chef-dk' succeeded.

Verification of component 'chefspec' succeeded.

Verification of component 'rubocop' succeeded.

Verification of component 'knife-spork' succeeded.

Verification of component 'openssl' succeeded.

Verification of component 'berkshelf' succeeded.

Verification of component 'chef-client' succeeded.

Verification of component 'fauxhai' succeeded.

Verification of component 'inspec' succeeded.

Verification of component 'tk-policyfile-provisioner' succeeded.

Verification of component 'kitchen-vagrant' succeeded.

Verification of component 'chef-provisioning' succeeded.

Verification of component 'package installation' succeeded.

Verification of component 'generated-cookbooks-pass-chefspec' succeeded.
下面是chef verify失败的案例。注意:Ruby在Chef中是必须的,它被嵌入在了ChefDK中。
# chef verify

..

/opt/chefdk/embedded/lib/ruby/gems/2.1.0/gems/mixlib-shellout-2.2.6/lib/mixlib/shellout.rb:289:in `invalid!': Expected process to exit with [0], but received '1' (Mixlib::ShellOut::ShellCommandFailed)

---- Begin output of /usr/bin/ohai -v ----

STDOUT:

STDERR: /opt/chefdk/embedded/lib/ruby/site_ruby/2.1.0/rubygems/dependency.rb:319:in `to_specs': Could not find 'chef-config' (= 12.8.0) - did find: [chef-config-12.7.2] (Gem::LoadError)
以上错误信息显示:“Could not find ‘chef-config’ (= 12.8.0) – did find: [chef-config-12.7.2] (Gem::LoadError)”,在安装的ChefDK中chef-config的版本是12.7.2的旧版本,在手动安装chef-confg 12.8.0版本后再执行chef verify,显示验证成功。
执行 chef -version命令,显示ChefDK的版本号以及所有附带组件
# chef --version

Chef Development Kit Version: 0.11.2

chef-client version: 12.7.2

berks version: 4.2.0

kitchen version: 1.5.0
设置Chef相关的环境变量,如:GEM_ROOT GEM_HOME GEM_PATH。
export GEM_ROOT="/opt/chefdk/embedded/lib/ruby/gems/2.1.0"

export GEM_HOME="/root/.chefdk/gem/ruby/2.1.0"

export GEM_PATH="/root/.chefdk/gem/ruby/2.1.0:/opt/chefdk/embedded/lib/ruby/gems/2.1.0"
此外,如果你的系统上已经安装了ruby,你需要更新与ruby相关的PATH变量,如下所示
export PATH="/opt/chefdk/bin:/root/.chefdk/gem/ruby/2.1.0/bin:/opt/chefdk/embedded/bin:/opt/chefdk/bin:/root/.chefdk/gem/ruby/2.1.0/bin:/opt/chefdk/embedded/bin:/opt/chefdk/bin:/root/.chefdk/gem/ruby/2.1.0/bin:/opt/chefdk/embedded/bin:/usr/local/sbin:/usr/local/bin:/usr/sbin:/usr/bin:/root/bin"
显示所有Chef设置的环境变量。
chef shell-init bash
想要快速设置这些环境变量,可以将其添加到bash_profile文件中,如下所示。
echo 'eval "$(chef shell-init bash)"' >> ~/.bash_profile
为了访问Chef服务器上的Chef Manage GUI,添加以下firewalld规则,开放Chef服务器上的相应端口。
firewall-cmd --direct  --add-rule ipv4 \

filter INPUT_direct 0 -i eth0 -p tcp \

 --dport 443 -j ACCEPT

firewall-cmd --direct  --add-rule ipv4 \

filter INPUT_direct 0 -i eth0 -p tcp \

 --dport 80 -j ACCEPT

firewall-cmd --direct  --add-rule ipv4 \

filter INPUT_direct 0 -i eth0 -p tcp \

 --dport 9683 -j ACCEPT

firewall-cmd --reload
登录到Chef Manage GUI,单击“Administration”选项,从列表中选择“organization”。此例中,“organization”为“example”,选中organization之后,点击左侧菜单中的“Starter Kit”。 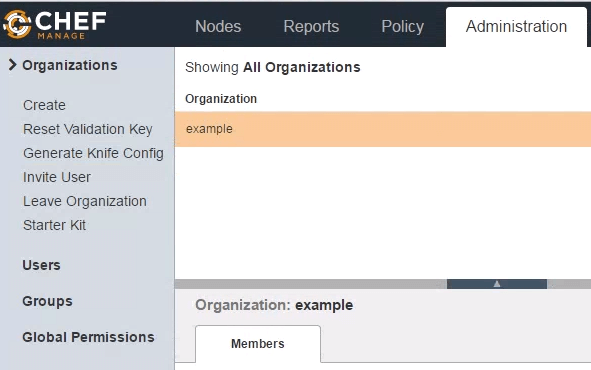
按下“Download(下载)”按钮之后,会跳出一个警告信息,按下“Proceed”,它会将chef-starter.zip文件下载到本地机器。
将chef-starter.zip文件传输到Chef工作站并解压到root的home目录下
# cd ~

# unzip chef-starter.zip

Archive:  chef-starter.zip

   creating: chef-repo/cookbooks/

   creating: chef-repo/cookbooks/starter/

   creating: chef-repo/cookbooks/starter/templates/

   creating: chef-repo/cookbooks/starter/templates/default/

  inflating: chef-repo/cookbooks/starter/templates/default/sample.erb

   creating: chef-repo/cookbooks/starter/files/

   creating: chef-repo/cookbooks/starter/files/default/

  inflating: chef-repo/cookbooks/starter/files/default/sample.txt

   creating: chef-repo/cookbooks/starter/recipes/

  inflating: chef-repo/cookbooks/starter/recipes/default.rb

   creating: chef-repo/cookbooks/starter/attributes/

  inflating: chef-repo/cookbooks/starter/attributes/default.rb

  inflating: chef-repo/cookbooks/starter/metadata.rb

  inflating: chef-repo/cookbooks/chefignore

  inflating: chef-repo/README.md

  inflating: chef-repo/.gitignore

   creating: chef-repo/.chef/

   creating: chef-repo/roles/

  inflating: chef-repo/.chef/knife.rb

  inflating: chef-repo/roles/starter.rb

  inflating: chef-repo/.chef/ramesh.pem

  inflating: chef-repo/.chef/example-validator.pem
如果你手动创建了chef-repo文件夹,那你就需要手动创建上述的子目录,复制knife.rb文件、organization-validator.pem文件(如:example-validator.pem)、username.pem文件(如:ramesh.pem)到上面显示的目录中。
在这个阶段如果执行knife client list会得到以下错误信息
# cd ~/chef-repo

# knife client list

ERROR: SSL Validation failure connecting to host: centos.example.com - SSL_connect returned=1 errno=0 state=error: certificate verify failed

ERROR: Could not establish a secure connection to the server.

Use `knife ssl check` to troubleshoot your SSL configuration.

If your Chef Server uses a self-signed certificate, you can use

`knife ssl fetch` to make knife trust the server's certificates.

Original Exception: OpenSSL::SSL::SSLError: SSL Error connecting to https://centos.example.com/organizations/example/clients - SSL_connect returned=1 errno=0 state=error: certificate verify failed
证书验证失败,因为我们没有从Chef服务器下载SSL证书,此时可以执行以下“knife ssl fetch”。
# cd ~/chef-repo

# knife ssl fetch

WARNING: Certificates from centos.example.com will be fetched and placed in your trusted_cert

directory (/root/chef-repo/.chef/trusted_certs).

Knife has no means to verify these are the correct certificates. You should

verify the authenticity of these certificates after downloading.
证书将会下载到以下truster_certs目录中
# ls -l /root/chef-repo/.chef/trusted_certs

-rw-r--r--. 1 root root 1379 Mar 20 20:17 centos_example_com.crt

# cat /root/chef-repo/.chef/trusted_certs/centos_example_com.crt

-----BEGIN CERTIFICATE-----

MIIDzDCCArSgAwIBAgIBADANBgkqhkiG9w0BAQsFADBRMQswCQYDVQQGEwJVUzEQ

MA4GA1UECgwHWW91Q29ycDETMBEGA1UECwwKT3BlcmF0aW9uczEbMBkGA1UEAwwS

ZXJhdGlvbnMxGzAZBgNVBAMMEmNlbnRvcy5leGFtcGxlLmNvbTCCASIwDQYJKoZI

..

..

WLyr2ORLMcck/OGsubabO/koMNTqhl2JJPECNiDJh06MeZ/2+BOwGZSpXDbw+vFE

NJAsLfsTzihGWZ58einMFA==

-----END CERTIFICATE-----
如果Chef工作站工作正常,当你执行“knife client list”时,它会显示所有连接工作站的客户端。由于我们刚刚安装它,因此只能看到刚刚我们创建的组织(organization)
# cd ~/chef-repo

# knife client list

example-validator
如果你现有的Chef工作站机器上已经有5个服务器连接到它了,你会看到以下信息
# knife client list

example-validator

node1

node2

node3

node4

node5
免费提供最新Linux技术教程书籍,为开源技术爱好者努力做得更多更好:https://www.linuxprobe.com/
在Linux上安装Chef工作站的更多相关文章
- 在Windows和Linux上安装paramiko模块以及easy_install的安装方法
一.paramiko模块有什么用? paramiko是用python语言写的一个模块,遵循SSH2协议,支持以加密和认证的方式,进行远程服务器的连接.由于使用的是python这样的能够跨平台运行的语言 ...
- 在Linux上安装Oracle RAC 12 c(12.1) 虚拟机,一步一步向导
Oracle RAC 12 c(12.1)在Linux上安装虚拟机,一步一步向导 今天我们将看到如何安装 12 c版本1 RAC(真正的应用程序集群)数据库2 Linux 64位的虚拟机 使用VMWa ...
- WINDOWS和Linux上安装php7 alpha 并安装 yaf
WINDOWS和Linux上安装php7 alpha 并安装 yaf PHP技术 widuu 2个月前 (06-15) 126浏览 0评论 windows 1.windows上安装 php7 ...
- 在Windows和Linux上安装paramiko模块
一.paramiko模块有什么用? paramiko是用python语言写的一个模块,遵循SSH2协议,支持以加密和认证的方式,进行远程服务器的连接.由于使用的是python这样的能够跨平台运行的语言 ...
- Linux上安装使用boost入门指导
Data Mining Linux上安装使用boost入门指导 获得boost boost分布 只需要头文件的库 使用boost建立一个简单的程序 准备使用boost二进制文件库 把你的程序链接到bo ...
- 如何在Linux上安装Storm
Storm是开源的分布式实时计算系统,能够让数据流处理变得简单.可靠,也因此在大数据领域有广泛的实际 应用.下面介绍一下如何在Linux系统上安装Storm.根据Storm官网介绍,安装Storm软件 ...
- linux上安装Drupal
linux上安装Drupal 前言:国内用drupal的并不太多,网上资料也很少.要注意的是drupal尽量别使用apt来安装,特别是ubuntu平台的drupal做出了一定的更改,会妨碍后期的学习和 ...
- 在Linux上安装Hadoop
先决条件: Hadoop是用JAVA写的,所以首先要安装Java.在Ubuntu上安装JDK见:http://blog.csdn.net/microfhu/article/details/766739 ...
- linux上安装配置samba服务器
linux上安装配置samba服务器 在linux上安装配置samba服务器 在这给大家介绍一个不错的家伙,samba服务.如果您正在犯愁,如何在Windows和Linux之间实现资源共享,就请看看这 ...
随机推荐
- SQL注入实验
看到他们黑站感觉很有意思的样子,于是我也玩了一下午,虽然都是些狠狠狠简单的东西,不过还是记录下来啦. 虽然和我现在做的没啥关系,不过,,,挺好 浏览器的“工具”——“internet选项”——“高级” ...
- getJSON获取JSON文件加载下拉框及动态验证比输入项
1.html界面 <form action="" method="get"> <div class="form-group" ...
- UOJ275 组合数问题
给定n,m和k,求有多少对(i , j)满足0 ≤ i ≤ n, 0 ≤ j ≤ min(i ,m)且C(︀i,j)︀是k的倍数.n,m ≤ 1018, k ≤ 100,且k是质数. 把i和j都看成k ...
- Elasticsearch快速入门案例
写在前面的话:读书破万卷,编码如有神-------------------------------------------------------------------- 参考内容: <Ela ...
- hdoj 4445 Crazy Tank 物理题/枚举角度1
Crazy TankTime Limit: 2000/1000 MS (Java/Others) Memory Limit: 32768/32768 K (Java/Others)Total S ...
- HDU step by step
section 1 不解释~ section 2 1.2.1 a+b coming #include<stdio.h> long long z,x,y; int main( ) { whi ...
- Accessing an element's parent with ElementTree(转)
Today I ran across a situation where I needed to programmatically remove specific elements from a KM ...
- 报错:不允许保存更改。您所做的更改要求删除并重新创建以下表……
在使用SQL Server 2008为某个表添加列的时候出现启用了"阻止保存要求重新创建表的更改问题的设置方法..."报错: 解决方法: 工具--选项--Designers-- ...
- sql语句分组/排序/计算总数/连接等sql语句书写
1.什么是表连接? 答:比如两张表,要获取的信息来自两张表,就需要通过外键的形式进行两张表的连接.最后产后组合信息. 表连接是通过join连接的.表连接说白了就是产生一个大表.表连接也都是用于查询上的 ...
- python笔记26-命令行传参sys.argv实际运用
前言 平常我们在用别人写好的python包的时候,在cmd输入xx -h就能查看到帮助信息,输入xx -p 8080就能把参数传入程序里,看起来非常酷. 本篇就来讲下如何在python代码里加入命令行 ...