Httpd服务进阶知识-基于Apache Modele的LAMP架构之PhpMyAdmin案例
Httpd服务进阶知识-基于Apache Modele的LAMP架构之PhpMyAdmin案例
作者:尹正杰
版权声明:原创作品,谢绝转载!否则将追究法律责任。
一.常见LAMP应用
PhpMyAdmin

  是一个以PHP为基础,以Web-Base方式架构在网站主机上的MySQL的数据库管理工具,让管理者可用Web接口管理MySQL数据库

WordPress

  是一种使用PHP语言开发的博客平台,用户可以在支持PHP和MySQL数据库的服务器上架设属于自己的网站。也可把 WordPress当作一个内容管理系统(CMS)来使用

   WordPress后来成为了一个"生态系统",它的作者也因此收入了数以千万美元的收入。WordPress本身也是开源的,围绕在WordPress背后形成了一个庞大的“生态圈”,有提供模板的,插件的,内容管理系统的(CMS)等等,我们可以去官网下载软件进行安装。

PHPWind:

  phpwind是杭州的一家公司,2003年发布了PHPWind的前身版本ofstar,并发展成为包含BBS、CMS、博客、SNS等一系列程序的通用型建站软件, 于2008年加入阿里巴巴集团

Crossday Discuz! Board(简称 Discuz!)

  discuz是phpwind竞争对手,是一套通用的社区论坛软件系统。自2001年6月面世以来,是全球成熟度最高、覆盖率最大的论坛软件系统之一。2010年8月23日,与腾讯达成收购协议

  其实discuz!就有门户站点的功能,国外也有drupal和xooms等等。这些都是开源的,因为我们都可以在网上下载下来安装测试,但是如果你想用这些软件进行营利的话,你可能就得向官方购买授权啦~

Phpbb:

  是全球比较流行,国人用的比较少,外国人用的倒是不少,不过phpbb现在已经被汉化了,对中文的支持也不错。phpwind和discuz都是国人开发的,没错,不知道为什么自己就是相当的自豪,尽管我不是PHP程序员。phpbb是外国人开发的,在全球的影响力还是相当不错的哟。
  外国还有一个叫"hpwind"也还不错,感兴趣的小伙伴也可以下载部署一下,我这里就不罗嗦了。

ECShop

  是一款B2C独立网店系统,适合企业及个人快速构建个性化网上商店。系统是基于PHP语言及MYSQL数据库构架开发的跨平台开源程序。2006年6月,ECShop推出第一个版本1.0
二.布署phpMyadmin
1>.查看phpMyadmin所以来的php及MySQL版本(https://www.phpmyadmin.net/downloads/)
[root@node101.yinzhengjie.org.cn ~]# yum info php

Loaded plugins: fastestmirror, langpacks

Loading mirror speeds from cached hostfile

 * base: mirror.jdcloud.com

 * extras: mirror.bit.edu.cn

 * updates: mirrors.huaweicloud.com

Installed Packages

Name        : php

Arch        : x86_64

Version     : 5.4.16

Release     : 46.1.el7_7

Size        : 4.4 M

Repo        : installed

From repo   : updates

Summary     : PHP scripting language for creating dynamic web sites

URL         : http://www.php.net/

License     : PHP and Zend and BSD

Description : PHP is an HTML-embedded scripting language. PHP attempts to make it

            : easy for developers to write dynamically generated web pages. PHP also

            : offers built-in database integration for several commercial and

            : non-commercial database management systems, so writing a

            : database-enabled webpage with PHP is fairly simple. The most common

            : use of PHP coding is probably as a replacement for CGI scripts.

            :

            : The php package contains the module (often referred to as mod_php)

            : which adds support for the PHP language to Apache HTTP Server.

[root@node101.yinzhengjie.org.cn ~]#
[root@node101.yinzhengjie.org.cn ~]# yum info php #CenOS7.6默认使用的是php5.4.16版本,如果不想编译安装php的话建议选择版本相对较久的PhpMyadmin
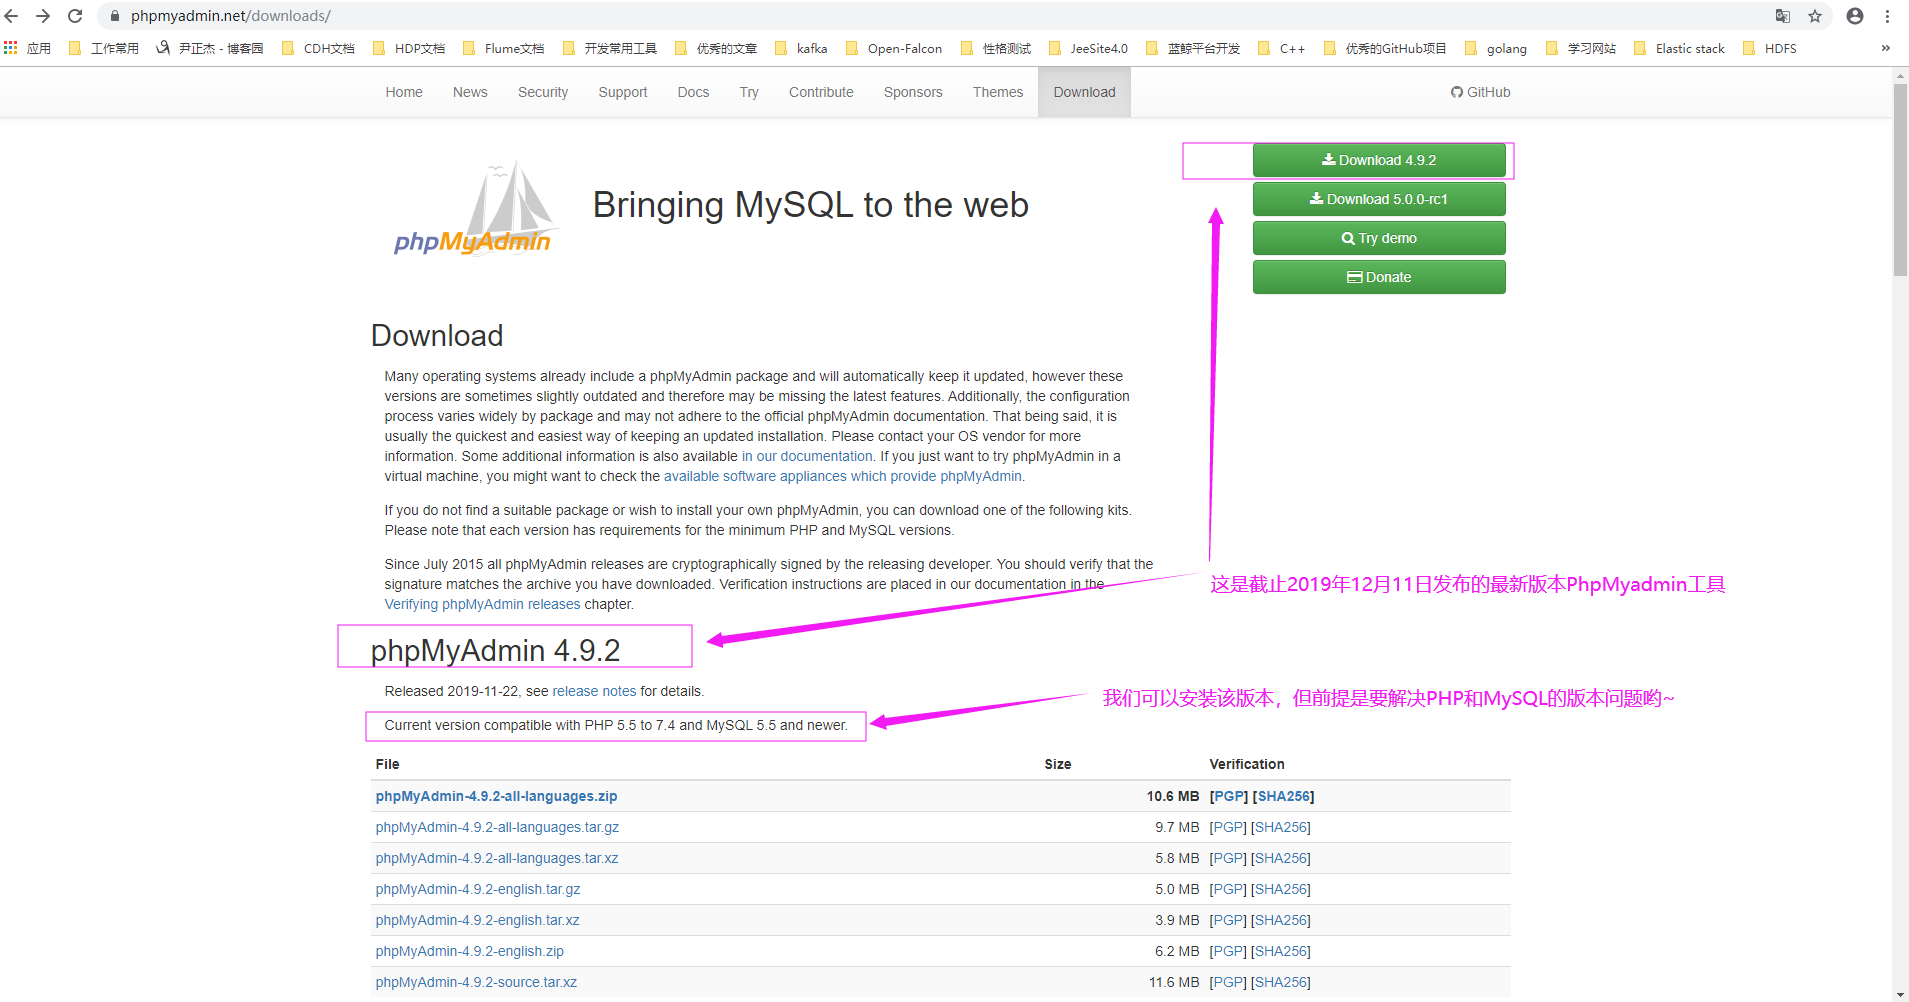
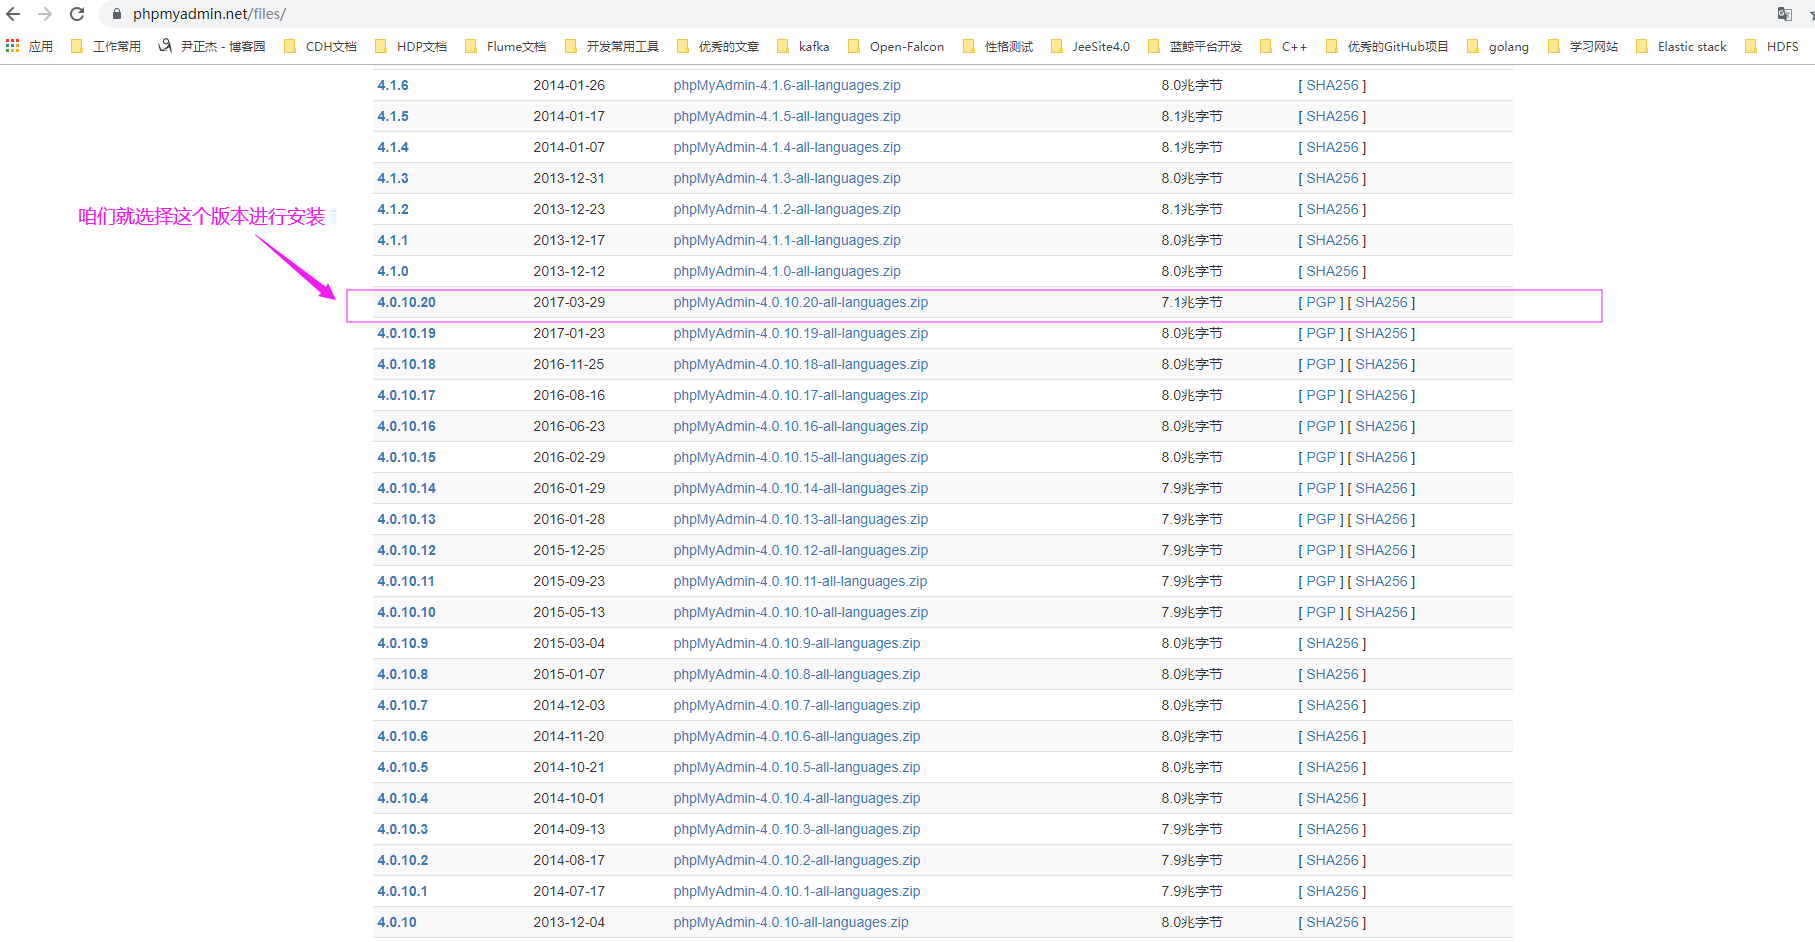
2>.咱们这里选择较久的版本安装phpadmin(https://www.phpmyadmin.net/files/),后面我会介绍使用编译安装最新版本
3>.安装phpMyAdmin所依赖的程序
[root@node101.yinzhengjie.org.cn ~]# rpm -q php php-mysql mariadb-server httpd      #这4个软件包都需要安装一下,若没有安装的话,请使用yum命令安装一下即可。(若有对应软件包输出信息说明你已经安装该软件啦)

php-5.4.16-46.1.el7_7.x86_64

php-mysql-5.4.16-46.1.el7_7.x86_64

mariadb-server-5.5.64-1.el7.x86_64

httpd-2.4.6-90.el7.centos.x86_64

[root@node101.yinzhengjie.org.cn ~]#
[root@node101.yinzhengjie.org.cn ~]# yum -y install php-mbstring

Loaded plugins: fastestmirror, langpacks

Loading mirror speeds from cached hostfile

 * base: mirror.jdcloud.com

 * extras: mirror.bit.edu.cn

 * updates: mirrors.huaweicloud.com

Resolving Dependencies

--> Running transaction check

---> Package php-mbstring.x86_64 0:5.4.16-46.1.el7_7 will be installed

--> Finished Dependency Resolution

Dependencies Resolved

============================================================================================================================================================================

 Package                                   Arch                                Version                                           Repository                            Size

============================================================================================================================================================================

Installing:

 php-mbstring                              x86_64                              5.4.16-46.1.el7_7                                 updates                              505 k

Transaction Summary

============================================================================================================================================================================

Install  1 Package

Total download size: 505 k

Installed size: 1.3 M

Downloading packages:

php-mbstring-5.4.16-46.1.el7_7.x86_64.rpm                                                                                                            | 505 kB  00:00:09

Running transaction check

Running transaction test

Transaction test succeeded

Running transaction

  Installing : php-mbstring-5.4.16-46.1.el7_7.x86_64                                                                                                                    1/1

  Verifying  : php-mbstring-5.4.16-46.1.el7_7.x86_64                                                                                                                    1/1

Installed:

  php-mbstring.x86_64 0:5.4.16-46.1.el7_7

Complete!

[root@node101.yinzhengjie.org.cn ~]#
[root@node101.yinzhengjie.org.cn ~]# yum -y install php-mbstring #除了安装上面4个软件还需要安装该软件包,用来多字节字符串处理的包
[root@node101.yinzhengjie.org.cn ~]# yum -y install epel-release

Loaded plugins: fastestmirror

Loading mirror speeds from cached hostfile

 * base: mirrors.huaweicloud.com

 * extras: mirrors.huaweicloud.com

 * updates: mirrors.huaweicloud.com

Resolving Dependencies

--> Running transaction check

---> Package epel-release.noarch :- will be installed

--> Finished Dependency Resolution

Dependencies Resolved

=================================================================================================================================

 Package                            Arch                         Version                      Repository                    Size

=================================================================================================================================

Installing:

 epel-release                       noarch                       -                         extras                         k

Transaction Summary

=================================================================================================================================

Install   Package

Total download size:  k

Installed size:  k

Downloading packages:

epel-release--.noarch.rpm                                                                              |   kB  ::

Running transaction check

Running transaction test

Transaction test succeeded

Running transaction

  Installing : epel-release--.noarch                                                                                      /

  Verifying  : epel-release--.noarch                                                                                      /

Installed:

  epel-release.noarch :-

Complete!

[root@node101.yinzhengjie.org.cn ~]#
[root@node101.yinzhengjie.org.cn ~]# yum -y install epel-release #安装该源是为了安装下面的3个软件包
[root@node101.yinzhengjie.org.cn ~]# yum -y install  php-mcrypt  libmcrypt  libmcrypt-devel

Loaded plugins: fastestmirror

Loading mirror speeds from cached hostfile

 * base: mirrors.huaweicloud.com

 * epel: mirrors.yun-idc.com

 * extras: mirrors.huaweicloud.com

 * updates: mirrors.huaweicloud.com

Resolving Dependencies

--> Running transaction check

---> Package libmcrypt.x86_64 :2.5.-.el7 will be installed

---> Package libmcrypt-devel.x86_64 :2.5.-.el7 will be installed

---> Package php-mcrypt.x86_64 :5.4.-.el7 will be installed

--> Finished Dependency Resolution

Dependencies Resolved

=================================================================================================================================

 Package                             Arch                       Version                           Repository                Size

=================================================================================================================================

Installing:

 libmcrypt                           x86_64                     2.5.-.el7                      epel                       k

 libmcrypt-devel                     x86_64                     2.5.-.el7                      epel                       k

 php-mcrypt                          x86_64                     5.4.-.el7                      epel                       k

Transaction Summary

=================================================================================================================================

Install   Packages

Total download size:  k

Installed size:  k

Downloading packages:

warning: /var/cache/yum/x86_64//epel/packages/libmcrypt-2.5.-.el7.x86_64.rpm: Header V3 RSA/SHA256 Signature, key ID 352c64e5: NOKEY

Public key for libmcrypt-2.5.-.el7.x86_64.rpm is not installed

(/): libmcrypt-2.5.-.el7.x86_64.rpm                                                                  |   kB  ::

(/): libmcrypt-devel-2.5.-.el7.x86_64.rpm                                                            |   kB  ::

(/): php-mcrypt-5.4.-.el7.x86_64.rpm                                                                 |   kB  ::

---------------------------------------------------------------------------------------------------------------------------------

Total                                                                                             kB/s |  kB  ::

Retrieving key from file:///etc/pki/rpm-gpg/RPM-GPG-KEY-EPEL-7

Importing GPG key 0x352C64E5:

 Userid     : "Fedora EPEL (7) <epel@fedoraproject.org>"

 Fingerprint: 91e9 7d7c 4a5e 96f1 7f3e 888f 6a2f aea2 352c 64e5

 Package    : epel-release--.noarch (@extras)

 From       : /etc/pki/rpm-gpg/RPM-GPG-KEY-EPEL-

Running transaction check

Running transaction test

Transaction test succeeded

Running transaction

  Installing : libmcrypt-2.5.-.el7.x86_64                                                                                 /

  Installing : libmcrypt-devel-2.5.-.el7.x86_64                                                                           /

  Installing : php-mcrypt-5.4.-.el7.x86_64                                                                                /

  Verifying  : libmcrypt-devel-2.5.-.el7.x86_64                                                                           /

  Verifying  : libmcrypt-2.5.-.el7.x86_64                                                                                 /

  Verifying  : php-mcrypt-5.4.-.el7.x86_64                                                                                /

Installed:

  libmcrypt.x86_64 :2.5.-.el7         libmcrypt-devel.x86_64 :2.5.-.el7         php-mcrypt.x86_64 :5.4.-.el7

Complete!

[root@node101.yinzhengjie.org.cn ~]#
[root@node101.yinzhengjie.org.cn ~]# yum -y install php-mcrypt libmcrypt libmcrypt-devel
4>.解压下载的phpMyAdmin程序
[root@node101.yinzhengjie.org.cn ~]# ll

total 4224

-rw-r--r--. 1 root root 4323896 Oct 24 08:51 phpMyAdmin-4.0.10.20-all-languages.tar.xz

[root@node101.yinzhengjie.org.cn ~]#

[root@node101.yinzhengjie.org.cn ~]# tar xf phpMyAdmin-4.0.10.20-all-languages.tar.xz

[root@node101.yinzhengjie.org.cn ~]#

[root@node101.yinzhengjie.org.cn ~]# mv phpMyAdmin-4.0.10.20-all-languages /var/www/htmlphp/MyAdmin

[root@node101.yinzhengjie.org.cn ~]#

[root@node101.yinzhengjie.org.cn ~]# ll /var/www/html/

total 4

drwxr-xr-x. 9 root root 4096 Mar 29  2017 phpMyAdmin

[root@node101.yinzhengjie.org.cn ~]#
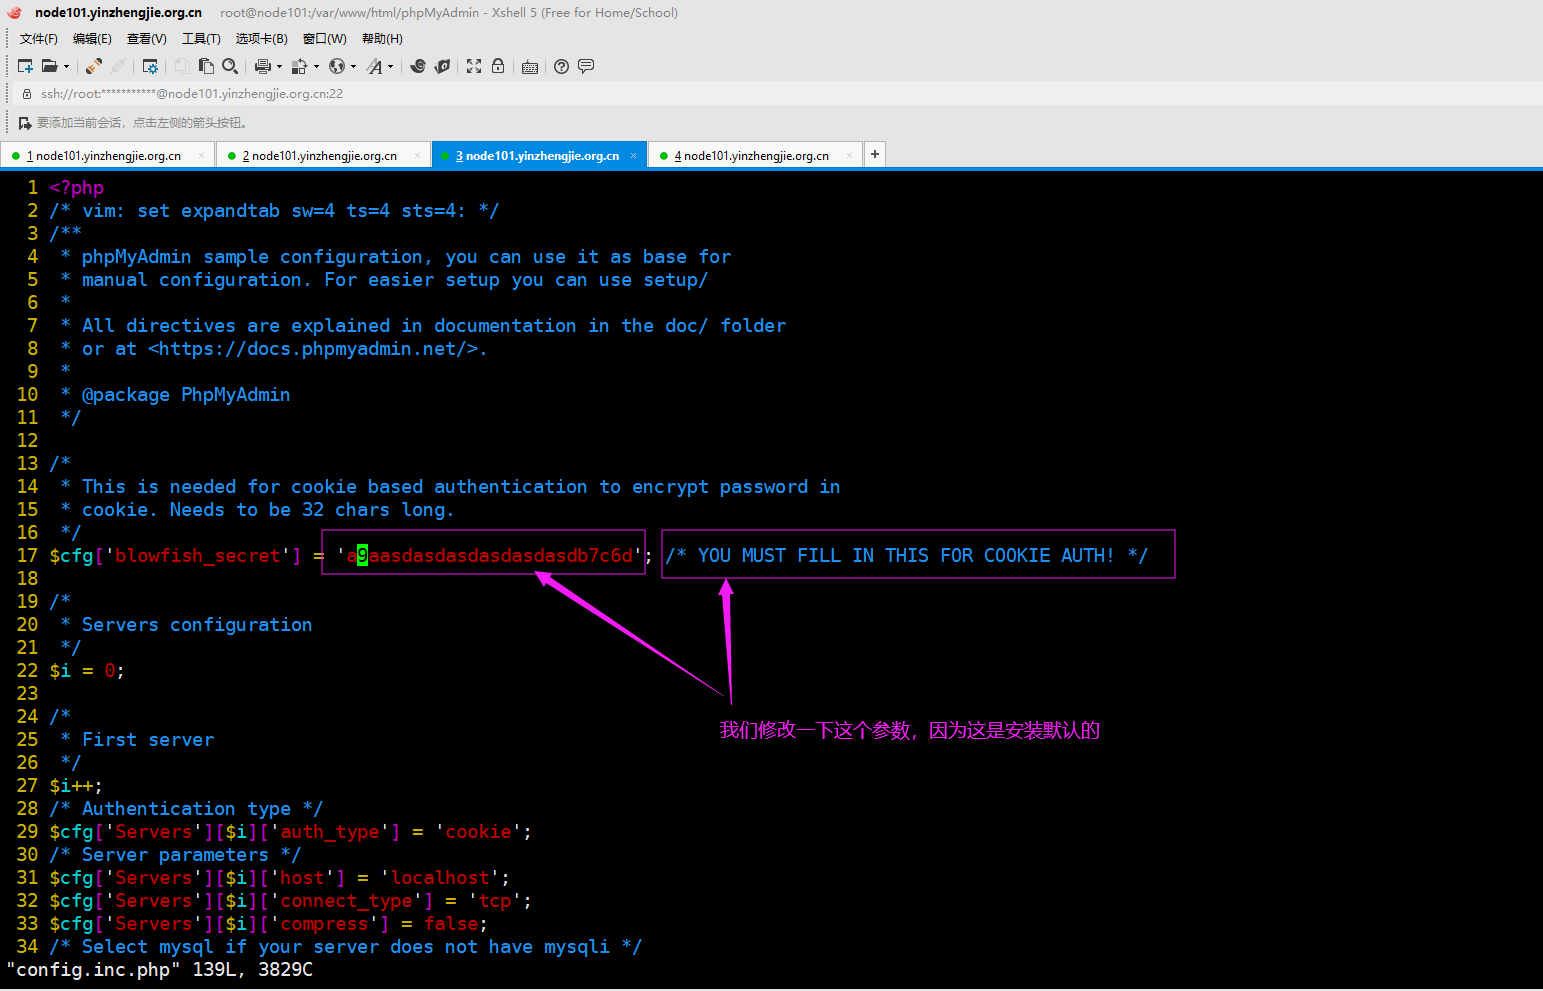
5>.生成config.inc.php配置文件
[root@node101.yinzhengjie.org.cn ~]# cd /var/www/html/phpMyAdmin/

[root@node101.yinzhengjie.org.cn /var/www/html/phpMyAdmin]#

[root@node101.yinzhengjie.org.cn /var/www/html/phpMyAdmin]# ll config.sample.inc.php

-rw-r--r--. 1 root root 3810 Mar 29  2017 config.sample.inc.php

[root@node101.yinzhengjie.org.cn /var/www/html/phpMyAdmin]#

[root@node101.yinzhengjie.org.cn /var/www/html/phpMyAdmin]# cp config.sample.inc.php config.inc.php

[root@node101.yinzhengjie.org.cn /var/www/html/phpMyAdmin]#

[root@node101.yinzhengjie.org.cn /var/www/html/phpMyAdmin]# vim config.inc.php          #如下图所示,修改途中所示的行。
6>.访问phpadmin的程序的首页
[root@node101.yinzhengjie.org.cn ~]# systemctl start httpd mariadb        #启动httpd服务和mariadb服务后,就可以访问phpMyAdmin的首页啦

[root@node101.yinzhengjie.org.cn ~]#

[root@node101.yinzhengjie.org.cn ~]# ss -ntl                     #Mariadb默认端口是3306,httpd默认端口是80

State       Recv-Q Send-Q                   Local Address:Port                                  Peer Address:Port

LISTEN                                               *:                                             *:*

LISTEN                                              *:                                               *:*

LISTEN                                      127.0.0.1:                                               *:*

LISTEN                                             :::                                              :::*

LISTEN                                             :::                                              :::*

LISTEN                                            :::                                              :::*

[root@node101.yinzhengjie.org.cn ~]#
[root@node101.yinzhengjie.org.cn ~]# mysql_secure_installation

NOTE: RUNNING ALL PARTS OF THIS SCRIPT IS RECOMMENDED FOR ALL MariaDB

      SERVERS IN PRODUCTION USE!  PLEASE READ EACH STEP CAREFULLY!

In order to log into MariaDB to secure it, we'll need the current

password for the root user.  If you've just installed MariaDB, and

you haven't set the root password yet, the password will be blank,

so you should just press enter here.

Enter current password for root (enter for none):

OK, successfully used password, moving on...

Setting the root password ensures that nobody can log into the MariaDB

root user without the proper authorisation.

Set root password? [Y/n] y

New password:

Re-enter new password:

Password updated successfully!

Reloading privilege tables..

 ... Success!

By default, a MariaDB installation has an anonymous user, allowing anyone

to log into MariaDB without having to have a user account created for

them.  This is intended only for testing, and to make the installation

go a bit smoother.  You should remove them before moving into a

production environment.

Remove anonymous users? [Y/n] y

 ... Success!

Normally, root should only be allowed to connect from 'localhost'.  This

ensures that someone cannot guess at the root password from the network.

Disallow root login remotely? [Y/n] y

 ... Success!

By default, MariaDB comes with a database named 'test' that anyone can

access.  This is also intended only for testing, and should be removed

before moving into a production environment.

Remove test database and access to it? [Y/n] y

 - Dropping test database...

 ... Success!

 - Removing privileges on test database...

 ... Success!

Reloading the privilege tables will ensure that all changes made so far

will take effect immediately.

Reload privilege tables now? [Y/n] y

 ... Success!

Cleaning up...

All done!  If you've completed all of the above steps, your MariaDB

installation should now be secure.

Thanks for using MariaDB!

[root@node101.yinzhengjie.org.cn ~]#

[root@node101.yinzhengjie.org.cn ~]# mysql -uroot -pyinzhengjie

Welcome to the MariaDB monitor.  Commands end with ; or \g.

Your MariaDB connection id is

Server version: 5.5.-MariaDB MariaDB Server

Copyright (c) , , Oracle, MariaDB Corporation Ab and others.

Type 'help;' or '\h' for help. Type '\c' to clear the current input statement.

MariaDB [(none)]> SHOW DATABASES ;

+--------------------+

| Database           |

+--------------------+

| information_schema |

| mysql              |

| performance_schema |

+--------------------+

 rows in set (0.00 sec)

MariaDB [(none)]> QUIT

Bye

[root@node101.yinzhengjie.org.cn ~]#
[root@node101.yinzhengjie.org.cn ~]# mysql_secure_installation #运行Mariadb安全脚本,需要为root用户配置密码
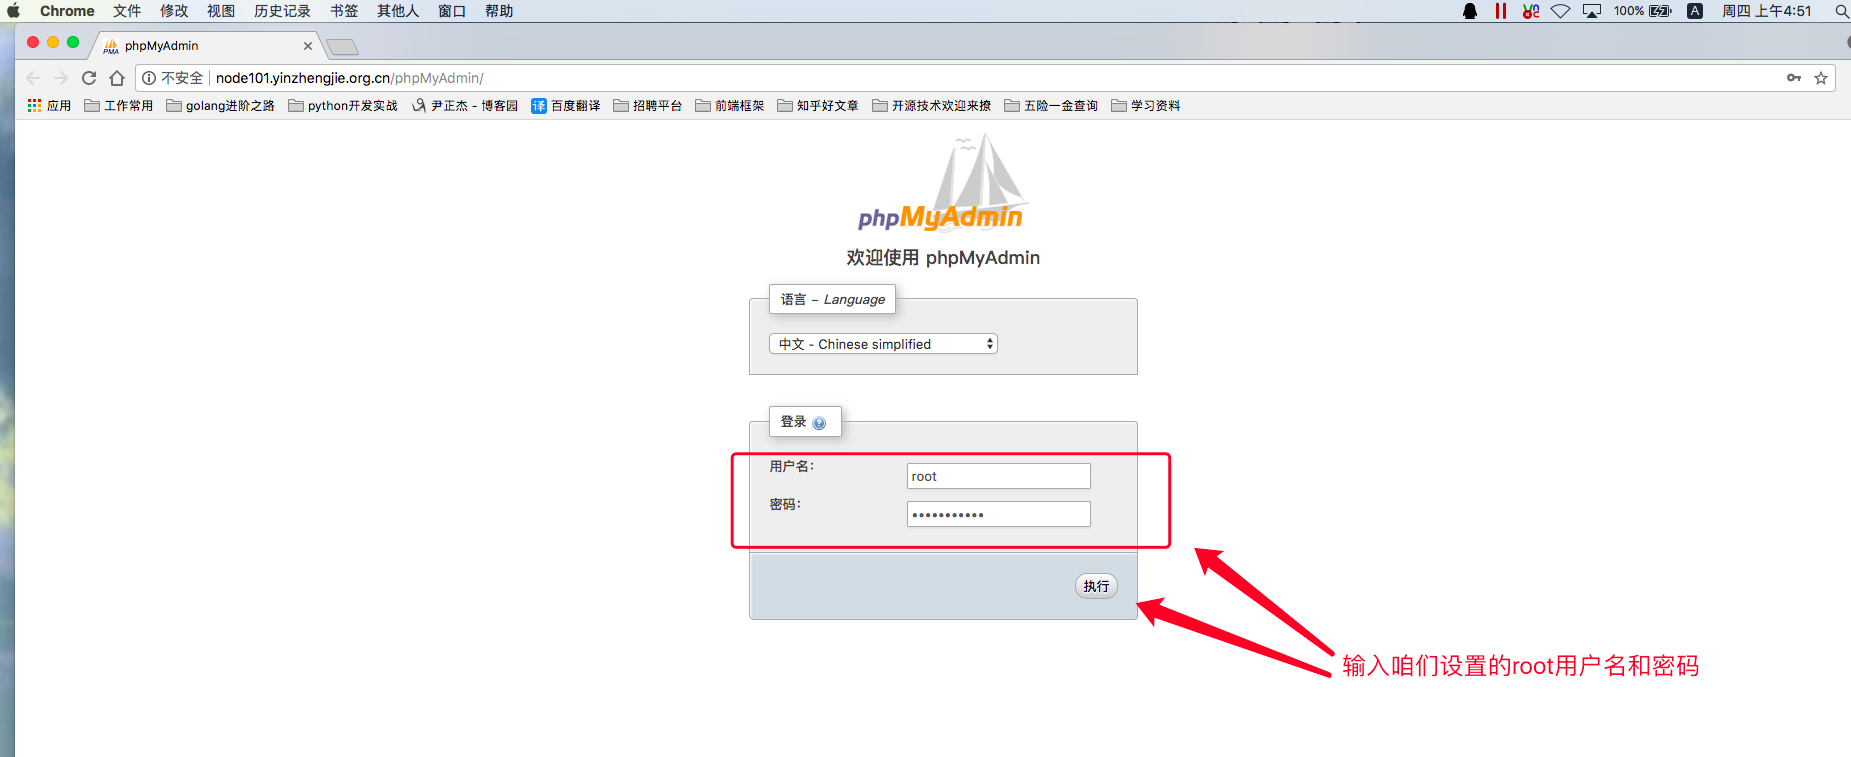
7>.如下图所示,php的WebUI登录成功
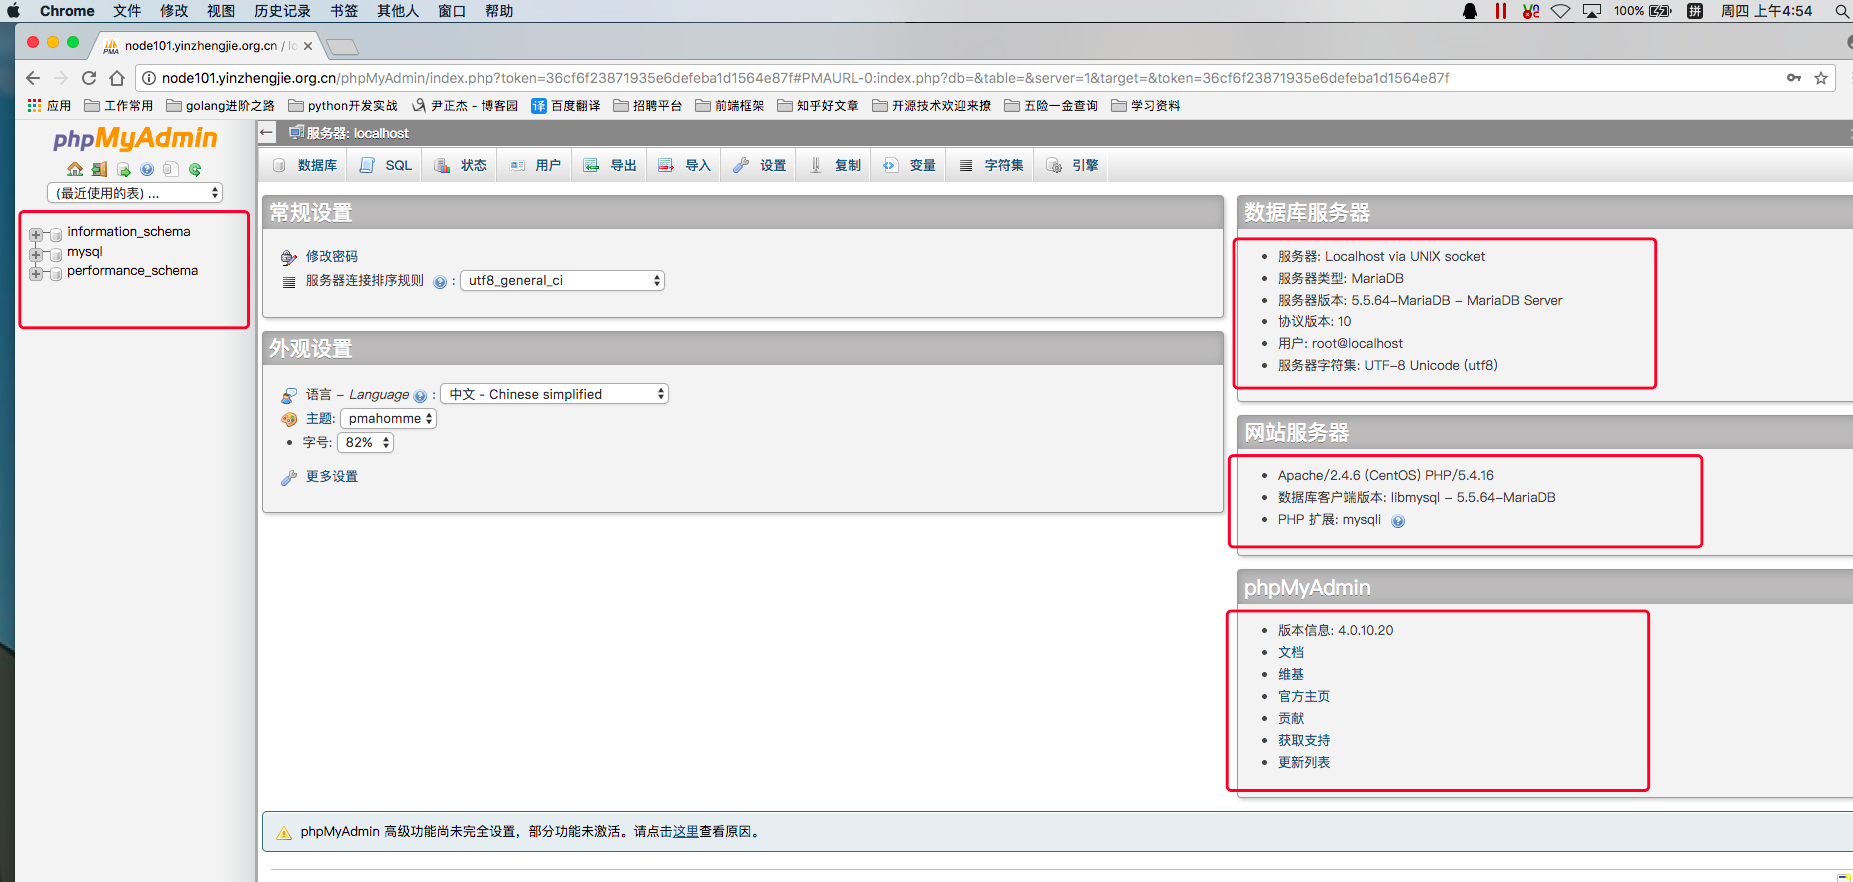
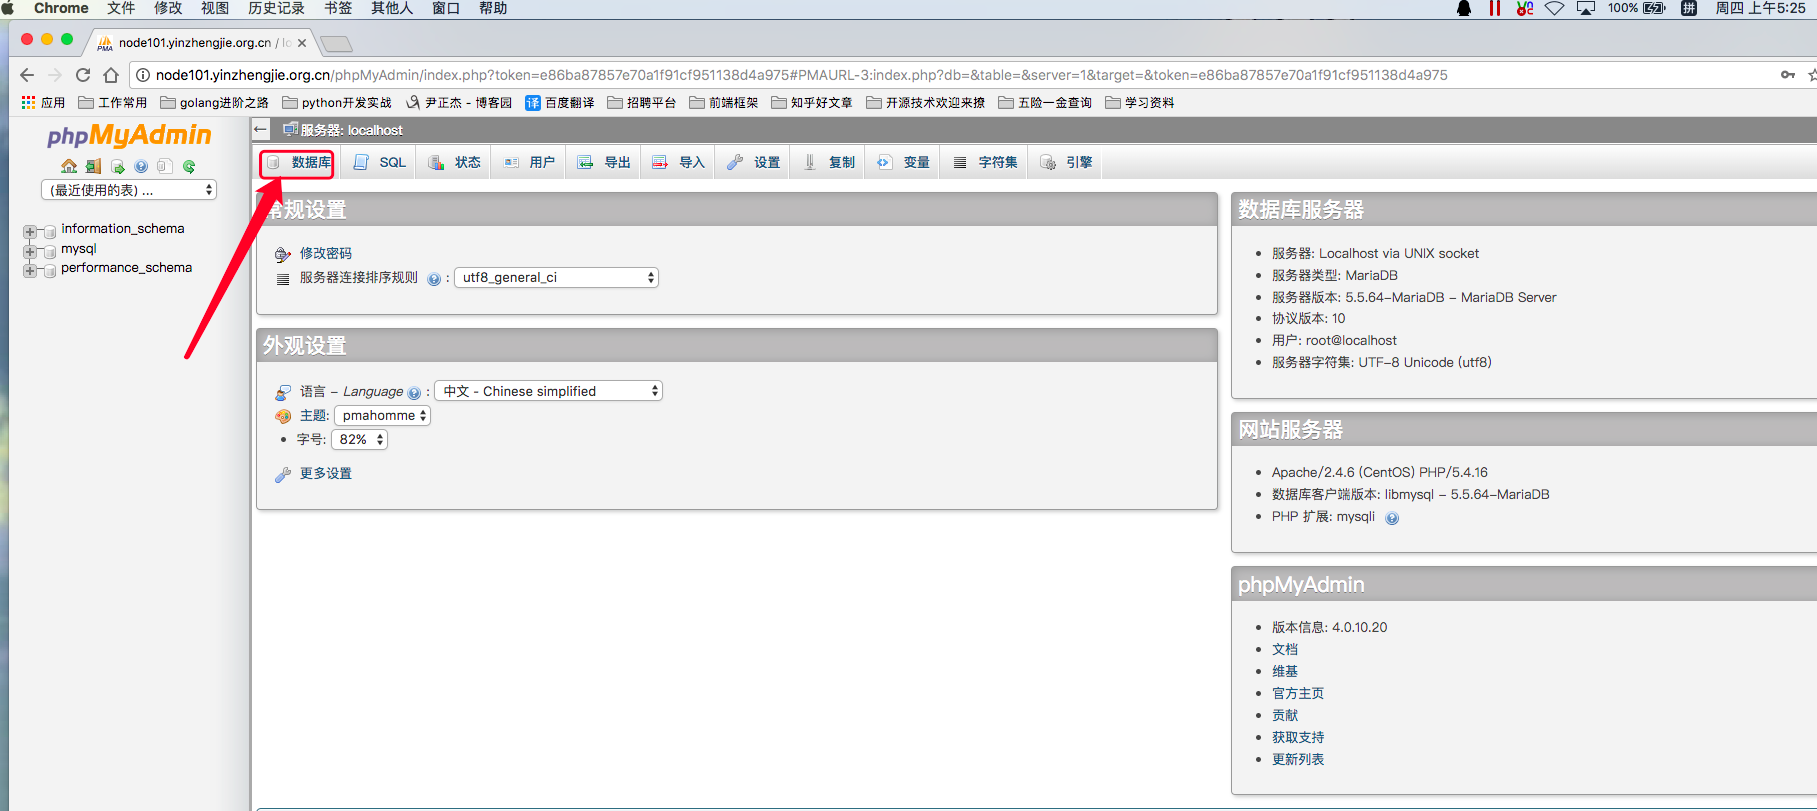
三.使用PhpMyAdmin的WebUI创建数据库
1>.如下图所示,点击"数据库"
2>.如下图所示,输入数据库的名称并点击"创建"
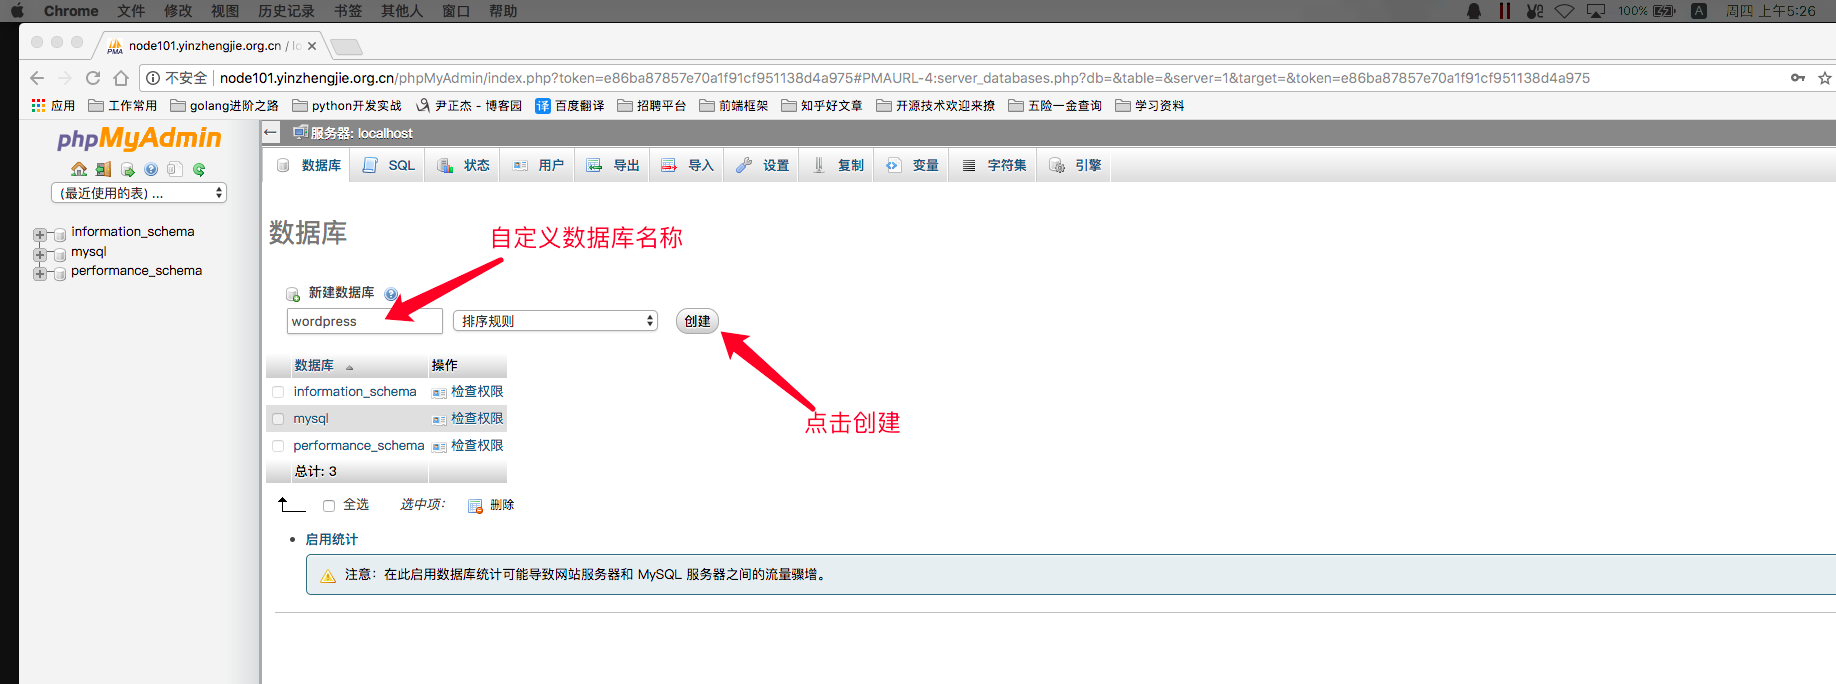
3>.数据库创建成功

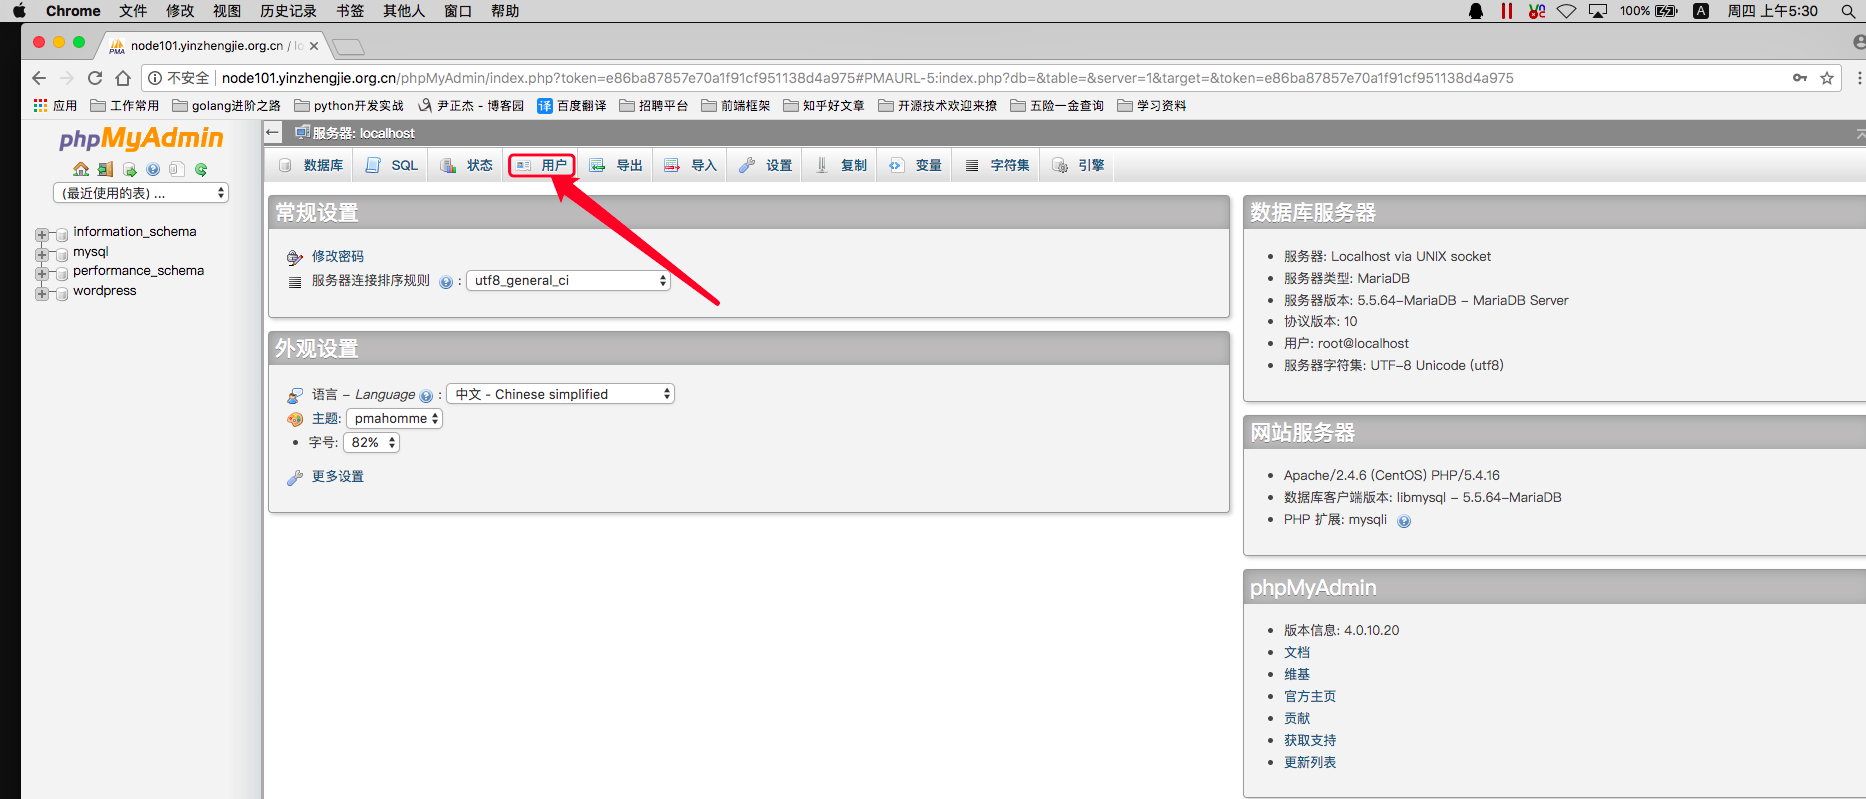
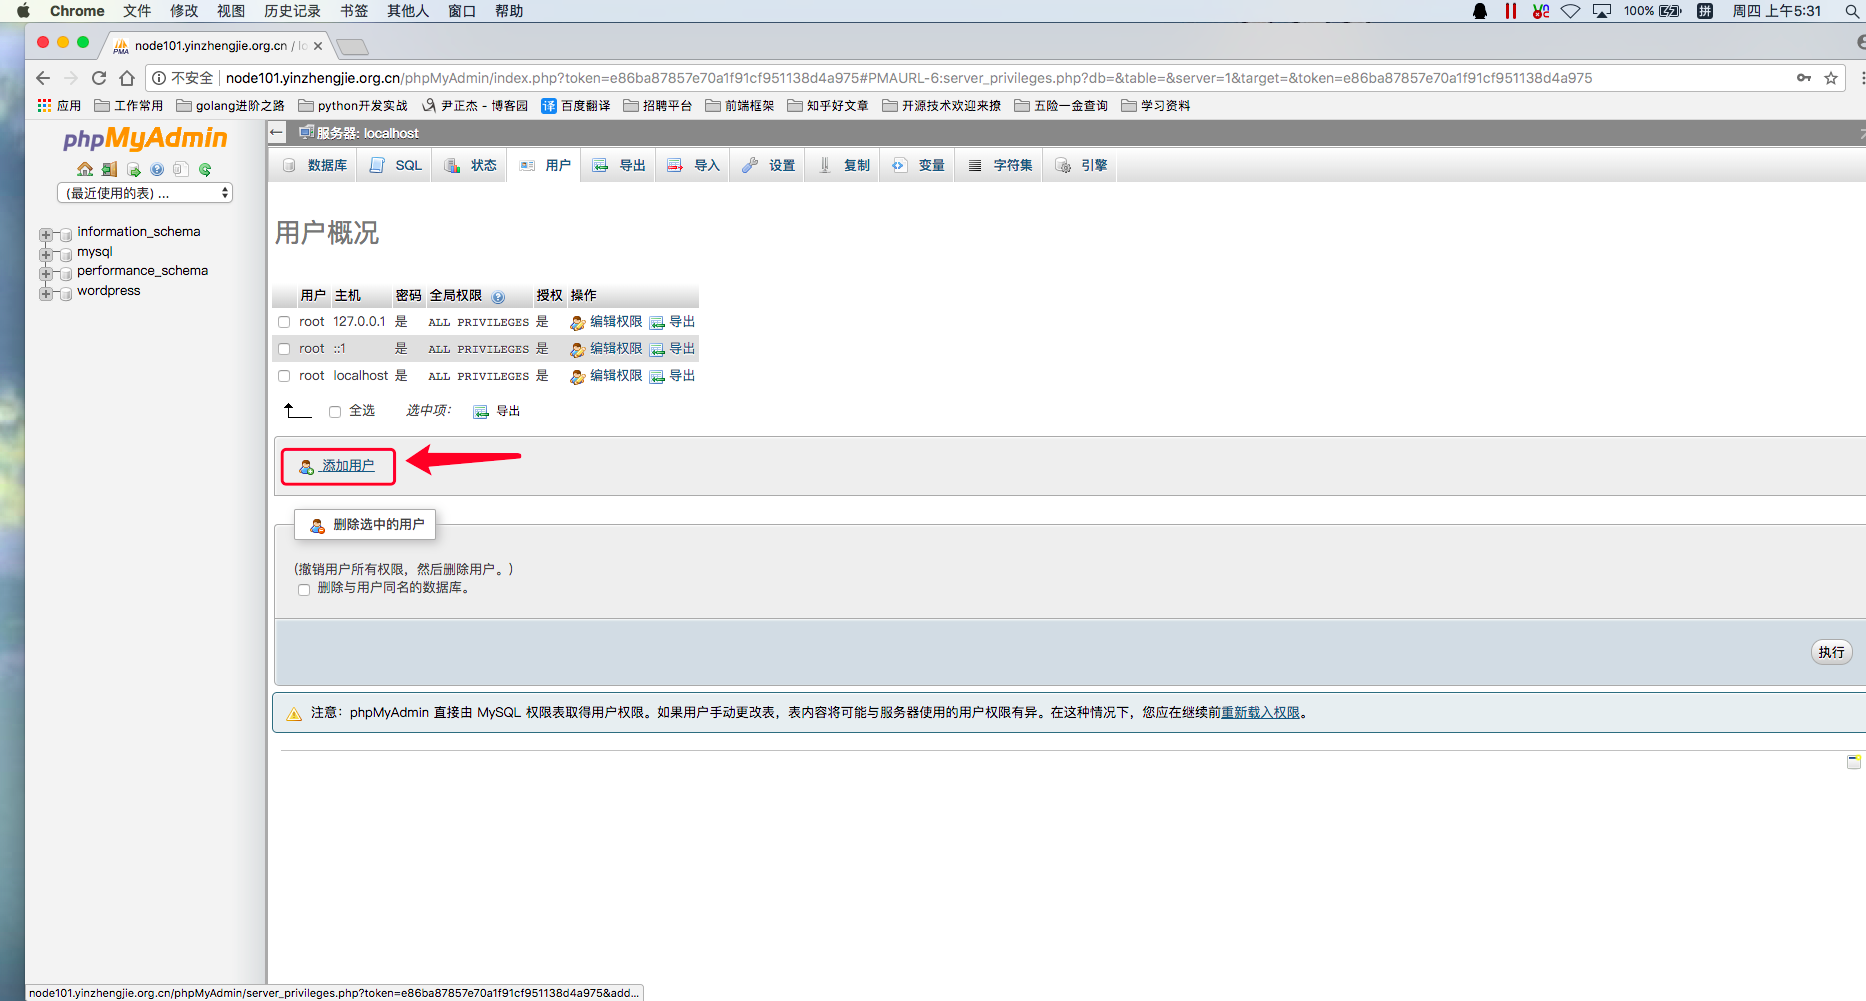
四.使用PhpMyAdmin的WebUI创建用户
1>.如下图所示,点击"用户"
2>.点击"添加用户"
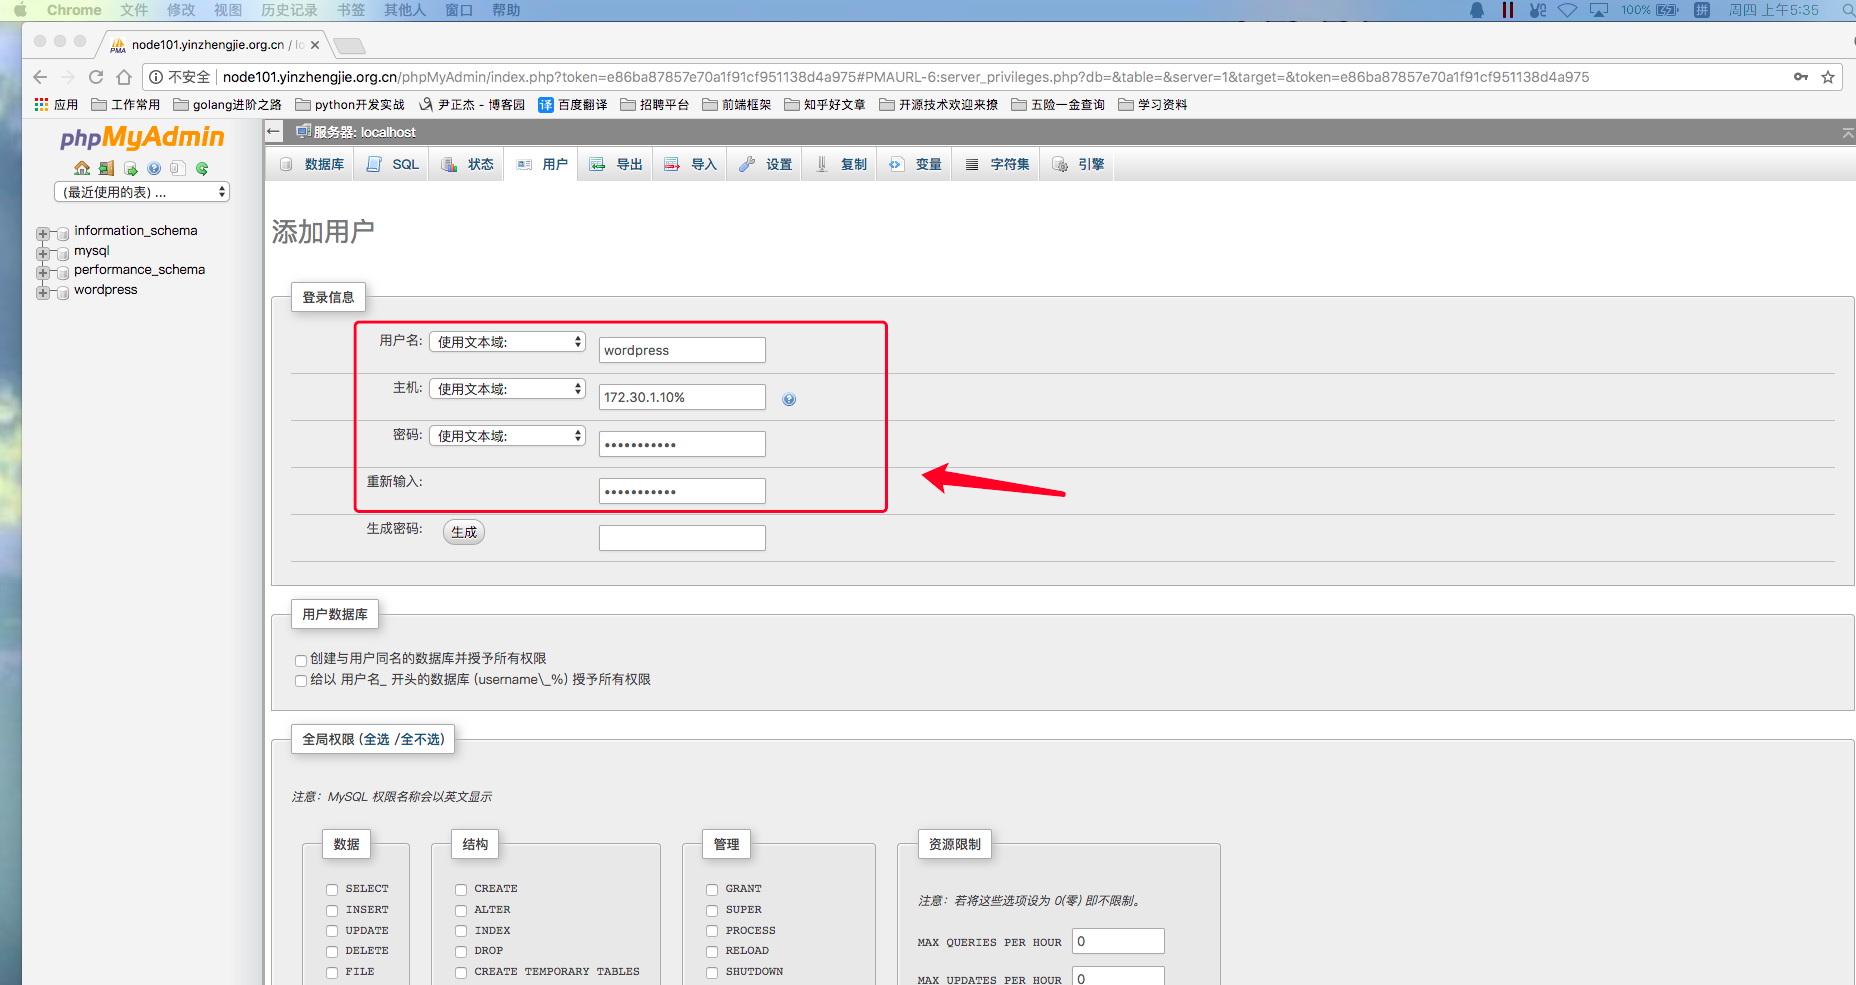
3>.如下图所示,输入要创建的用户名和密码
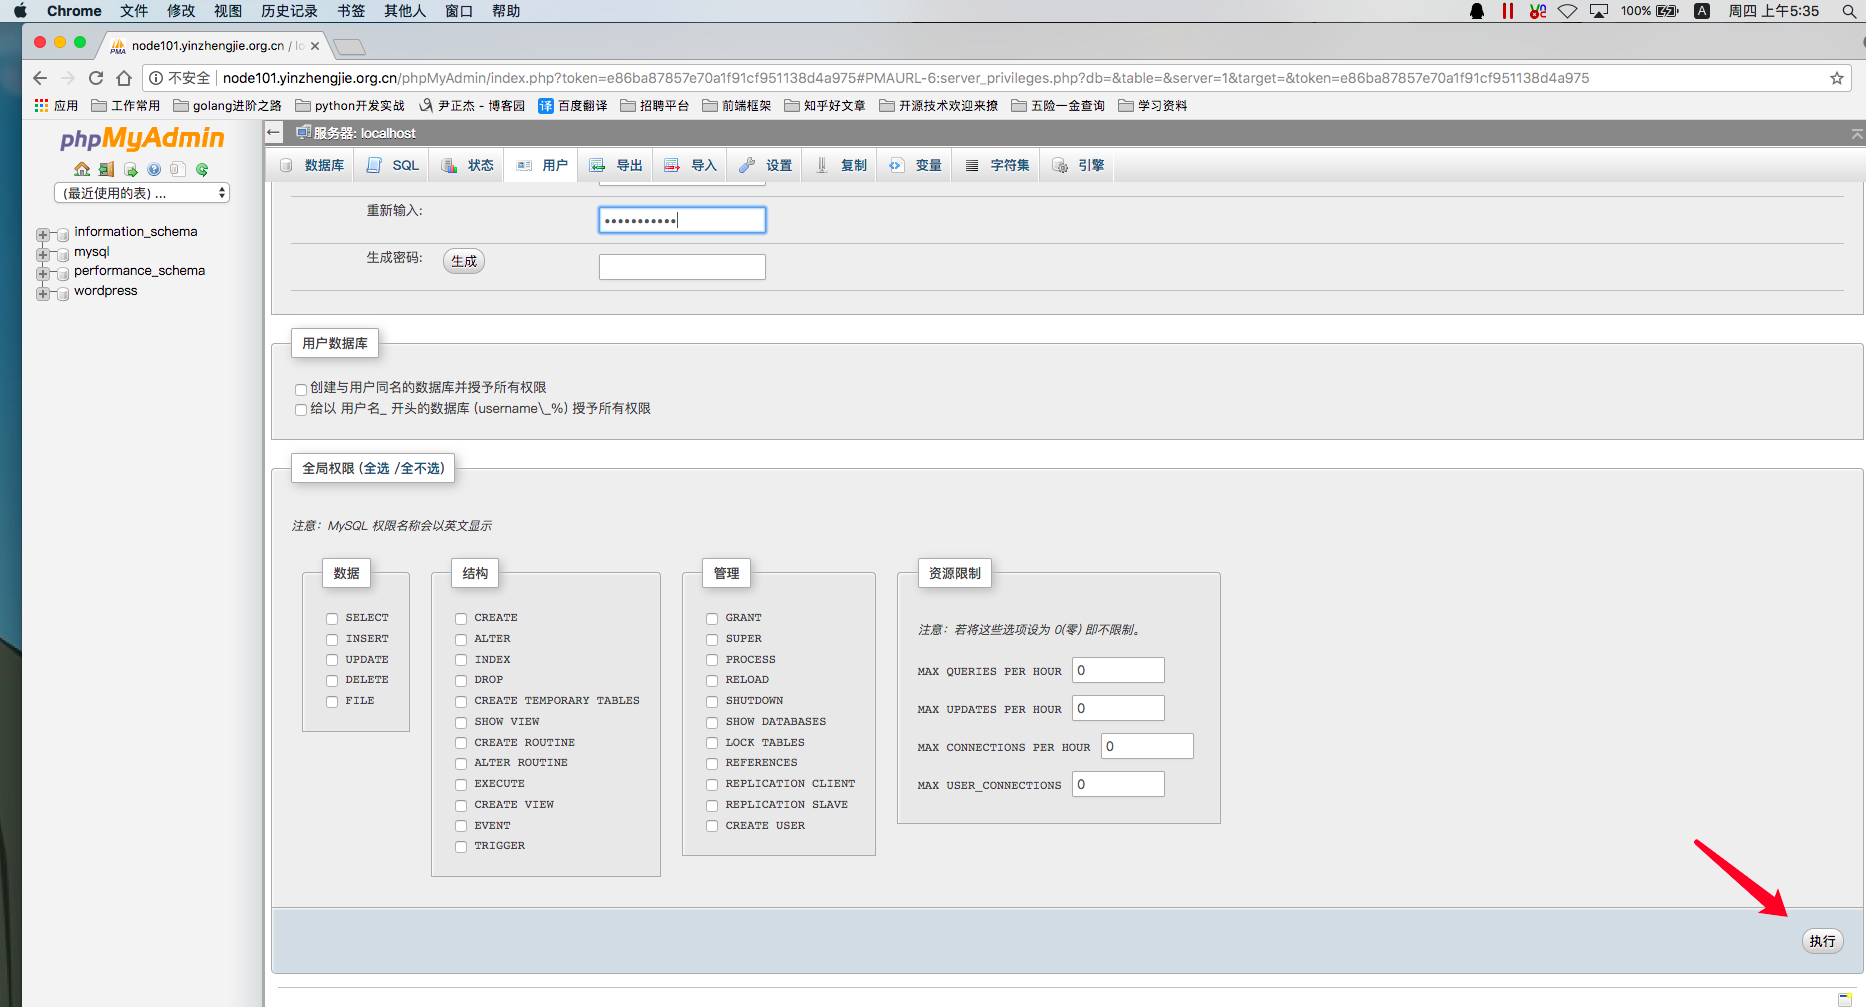
4>.确认输入完成mysql用户后,点击"执行"
5>.如下图所示,创建用户成功,根据提示点击下面的"重新载入权限"
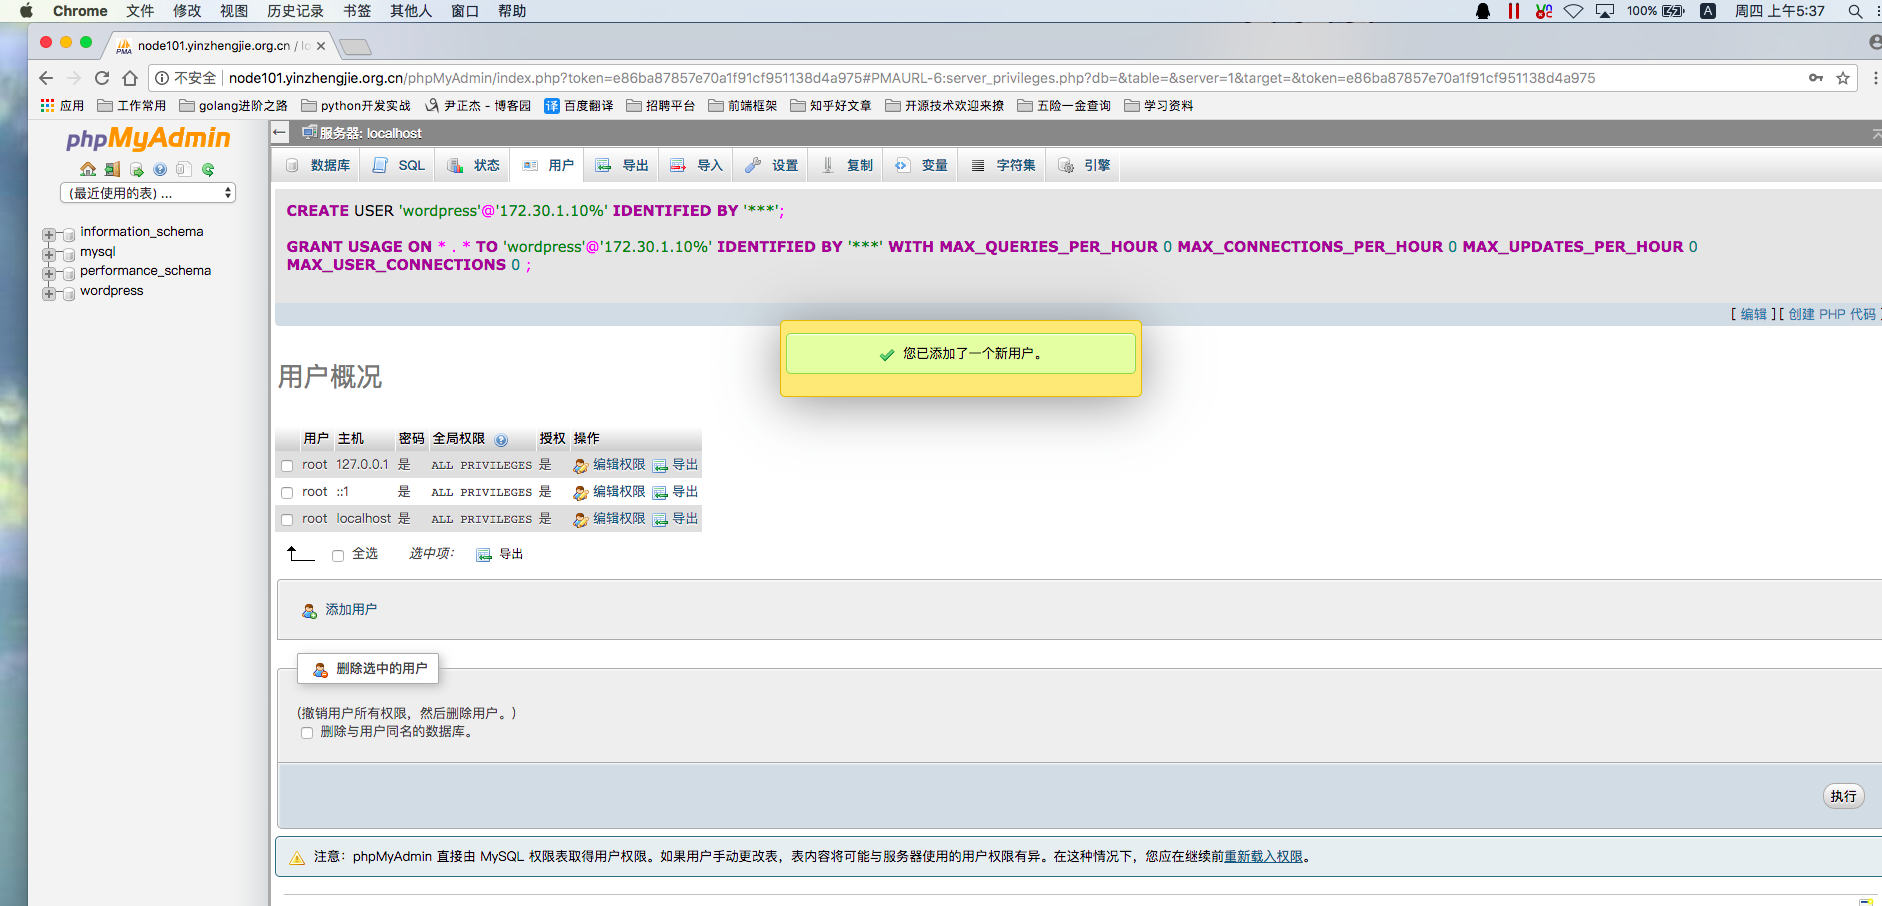
6>.查看创建用户的权限,如下图所示,创建的权限默认只有连接数据库权限
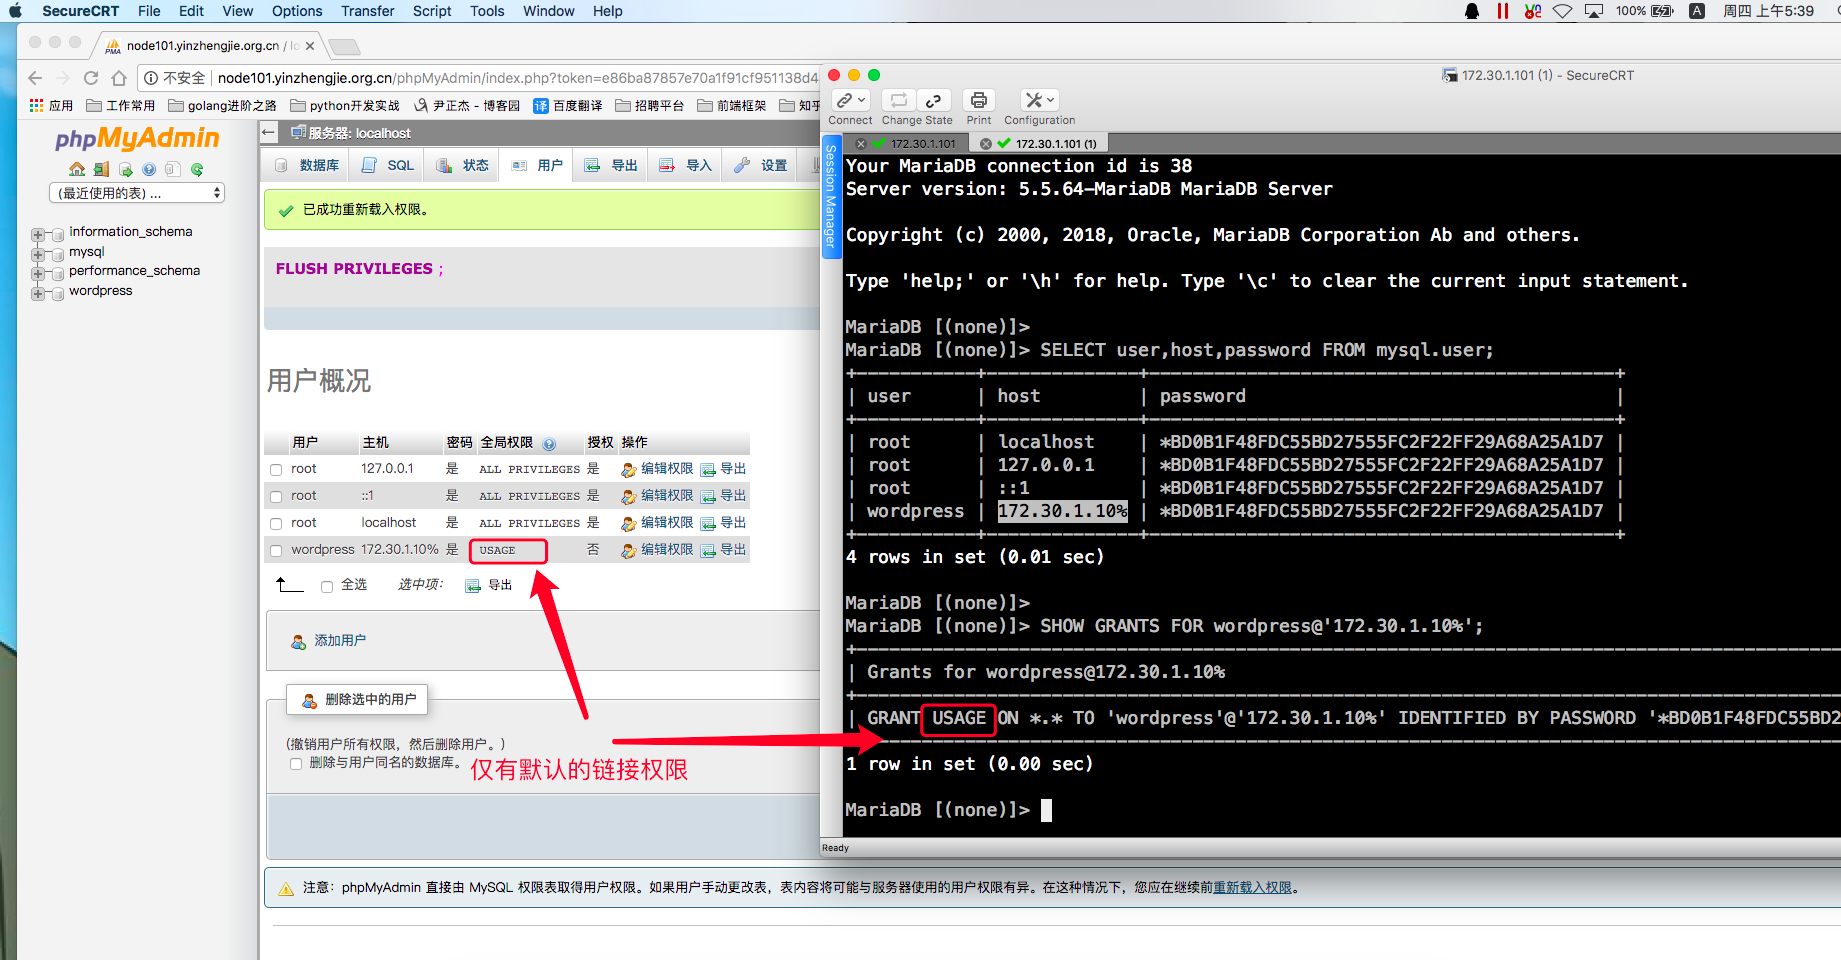
五.使用PhpMyAdmin的WebUI为创建的用户授权
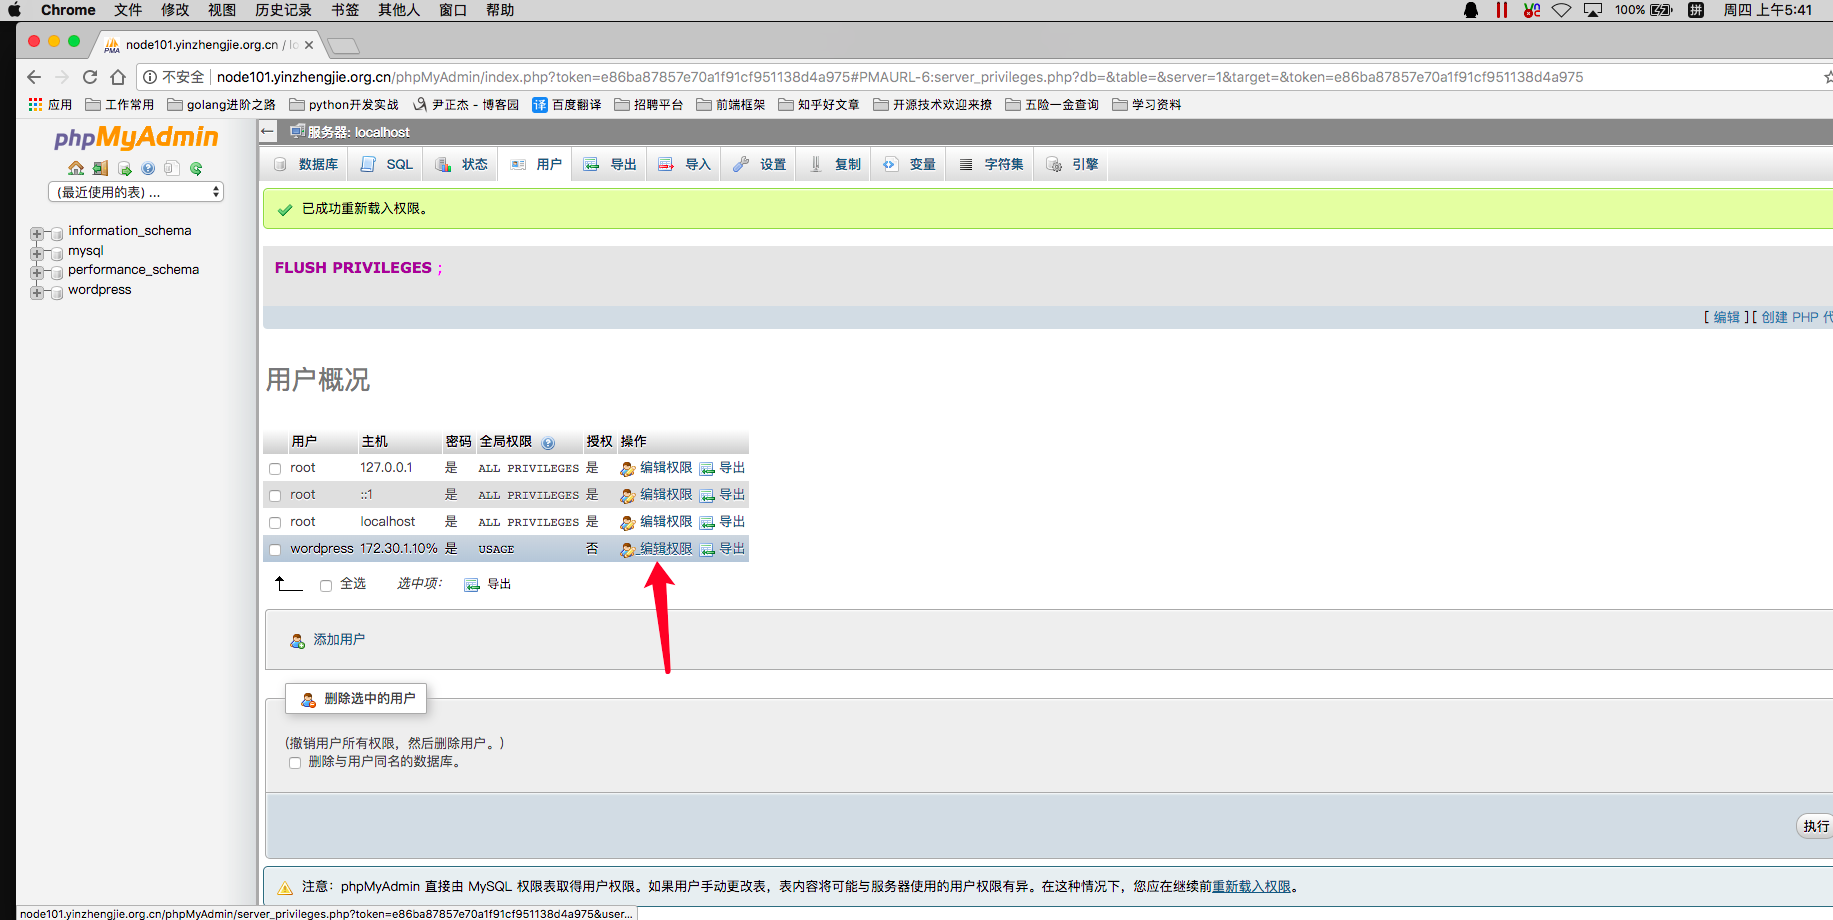
1>.如下图所示,为我们创建的wordpress用户授权,点击"编辑权限"
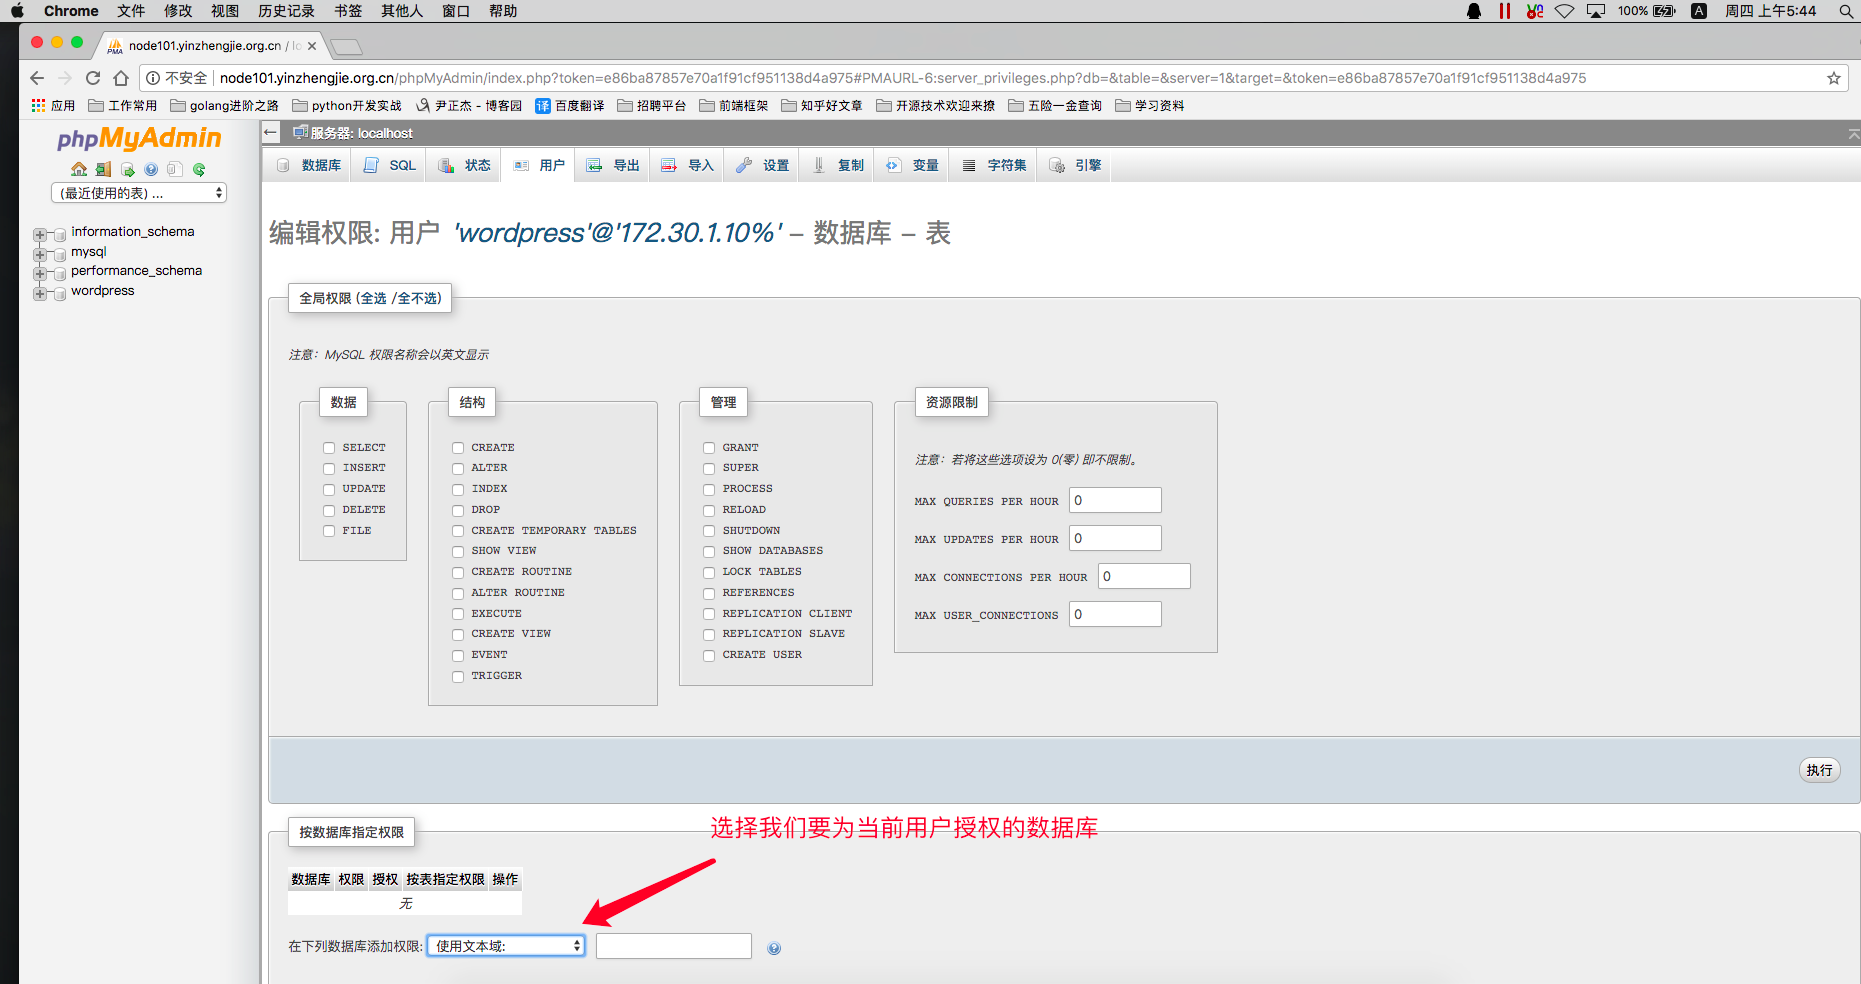
2>.选择数据库"wordpress"
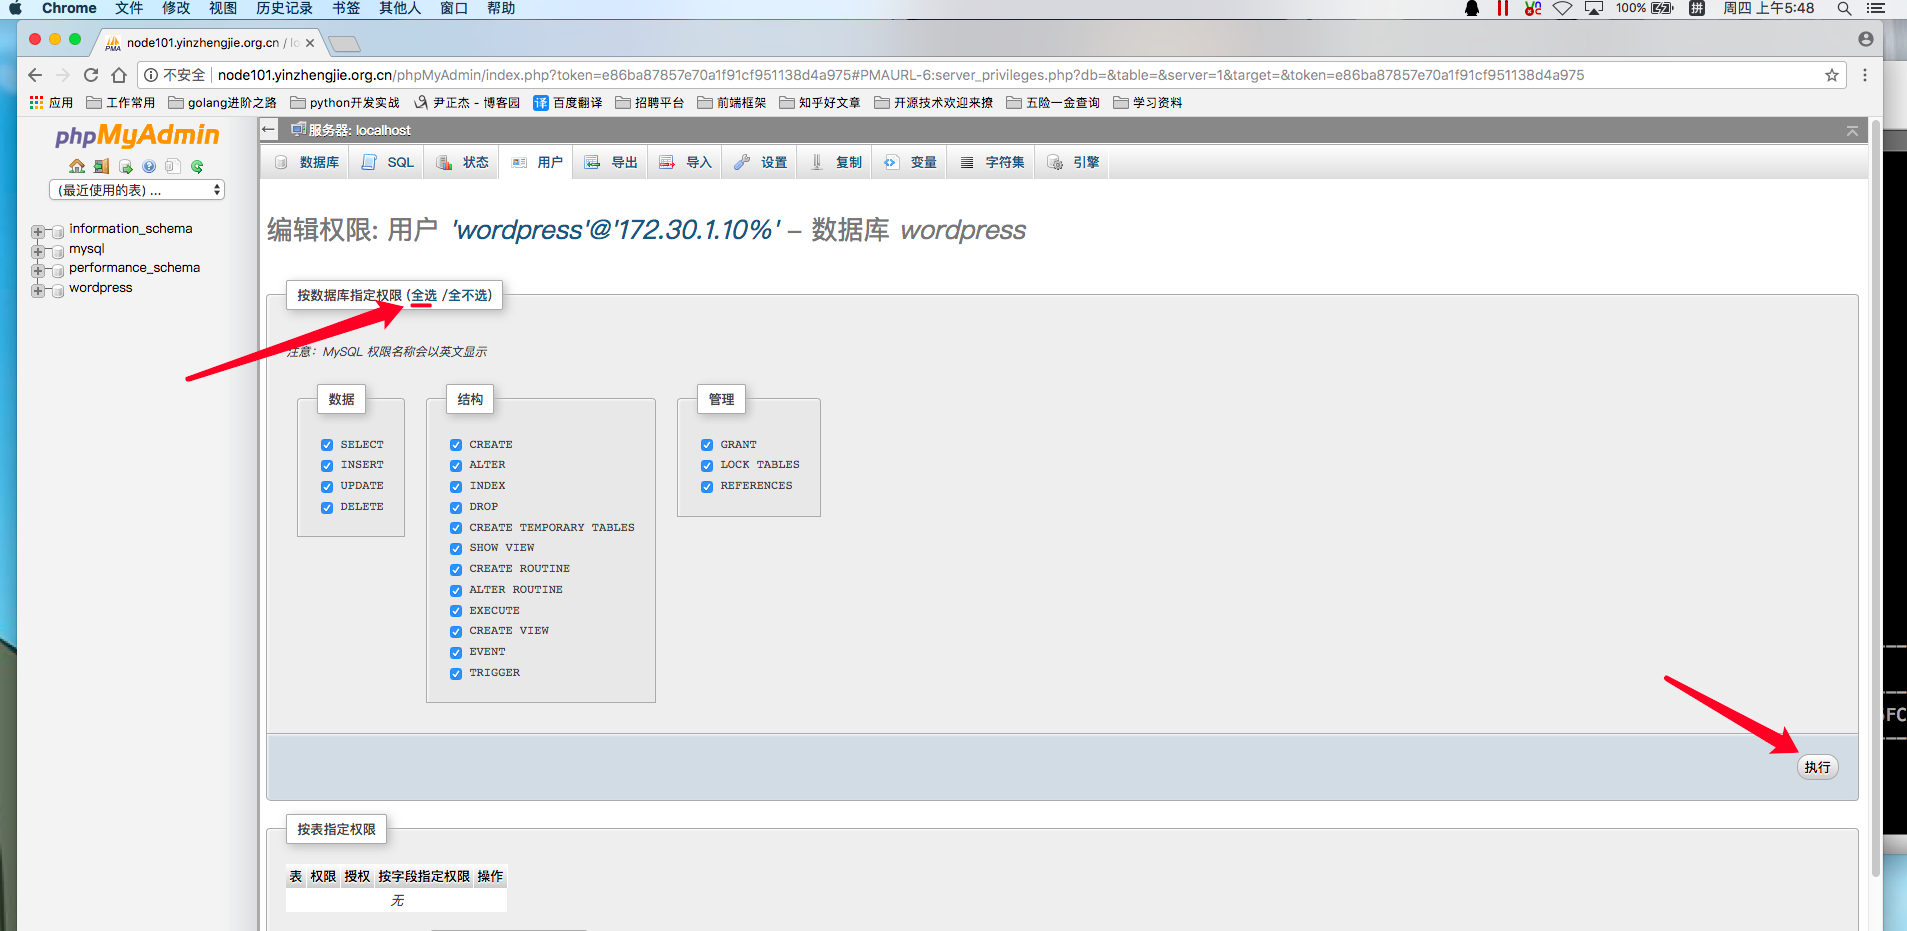
3>.如下图所示,将整个数据库权限都授权给wordpress@'172.30.1.10%'用户并点击"执行"
4>.授权成功

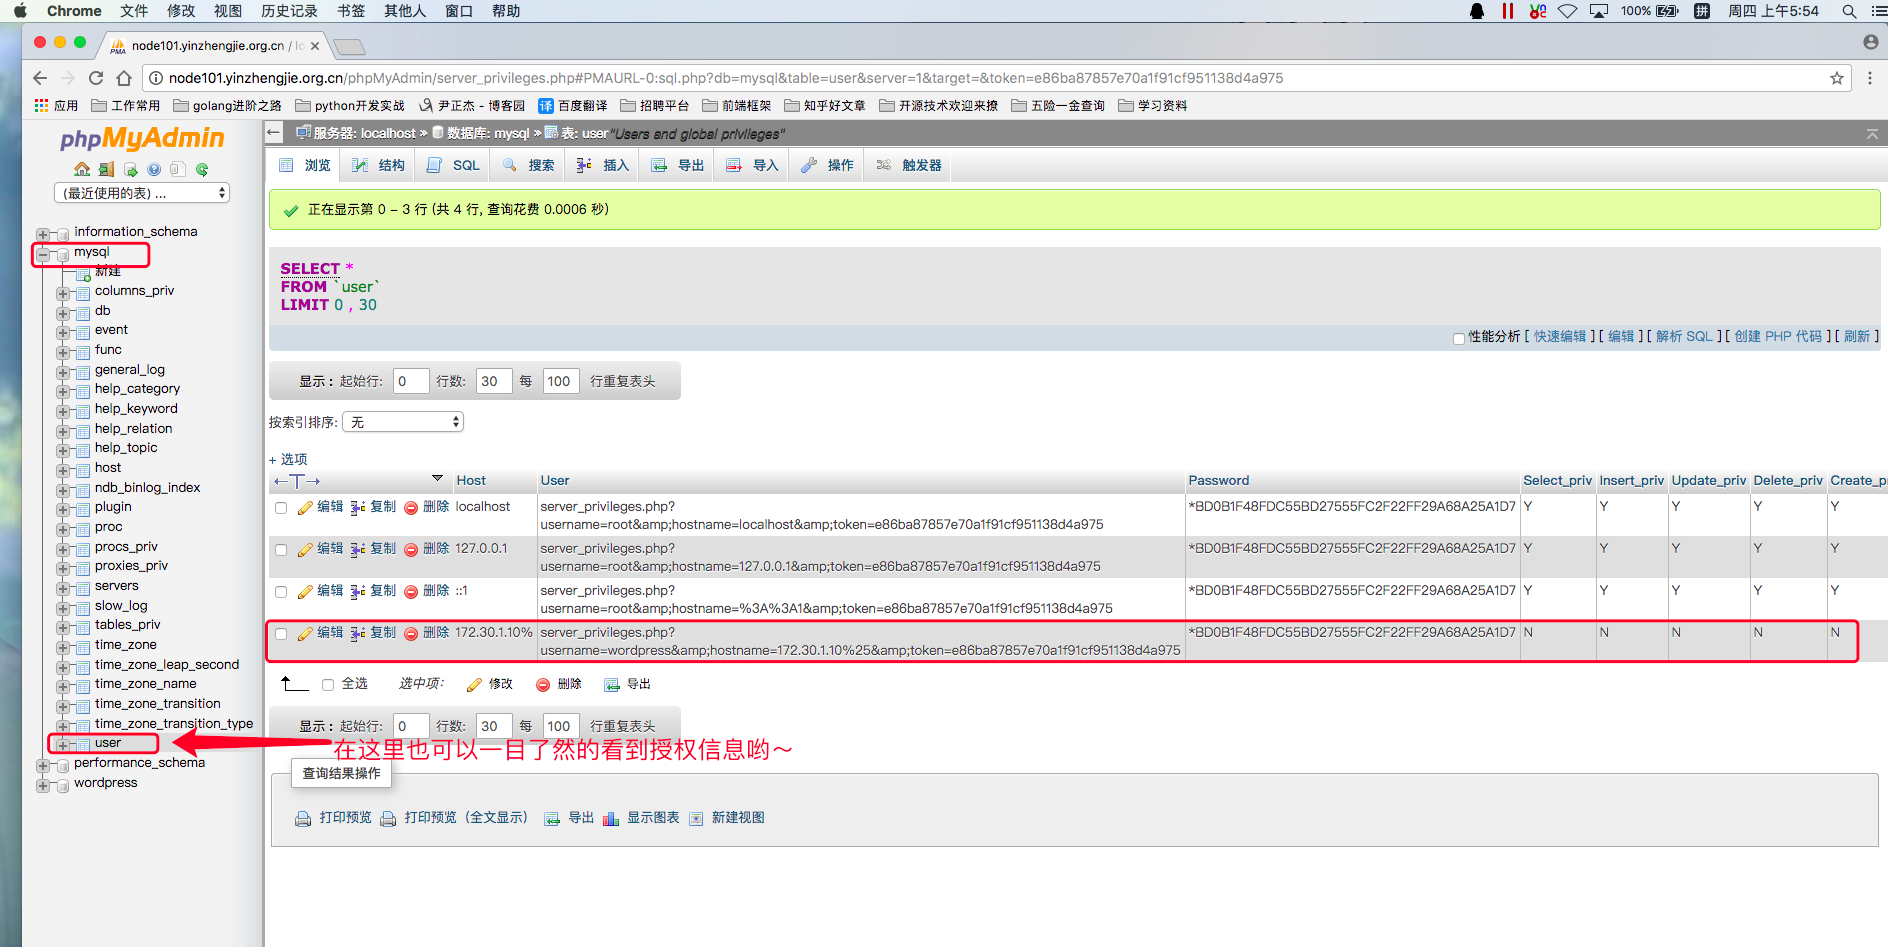
5>.如下图所示,咱们也可以通过phpMyAdmin的WebUI查看授权信息
6>.测试创建的用户是否可以正常连接数据库
[root@node101.yinzhengjie.org.cn ~]# mysql -u wordpress -h 172.30.1.101 -pyinzhengjie

Welcome to the MariaDB monitor.  Commands end with ; or \g.

Your MariaDB connection id is

Server version: 5.5.-MariaDB MariaDB Server

Copyright (c) , , Oracle, MariaDB Corporation Ab and others.

Type 'help;' or '\h' for help. Type '\c' to clear the current input statement.

MariaDB [(none)]> SHOW DATABASES;

+--------------------+

| Database           |

+--------------------+

| information_schema |

| wordpress          |

+--------------------+

 rows in set (0.00 sec)

MariaDB [(none)]>

MariaDB [(none)]> QUIT

Bye

[root@node101.yinzhengjie.org.cn ~]#

[root@node101.yinzhengjie.org.cn ~]#
Httpd服务进阶知识-基于Apache Modele的LAMP架构之PhpMyAdmin案例的更多相关文章
- Httpd服务进阶知识-基于Apache Modele的LAMP架构之WordPress案例
Httpd服务进阶知识-基于Apache Modele的LAMP架构之WordPress案例 作者:尹正杰 版权声明:原创作品,谢绝转载!否则将追究法律责任. 一.安装依赖包及数据库授权 博主推荐阅读 ...
- Httpd服务进阶知识-基于Apache Modele的LAMP架构之Discuz!案例
Httpd服务进阶知识-基于Apache Modele的LAMP架构之Discuz!论坛案例 作者:尹正杰 版权声明:原创作品,谢绝转载!否则将追究法律责任. 一.安装依赖包及数据库 博主推荐阅读: ...
- Httpd服务进阶知识-基于FASTCGI实现的LAMP架构
Httpd服务进阶知识-基于FASTCGI实现的LAMP架构 作者:尹正杰 版权声明:原创作品,谢绝转载!否则将追究法律责任. 一.httpd+php结合的方式 module: php fastcgi ...
- Httpd服务进阶知识-LAMP源码编译安装
Httpd服务进阶知识-LAMP源码编译安装 作者:尹正杰 版权声明:原创作品,谢绝转载!否则将追究法律责任. 想必大家都知道,动态资源交给fastcgi程序处理,静态资源依旧由httpd服务器处理 ...
- Httpd服务进阶知识-LAMP架构概述
Httpd服务进阶知识-LAMP架构概述 作者:尹正杰 版权声明:原创作品,谢绝转载!否则将追究法律责任. 一.LAMP架构概述 1>.什么是LAM(M)P架构 L: linux A: apa ...
- Httpd服务进阶知识-HTTP协议详解
Httpd服务进阶知识-HTTP协议详解 作者:尹正杰 版权声明:原创作品,谢绝转载!否则将追究法律责任. 一.WEB开发概述 1>.C/S编程 CS即客户端.服务器编程. 客户端.服务端之间需 ...
- Httpd服务进阶知识-调用操作系统的Sendfile机制
Httpd服务进阶知识-调用操作系统的Sendfile机制 作者:尹正杰 版权声明:原创作品,谢绝转载!否则将追究法律责任. 一.不用 sendfile 的传统网络传输过程 read(file, tm ...
- Httpd服务入门知识-Httpd服务常见配置案例之基于用户账号实现访问控制
Httpd服务入门知识-Httpd服务常见配置案例之基于用户账号实现访问控制 作者:尹正杰 版权声明:原创作品,谢绝转载!否则将追究法律责任. 一.基于用户的访问控制概述 认证质询: WWW-Auth ...
- Httpd服务入门知识-Httpd服务常见配置案例之Apache的工作做状态status页面
Httpd服务入门知识-Httpd服务常见配置案例之Apache的工作做状态status页面 作者:尹正杰 版权声明:原创作品,谢绝转载!否则将追究法律责任. 一.status功能概述 status页 ...
随机推荐
- npm install命令遇到relocation error: npm: symbol SSL_set_cert_cb的报错问题
在安装elasticsearch-head的过程中npm install遇到如下报错 [root@localhost elasticsearch-head]# npm install npm: rel ...
- Java 并发系列之五:java 锁
1. Lock接口 2. 队列同步器AQS 3. 重入锁 ReentrantLock 4. 读写锁 ReentrantReadWriteLock 5. LockSupport工具 6. Conditi ...
- 配置tomcat服务器内存大小中的Xms、Xmx、PermSize、MaxPermSize 详解
1.参数的含义 -vmargs -Xms256m -Xmx512m -XX:PermSize=256M -XX:MaxPermSize=512M -vmargs 说明后面是VM的参数,所以后面的其实都 ...
- 10 张图带你深入理解 Docker 容器和镜像
这篇文章希望能够帮助读者深入理解 Docker 的命令,还有容器(container)和镜像(image)之间的区别,并深入探讨容器和运行中的容器之间的区别. 当我对 Docker 技术还是一知半解的 ...
- python cython c 性能对比
我们用以下方法计算百万以上float型数据的标准偏差,以估计各个方法的计算性能: 原始python numpy cython c(由cython调用) python 原始方法: # File: Std ...
- AtCoder-arc059 (题解)
A - いっしょ / Be Together (结论/暴力) 题目链接 题目大意: 有 \(n\) 个数字,要将它们变成相等,对每一个数字最多操作一次,如将 \(a \to b\) 的代价为 \((a ...
- Akka-CQRS(11)- akka-http for http-web-service: Marshalling-数据序列化
前面几篇讨论了关于gRPC方式的前后端连接集成方式.gRPC也是一个开放的标准,但讲到普及性就远远不及基于http/1.1协议的web-service了.特别是gRPC的前端编程还是有一定的门槛,所以 ...
- ASP.NET MVC实现单用户登录
现在许多网站都要求登录后才能进行进一步的操作,当不允许多用户同时登录一个帐号时,就需要一种机制,当再登录一个相同的帐号时,前面登录的人被挤下线,或者禁止后面的人登录.这里实现的是前一种功能. 网上有许 ...
- ABP 使用cache缓存
using Abp.Application.Services.Dto; using Abp.Runtime.Caching; using Microsoft.Extensions.Configurat ...
- springMVC中controller层方法中使用private和public问题
楼主一直习惯使用public,偶尔手误也可能使用private,但是发觉也没啥区别,都能调用service层,注入bean. 后来做一个新项目时,发觉自己以前的写的部分功能报错,当时有点懵逼,,找了半 ...