[ipsec][strongswan]strongswan源码分析--(零)引子
strongswan sa
该系列文章的全部内容都是基于 strongswan 5.7.2版本
资料
https://wiki.strongswan.org/projects/strongswan/wiki/IntroductionTostrongSwan
编译
略
启动
ipsec start
rpm安装的
[root@D129 ~]# systemctl start strongswan

[root@D129 ~]# swanctl --version

strongSwan swanctl 5.7.1

[root@D129 ~]#
注:通过rpm安装的已经没有ipsec命令了,只有swanctl命令。
进程信息
TODO
结构
- start daemon
- keying daemon
架构图与插件
TODO
查看插件
[root@T9 sbin]# ./swanctl --stats

uptime: 2 minutes, since Dec 14 16:04:11 2018

worker threads: 16 total, 11 idle, working: 4/0/1/0

job queues: 0/0/0/0

jobs scheduled: 0

IKE_SAs: 0 total, 0 half-open

mallinfo: sbrk 2297856, mmap 0, used 288560, free 2009296

loaded plugins: charon aes des rc2 sha2 sha1 md5 mgf1 random nonce x509 revocation constraints pubkey pkcs1 pkcs7 pkcs8 pkcs12 pgp dnskey sshkey pem fips-prf gmp curve25519 xcbc cmac hmac attr kernel-netlink resolve socket-default stroke vici updown xauth-generic counters
配置运行
传统配置方法
使用ipsec命令(ipsec stroke接口)和ipsec.conf and ipsec.secrets配置文件。
新的配置方法
使用swanctl命令(vici接口)swanctl命令和swanctl.conf配置文件。
strongswang.conf中是全局和插件配置。
其他配置方法
- 使用数据库插件,在数据库中进行配置。
- 使用其他插件,如networkmanager等。
详细的配置文档
- 看ipsec.conf和swanctl.conf的注释。
- man
man -M ../share/man/ strongswan.conf

man -M ../share/man/ swanctl.conf

man -M ../share/man/ ipsec.conf.5
配置示例
[root@T9 OUTPUT]# cat ./etc/swanctl/conf.d/test.conf

connections {

	net-net {

		remote_addrs = 192.168.7.129

		ppk_id = mykey

		ppk_required = yes

		local {

			auth = psk

		}

		remote {

			auth = psk

		}

		children {

			net-net {

				local_ts = 10.129.0.0/16

				remote_ts = 10.9.0.0/16

			}

		}

	}

}

secrets {

	ppk {

		secret = 1234

		id = mykey

	}

}
重新加载
[root@D129 ~]# swanctl --load-all

loaded ppk secret 'ppk'

no authorities found, 0 unloaded

no pools found, 0 unloaded

loaded connection 'net-net'

successfully loaded 1 connections, 0 unloaded

[root@D129 ~]# swanctl --list-conn

net-net: IKEv1/2, no reauthentication, rekeying every 14400s

  ppk: mykey, required

  local:  %any

  remote: 192.168.7.9

  local pre-shared key authentication:

  remote pre-shared key authentication:

  net-net: TUNNEL, rekeying every 3600s

    local:  10.9.0.0/16

    remote: 10.129.0.0/16
用法
ipsec up <name>

ipsec down <name>

ipsec reload

ipsec update

ipsec restart

ipsec list

ipsec status

ipsec statusall
logs
日志文件定义在strongswan.conf中。
使用ipsec start --nofork, 日志会输出在console,用来debug。
加密库
三个加密库任选其一:
libgmp
默认使用的,GNU的
libcrypto
openssl的库
libgcrypto
也是GNU的。www.gnupg.org
依赖的内核模块
ah4
ah6
esp4
esp6
xfrm4_tunnel
xfrm6_tunnel
xfrm_user
ip_tunnel
tunnel
tunnel6
xfrm4_mode_tunnel
xfrm6_mode_tunnel
祥见:http://wiki.strongswan.org/projects/strongswan/wiki/KernelModules
child sa
构成
A CHILD_SA consists of two components:

The actual __IPsec SAs__ (there are two, one in each direction) describing

the algorithms and keys used to encrypt and authenticate the traffic

The __policies__ (there are at least two) that define which network

traffic shall use such an SA.
定义
strongSwan installs the negotiated IPsec SAs and SPs into the kernel

by using a platform dependent kernel API.

The actual IPsec traffic is not handled by strongSwan but instead by

the network and IPsec stack of the operating system kernel.
sa信息查看与调试
ip xfrm status

ip xfrm policy
使用-s能查看更丰富的信息。
证书
- 使用ipsec kpi可以生成。
见:https://wiki.strongswan.org/projects/strongswan/wiki/SimpleCA - 使用openssl生成。
转发
隧道
路由
略
MSS/MTU
https://wiki.strongswan.org/projects/strongswan/wiki/ForwardingAndSplitTunneling#MTUMSS-issues
VICI interface
https://wiki.strongswan.org/projects/strongswan/wiki/Vici
编译DEBUG
./configure --prefix=/root/OUTPUT --exec-prefix=/root/OUTPUT CFLAGS="-g -O0"
gdb
只启动 charon一个daemon进程,功能也是正常的。
gdb /root/OUTPUT/libexec/ipsec/charon

./swanctl --load-all

./ipsec up net-net
代码
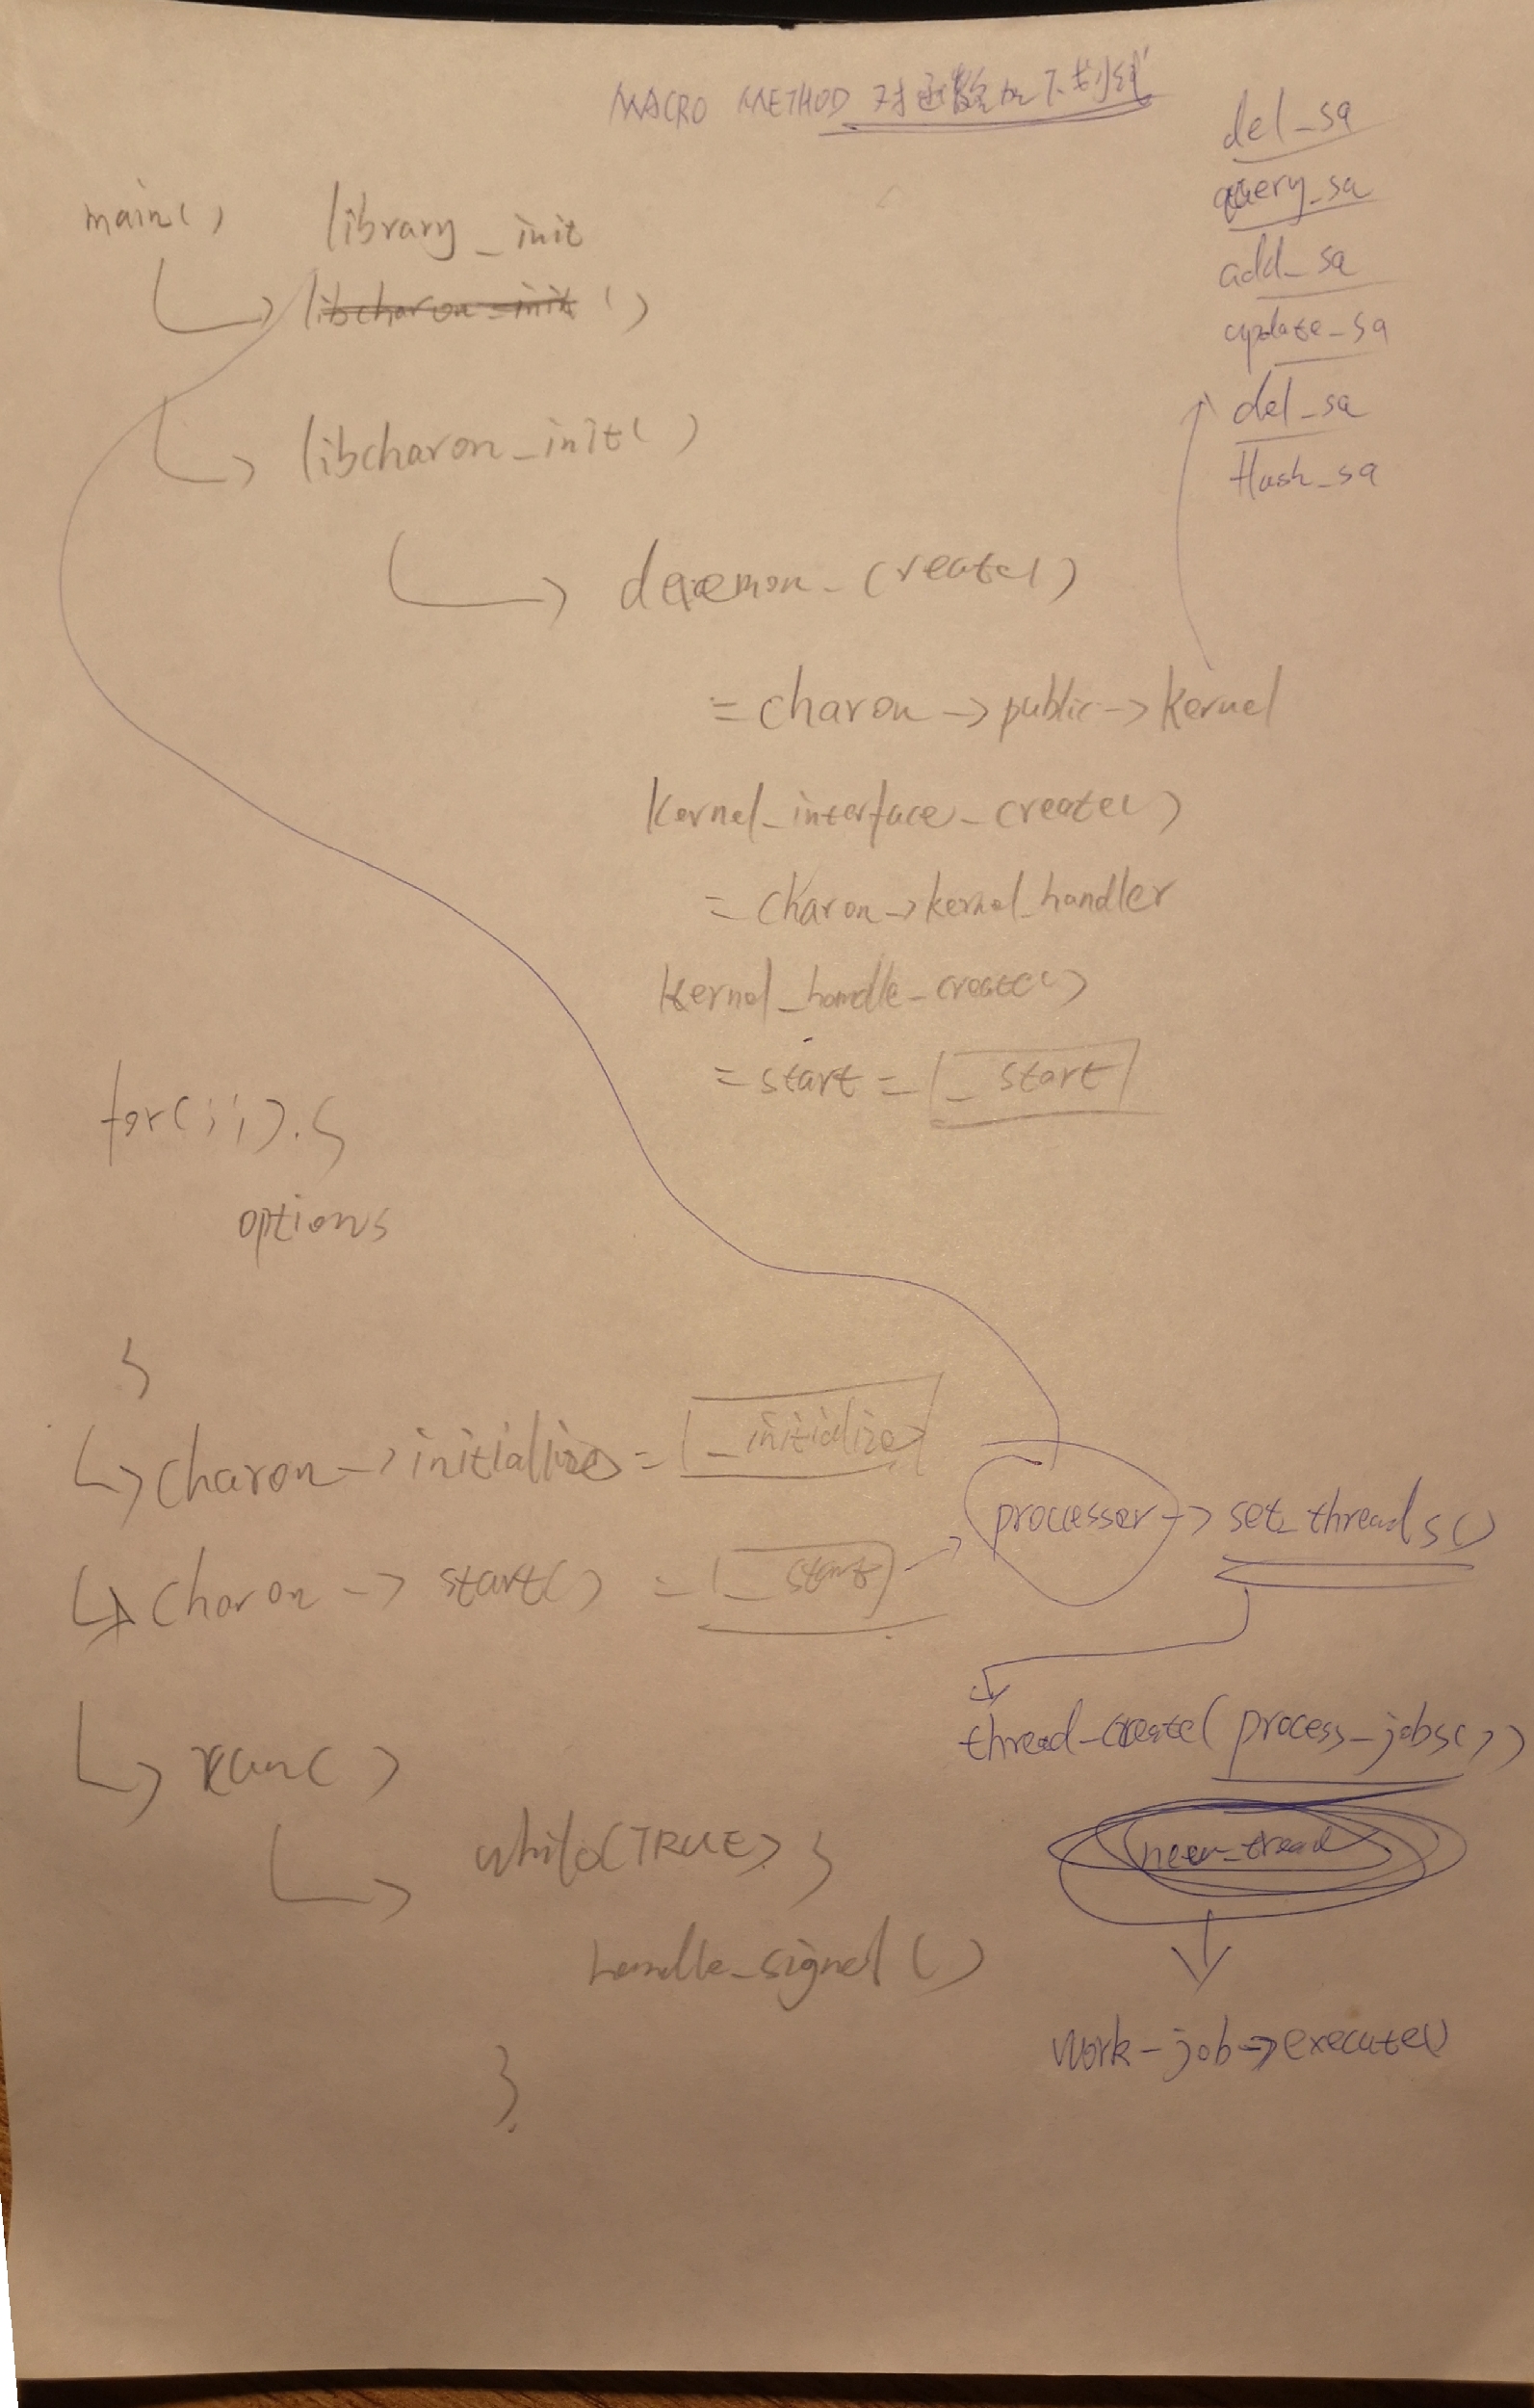
charon进程的入口
src/charon/charon.c:main()
接口
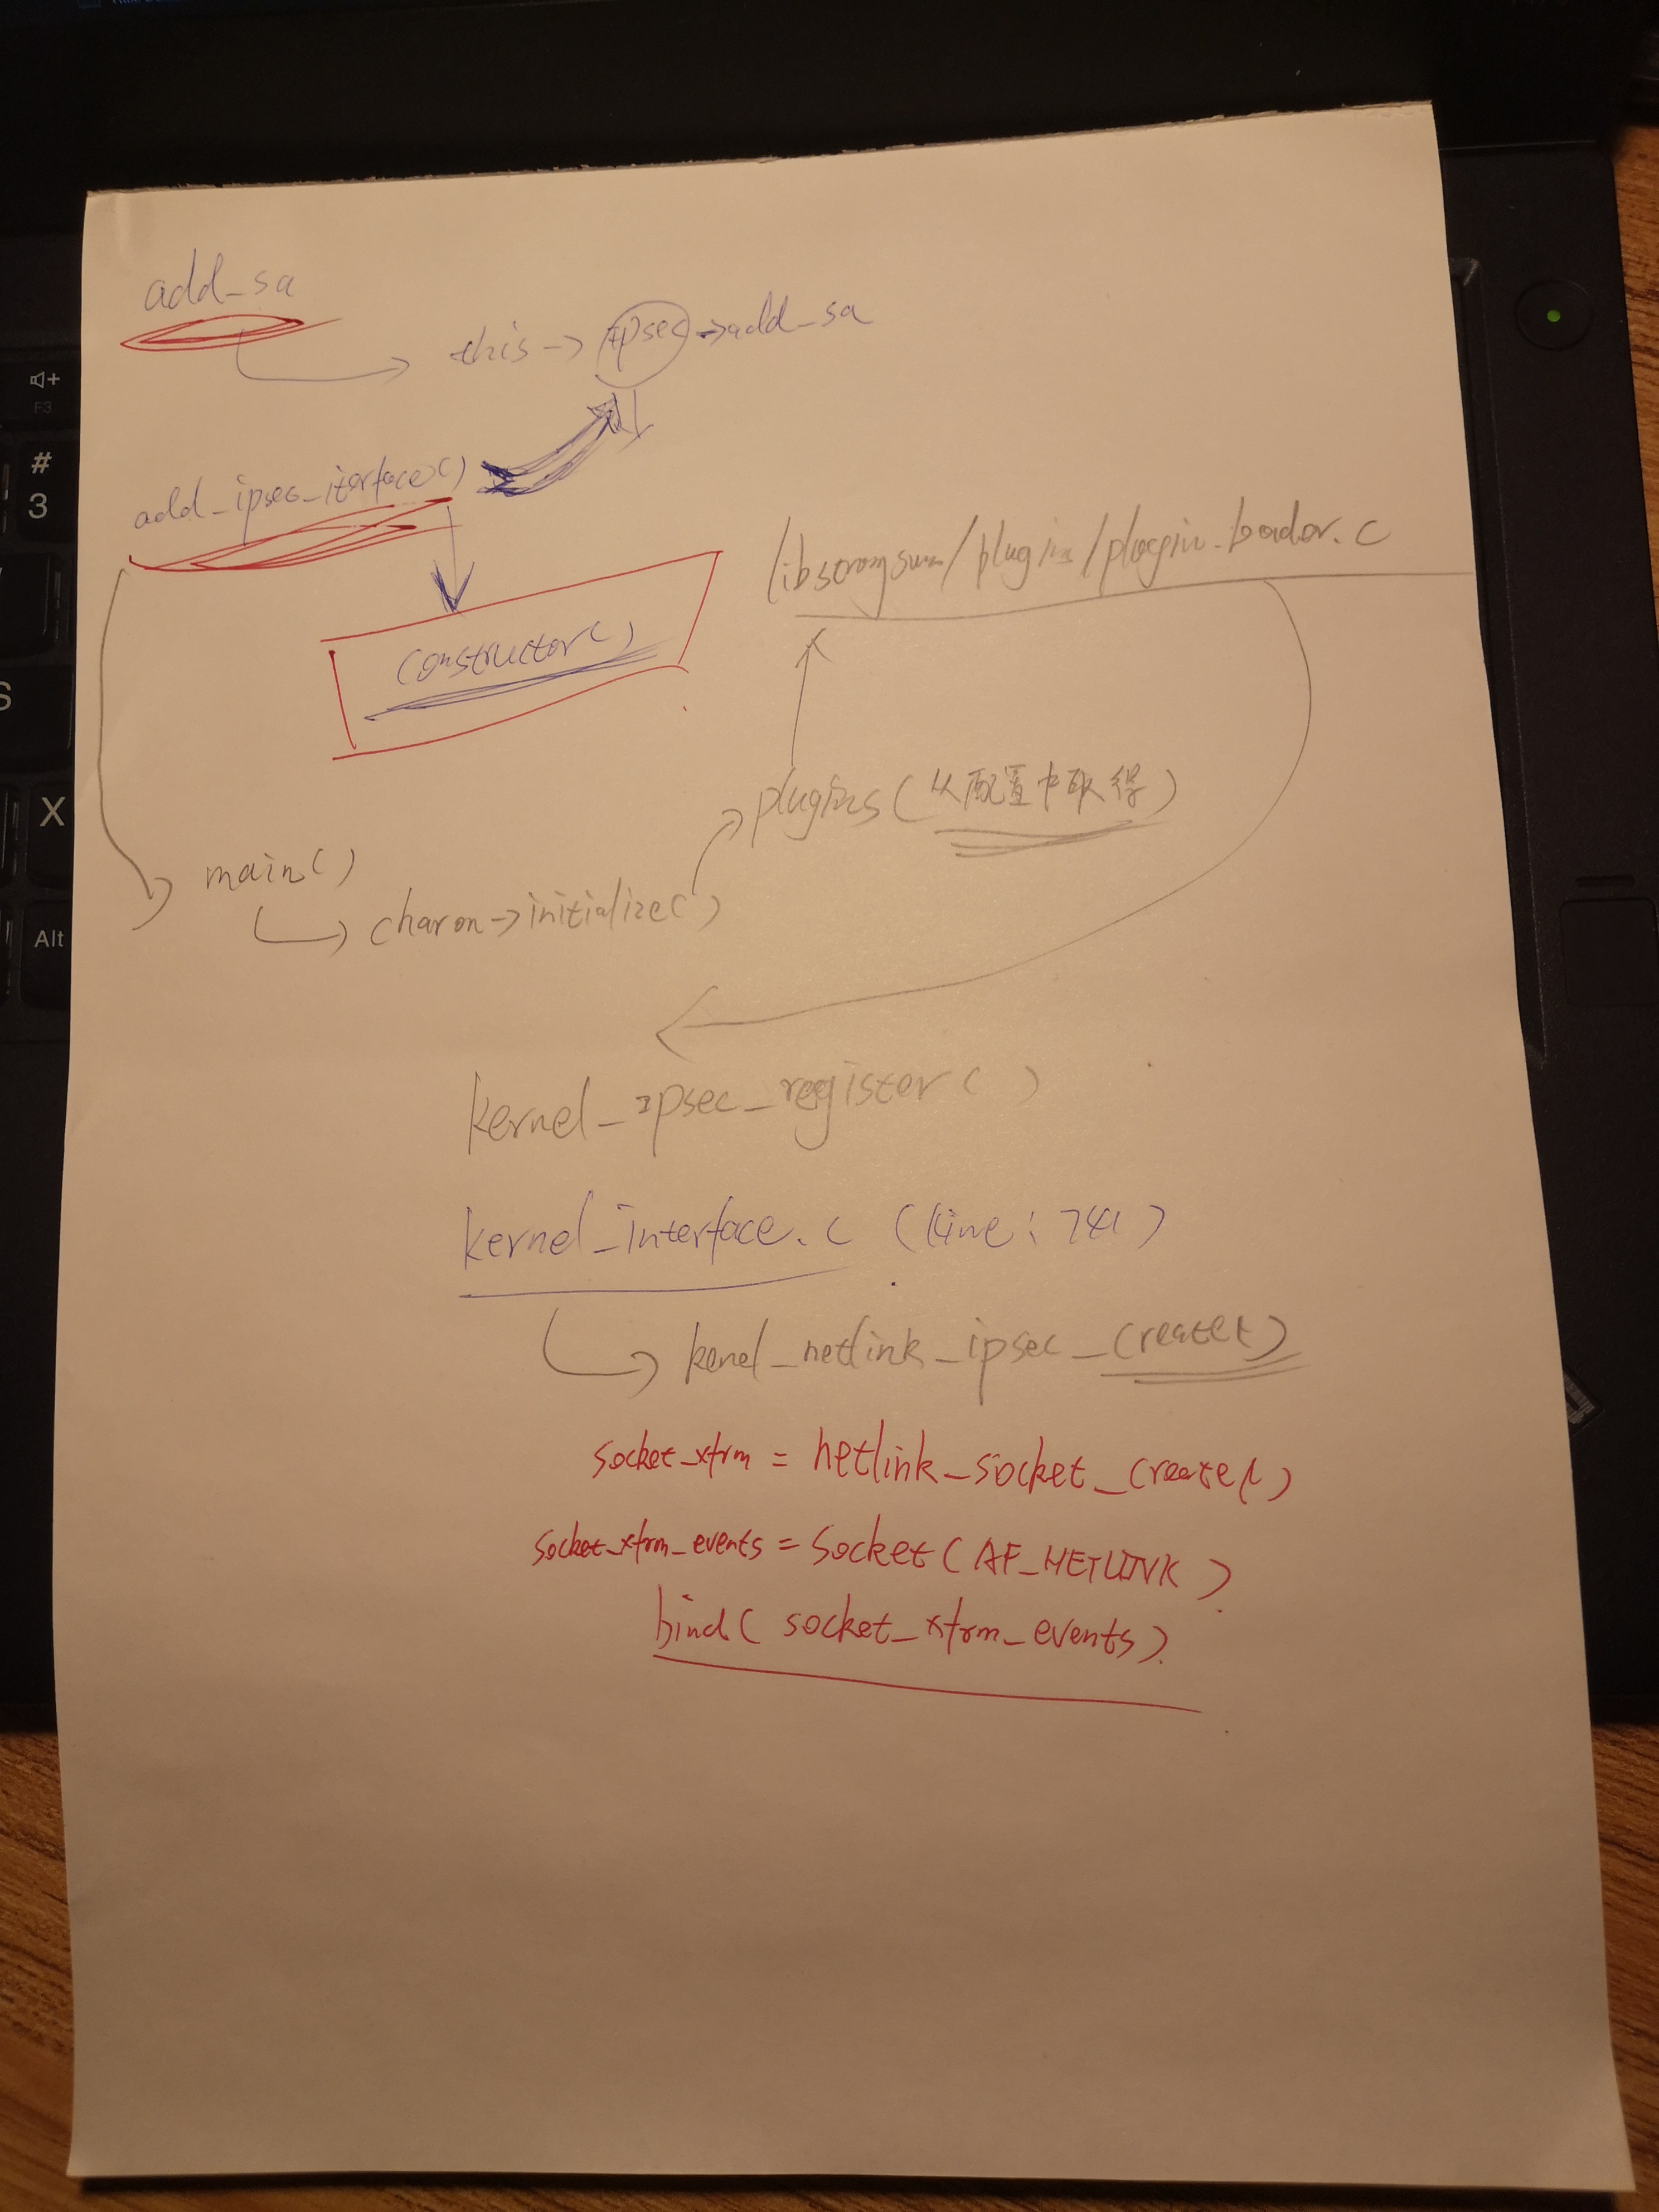
./src/libcharon/kernel/kernel_interface.c
架构流程图
传统方式启动并加载ipsec的流程图
通过plugin方式调用ipsec调用内核接口的原理
system的方式启动并加载ipsec的流程图

ipsec初始化
接口
sa的参数:
src/libcharon/kernel/kernel_ipsec.h
struct kernel_ipsec_add_sa_t
调用栈
#0  add_ipsec_interface (this=0x60de50, constructor=0x7ffff305ef82 <kernel_netlink_ipsec_create>)

    at kernel/kernel_interface.c:738

#1  0x00007ffff78c66fc in kernel_ipsec_register (plugin=0x62e990, feature=0x7ffff326d298 <f.9409+24>, reg=true,

    data=0x7ffff305ef82 <kernel_netlink_ipsec_create>) at kernel/kernel_ipsec.c:28

#2  0x00007ffff7b9d82a in plugin_feature_load (plugin=0x62e990, feature=0x7ffff326d298 <f.9409+24>,

    reg=0x7ffff326d280 <f.9409>) at plugins/plugin_feature.c:451

#3  0x00007ffff7b9aec5 in load_feature (this=0x60a590, provided=0x62f420, level=4) at plugins/plugin_loader.c:786

#4  0x00007ffff7b9b12a in load_provided (this=0x60a590, provided=0x62f420, level=3)

    at plugins/plugin_loader.c:861

#5  0x00007ffff7b9ab54 in load_registered (this=0x60a590, registered=0x62f300, level=3)

    at plugins/plugin_loader.c:688

#6  0x00007ffff7b9ac8b in load_dependencies (this=0x60a590, provided=0x630810, level=3)

    at plugins/plugin_loader.c:730

#7  0x00007ffff7b9ae98 in load_feature (this=0x60a590, provided=0x630810, level=3) at plugins/plugin_loader.c:784

#8  0x00007ffff7b9b12a in load_provided (this=0x60a590, provided=0x630810, level=2)

    at plugins/plugin_loader.c:861

#9  0x00007ffff7b9ab54 in load_registered (this=0x60a590, registered=0x6306f0, level=2)

    at plugins/plugin_loader.c:688

#10 0x00007ffff7b9ac8b in load_dependencies (this=0x60a590, provided=0x610550, level=2)

    at plugins/plugin_loader.c:730

#11 0x00007ffff7b9ae98 in load_feature (this=0x60a590, provided=0x610550, level=2) at plugins/plugin_loader.c:784

#12 0x00007ffff7b9b12a in load_provided (this=0x60a590, provided=0x610550, level=1)

    at plugins/plugin_loader.c:861

#13 0x00007ffff7b9ab54 in load_registered (this=0x60a590, registered=0x610460, level=1)

    at plugins/plugin_loader.c:688

#14 0x00007ffff7b9ac8b in load_dependencies (this=0x60a590, provided=0x60f830, level=1)

    at plugins/plugin_loader.c:730

#15 0x00007ffff7b9ae98 in load_feature (this=0x60a590, provided=0x60f830, level=1) at plugins/plugin_loader.c:784

#16 0x00007ffff7b9b12a in load_provided (this=0x60a590, provided=0x60f830, level=0)

    at plugins/plugin_loader.c:861

#17 0x00007ffff7b9b196 in load_features (this=0x60a590) at plugins/plugin_loader.c:882

#18 0x00007ffff7b9c0e0 in load_plugins (this=0x60a590,

    list=0x402d48 "aes des rc2 sha2 sha1 md5 mgf1 random nonce x509 revocation constraints pubkey pkcs1 pkcs7 pkcs8 pkcs12 pgp dnskey sshkey pem fips-prf gmp curve25519 xcbc cmac hmac attr kernel-netlink resolve socket-"...)

    at plugins/plugin_loader.c:1271

#19 0x00007ffff78ad2d8 in initialize (this=0x60aa90,

    plugins=0x402d48 "aes des rc2 sha2 sha1 md5 mgf1 random nonce x509 revocation constraints pubkey pkcs1 pkcs7 pkcs8 pkcs12 pgp dnskey sshkey pem fips-prf gmp curve25519 xcbc cmac hmac attr kernel-netlink resolve socket-"...)

    at daemon.c:900

#20 0x000000000040241b in main (argc=1, argv=0x7fffffffe4f8) at charon.c:422
add policy的调用栈
响应 swanctl --load-all命令。 调用了三次,添加了三个policy
#0  add_policy (this=0x634310, id=0x7ffff21f85c0, data=0x7ffff21f8590) at kernel_netlink_ipsec.c:2801

#1  0x00007ffff78c4b0b in add_policy (this=0x60de50, id=0x7ffff21f85c0, data=0x7ffff21f8590)

    at kernel/kernel_interface.c:481

#2  0x00007ffff78cf652 in install_policies_inbound (this=0x7fffc0004510, my_addr=0x7fffc0004790,

    other_addr=0x7fffc0004880, my_ts=0x7fffc0004b30, other_ts=0x7fffc0004f40, my_sa=0x7ffff21f86b0,

    other_sa=0x7ffff21f86d0, type=POLICY_IPSEC, priority=POLICY_PRIORITY_ROUTED, manual_prio=0)

    at sa/child_sa.c:1005

#3  0x00007ffff78cf866 in install_policies_internal (this=0x7fffc0004510, my_addr=0x7fffc0004790,

    other_addr=0x7fffc0004880, my_ts=0x7fffc0004b30, other_ts=0x7fffc0004f40, my_sa=0x7ffff21f86b0,

    other_sa=0x7ffff21f86d0, type=POLICY_IPSEC, priority=POLICY_PRIORITY_ROUTED, manual_prio=0, outbound=true)

    at sa/child_sa.c:1077

#4  0x00007ffff78d0022 in install_policies (this=0x7fffc0004510) at sa/child_sa.c:1266

#5  0x00007ffff78e2c61 in install (this=0x60ec30, peer=0x7fffc0003c30, child=0x7fffc0002dc0)

    at sa/trap_manager.c:317

#6  0x00007ffff281daa8 in run_start_action (this=0x63d760, peer_cfg=0x7fffc0003c30, child_cfg=0x7fffc0002dc0)

    at vici_config.c:2072

#7  0x00007ffff281e0d8 in handle_start_actions (this=0x63d760, peer_cfg=0x7fffc0003c30, undo=false)

    at vici_config.c:2233

#8  0x00007ffff281e50f in merge_config (this=0x63d760, peer_cfg=0x7fffc0003c30) at vici_config.c:2310

#9  0x00007ffff281ee8c in _cb_config_sn (request=0x7ffff21f8b90, message=0x7fffc00020e0, ctx=0x7ffff21f8b40,

    name=0x7fffc0000f20 "net-net") at vici_config.c:2542

#10 0x00007ffff280d394 in parse (this=0x7fffc00020e0, ctx=0x7ffff21f8b40,

    section=0x7ffff281e548 <_cb_config_sn>, kv=0x0, li=0x0, user=0x7ffff21f8b90) at vici_message.c:530

#11 0x00007ffff281eefe in _cb_load_conn (this=0x63d760, name=0x63d9f0 "load-conn", id=1, message=0x7fffc00020e0)

    at vici_config.c:2554

#12 0x00007ffff280f0f6 in process_request (this=0x63ad10, name=0x7ffff21f8c30 "load-conn", id=1, data=...)

    at vici_dispatcher.c:289

#13 0x00007ffff280f3c2 in _cb_inbound (this=0x63ad10, id=1, data=...) at vici_dispatcher.c:346

#14 0x00007ffff280b92f in _cb_process_queue (sel=0x7fffc0000c40) at vici_socket.c:508

#15 0x00007ffff7b9e138 in execute (this=0x7fffc0001c70) at processing/jobs/callback_job.c:77

#16 0x00007ffff7b9e6a7 in process_job (this=0x609650, worker=0x6107c0) at processing/processor.c:235

#17 0x00007ffff7b9e9a9 in process_jobs (worker=0x6107c0) at processing/processor.c:321

#18 0x00007ffff7bb6df9 in thread_main (this=0x611ab0) at threading/thread.c:331

#19 0x00007ffff7373dd5 in start_thread () from /lib64/libpthread.so.0

#20 0x00007ffff6e98ead in clone () from /lib64/libc.so.6
add sa的调用栈
响应 ipsec up net-net命令。调用两次之后又调用三次add_policy
(gdb) bt

#0  add_sa (this=0x634310, id=0x7ffff09f5930, data=0x7ffff09f58b0) at kernel_netlink_ipsec.c:1548

#1  0x00007ffff78c4962 in add_sa (this=0x60de50, id=0x7ffff09f5930, data=0x7ffff09f58b0)

    at kernel/kernel_interface.c:426

#2  0x00007ffff78cf2c2 in install_internal (this=0x7fffac005220, encr=..., integ=..., spi=1610579395, cpi=0,

    initiator=true, inbound=true, tfcv3=true) at sa/child_sa.c:908

#3  0x00007ffff78cf3a4 in install (this=0x7fffac005220, encr=..., integ=..., spi=1610579395, cpi=0,

    initiator=true, inbound=true, tfcv3=true) at sa/child_sa.c:921

#4  0x00007ffff78f3854 in select_and_install (this=0x7fffc4002250, no_dh=true, ike_auth=true)

    at sa/ikev2/tasks/child_create.c:712

#5  0x00007ffff78f6980 in process_i (this=0x7fffc4002250, message=0x7fffe0001010)

    at sa/ikev2/tasks/child_create.c:1645

#6  0x00007ffff78e8dac in process_response (this=0x7fffc4001380, message=0x7fffe0001010)

    at sa/ikev2/task_manager_v2.c:745

#7  0x00007ffff78eb00c in process_message (this=0x7fffc4001380, msg=0x7fffe0001010)

    at sa/ikev2/task_manager_v2.c:1613

#8  0x00007ffff78d545c in process_message (this=0x7fffc4000a40, message=0x7fffe0001010) at sa/ike_sa.c:1572

#9  0x00007ffff78cabe4 in execute (this=0x7fffe00011b0) at processing/jobs/process_message_job.c:74

#10 0x00007ffff7b9e6a7 in process_job (this=0x609650, worker=0x63f650) at processing/processor.c:235

#11 0x00007ffff7b9e9a9 in process_jobs (worker=0x63f650) at processing/processor.c:321

#12 0x00007ffff7bb6df9 in thread_main (this=0x63f680) at threading/thread.c:331

#13 0x00007ffff7373dd5 in start_thread () from /lib64/libpthread.so.0

#14 0x00007ffff6e98ead in clone () from /lib64/libc.so.6

(gdb)
https://en.wikipedia.org/wiki/Policy-based_routing
http://kernelspec.blogspot.com/2014/10/ipsec-implementation-in-linux-kernel.html
更多strongswan系列的其他内容:
https://www.cnblogs.com/hugetong/tag/strongswan/
[ipsec][strongswan]strongswan源码分析--(零)引子的更多相关文章
- epoll(2) 使用及源码分析的引子
epoll(2) 使用及源码分析的引子 本文代码取自内核版本 4.17 epoll(2) - I/O 事件通知设施. epoll 是内核在2.6版本后实现的,是对 select(2)/poll(2) ...
- [Abp 源码分析]零、文章目录
0.系列文章目录 一.Abp 框架启动流程分析 二.模块系统 三.依赖注入 四.模块配置 五.系统设置 六.工作单元的实现 七.仓储与 Entity Framework Core 八.缓存管理 九.事 ...
- [dev][ipsec][dpdk] strongswan/dpdk源码分析之ipsec算法配置过程
1 简述 storngswan的配置里用一种固定格式的字符串设置了用于协商的预定义算法.在包协商过程中strongswan将字符串转换为固定的枚举值封在数据包里用于传输. 协商成功之后,这组被协商选中 ...
- 「从零单排canal 03」 canal源码分析大纲
在前面两篇中,我们从基本概念理解了canal是一个什么项目,能应用于什么场景,然后通过一个demo体验,有了基本的体感和认识. 从这一篇开始,我们将从源码入手,深入学习canal的实现方式.了解can ...
- QTimer源码分析(以Windows下实现为例)
QTimer源码分析(以Windows下实现为例) 分类: Qt2011-04-13 21:32 5026人阅读 评论(0) 收藏 举报 windowstimerqtoptimizationcallb ...
- 【JUC】JDK1.8源码分析之CountDownLatch(五)
一.前言 分析完了CyclicBarrier后,下面分析CountDownLatch,CountDownLatch用于同步一个或多个任务,强制他们等待由其他任务执行的一组操作完成.CountDownL ...
- 《深入理解Spark:核心思想与源码分析》(前言及第1章)
自己牺牲了7个月的周末和下班空闲时间,通过研究Spark源码和原理,总结整理的<深入理解Spark:核心思想与源码分析>一书现在已经正式出版上市,目前亚马逊.京东.当当.天猫等网站均有销售 ...
- Mahout源码分析之 -- 文档向量化TF-IDF
fesh个人实践,欢迎经验交流!Blog地址:http://www.cnblogs.com/fesh/p/3775429.html Mahout之SparseVectorsFromSequenceFi ...
- 《深入理解Spark:核心思想与源码分析》一书正式出版上市
自己牺牲了7个月的周末和下班空闲时间,通过研究Spark源码和原理,总结整理的<深入理解Spark:核心思想与源码分析>一书现在已经正式出版上市,目前亚马逊.京东.当当.天猫等网站均有销售 ...
随机推荐
- 安卓之Android.mk多文件以及动态库编译
1.多文件编译 多文件编译共有两种方式: (1) 在Android.mk中一一添加 LOCAL_PATH:= $(call my-dir) #定义当前模块的相对路径 include $(CLEAR_V ...
- [LeetCode] 346. Moving Average from Data Stream 从数据流中移动平均值
Given a stream of integers and a window size, calculate the moving average of all integers in the sl ...
- Oracle Spatial分区应用研究之二:按县分区与按省分区对比测试报告
1.实验目的 在上一轮的实验中,oracle 11g r2版本下,在87县市实验数据的基础上,比较了分表与分区的效率,得出了分区+全局索引效率较高的结论(见上一篇博客).不过我们尚未比较过不同的分区粒 ...
- Ubuntu环境下非root用户指定版本Python的安装及虚拟环境virtualenv的使用
Ubuntu环境下非root用户指定版本Python的安装及虚拟环境virtualenv的使用 参考博客: https://blog.csdn.net/leviopku/article/details ...
- [转帖]《吊打面试官》系列-Redis基础
<吊打面试官>系列-Redis基础 https://www.cnblogs.com/aobing/archive/2019/11/07/11811194.html 你知道的越多,你不知 ...
- Fiddler抓包工具如何可以抓取HTTPS
- UML概念模型
UML概念模型 UML(Unified Modeling Language):统一建模语言,为面向对象开发系统的产品进行说明.可视化.和编制文档的标准语言 面向对象程序设计 面向对象基本概念:对象.类 ...
- 使用flask做网页的excel成绩分析
使用到的技术:pyecharts flask 首先 pip install flask 和下载pip install pyecharts==0.5.5 项目结构: 代码: from flask imp ...
- python大道——博客目录
python基础 第一章 计算机基础 计算机基础 第二章 python基础语法 python入门 第三章 基础数据类型和文件操作 整型.布尔.字符串 列表.字典.集合 公共功能.小数据池 hash ...
- 在KubeSphere中部署Kubeapps
1. 情况说明 使用一台VMWare Workstation虚拟机,4核8G内存,50G磁盘 已安装KubeSphere 2.1 版本,已经按照官方文档的入门必读,示例一创建好相应的账号信息等 Kub ...