
Android 多用户
下面几篇介绍的不错,推荐看看
https://www.jianshu.com/p/3ad2163f7d34 Android 9.x 多用户机制 1 #Profile user创建过程
https://www.jianshu.com/p/12dd5408943a Android 9.x多用户机制 2 #Profile User启动过程
https://www.jianshu.com/p/4aaa181a44ec Android9.x多用户机制#Profile user 桌面图标显示过程
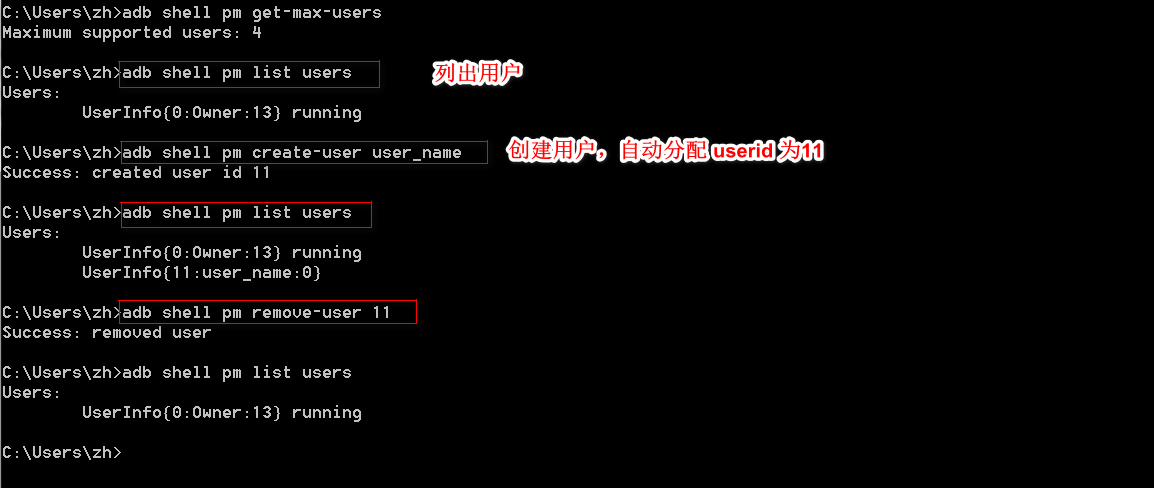
多用户相关 adb 命令:
查看支持最多用户数
adb shell pm get-max-users
查询系统所有用户
adb shell pm list users
创建新用户
adb shell pm create-user user_name
移除指定id用户
adb shell pm remove-user user_id
安装应用到某个用户
adb install –user USER_ID name.apk
多用户切换:
adb shell am switch-user USER_ID
//一般0是本机机主,10或者11 或及以后 都是新用户

切换到userid 12的用户

https://www.itcodemonkey.com/article/6169.html Android 多用户 —— 从入门到应用分身 (上)
// 第一步,创新新用户:

$ adb shell pm craete-user 'test-user'

// 第二步,得道新用户的userId:

$ adb shell dumpsys user

  ...

  UserInfo{10:test-user:0} serialNo=1001

  ...

// 得道UserId = 10

// 第三步, 启动新用户:

$ adb shell am start-user 10

// 第四步, 将新用户切到前台来:

$ adb shell am switch-user 10

// 第五步, 校验切换用户成功:

$ adb shell dumpsys activity a | grep 'Hist '

      * Hist #0: ActivityRecord{8636857 u10 com.meizu.flyme.launcher/.Launcher t1100001}

// 看到桌面"com.meizu.flyme.launcher/.Launcher"运行在"u10"即运行在userId=10的用户下, 说明新用户正处与前台.

// ps: 如切回主用户不赘述, 可自行查询 "adb shell pm / am"命令.
安装应用到 影子用户
// 首先要获取影子用户的userID:

$ adb shell dumpsys user

  ...

  UserInfo{10:FlymeParallelSpace:30} serialNo=10

  ...

// UserInfo{10:FlymeParallelSpace:30}表示:

//  userId=10,

//  userName="FlymeParallelSpace",

//  flags=0x30

于是我们得到影子用户的UserId

// 如微信已经安装了, 使用adb命令重安装到影子用户:

$ adb shell pm install -r --user 10 `adb shell pm path com.tencent.mm | awk -F':' '{print $2}'`

// "--user 10" 指定安装userId为10.

// 或者调用API:

//   PMS.installExistingPackageAsUser()

//   PMS.installPackageAsUser()
分别启动主用户和影子用户下的微信
// 首先找到微信的首页Activity:

$ adb shell dumpsys package com.tencent.mm | grep "android.intent.action.MAIN:" -A 5

      android.intent.action.MAIN:

        8f8990c com.tencent.mm/.ui.LauncherUI filter 3d82835

          Action: "android.intent.action.MAIN"

          Category: "android.intent.category.LAUNCHER"

          Category: "android.intent.category.MULTIWINDOW_LAUNCHER"

          AutoVerify=false

 // 得到首页Activity为"com.tencent.mm/.ui.LauncherUI"

 //于是启动影子用户下的微信为:

 $ adb shell am start --user 10 com.tencent.mm/.ui.LauncherUI

 // "--user 10"为指定userId为10, 不指定则默认为主用户, 即userId=0为默认.

 // ps: 并不是所有可指定userId的命令都这样设定.

 //     如 "am force-stop"命令是默认情况下杀所有用户下进程, 而非仅杀主用户下进程.

// 启动主用户下微信:

$ adb shell am start --user 0 com.tencent.mm/.ui.LauncherUI

 或:

$ adb shell am start com.tencent.mm/.ui.LauncherUI

检查微信进程:

$ adb shell ps | grep com.tencent.mm

u10_a110 19794 11620 2157444 185912 SyS_epoll_ 00eb0ce428 S com.tencent.mm

u10_a110 19882 11620 1832116 121932 SyS_epoll_ 00eb0ce428 S com.tencent.mm:push

u0_a110   19989 11620 2151704 194924 SyS_epoll_ 00eb0ce428 S com.tencent.mm

u0_a110   20072 11620 1830048 122600 SyS_epoll_ 00eb0ce428 S com.tencent.mm:push
可以看到,微信出现两组进程组, 一组在u0_a110用户下, 一组在u10_a110用户下。且观察界面可以看到他们同时运行在同一个桌面下。基于多用户, 我们很容易将创建了任意应用(微信)的分身乃至多开(多创建几个影子用户即可)。
adb shell ps | grep u10
u10_a26   20491 11620 1274140 99920 SyS_epoll_ 00eb0ce428 S com.meizu.flyme.input
u10_a35   20507 11623 1987644 138320 SyS_epoll_ 75ce5b88a0 S com.android.systemui
u10_system 20599 11623 1822584 112340 SyS_epoll_ 75ce5b88a0 S com.meizu.flyme.xtemui
u10_a35   20630 11623 1805016 98724 SyS_epoll_ 75ce5b88a0 S com.android.systemui:recents
u10_a97   20826 11623 1808060 112752 SyS_epoll_ 75ce5b88a0 S com.meizu.flyme.weather
u10_a3    20839 11623 1800452 120916 SyS_epoll_ 75ce5b88a0 S android.process.acore
u10_a12   24815 11623 1777532 77556 SyS_epoll_ 75ce5b88a0 S android.process.media
https://blog.csdn.net/stephen8341/article/details/43196519 android多用户下应用安装详解三(特殊需求实现)
https://blog.csdn.net/stephen8341/article/details/43195621 android多用户下应用安装详解二(开机读取流程)
https://blog.csdn.net/stephen8341/article/details/43192015 android多用户下应用安装详解一(新应用安装情况)
Android P
Settings.java
 /**

     * Creates a new {@code PackageSetting} object.

     * Use this method instead of the constructor to ensure a settings object is created

     * with the correct base.

     */

    static @NonNull PackageSetting createNewSetting(String pkgName, PackageSetting originalPkg,

            PackageSetting disabledPkg, String realPkgName, SharedUserSetting sharedUser,

            File codePath, File resourcePath, String legacyNativeLibraryPath, String primaryCpuAbi,

            String secondaryCpuAbi, long versionCode, int pkgFlags, int pkgPrivateFlags,

            UserHandle installUser, boolean allowInstall, boolean instantApp,

            boolean virtualPreload, String parentPkgName, List<String> childPkgNames,

            UserManagerService userManager,

            String[] usesStaticLibraries, long[] usesStaticLibrariesVersions) {

        final PackageSetting pkgSetting;

        if (originalPkg != null) {

            if (PackageManagerService.DEBUG_UPGRADE) Log.v(PackageManagerService.TAG, "Package "

                    + pkgName + " is adopting original package " + originalPkg.name);

            pkgSetting = new PackageSetting(originalPkg, pkgName /*realPkgName*/);

            pkgSetting.childPackageNames =

                    (childPkgNames != null) ? new ArrayList<>(childPkgNames) : null;

            pkgSetting.codePath = codePath;

            pkgSetting.legacyNativeLibraryPathString = legacyNativeLibraryPath;

            pkgSetting.parentPackageName = parentPkgName;

            pkgSetting.pkgFlags = pkgFlags;

            pkgSetting.pkgPrivateFlags = pkgPrivateFlags;

            pkgSetting.primaryCpuAbiString = primaryCpuAbi;

            pkgSetting.resourcePath = resourcePath;

            pkgSetting.secondaryCpuAbiString = secondaryCpuAbi;

            // NOTE: Create a deeper copy of the package signatures so we don't

            // overwrite the signatures in the original package setting.

            pkgSetting.signatures = new PackageSignatures();

            pkgSetting.versionCode = versionCode;

            pkgSetting.usesStaticLibraries = usesStaticLibraries;

            pkgSetting.usesStaticLibrariesVersions = usesStaticLibrariesVersions;

            // Update new package state.

            pkgSetting.setTimeStamp(codePath.lastModified());

        } else {

            pkgSetting = new PackageSetting(pkgName, realPkgName, codePath, resourcePath,

                    legacyNativeLibraryPath, primaryCpuAbi, secondaryCpuAbi,

                    null /*cpuAbiOverrideString*/, versionCode, pkgFlags, pkgPrivateFlags,

                    parentPkgName, childPkgNames, 0 /*sharedUserId*/, usesStaticLibraries,

                    usesStaticLibrariesVersions);

            pkgSetting.setTimeStamp(codePath.lastModified());

            pkgSetting.sharedUser = sharedUser;

            // If this is not a system app, it starts out stopped.

            if ((pkgFlags&ApplicationInfo.FLAG_SYSTEM) == 0) {

                if (DEBUG_STOPPED) {

                    RuntimeException e = new RuntimeException("here");

                    e.fillInStackTrace();

                    Slog.i(PackageManagerService.TAG, "Stopping package " + pkgName, e);

                }

                List<UserInfo> users = getAllUsers(userManager);

                final int installUserId = installUser != null ? installUser.getIdentifier() : 0;

                if (users != null && allowInstall) {

                    for (UserInfo user : users) {

                        // By default we consider this app to be installed

                        // for the user if no user has been specified (which

                        // means to leave it at its original value, and the

                        // original default value is true), or we are being

                        // asked to install for all users, or this is the

                        // user we are installing for.

                        final boolean installed = installUser == null

                                || (installUserId == UserHandle.USER_ALL

                                    && !isAdbInstallDisallowed(userManager, user.id))

                                || installUserId == user.id;

                        pkgSetting.setUserState(user.id, 0, COMPONENT_ENABLED_STATE_DEFAULT,

                                installed,

                                true /*stopped*/,

                                true /*notLaunched*/,

                                false /*hidden*/,

                                false /*suspended*/,

                                null /*suspendingPackage*/,

                                null /*dialogMessage*/,

                                null /*suspendedAppExtras*/,

                                null /*suspendedLauncherExtras*/,

                                instantApp,

                                virtualPreload,

                                null /*lastDisableAppCaller*/,

                                null /*enabledComponents*/,

                                null /*disabledComponents*/,

                                INTENT_FILTER_DOMAIN_VERIFICATION_STATUS_UNDEFINED,

                                0, PackageManager.INSTALL_REASON_UNKNOWN,

                                null /*harmfulAppWarning*/);

                    }

                }

            }

            if (sharedUser != null) {

                pkgSetting.appId = sharedUser.userId;

            } else {

                // Clone the setting here for disabled system packages

                if (disabledPkg != null) {

                    // For disabled packages a new setting is created

                    // from the existing user id. This still has to be

                    // added to list of user id's

                    // Copy signatures from previous setting

                    pkgSetting.signatures = new PackageSignatures(disabledPkg.signatures);

                    pkgSetting.appId = disabledPkg.appId;

                    // Clone permissions

                    pkgSetting.getPermissionsState().copyFrom(disabledPkg.getPermissionsState());

                    // Clone component info

                    List<UserInfo> users = getAllUsers(userManager);

                    if (users != null) {

                        for (UserInfo user : users) {

                            final int userId = user.id;

                            pkgSetting.setDisabledComponentsCopy(

                                    disabledPkg.getDisabledComponents(userId), userId);

                            pkgSetting.setEnabledComponentsCopy(

                                    disabledPkg.getEnabledComponents(userId), userId);

                        }

                    }

                }

            }

        }

        return pkgSetting;

    }
PackageManagerService.java
 final boolean createNewPackage = (pkgSetting == null);

        if (createNewPackage) {

            final String parentPackageName = (pkg.parentPackage != null)

                    ? pkg.parentPackage.packageName : null;

            final boolean instantApp = (scanFlags & SCAN_AS_INSTANT_APP) != 0;

            final boolean virtualPreload = (scanFlags & SCAN_AS_VIRTUAL_PRELOAD) != 0;

            // REMOVE SharedUserSetting from method; update in a separate call

            pkgSetting = Settings.createNewSetting(pkg.packageName, originalPkgSetting,

                    disabledPkgSetting, realPkgName, sharedUserSetting, destCodeFile,

                    destResourceFile, pkg.applicationInfo.nativeLibraryRootDir,

                    pkg.applicationInfo.primaryCpuAbi, pkg.applicationInfo.secondaryCpuAbi,

                    pkg.mVersionCode, pkg.applicationInfo.flags, pkg.applicationInfo.privateFlags,

                    user, true /*allowInstall*/, instantApp, virtualPreload,

                    parentPackageName, pkg.getChildPackageNames(),

                    UserManagerService.getInstance(), usesStaticLibraries,

                    pkg.usesStaticLibrariesVersions);

        }
UserMS.java
userInfo.lastLoggedInFingerprint = Build.FINGERPRINT; //记录上一次指纹信息,可以用于ota?
    /**

     * Called right before a user is started. This gives us a chance to prepare

     * app storage and apply any user restrictions.

     */

    public void onBeforeStartUser(int userId) {

        UserInfo userInfo = getUserInfo(userId);

        if (userInfo == null) {

            return;

        }

        final int userSerial = userInfo.serialNumber;

        // Migrate only if build fingerprints mismatch

        boolean migrateAppsData = !Build.FINGERPRINT.equals(userInfo.lastLoggedInFingerprint);

        mUserDataPreparer.prepareUserData(userId, userSerial, StorageManager.FLAG_STORAGE_DE);

        mPm.reconcileAppsData(userId, StorageManager.FLAG_STORAGE_DE, migrateAppsData);  //

        if (userId != UserHandle.USER_SYSTEM) {

            synchronized (mRestrictionsLock) {

                applyUserRestrictionsLR(userId);

            }

        }

    }
Android 多用户的更多相关文章
- Android 多用户多缓存的简单处理方案
需求:1.在缓存中记录用户登录信息.例如:用户名,密码 2.记录用户操作数据.例如:是否记住用户名密码.设置7天内自动登录等 简单设计:1)使用sqlite设计一张用户数据表,有用户名.密码.操作数据 ...
- android 5.0 创建多用户 双开多开应用(2)
上一讲 讲了如何创建一个user android 5.0 创建多用户 双开多开应用(1) 为什么要创建User 例如window 系统创建了一个user 会在当前用户下进行操作,而android 多 ...
- android 5.0 创建多用户 双开多开应用(1)
Andriod5.0多用户 双开应用 android多用户是5.0之后有的,类似windows的账户系统 不过官方还没有完全确认,API大都是hide状态 我这里提供一种方式并不适用所有的,由于我们有 ...
- Android 虚拟多开系列二——技术原理
目录 Android虚拟多开应用有哪些? Android虚拟多开应用技术原理有哪几类? Android虚拟多开需求分析 反虚拟多开技术 ...
- 修改Android源码实现原生应用双开,应用多开
1. 准备 把某系统双开的两个app的信息进行对比 1.1 目录的对比 1.1.1 data目录对比 原应用: /data/user/0/com.luoyesiqiu.crackme/files 被复 ...
- [Android]从Launcher开始启动App流程源码分析
以下内容为原创,欢迎转载,转载请注明 来自天天博客:http://www.cnblogs.com/tiantianbyconan/p/5017056.html 从Launcher开始启动App流程源码 ...
- Android AsyncTask 深度理解、简单封装、任务队列分析、自定义线程池
前言:由于最近在做SDK的功能,需要设计线程池.看了很多资料不知道从何开始着手,突然发现了AsyncTask有对线程池的封装,so,就拿它开刀,本文将从AsyncTask的基本用法,到简单的封装,再到 ...
- Android应用开发基础之十二:版本控制
为什么需要版本控制? 场景1: 你的代码正常工作 你改了其中的几行代码 程序出了问题 你把代码改回来 程序还是不能正常工作——为什么? 场景2: 你的程序昨天还能正常运行 昨天晚上你修改了很多内容,做 ...
- Android进程绝杀技--forceStop
一.概述 1.1 引言 话说Android开源系统拥有着App不计其数,百家争鸣,都想在这"大争之世"寻得系统存活的一席之地.然则系统资源有限,如若都割据为王,再强劲的CPU也会忙 ...
随机推荐
- MySQL MHA工作原理
MHA工作组件 MHA(Master High Availability)是一种MySQL高可用解决方案,由日本DeNA公司开发,主要用于在故障切换和主从提升时进行快速切换,并最大程度保证数据一致性. ...
- SHELL脚本编程-普通数组(列表)和关联数组(字典)
SHELL脚本编程-普通数组(列表)和关联数组(字典) 作者:尹正杰 版权声明:原创作品,谢绝转载!否则将追究法律责任. 一.数组相关概述 变量: 存储单个元素的内存空间 数组: 存储多个元素的连续的 ...
- HTML&CSS基础-html常用的标签
HTML&CSS基础-html常用的标签 作者:尹正杰 版权声明:原创作品,谢绝转载!否则将追究法律责任. 一.html的源代码 <!DOCTYPE html> <html& ...
- Mysql【第三课】
- 浏览器 Web Storage - sessionStorage & localStorage
storage事件 当储存的数据发生变化时,会触发storage事件.我们可以指定这个事件的回调函数. window.addEventListener("storage",onSt ...
- django-获取购物车商品数量-redis
视图函数views.py中 from django_redis import get_redis_connection # 连接redis class IndexView(View): '''首页'' ...
- 导出服务器Oracle数据库为dmp文件
本文链接:https://blog.csdn.net/rensheng_ruxi/article/details/79877267一.前提:本机安装有Oracle客户端,并且是正确安装. 二.导出Or ...
- LG1036
当我们看到这道题的时候,我们不仅大吼一声,这不就是搜索嘛. 于是搜索两大刀!搜索目标和搜索状态! 搜索目标:求选数的方案,以及他们的和是否为质数. 搜索状态: 1.从后往前分析目标(或从前往后):和是 ...
- spring-cloud(一)
1.SpringCloud概述和搭建Eureka服务注册中心 Spring Cloud是一系列框架的有序集合.它利用Spring Boot的开发便利性巧妙地简化了分布式系统基础设施的开发,如服务发现注 ...
- asp.net Web 项目的文件/文件夹上传下载
以ASP.NET Core WebAPI 作后端 API ,用 Vue 构建前端页面,用 Axios 从前端访问后端 API ,包括文件的上传和下载. 准备文件上传的API #region 文件上传 ...