QQ5.0侧滑
package com.example;

import android.os.Bundle;

import android.support.v7.app.ActionBarActivity;

import android.view.View;

public class MainActivity extends ActionBarActivity {

    private SlidingMenu mMenu;

    @Override

    protected void onCreate(Bundle savedInstanceState) {

        super.onCreate(savedInstanceState);

        setContentView(R.layout.activity_main);

        mMenu = (SlidingMenu) findViewById(R.id.id_menu);

    }

    public void toggleMenu(View view)

    {

        mMenu.toggle();

    }

}
package com.example;

import android.app.Activity;

import android.content.Context;

import android.graphics.Bitmap;

import android.graphics.Rect;

import android.util.DisplayMetrics;

import android.view.View;

import android.view.WindowManager;

/**

 * Created by tuhao-pc on 2015/12/28.

 * 获取屏幕相关的辅助类

 */

public class ScreenUtils {

    private  ScreenUtils() {

    }

    /**

     *获取屏幕的高度

     * @param context

     * @return

     */

    public static  int getScreenWidth(Context context){

        WindowManager wm = (WindowManager) context.getSystemService(Context.WINDOW_SERVICE);

        DisplayMetrics outMetrics = new DisplayMetrics();

        wm.getDefaultDisplay().getMetrics(outMetrics);

        return outMetrics.widthPixels;

    }

    /**

     * 获取屏幕的高度

     * @param context

     * @return

     */

    public static int getScreenHeight(Context context){

        WindowManager wm = (WindowManager) context.getSystemService(Context.WINDOW_SERVICE);

        DisplayMetrics outMetrics = new DisplayMetrics();

        wm.getDefaultDisplay().getMetrics(outMetrics);

        return outMetrics.heightPixels;

    }

    /**

     * 获取手机状态栏的状态

     * @param context

     * @return

     */

    public static int getStatusHeight(Context context){

        int statusHeight = -1;

        Class<?> clazz = null;

        try {

            clazz = Class.forName("com.android.internal.R$dimen");

            Object object = clazz.newInstance();

            int height = Integer.parseInt(clazz.getField("status_bar_height").get(object).toString());

            statusHeight = context.getResources().getDimensionPixelSize(height);

        } catch (ClassNotFoundException e) {

            e.printStackTrace();

        } catch (NoSuchFieldException e) {

            e.printStackTrace();

        } catch (InstantiationException e) {

            e.printStackTrace();

        } catch (IllegalAccessException e) {

            e.printStackTrace();

        }

        return statusHeight;

    }

    /**

     * 获取当前屏幕截图,包含状态栏

     *

     * @param activity

     * @return

     */

    public static Bitmap snapShotWithStatusBar(Activity activity)

    {

        View view = activity.getWindow().getDecorView();

        view.setDrawingCacheEnabled(true);

        view.buildDrawingCache();

        Bitmap bmp = view.getDrawingCache();

        int width = getScreenWidth(activity);

        int height = getScreenHeight(activity);

        Bitmap bp = null;

        bp = Bitmap.createBitmap(bmp, 0, 0, width, height);

        view.destroyDrawingCache();

        return bp;

    }

    /**

     * 获取当前屏幕截图,不包含状态栏

     *

     * @param activity

     * @return

     */

    public static Bitmap snapShotWithoutStatusBar(Activity activity)

    {

        View view = activity.getWindow().getDecorView();

        view.setDrawingCacheEnabled(true);

        view.buildDrawingCache();

        Bitmap bmp = view.getDrawingCache();

        Rect frame = new Rect();

        activity.getWindow().getDecorView().getWindowVisibleDisplayFrame(frame);

        int statusBarHeight = frame.top;

        int width = getScreenWidth(activity);

        int height = getScreenHeight(activity);

        Bitmap bp = null;

        bp = Bitmap.createBitmap(bmp, 0, statusBarHeight, width, height

                - statusBarHeight);

        view.destroyDrawingCache();

        return bp;

    }

}
package com.example;

import android.content.Context;

import android.content.res.TypedArray;

import android.util.AttributeSet;

import android.util.TypedValue;

import android.view.MotionEvent;

import android.view.ViewGroup;

import android.widget.HorizontalScrollView;

import android.widget.LinearLayout;

import com.nineoldandroids.view.ViewHelper;

/**

 * Created by tuhao-pc on 2015/12/28.

 */

public class SlidingMenu  extends HorizontalScrollView{

    private int mScreenWidth;

    private int mMenuRightPadding;

    private int mMenuWidth;

    private int mHalfMenuWidth;

    private boolean isOpen;

    private boolean once;

    private ViewGroup mMenu;

    private ViewGroup mContent;

    public SlidingMenu(Context context) {

        this(context,null);

    }

    public SlidingMenu(Context context, AttributeSet attrs) {

        this(context, attrs, 0);

    }

    public SlidingMenu(Context context, AttributeSet attrs, int defStyleAttr) {

        super(context, attrs, defStyleAttr);

        mScreenWidth = ScreenUtils.getScreenWidth(context);

        TypedArray a = context.getTheme().obtainStyledAttributes(attrs,R.styleable.SlidingMenu,defStyleAttr,0);

        int count = a.getIndexCount();

        for(int i = 0;i < count;i++){

            int attr = a.getIndex(i);

            switch (attr){

                case R.styleable.SlidingMenu_rightPadding:{

//                    默认是50

                    mMenuRightPadding = a.getDimensionPixelSize(attr, (int) TypedValue.applyDimension(TypedValue.COMPLEX_UNIT_DIP,50f,getResources().getDisplayMetrics()));

                    break;

                }

            }

        }

        a.recycle();

    }

    @Override

    protected void onMeasure(int widthMeasureSpec, int heightMeasureSpec) {

        /**

         * 显示设置一个宽度

         */

        if(!once){

            LinearLayout wrapper = (LinearLayout) getChildAt(0);

            mMenu = (ViewGroup) wrapper.getChildAt(0);

            mContent = (ViewGroup) wrapper.getChildAt(1);

            mMenuWidth = mScreenWidth - mMenuRightPadding;

            mHalfMenuWidth = mMenuWidth/2;

            mMenu.getLayoutParams().width = mMenuWidth;

            mContent.getLayoutParams().width = mScreenWidth;

        }

        super.onMeasure(widthMeasureSpec, heightMeasureSpec);

    }

    @Override

    protected void onLayout(boolean changed, int l, int t, int r, int b) {

        super.onLayout(changed, l, t, r, b);

        if(changed) {

//            将菜单隐藏

            this.scrollTo(mMenuWidth, 0);

            once = true;

        }

    }

    @Override

    public boolean onTouchEvent(MotionEvent ev) {

        int action = ev.getAction();

        switch (action){

            // Up时,进行判断,如果显示区域大于菜单宽度一半则完全显示,否则隐藏

            case MotionEvent.ACTION_UP:{

                int scrollX = getScrollX();

                if(scrollX > mHalfMenuWidth){

                    this.smoothScrollTo(mMenuWidth,0);

                    isOpen = false;

                }

                else{

                    this.smoothScrollTo(0,0);

                    isOpen = true;

                }

                return true;

            }

        }

        return super.onTouchEvent(ev);

    }

    /**

     * 打开菜单

     */

    public void openMenu()

    {

        if (isOpen)

            return;

        this.smoothScrollTo(0, 0);

        isOpen = true;

    }

    /**

     * 关闭菜单

     */

    public void closeMenu()

    {

        if (isOpen)

        {

            this.smoothScrollTo(mMenuWidth, 0);

            isOpen = false;

        }

    }

    /**

     * 切换菜单状态

     */

    public void toggle()

    {

        if (isOpen)

        {

            closeMenu();

        } else

        {

            openMenu();

        }

    }

    @Override

    protected void onScrollChanged(int l, int t, int oldl, int oldt)

    {

        super.onScrollChanged(l, t, oldl, oldt);

        float scale = l * 1.0f / mMenuWidth;

        float leftScale = 1 - 0.3f * scale;

        float rightScale = 0.8f + scale * 0.2f;

        ViewHelper.setScaleX(mMenu, leftScale);

        ViewHelper.setScaleY(mMenu, leftScale);

        ViewHelper.setAlpha(mMenu, 0.6f + 0.4f * (1 - scale));

        ViewHelper.setTranslationX(mMenu, mMenuWidth * scale * 0.7f);

        ViewHelper.setPivotX(mContent, 0);

        ViewHelper.setPivotY(mContent, mContent.getHeight() / 2);

        ViewHelper.setScaleX(mContent, rightScale);

        ViewHelper.setScaleY(mContent, rightScale);

    }

}
布局文件和资源文件(xml)
<?xml version="1.0" encoding="utf-8"?>

<LinearLayout

    xmlns:android="http://schemas.android.com/apk/res/android"

    xmlns:tu = "http://schemas.android.com/apk/res-auto"

    android:layout_width="match_parent"

    android:layout_height="match_parent">

    <com.example.SlidingMenu

        android:id="@+id/id_menu"

        android:layout_width="match_parent"

        android:layout_height="match_parent"

        android:background="@mipmap/img_frame_background"

        tu:rightPadding="20dp">

        <LinearLayout

            android:layout_width="wrap_content"

            android:layout_height="fill_parent"

            android:orientation="horizontal" >

            <include layout="@layout/layout_menu" />

            <LinearLayout

                android:layout_width="fill_parent"

                android:layout_height="fill_parent"

                android:background="@mipmap/qq" >

                <Button

                    android:layout_width="wrap_content"

                    android:layout_height="wrap_content"

                    android:onClick="toggleMenu"

                    android:text="切换菜单" />

            </LinearLayout>

        </LinearLayout>

    </com.example.SlidingMenu>

</LinearLayout>
<?xml version="1.0" encoding="utf-8"?>

<RelativeLayout xmlns:android="http://schemas.android.com/apk/res/android"

    android:layout_width="match_parent"

    android:layout_height="match_parent"

    android:background="#0000" >

    <LinearLayout

        android:layout_width="match_parent"

        android:layout_height="wrap_content"

        android:layout_centerVertical="true"

        android:orientation="vertical" >

        <RelativeLayout

            android:layout_width="match_parent"

            android:layout_height="wrap_content" >

            <ImageView

                android:id="@+id/one"

                android:layout_width="50dp"

                android:layout_height="50dp"

                android:layout_centerVertical="true"

                android:layout_marginLeft="20dp"

                android:layout_marginTop="20dp"

                android:src="@mipmap/img_1" />

            <TextView

                android:layout_width="fill_parent"

                android:layout_height="wrap_content"

                android:layout_centerVertical="true"

                android:layout_marginLeft="20dp"

                android:layout_toRightOf="@id/one"

                android:text="第1个Item"

                android:textColor="#f0f0f0"

                android:textSize="20sp" />

        </RelativeLayout>

        <RelativeLayout

            android:layout_width="match_parent"

            android:layout_height="wrap_content" >

            <ImageView

                android:id="@+id/two"

                android:layout_width="50dp"

                android:layout_height="50dp"

                android:layout_centerVertical="true"

                android:layout_marginLeft="20dp"

                android:layout_marginTop="20dp"

                android:src="@mipmap/img_2" />

            <TextView

                android:layout_width="fill_parent"

                android:layout_height="wrap_content"

                android:layout_centerVertical="true"

                android:layout_marginLeft="20dp"

                android:layout_toRightOf="@id/two"

                android:text="第2个Item"

                android:textColor="#f0f0f0"

                android:textSize="20sp" />

        </RelativeLayout>

        <RelativeLayout

            android:layout_width="match_parent"

            android:layout_height="wrap_content" >

            <ImageView

                android:id="@+id/three"

                android:layout_width="50dp"

                android:layout_height="50dp"

                android:layout_centerVertical="true"

                android:layout_marginLeft="20dp"

                android:layout_marginTop="20dp"

                android:src="@mipmap/img_3" />

            <TextView

                android:layout_width="fill_parent"

                android:layout_height="wrap_content"

                android:layout_centerVertical="true"

                android:layout_marginLeft="20dp"

                android:layout_toRightOf="@id/three"

                android:text="第3个Item"

                android:textColor="#f0f0f0"

                android:textSize="20sp" />

        </RelativeLayout>

        <RelativeLayout

            android:layout_width="match_parent"

            android:layout_height="wrap_content" >

            <ImageView

                android:id="@+id/four"

                android:layout_width="50dp"

                android:layout_height="50dp"

                android:layout_centerVertical="true"

                android:layout_marginLeft="20dp"

                android:layout_marginTop="20dp"

                android:src="@mipmap/img_4" />

            <TextView

                android:layout_width="fill_parent"

                android:layout_height="wrap_content"

                android:layout_centerVertical="true"

                android:layout_marginLeft="20dp"

                android:layout_toRightOf="@id/four"

                android:text="第一个Item"

                android:textColor="#f0f0f0"

                android:textSize="20sp" />

        </RelativeLayout>

        <RelativeLayout

            android:layout_width="match_parent"

            android:layout_height="wrap_content" >

            <ImageView

                android:id="@+id/five"

                android:layout_width="50dp"

                android:layout_height="50dp"

                android:layout_centerVertical="true"

                android:layout_marginLeft="20dp"

                android:layout_marginTop="20dp"

                android:src="@mipmap/img_5" />

            <TextView

                android:layout_width="fill_parent"

                android:layout_height="wrap_content"

                android:layout_centerVertical="true"

                android:layout_marginLeft="20dp"

                android:layout_toRightOf="@id/five"

                android:text="第5个Item"

                android:textColor="#f0f0f0"

                android:textSize="20sp" />

        </RelativeLayout>

    </LinearLayout>

</RelativeLayout>
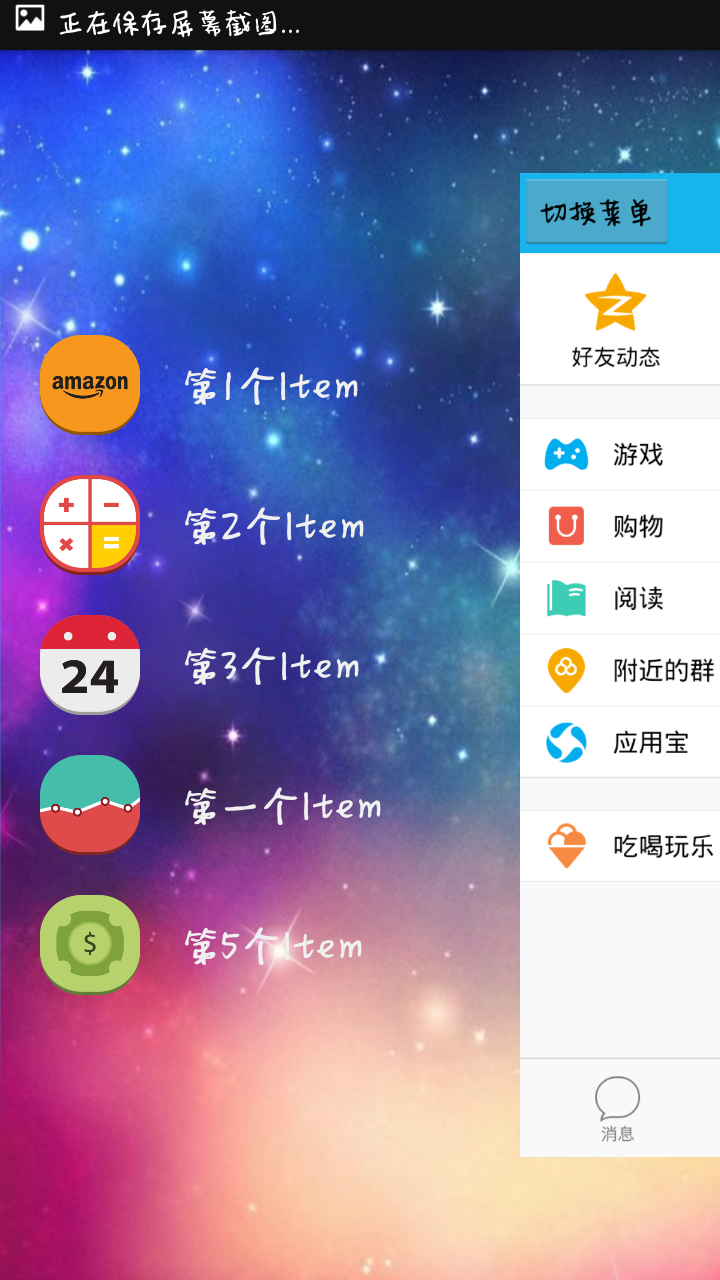
运行效果截图

QQ5.0侧滑的更多相关文章
- 安卓开发笔记——关于开源项目SlidingMenu的使用介绍(仿QQ5.0侧滑菜单)
记得去年年末的时候写过这个侧滑效果,当时是利用自定义HorizontalScrollView来实现的,效果如下: 有兴趣的朋友可以看看这篇文件<安卓开发笔记——自定义HorizontalScro ...
- 仿QQ5.0侧滑菜单
一.概述 侧滑菜单现在已经非常流行了,目前大概有这么几种:最普通的侧滑,抽屉侧滑,QQ侧滑 注:本文来自慕课网 二.最普通的侧滑 先上图 代码如下: public class MainActivity ...
- 安卓开发笔记——自定义HorizontalScrollView控件(实现QQ5.0侧滑效果)
对于滑动菜单栏SlidingMenu,大家应该都不陌生,在市场上的一些APP应用里经常可以见到,比如人人网,FaceBook等. 前段时间QQ5.0版本出来后也采用了这种设计风格:(下面是效果图) 之 ...
- 【转】仿QQ5.0侧滑菜单ResideMenu
本文由孙国威 原创.如需转载,请注明出处! 原文:http://blog.csdn.net/manoel/article/details/39013095 为了后续对这个项目进行优化,比如透明度动画. ...
- DragLayout: QQ5.0侧拉菜单的新特效
一.项目概要 1.1 项目效果如图: 1.2 需要使用到的技术 ViewDragHelper: 要实现和QQ5.0侧滑的特效,需要借助谷歌在2013年I/O大会上发布的ViewDragHelper ...
- QQ5.0左侧滑动显示效果
前三篇为大家介绍了如何实现简单的类QQ5.0左侧的侧滑效果,本篇我将带领大家一起探讨一下如何真正实现QQ5.0左侧的侧滑效果,对于本篇的内容与之前的三篇关联性很强,如果前三篇你已经完全掌握,对于这一篇 ...
- Android音乐播放器源码(歌词.均衡器.收藏.qq5.0菜单.通知)
一款Android音乐播放器源码,基本功能都实现了 qq5.0菜单(歌词.均衡器.收藏.qq5.0菜单.通知) 只有向右滑动出现,菜单键和指定按钮都还没有添加. 源码下载:http://code.66 ...
- 使用DrawerLayout实现QQ5.0侧拉菜单效果
在上一篇文章中,我们介绍了怎么使用DrawerLayout来实现一个简单的侧拉菜单(使用DrawerLayout实现侧拉菜单),也就是我们常说的抽屉效果,GitHub上类似效果的实现方式非常多,实现出 ...
- Android 自定义View修炼-仿QQ5.0 的侧滑菜单效果的实现
有一段时间没有写博客了,最近比较忙,没什么时间写,刚好今天有点时间, 我就分享下,侧滑菜单的实现原理,一般android侧滑的实现原理和步骤如下:(源码下载在下面最后给出哈) 1.使用ViewGrou ...
随机推荐
- 树莓派 离线安装 apt-get offline
有网络的地方 sudo cp /var/cache/apt/archives/YOUR_PACK_NAME ~/swap/deb/ 没网络的地方 sudo dpkg -i ~/swap/deb/*
- Android开发学习--RecycleView入门
该控件用于在有限的窗口中展示大量数据集,其实这样功能的控件我们并不陌生,例如:ListView.GridView 通过设置它提供的不同LayoutManager,ItemDecoration , It ...
- JSP(Java Servlet Page)
一.简介 HTML HTML擅长显示一个静态的网页,但是不能调用Java程序. Servlet Servlet擅长调用Java程序和后台进行交互,但是它不擅长显示一个完整的HTML页面. 我们希望创建 ...
- Android开发-下载网络图片并显示到本地
Android下载网络图片的流程是: 发送网络请求->将图片以流的形式下载下来->将流转换为Bitmap并赋给ImageView控件. 注意点 最新的Android系统不可以在主线程上请求 ...
- iOS Programming NSUserDefaults
iOS Programming NSUserDefaults When you start an app for the first time, it uses its factory settin ...
- 读取Java文件到byte数组的三种方式
package zs; import java.io.BufferedInputStream; import java.io.ByteArrayOutputStream; import java.io ...
- 观锁和乐观锁——《POJOs in Action》
1 事务隔离 事务隔离是数据库提供的功能. SQL Server通过SET TRANSACTION ISOLATION LEVEL语句设置事务隔离级别: SET TRANSACTION ...
- VirtualBox Networking Model
- 用Go向MySQL导入.csv文件
今天来更新一个很少碰到,但碰到了又让人十分蛋疼的问题——Go语言中执行MySQL的load data local infile语句报local file 'xxx' is not registered ...
- opencv读图片错误,已解决
could not loag image... terminate called after throwing an instance of 'cv::Exception' what(): OpenC ...