Beginner’s Tutorial: 3D Line and Border Effects in XAML
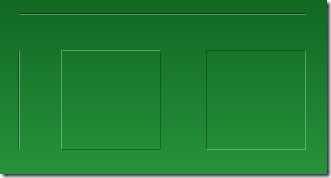
This mini-tutorial might be for you if you’re having troubles finding the right line colors to achieve simple 3D effects like these:
The solution to this very problem is actually pretty simple, and it always takes the same three ingredients:
- A white line
- A black line
- Reduced opacity
Basically, to get an edged line on a green background, you don’t need to fiddle with different shades of green. Just use white and black lines and play with the opacity. Here’s the settings in Blend for one of the white lines in the above screenshot:

…and this is the corresponding XAML for the two vertical lines:
<Grid Background="Green">

  <Path Stretch="Fill" Stroke="#5A000000" Margin="25,62,0,0"

        Width="1" Height="100" Data="M130,176 L130,303.03543"/>

  <Path Stretch="Fill" Stroke="#5AFFFFFF" Margin="26,62,0,0"

        Width="1" Height="100" Data="M130,176 L130,303.03543"/>

</Grid>
Tip: Hiding Blend’s Handles
If you’re trying to format a line, Blend’s handles don’t help much, as the basically hide the whole content:
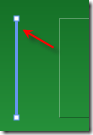
However – you can easily hide / show them by pressing the F9 button.
Tutorial: Creating a 3D Toggle Button Style
Another usage of white and black lines is a 3D effect for borders. Let’s put this to action and create a reusable style that can be applied to a ToggleButton control:
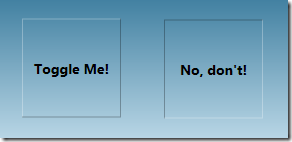
Rather than joining four lines for each button state, I’ll use two Border controls with the same dimensions for each state, taking advantage that the BorderThickness property can be set independently for every edge. Here’s the borders for the unchecked state:
<Grid x:Name="uncheckedState">

  <Border BorderBrush="#49FFFFFF" BorderThickness="1,1,0,0"/>

  <Border BorderBrush="#49000000" BorderThickness="0,0,1,1"/>

</Grid>
…and here’s the borders for the checked state. Note that its Visibility property of the surrounding grid is set to Collapsed in order to hide the borders:
<Grid x:Name="checkedState" Visibility="Collapsed">

  <Border BorderBrush="#49000000" BorderThickness="1,1,0,0"/>

  <Border BorderBrush="#49FFFFFF" BorderThickness="0,0,1,1"/>

</Grid>
I put these borders together in a simple style, which uses a trigger to switch the visibility of the two borders as soon as the IsChecked property of the ToggleButton changes:
<Style TargetType="{x:Type ToggleButton}">

  <Setter Property="Template">

    <Setter.Value>

      <ControlTemplate TargetType="{x:Type ToggleButton}">

        <Grid x:Name="mainGrid" Margin="0,0,1,1">

          <Grid x:Name="uncheckedState">

            <Border BorderBrush="#49FFFFFF" BorderThickness="1,1,0,0"/>

            <Border BorderBrush="#49000000" BorderThickness="0,0,1,1"/>

          </Grid>

          <Grid x:Name="checkedState" Visibility="Collapsed">

            <Border BorderBrush="#49000000" BorderThickness="1,1,0,0"/>

            <Border BorderBrush="#49FFFFFF" BorderThickness="0,0,1,1"/>

          </Grid>

          <!--

            WPF needs a background to toggle IsChecked

            if the ContentPresenter does not fill the whole area

          -->

          <Border Background="#00000000" />

          <ContentPresenter VerticalAlignment="Center"

                            HorizontalAlignment="Center" />

        </Grid>

        <!-- triggers toggle visual appearance -->

        <ControlTemplate.Triggers>

          <Trigger Property="IsChecked" Value="True">

            <Setter TargetName="checkedState"

                    Property="Visibility"

                    Value="Visible" />

            <Setter TargetName="uncheckedState"

                    Property="Visibility"

                    Value="Collapsed" />

            <Setter TargetName="mainGrid"

                    Property="Margin"

                    Value="1,1,0,0"/>

          </Trigger>

        </ControlTemplate.Triggers>

      </ControlTemplate>

    </Setter.Value>

  </Setter>

</Style>
With the style in place, you can easily declare a ToggleButton like this:
<ToggleButton Width="100" Height="24" Content="hello world" />
Beginner’s Tutorial: 3D Line and Border Effects in XAML的更多相关文章
- 国外60个专业3D模型网站
原始链接:http://blog.sina.com.cn/s/blog_4ba3c7950100jxkh.html Today, 3D models are used in a wide variet ...
- win10 uwp 使用 Matrix3DProjection 进行 3d 投影
原文:win10 uwp 使用 Matrix3DProjection 进行 3d 投影 版权声明:博客已迁移到 http://lindexi.gitee.io 欢迎访问.如果当前博客图片看不到,请到 ...
- 3D分析之3D要素工具箱(转)
来自:http://blog.csdn.net/kikitamoon/article/details/8193764 整理有关 ArcGIS 10.1 3D分析工具箱中,3D Feature 工具箱中 ...
- 3D分析之Functional Surface工具箱(转)
来自:http://blog.csdn.net/kikitamoon/article/details/8195797 1. Add Surface Information(添加表面信息) 向点.线或面 ...
- 论文阅读: Building a 3-D Line-Based Map Using Stereo SLAM
Abstract 一个把直线用作feature的SLAM系统. 跟点相比, 直线对于环境的结构提供了更丰富的信息, 也让其鞥有可能推断地图的空间语义. 使用了Plucker line coordian ...
- Python画各种 3D 图形Matplotlib库
回顾 2D 作图 用赛贝尔曲线作 2d 图.此图是用基于 Matplotlib 的 Path 通过赛贝尔曲线实现的,有对赛贝尔曲线感兴趣的朋友们可以去学习学习,在 matplotlib 中,figur ...
- 3D视觉 之 线激光3D相机
1 3D 视觉 常见的三维视觉技术,包含双目.ToF.激光三角.结构光等,如下图: 1)毫米级 双目.ToF.结构光(散斑)的精度为 mm 级,多见于消费领域,如:导航避障,VR/AR,刷脸 ...
- WPF 3D编程介绍
原文:WPF 3D编程介绍 上一篇文章简单的介绍了WPF编程的相关的内容,也推荐了本书.今天要来讲一下在WPF如何开展3D编程. 使用的xmal 和C#开发的时候:需要使用如下的关键要素: 1:摄像机 ...
- arcmap Command
The information in this document is useful if you are trying to programmatically find a built-in com ...
随机推荐
- 【42.86%】【Codeforces Round #380D】Sea Battle
time limit per test1 second memory limit per test256 megabytes inputstandard input outputstandard ou ...
- 飘逸的python - property及实现lazy property
@property有什么用呢?表面看来,就是将一个方法用属性的方式来訪问. 上代码,代码最清晰了. class Circle(object): def __init__(self, radius): ...
- crx 【 集合 】
Vimium dbepggeogbaibhgnhhndojpepiihcmeb-1.64-Crx4Chrome.com.crx https://www.crx4chrome.com/down/731/ ...
- 终端中经常使用的shell 命令
Mac 在shell命令终端中,Ctrl+n相当于方向向下的方向键,Ctrl+p相当于方向向上的方向键. 在命令终端中通过它们或者方向键能够实现对历史命令的高速查找.这也是高速输入命令的技巧. 在命令 ...
- inflate, findViewById与setContentView的区别与联系 分类: H1_ANDROID 2014-04-18 22:54 1119人阅读 评论(0) 收藏
protected void onCreate(Bundle savedInstanceState) { super.onCreate(savedInstanceState); setContentV ...
- PHP移动互联网开发笔记(1)——环境搭建及配置
开篇说明:记得我上大二的时候第一次听到PHP,当时只知道这是一个开发网站的语言,并没有深入学习,在学了Java Web开发和Android开发之后我对互联网的发展方向有了一个我自己的认识,现在我们不能 ...
- Qt 子窗口内嵌到父窗口中
有时需要把一个子窗口内嵌进入父窗口当中. 我们可以这样做 1.新建一个QWidget 或者QDialog的子类 ClassA(父类为ClassB) 2.在新建类的构造函数中添加设置窗口属性 setWi ...
- 简体和繁体加起来有六七万个汉字,所以Unicode只能排除一些几乎不用的汉字,Unicode编码的熟悉与研究过程(内附全部汉字编码列表)
我有一个问题是:是不是会有个别汉字无法在Unicode下表示,这种情况下就不能完全显示了? 各种编码查询表:http://bm.kdd.cc/ ---------------------------- ...
- Java NIO(6)----NIO与IO
当学习了Java NIO和IO的API后,一个问题立即涌入脑海: 我应该何时使用IO.何时使用NIO呢?在本文中,我会尽量清晰地解析Java NIO和IO的差异.它们的使用场景,以及它们怎样影响您的代 ...
- NOIP模拟 run - 双向链表
题目大意: 企鹅国正在举办全面运动会,第一项比赛就是跑步.N 个人在圆形跑道上跑步,他们都有各自的速度和起点.但这个跑步规则很奇怪,当两个人相遇的时候编号较小的就会出局,当场上剩下最后一个人的时候跑步 ...