
elasticsearch节点间通信的基础transport
在前一篇中我们分析了cluster的一些元素。接下来的章节会对cluster的运作机制做详细分析。本节先分析一些transport,它是cluster间通信的基础。它有两种实现,一种是基于netty实现nettytransport,主要用于节点间的通信。另一种是localtransport,主要是用于同一个jvm上的节点通信。因为是同一个jvm上的网络模拟,localtransport实现上非常简单,实际用处也非常有限,这里就不过多说明。这一篇的重点是nettytransport。
transport顾名思义是集群通信的基本通道,无论是集群状态信息,还是搜索索引请求信息,都是通过transport传送。elasticsearch定义了tansport,tansportmessage,tansportchannel,tansportrequest,tansportresponse等所需的所有的基础接口。这里将以transport为主,分析过程中会附带介绍其它接口。首先看一下transport节点的定义,如下图所示:
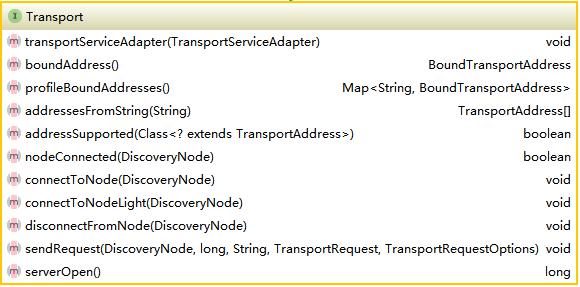
NettyTransport实现了该接口。分析NettyTransport前简单说一下Netty的用法,Netty的使用需要三个模块ServerBootStrap,ClientBootStrap(v3.x)及MessageHandler。ServerBootStrap启动服务器,ClientBootStrap启动客户端并连接服务器,MessageHandler是message处理逻辑所在,也就是业务逻辑。其它详细使用请参考Netty官方文档。NettyTransport每个在doStart()方法中启动serverBootStrap,和ClientBootStrap,并绑定ip,代码如下所示:
protected void doStart() throws ElasticsearchException {

       clientBootstrap = createClientBootstrap();//根据配置启动客户端

       ……//省略了无关分代码
    createServerBootstrap(name, mergedSettings);//启动server端

       bindServerBootstrap(name, mergedSettings);//绑定ip

        }
每一个节点都需要发送和接收,因此两者都需要启动,client和server的启动分别在相应的方法中,启动过程就是netty的启动过程,有兴趣可以去看相应方法。bindServerBootstrap(name, mergedSettings)将本地ip和断开绑定到netty同时设定好export host(export host的具体作业我也看明白也没有看到相关的绑定,需要进一步研究)。启动client及server的过程中将messagehandler注入到channelpipeline中。至此启动过程完成,但是client并未连接任何server,连接过程是在节点启动后,才连接到其它节点的。
首先看一下如何连接到node,方法代码如下所示:
public void connectToNode(DiscoveryNode node, boolean light) {
     //transport的模块必须要启动

        if (!lifecycle.started()) {

            throw new ElasticsearchIllegalStateException("can't add nodes to a stopped transport");

        }
     //获取读锁,每个节点可以和多个节点建立连接,因此这里用读锁

        globalLock.readLock().lock();

        try {
        //以node.id为基础获取一个锁,这保证对于每个node只能建立一次连接

            connectionLock.acquire(node.id());

            try {

                if (!lifecycle.started()) {

                    throw new ElasticsearchIllegalStateException("can't add nodes to a stopped transport");

                }

                NodeChannels nodeChannels = connectedNodes.get(node);

                if (nodeChannels != null) {

                    return;

                }

                try {

                    if (light) {//这里的light,就是对该节点只获取一个channel,所有类型(5种连接类型下面会说到)都使用者一个channel

                        nodeChannels = connectToChannelsLight(node);

                    } else {

                        nodeChannels = new NodeChannels(new Channel[connectionsPerNodeRecovery], new Channel[connectionsPerNodeBulk], new Channel[connectionsPerNodeReg], new Channel[connectionsPerNodeState], new Channel[connectionsPerNodePing]);

                        try {

                            connectToChannels(nodeChannels, node);

                        } catch (Throwable e) {

                            logger.trace("failed to connect to [{}], cleaning dangling connections", e, node);

                            nodeChannels.close();

                            throw e;

                        }

                    }

                    // we acquire a connection lock, so no way there is an existing connection

                    connectedNodes.put(node, nodeChannels);

                    if (logger.isDebugEnabled()) {

                        logger.debug("connected to node [{}]", node);

                    }

                    transportServiceAdapter.raiseNodeConnected(node);

                } catch (ConnectTransportException e) {

                    throw e;

                } catch (Exception e) {

                    throw new ConnectTransportException(node, "general node connection failure", e);

                }

            } finally {

                connectionLock.release(node.id());

            }

        } finally {

            globalLock.readLock().unlock();

        }

    }
如果不是轻连接,每个server和clien之间都有5中连接,着5中连接承担着不同的任务。连接方法的代码如下所示:
 protected void connectToChannels(NodeChannels nodeChannels, DiscoveryNode node) {
    //五种连接方式,不同的连接方式对应不同的集群操作

        ChannelFuture[] connectRecovery = new ChannelFuture[nodeChannels.recovery.length];

        ChannelFuture[] connectBulk = new ChannelFuture[nodeChannels.bulk.length];

        ChannelFuture[] connectReg = new ChannelFuture[nodeChannels.reg.length];

        ChannelFuture[] connectState = new ChannelFuture[nodeChannels.state.length];

        ChannelFuture[] connectPing = new ChannelFuture[nodeChannels.ping.length];

        InetSocketAddress address = ((InetSocketTransportAddress) node.address()).address();
    //尝试建立连接

        for (int i = 0; i < connectRecovery.length; i++) {

            connectRecovery[i] = clientBootstrap.connect(address);

        }

        for (int i = 0; i < connectBulk.length; i++) {

            connectBulk[i] = clientBootstrap.connect(address);

        }

        for (int i = 0; i < connectReg.length; i++) {

            connectReg[i] = clientBootstrap.connect(address);

        }

        for (int i = 0; i < connectState.length; i++) {

            connectState[i] = clientBootstrap.connect(address);

        }

        for (int i = 0; i < connectPing.length; i++) {

            connectPing[i] = clientBootstrap.connect(address);

        }

    //获取每个连接的channel存入到相应的channels中便于后面使用。

        try {

            for (int i = 0; i < connectRecovery.length; i++) {

                connectRecovery[i].awaitUninterruptibly((long) (connectTimeout.millis() * 1.5));

                if (!connectRecovery[i].isSuccess()) {

                    throw new ConnectTransportException(node, "connect_timeout[" + connectTimeout + "]", connectRecovery[i].getCause());

                }

                nodeChannels.recovery[i] = connectRecovery[i].getChannel();

                nodeChannels.recovery[i].getCloseFuture().addListener(new ChannelCloseListener(node));

            }

            for (int i = 0; i < connectBulk.length; i++) {

                connectBulk[i].awaitUninterruptibly((long) (connectTimeout.millis() * 1.5));

                if (!connectBulk[i].isSuccess()) {

                    throw new ConnectTransportException(node, "connect_timeout[" + connectTimeout + "]", connectBulk[i].getCause());

                }

                nodeChannels.bulk[i] = connectBulk[i].getChannel();

                nodeChannels.bulk[i].getCloseFuture().addListener(new ChannelCloseListener(node));

            }

            for (int i = 0; i < connectReg.length; i++) {

                connectReg[i].awaitUninterruptibly((long) (connectTimeout.millis() * 1.5));

                if (!connectReg[i].isSuccess()) {

                    throw new ConnectTransportException(node, "connect_timeout[" + connectTimeout + "]", connectReg[i].getCause());

                }

                nodeChannels.reg[i] = connectReg[i].getChannel();

                nodeChannels.reg[i].getCloseFuture().addListener(new ChannelCloseListener(node));

            }

            for (int i = 0; i < connectState.length; i++) {

                connectState[i].awaitUninterruptibly((long) (connectTimeout.millis() * 1.5));

                if (!connectState[i].isSuccess()) {

                    throw new ConnectTransportException(node, "connect_timeout[" + connectTimeout + "]", connectState[i].getCause());

                }

                nodeChannels.state[i] = connectState[i].getChannel();

                nodeChannels.state[i].getCloseFuture().addListener(new ChannelCloseListener(node));

            }

            for (int i = 0; i < connectPing.length; i++) {

                connectPing[i].awaitUninterruptibly((long) (connectTimeout.millis() * 1.5));

                if (!connectPing[i].isSuccess()) {

                    throw new ConnectTransportException(node, "connect_timeout[" + connectTimeout + "]", connectPing[i].getCause());

                }

                nodeChannels.ping[i] = connectPing[i].getChannel();

                nodeChannels.ping[i].getCloseFuture().addListener(new ChannelCloseListener(node));

            }

            if (nodeChannels.recovery.length == 0) {

                if (nodeChannels.bulk.length > 0) {

                    nodeChannels.recovery = nodeChannels.bulk;

                } else {

                    nodeChannels.recovery = nodeChannels.reg;

                }

            }

            if (nodeChannels.bulk.length == 0) {

                nodeChannels.bulk = nodeChannels.reg;

            }

        } catch (RuntimeException e) {

            // clean the futures

            for (ChannelFuture future : ImmutableList.<ChannelFuture>builder().add(connectRecovery).add(connectBulk).add(connectReg).add(connectState).add(connectPing).build()) {

                future.cancel();

                if (future.getChannel() != null && future.getChannel().isOpen()) {

                    try {

                        future.getChannel().close();

                    } catch (Exception e1) {

                        // ignore

                    }

                }

            }

            throw e;

        }

    }
以上就是节点建立连接的过程,每一对client和server间都会建立一定数量的不同连接。之所以要区分连接,是因为不同的操作消耗的资源不同,请求的频率也不同。对于资源消耗少请求频率高的如ping,可以建立多一些连接,来确保并发。对于消耗资源多如bulk操作,则要少建立一些连接,保证机器不被拖垮。节点的断开,这是讲相应的channel释放的过程。这里就不再做详细说明,可以参考相关源码。
总结一下nettytransport的连接过程,启动过程分别启动client和server,同时将对于的messagehandler注入,启动多次就是netty的启动过程。然后绑定server ip和断开。但是这里并没有连接,连接发送在节点启动时,节点启动会获取cluster信息,分别对集群中的节点建立上述的5种连接。这就是NettyTransport的启动和连接过程。transport还有一个很重要的功能就是发送request,及如何处理request,这些功能会在下一篇中分析。
elasticsearch节点间通信的基础transport的更多相关文章
- RAC 安装完成后 节点间通信不依赖于SSH
RAC 安装完成后,想修改ssh 的端口.google了一下.原文https://community.oracle.com/thread/2444594?tstart=0 原文说的是11g,10g也好 ...
- kibana访问多个 Elasticsearch 节点间的负载均衡
如果 Elasticsearch 集群有多个节点,分发 Kibana 节点之间请求的最简单的方法就是在 Kibana 机器上运行一个 Elasticsearch 协调(Coordinating onl ...
- 使用WebSocket帮助应用程序群集节点间通信
[序列化message传输方式]两种方式都是转成二进制. 1.使用Java序列化器,ObjectXXXputStream 2.使用ByteBuffer.wrap(bytes). 在一个标准群集场景中, ...
- TinyOS节点间通信相关接口和组件介绍
一.基本通信接口: Packet:提供了对message_t抽象数据类型的基本访问.这个接口的命令有:清空消息内容,获得消息的有效载荷区长度,获得消息有效载荷区的指针. //tos/interfa ...
- BFT-SMaRt:用Java做节点间的可靠信道
目录 一.引子 二.名词统一 1. 节点id 2. 节点 3. 本地节点 4. 配置域 5. TTP 6. 陌生域 三.节点服务类 四.节点通信系统概览 五.节点通信层准备 1. 创建socket服务 ...
- Blazor入门笔记(6)-组件间通信
1.环境 VS2019 16.5.1.NET Core SDK 3.1.200Blazor WebAssembly Templates 3.2.0-preview2.20160.5 2.简介 在使用B ...
- 集群节点间网络通信TIPC
1. TIPC背景介绍 TIPC主要是用于集群网络环境之中,它这个协议有一些前提假设包括: 协议发送的大部分message都是直接到达目的地(无路由): message的传输时间都很短; messag ...
- Cassandra1.2文档学习(2)——节点间通信协议之gossip协议
参考文档:http://www.datastax.com/documentation/cassandra/1.2/webhelp/index.html#cassandra/architecture/a ...
- 源码分析Android Handler是如何实现线程间通信的
源码分析Android Handler是如何实现线程间通信的 Handler作为Android消息通信的基础,它的使用是每一个开发者都必须掌握的.开发者从一开始就被告知必须在主线程中进行UI操作.但H ...
随机推荐
- Controller接口控制器2
5.ServletForwardingController 将接收到的请求转发到一个命名的servlet,具体示例如下: package cn.javass.chapter4.web.servlet; ...
- 第一次接触正则表达式/^[A-Za-z_][A-Za-z0-9_]{5,15}$/
/^[A-Za-z_][A-Za-z0-9_]{5,15}$/ /^$/ :完整表达式 ^ :表示以什么开始,或者取反 $ :结束 ^[A-Za-z_] : 以字母开始,无论大小都可以: [^A-Za ...
- Node书签
1.开源项目 [译]过去一年25个惊人的开源Node.js项目(2018版) 百度网盘下载助手
- zip---解压缩文件
zip命令可以用来解压缩文件,或者对文件进行打包操作.zip是个使用广泛的压缩程序,文件经它压缩后会另外产生具有“.zip”扩展名的压缩文件. 语法 zip(选项)(参数) 选项 -A:调整可执行的自 ...
- Webhook
Webhook就是用户通过自定义回调函数的方式来改变Web应用的一种行为,这些回调函数可以由不是该Web应用官方的第三方用户或者开发人员来维护,修改.通过Webhook,你可以自定义一些行为通知到指定 ...
- HypericHQ
https://sourceforge.net/projects/hyperichq-zh-cn/?source=typ_redirect
- Cocos2d-x开发的Android应用怎么加入插屏广告
Cocos2d-x系统开发游戏已经变得比較流行,但是用这个开发的游戏.想要加入广告就不是那么理想了.尤其是插屏广告.由于插屏广告通常是要在暂停或者结束游戏的时候展示才比較的合理.但是Cocos2d-x ...
- HDU 5375 Gray code(DP)
题意:给一串字符串,里面可能出现0,1,?,当中问号可能为0或1,将这个二进制转换为格雷码后,格雷码的每位有一个权值,当格雷码位取1时.加上该位权值,求最大权值和为多少. 分析:比赛的时候愚了.竟然以 ...
- 路由及路由器工作原理深入解析3:路由与port
日志"路由及路由器工作原理深入解析1"http://user.qzone.qq.com/2756567163/blog/1438322342介绍了"为什么要使用路 ...
- EF搭建数据库
http://blog.csdn.net/mss359681091/article/details/52135867http://blog.csdn.net/x_craft/article/detai ...