How to install Wordpress 4.0 on CentOS 7.0
This document describes how to install and configure Wordpress 4.0 on CentOS 7.0. WordPress started in 2003 with a single bit of code to enhance the typography of everyday writing and with fewer users than you can count on your fingers and toes. Since then it has grown to be the largest self-hosted blogging tool in the world, used on millions of sites and seen by tens of millions of people every day. This tutorial explains the process of installing Wordpress 4.0 on CentOS 7.0 in the form of a simple-to-follow guide.
1 Preliminary Note
This tutorial is based on CentOS 7.0 server, so you should set up a basic CentOS 7.0 server installation before you continue with this tutorial. The system should have a static IP address. I use 192.168.0.100 as my IP address in this tutorial and server1.example.com as the hostname. You must have a LAMP server installed in CentOS 7.0 as mentioned in the tutorial to continue further.
2 Database initialization
I will create the database for the Wordpress 4.0 as follows:
mysql -u root -p
Here we are adding database=wordpressdb user=wordpressuser and password=wordpresspassword:
CREATE DATABASE wordpressdb;
CREATE USER wordpressuser@localhost IDENTIFIED BY 'wordpresspassword';
GRANT ALL PRIVILEGES ON wordpressdb.* TO wordpressuser@localhost;
Further moving ahead:
FLUSH PRIVILEGES;
exit
Restart services
service httpd restart
service mariadb restart
Further you need to allow the Firewall-cmd to http and https as follows:
firewall-cmd --permanent --zone=public --add-service=http
firewall-cmd --permanent --zone=public --add-service=https
firewall-cmd --reload
3 Installation of Wordpress 4.0
We will first make a directory temp in which I will the download the latest version of the Wordpress as follows:
mkdir temp
cd temp
yum install wget unzip net-tools
wget http://wordpress.org/latest.zip
Further moving ahead if you wish to work with images, install
plugins and site updation with SSH credentials then we will install:
yum install php-gd
service httpd restart
unzip the Wordpress 4.0 zip file in the folder:
unzip -q latest.zip -d /var/www/html/
Now give appropriate permissions in the directory
chown -R apache:apache /var/www/html/wordpress
chmod -R 755 /var/www/html/wordpress
Further we need to manually create the uploads directory beneath the
wp-content directory at our document root. This will be the parent
directory of our content:
mkdir -p /var/www/html/wordpress/wp-content/uploads
We need to allow the web server itself to write to this directory. We
can do this by assigning group ownership of this directory to our web
server. This will allow the web server to create files and directories
under this directory, which will permit us to upload content to the
server. Proceed like this:
chown -R :apache /var/www/html/wordpress/wp-content/uploads
Now
we need the sample configuration file,to copy it to the default
configuration file to get WordPress to recognize the file. The sample
configuration file is available at /var/www/html/wordpress:
cd /var/www/html/wordpress/
cp wp-config-sample.php wp-config.php
vi wp-config.php
[...]

// ** MySQL settings - You can get this info from your web host ** //

/** The name of the database for WordPress */

define('DB_NAME', 'wordpressdb');

/** MySQL database username */

define('DB_USER', 'wordpressuser');

/** MySQL database password */

define('DB_PASSWORD', 'wordpresspassword');

[...]
Change values as you gave at the time of database initialization.
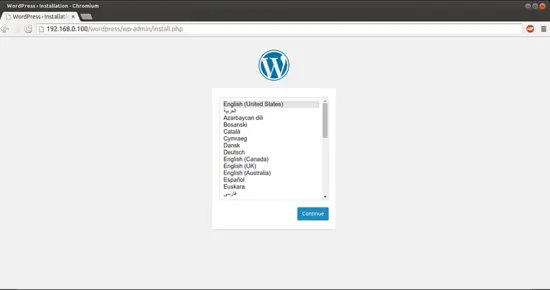
Now proceed to the web installation of Wordpress 4.0. Go to the URL http://192.168.0.100/wordpress/wp-admin/install.php:
Select language and press Continue:
Next
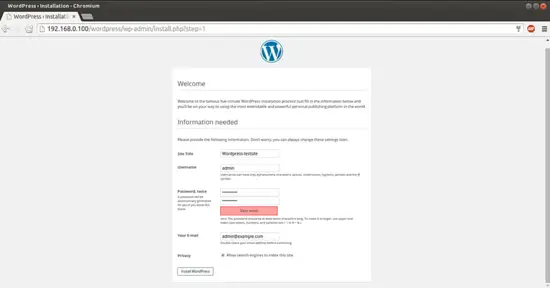
Now give the values as I gave in my case
Site Title = Wordpress-testsite

Admin Email = admin@example.com

Username = admin

Admin password = howtoforge

Confirm Admin Password = howtoforge
The above values will differ in you case, you can give any values of your choice. After giving the values press InstallWordpress:
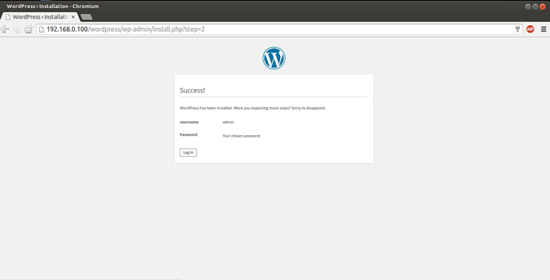
Now we will proceed towards the login page by pressing LogIn:
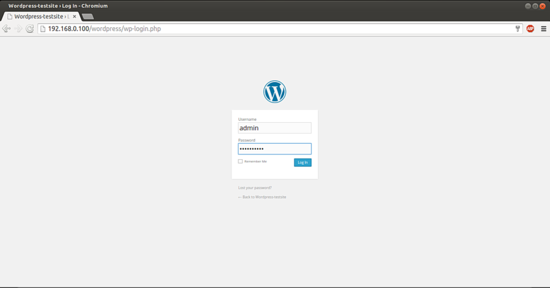
Give the credentials as you selected at the time of web wordpress installation:
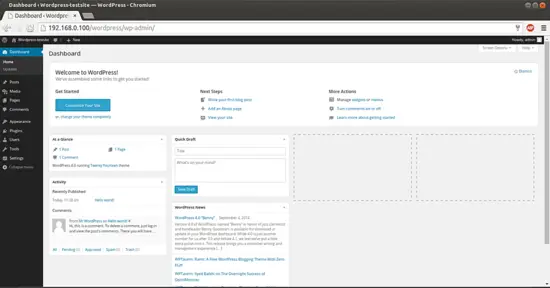
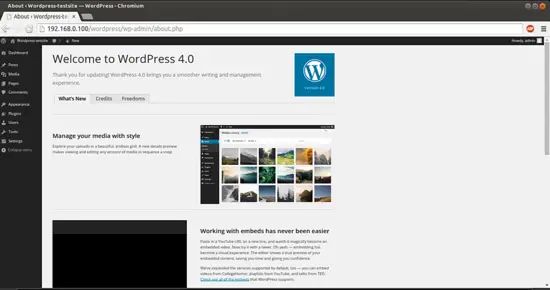
This will be your default welcome window of Wordpress. We can check the Wordpress version in browser as:
6 Configure Pretty Permalinks for WordPress
This part is optional.
By default, WordPress creates URLs dynamically that look something like this http://server_domain_name_or_IP/?p=1. This isn't exactly the most useful interface for visitors or search engines, so most users want to modify this. WordPress has the ability to create "pretty" permalinks which will clean up the URL into a more human-friendly format. To overcome this thing we will proceed as follows:
6.1 Apache Rewrite
We will modify the apache virtual host file for Wordpress to get it allowed for .htaccess overrides. For this we will edit the virtual host file and add the entries as:
vi /etc/httpd/conf/httpd.conf
[...]
 # Further relax access to the default document root:

<Directory "/var/www/html">

    #

    # Possible values for the Options directive are "None", "All",

    # or any combination of:

    #   Indexes Includes FollowSymLinks SymLinksifOwnerMatch ExecCGI MultiViews

    #

    # Note that "MultiViews" must be named *explicitly* --- "Options All"

    # doesn't give it to you.

    #

    # The Options directive is both complicated and important.  Please see

    # http://httpd.apache.org/docs/2.4/mod/core.html#options

    # for more information.

    #

    Options Indexes FollowSymLinks

    #

    # AllowOverride controls what directives may be placed in .htaccess files.

    # It can be "All", "None", or any combination of the keywords:

    #   Options FileInfo AuthConfig Limit

    #

     AllowOverride All

[...]
Change the value from AllowOverride None to AllowOverride All, next restart the service:
service httpd restart
6.2 Create an .htaccess File
Now we will create .htaccess file in document root, it will allow Apache to rewrites:
touch /var/www/html/wordpress/.htaccess
We need the web server to be the group owner though, so we should adjust the ownership as follows:
chown apache /var/www/html/wordpress/.htaccess
If you want WordPress to automatically update this file with rewrite rules, you can ensure that it has the correct permissions to do so by using:
chmod 664 /var/www/html/wordpress/.htaccess
If you want to update this file manually for the sake of a small security gain, you can allow the web server only read privileges by typing:
chmod 644 /var/www/html/wordpress/.htaccess
In my case I am using permissions 644.
6.3 Permalink Settings in WordPress
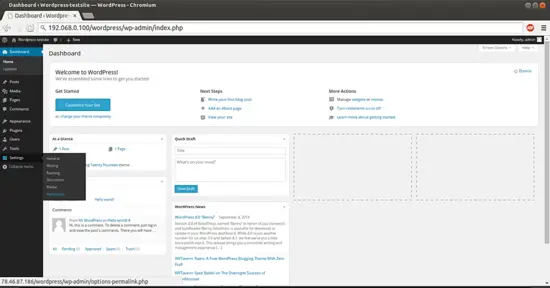
Now we can easily adjust the permalink settings through the WordPress administration interface. Goto Settings-->Permalinks:
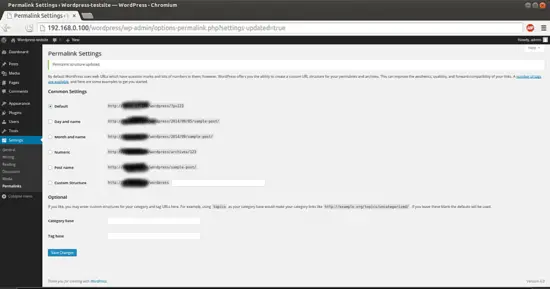
When you have made your selection, click "Save Changes" to generate the rewrite rules.
Case1:If you allowed the web server write access to your .htaccess file, you should see a message like this:
Case2: If you did not allow the web server write access to your .htaccess file, you will be provided with the rewrite rules you need to add to the file manually.
In that case you need to add the values in the .htaccess file manually, Wordpress will pop-up the Rewrite value in the same screen as shown below:

Copy all the lines that WordPress gives you and then edit file on your server:
vi /var/www/html/wordpress/.htaccess
Just add the lines generated in the file and it will provide the same functionality.
Congratulations! You now have a fully functional WordPress 4.0 instance on your CentOS 7.0 :)
7 Links
- Wordpress : http://wordpress.org/
- CentOS : http://www.centos.org/

refer: https://www.howtoforge.com/how-to-install-wordpress-on-centos-7
How to install Wordpress 4.0 on CentOS 7.0的更多相关文章
- VNC 安装 (适用Redhat 9.0 和 CentOS 7.0+)
Remote Service 本文转自https://www.cnblogs.com/yjscloud/p/6695388.html VNC 安装 (适用Redhat 9.0 和 CentOS 7.0 ...
- RedHat 7.0及CentOS 7.0禁止Ping的三种方法
作者:荒原之梦 原文链接:http://zhaokaifeng.com/?p=538 前言: "Ping"属于ICMP协议(即"Internet控制报文协议") ...
- CentOS 6.0图解网络安装全过程
转自CentOS 6.0图解网络安装全过程 国内镜像站点(东北大学.网易) 网易镜像站点:http://mirrors.163.com/centos/6.0/isos/ 中科大镜像站点:http:// ...
- Licode Install CentOS 7.0
mysqldump --add-drop-table -uroot -p123456 jit >/extra_disk/jit.sql sudo npm install -g node-gyp ...
- Install Jenkins 2.1.36 and openjdk 1.7.0 on centos 7
#!/bin/bash## Copyright (c) 2014-2015 Michael Dichirico (https://github.com/mdichirico)# This softwa ...
- MonoDevelop 4.2.2/Mono 3.4.0 in CentOS 6.5 安装笔记
MonoDevelop 4.2.2/Mono 3.4.0 in CentOS 6.5 安装笔记 说明 以root账户登录Linux操作系统,注意:本文中的所有命令行前面的 #> 表示命令行提示符 ...
- asp.net core 简单部署之FTP配置(CentOS 7.0安装配置Vsftp服务器)
配置过程原文地址:http://www.osyunwei.com/archives/9006.html 坑和结果 正确的跟着这个内容走,是靠谱的. 我自己给自己踩了个坑,请参照文章的朋友注意第七条:七 ...
- CentOS 7.0系统安装配置步骤详解
CentOS 7.0系统是一个很新的版本哦,很多朋友都不知道CentOS 7.0系统是怎么去安装配置的哦,因为centos7.0与以前版本是有很大的改进哦. 说明: 截止目前CentOS 7.x最新版 ...
- CentOS 7.0安装配置Vsftp服务器
一.配置防火墙,开启FTP服务器需要的端口 CentOS 7.0默认使用的是firewall作为防火墙,这里改为iptables防火墙. 1.关闭firewall: systemctl stop fi ...
随机推荐
- Bash Shell字符串操作小结
装载自:http://my.oschina.net/aiguozhe/blog/41557 1. 取长度 str="abcd" expr length $str # 4 echo ...
- [转载]新功能:用微软的Live Writer离线写博文
原文地址:Writer离线写博文">新功能:用微软的Live Writer离线写博文作者:新浪博客 Writer离线写博文" title="[转载]新功能:用微软的 ...
- JQuery onload、ready概念介绍及使用方法
页面加载完成有两种事件,一是ready,表示文档结构已经加载完成,onload,ready概念容易混淆,下面为大家详细介绍下 页面加载完成有两种事件,一是ready,表示文档结构已经加载完成(不包 ...
- CSS基础知识点(二)——选择器
在这一篇中,主要总结一下CSS中的选择器. 参考:http://www.cnblogs.com/webblog/archive/2009/07/07/1518274.html CSS中的选择器主要包括 ...
- C++ Primer : 第二章:变量和基本类型(1)
变量和基本类型之第一篇:基本内置类型和变量 一. (1) C++定义了一套包括算数类型和空类型,这些类型有:布尔类型bool,字符类型char,宽字符类型wchar_t,Unicode字符char16 ...
- HDU 5955 Guessing the Dice Roll
HDU 5955 Guessing the Dice Roll 2016 ACM/ICPC 亚洲区沈阳站 题意 有\(N\le 10\)个人,每个猜一个长度为\(L \le 10\)的由\(1-6\) ...
- Java—面向对象—构造方法及相关思维导图
先构造一个Book类的代码 package org.hanqi.pn0120; public class Book { //构造方法 //1.方法名和类名一样 //2.没有返回值,不需要加void / ...
- socket模块
1 1.1 server: #!/use/local/env python# -*- coding:utf-8 -*- import socket ip_port = ('127.0.0.1', 99 ...
- java 四种内部类和内部接口
/** * 常规内部类:常规内部类没有用static修饰且定义在在外部类类体中. * 1.常规内部类中的方法可以直接使用外部类的实例变量和实例方法. * 2.在常规内部类中可以直接用内部类创建对象 * ...
- 【转】IOS学习笔记29—提示框第三方库之MBProgressHUD
原文网址:http://blog.csdn.net/ryantang03/article/details/7877120 MBProgressHUD是一个开源项目,实现了很多种样式的提示框,使用上简单 ...