
NodeJS + PhantomJS 抓取页面信息以及截图
利用PhantomJS做网页截图经济适用,但其API较少,做其他功能就比较吃力了。例如,其自带的Web Server Mongoose最高只能同时支持10个请求,指望他能独立成为一个服务是不怎么实际的。所以这里需要另一个语言来支撑服务,这里选用NodeJS来完成。
源码地址
对源代码感兴趣的朋友可以在Github获取:
安装PhantomJS
首先,去PhantomJS官网下载对应平台的版本,或者下载源代码自行编译。然后将PhantomJS配置进环境变量,输入
$ phantomjs
如果有反应,那么就可以进行下一步了。
利用PhantomJS进行简单截图
var webpage = require('webpage')

  , page = webpage.create();

page.viewportSize = { width: 1024, height: 800 };

page.clipRect = { top: 0, left: 0, width: 1024, height: 800 };

page.settings = {

  javascriptEnabled: false,

  loadImages: true,

  userAgent: 'Mozilla/5.0 (Windows NT 6.1) AppleWebKit/537.31 (KHTML, like Gecko) PhantomJS/19.0'

};

page.open('http://www.baidu.com', function (status) {

  var data;

  if (status === 'fail') {

    console.log('open page fail!');

  } else {

    page.render('./snapshot/test.png');

  }

  // release the memory

  page.close();

});
这里我们设置了窗口大小为1024 * 800:
page.viewportSize = { width: 1024, height: 800 };截取从(0, 0)为起点的1024 * 800大小的图像:
page.clipRect = { top: 0, left: 0, width: 1024, height: 800 };禁止Javascript,允许图片载入,并将userAgent改为"Mozilla/5.0 (Windows NT 6.1) AppleWebKit/537.31 (KHTML, like Gecko) PhantomJS/19.0":
page.settings = {

  javascriptEnabled: false,

  loadImages: true,

  userAgent: 'Mozilla/5.0 (Windows NT 6.1) AppleWebKit/537.31 (KHTML, like Gecko) PhantomJS/19.0'

};
然后利用page.open打开页面,最后截图输出到./snapshot/test.png中:
page.render('./snapshot/test.png');NodeJS与PhantomJS通讯
我们先来看看PhantomJS能做什么通讯。
- 命令行传参
例如:
phantomjs snapshot.js http://www.baidu.com
命令行传参只能在PhantomJS开启时进行传参,在运行过程中就无能为力了。
- 标准输出
标准输出能从PhantomJS向NodeJS输出数据,但却没法从NodeJS传数据给PhantomJS。
不过测试中,标准输出是这几种方式传输最快的,在大量数据传输中应当考虑。
- HTTP
PhantomJS向NodeJS服务发出HTTP请求,然后NodeJS返回相应的数据。
这种方式很简单,但是请求只能由PhantomJS发出。
- Websocket
值得注意的是PhantomJS 1.9.0支持Websocket了,不过可惜是hixie-76 Websocket,不过毕竟还是提供了一种NodeJS主动向PhantomJS通讯的方案了。
测试中,我们发现PhantomJS连上本地的Websocket服务居然需要1秒左右,暂时不考虑这种方法吧。
- phantomjs-node
phantomjs-node成功将PhantomJS作为NodeJS的一个模块来使用,但我们看看作者的原理解释:
I will answer that question with a question. How do you communicate with a process that doesn't support shared memory, sockets, FIFOs, or standard input?
Well, there's one thing PhantomJS does support, and that's opening webpages. In fact, it's really good at opening web pages. So we communicate with PhantomJS by spinning up an instance of ExpressJS, opening Phantom in a subprocess, and pointing it at a special webpage that turns socket.io messages into
alert()calls. Thosealert()calls are picked up by Phantom and there you go!The communication itself happens via James Halliday's fantastic dnode library, which fortunately works well enough when combined with browserify to run straight out of PhantomJS's pidgin Javascript environment.
实际上phantomjs-node使用的也是HTTP或者Websocket来进行通讯,不过其依赖庞大,我们只想做一个简单的东西,暂时还是不考虑这个东东吧。
设计图
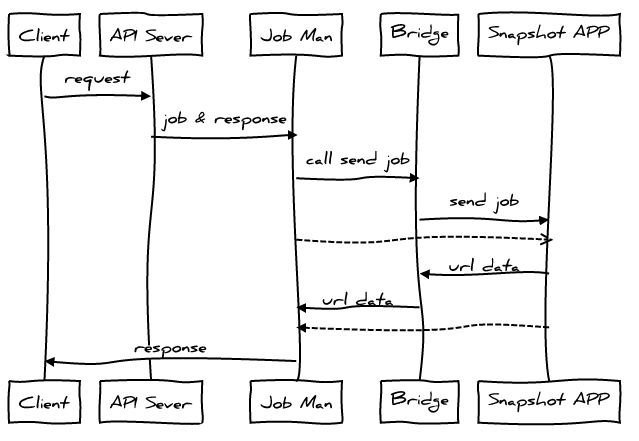
让我们开始吧
我们在第一版中选用HTTP进行实现。
首先利用cluster进行简单的进程守护(index.js):
module.exports = (function () {

  "use strict"

  var cluster = require('cluster')

    , fs = require('fs');

  if(!fs.existsSync('./snapshot')) {

    fs.mkdirSync('./snapshot');

  }

  if (cluster.isMaster) {

    cluster.fork();

    cluster.on('exit', function (worker) {

      console.log('Worker' + worker.id + ' died :(');

      process.nextTick(function () {

        cluster.fork();

      });

    })

  } else {

    require('./extract.js');

  }

})();
然后利用connect做我们的对外API(extract.js):
module.exports = (function () {

  "use strict"

  var connect = require('connect')

    , fs = require('fs')

    , spawn = require('child_process').spawn

    , jobMan = require('./lib/jobMan.js')

    , bridge = require('./lib/bridge.js')

    , pkg = JSON.parse(fs.readFileSync('./package.json'));

  var app = connect()

    .use(connect.logger('dev'))

    .use('/snapshot', connect.static(__dirname + '/snapshot', { maxAge: pkg.maxAge }))

    .use(connect.bodyParser())

    .use('/bridge', bridge)

    .use('/api', function (req, res, next) {

      if (req.method !== "POST" || !req.body.campaignId) return next();

      if (!req.body.urls || !req.body.urls.length) return jobMan.watch(req.body.campaignId, req, res, next);

      var campaignId = req.body.campaignId

        , imagesPath = './snapshot/' + campaignId + '/'

        , urls = []

        , url

        , imagePath;

      function _deal(id, url, imagePath) {

        // just push into urls list

        urls.push({

          id: id,

          url: url,

          imagePath: imagePath

        });

      }

      for (var i = req.body.urls.length; i--;) {

        url = req.body.urls[i];

        imagePath = imagesPath + i + '.png';

        _deal(i, url, imagePath);

      }

      jobMan.register(campaignId, urls, req, res, next);

      var snapshot = spawn('phantomjs', ['snapshot.js', campaignId]);

      snapshot.stdout.on('data', function (data) {

        console.log('stdout: ' + data);

      });

      snapshot.stderr.on('data', function (data) {

        console.log('stderr: ' + data);

      });

      snapshot.on('close', function (code) {

        console.log('snapshot exited with code ' + code);

      });

    })

    .use(connect.static(__dirname + '/html', { maxAge: pkg.maxAge }))

    .listen(pkg.port, function () { console.log('listen: ' + 'http://localhost:' + pkg.port); });

})();
这里我们引用了两个模块bridge和jobMan。
其中bridge是HTTP通讯桥梁,jobMan是工作管理器。我们通过campaignId来对应一个job,然后将job和response委托给jobMan管理。然后启动PhantomJS进行处理。
通讯桥梁负责接受或者返回job的相关信息,并交给jobMan(bridge.js):
module.exports = (function () {

  "use strict"

  var jobMan = require('./jobMan.js')

    , fs = require('fs')

    , pkg = JSON.parse(fs.readFileSync('./package.json'));

  return function (req, res, next) {

      if (req.headers.secret !== pkg.secret) return next();

      // Snapshot APP can post url information

      if (req.method === "POST") {

        var body = JSON.parse(JSON.stringify(req.body));

        jobMan.fire(body);

        res.end('');

      // Snapshot APP can get the urls should extract

      } else {

        var urls = jobMan.getUrls(req.url.match(/campaignId=([^&]*)(\s|&|$)/)[1]);

        res.writeHead(200, {'Content-Type': 'application/json'});

        res.statuCode = 200;

        res.end(JSON.stringify({ urls: urls }));

      }

  };

})();
如果request method为POST,则我们认为PhantomJS正在给我们推送job的相关信息。而为GET时,则认为其要获取job的信息。
jobMan负责管理job,并发送目前得到的job信息通过response返回给client(jobMan.js):
module.exports = (function () {

  "use strict"

  var fs = require('fs')

    , fetch = require('./fetch.js')

    , _jobs = {};

  function _send(campaignId){

    var job = _jobs[campaignId];

    if (!job) return;

    if (job.waiting) {

      job.waiting = false;

      clearTimeout(job.timeout);

      var finished = (job.urlsNum === job.finishNum)

        , data = {

        campaignId: campaignId,

        urls: job.urls,

        finished: finished

      };

      job.urls = [];

      var res = job.res;

      if (finished) {

        _jobs[campaignId] = null;

        delete _jobs[campaignId]

      }

      res.writeHead(200, {'Content-Type': 'application/json'});

      res.statuCode = 200;

      res.end(JSON.stringify(data));

    }

  }

  function register(campaignId, urls, req, res, next) {

    _jobs[campaignId] = {

      urlsNum: urls.length,

      finishNum: 0,

      urls: [],

      cacheUrls: urls,

      res: null,

      waiting: false,

      timeout: null

    };

    watch(campaignId, req, res, next);

  }

  function watch(campaignId, req, res, next) {

    _jobs[campaignId].res = res;

    // 20s timeout

    _jobs[campaignId].timeout = setTimeout(function () {

      _send(campaignId);

    }, 20000);

  }

  function fire(opts) {

    var campaignId = opts.campaignId

      , job = _jobs[campaignId]

      , fetchObj = fetch(opts.html);

    if (job) {

      if (+opts.status && fetchObj.title) {

        job.urls.push({

          id: opts.id,

          url: opts.url,

          image: opts.image,

          title: fetchObj.title,

          description: fetchObj.description,

          status: +opts.status

        });

      } else {

        job.urls.push({

          id: opts.id,

          url: opts.url,

          status: +opts.status

        });

      }

      if (!job.waiting) {

        job.waiting = true;

        setTimeout(function () {

          _send(campaignId);

        }, 500);

      }

      job.finishNum ++;

    } else {

      console.log('job can not found!');

    }

  }

  function getUrls(campaignId) {

    var job = _jobs[campaignId];

    if (job) return job.cacheUrls;

  }

  return {

    register: register,

    watch: watch,

    fire: fire,

    getUrls: getUrls

  };

})();
这里我们用到fetch对html进行抓取其title和description,fetch实现比较简单(fetch.js):
module.exports = (function () {

  "use strict"

  return function (html) {

    if (!html) return { title: false, description: false };

    var title = html.match(/\<title\>(.*?)\<\/title\>/)

      , meta = html.match(/\<meta\s(.*?)\/?\>/g)

      , description;

    if (meta) {

      for (var i = meta.length; i--;) {

        if(meta[i].indexOf('name="description"') > -1 || meta[i].indexOf('name="Description"') > -1){

          description = meta[i].match(/content\=\"(.*?)\"/)[1];

        }

      }

    }

    (title && title[1] !== '') ? (title = title[1]) : (title = 'No Title');

    description || (description = 'No Description');

    return {

      title: title,

      description: description

    };

  };

})();
最后是PhantomJS运行的源代码,其启动后通过HTTP向bridge获取job信息,然后每完成job的其中一个url就通过HTTP返回给bridge(snapshot.js):
var webpage = require('webpage')

  , args = require('system').args

  , fs = require('fs')

  , campaignId = args[1]

  , pkg = JSON.parse(fs.read('./package.json'));

function snapshot(id, url, imagePath) {

  var page = webpage.create()

    , send

    , begin

    , save

    , end;

  page.viewportSize = { width: 1024, height: 800 };

  page.clipRect = { top: 0, left: 0, width: 1024, height: 800 };

  page.settings = {

    javascriptEnabled: false,

    loadImages: true,

    userAgent: 'Mozilla/5.0 (Windows NT 6.1) AppleWebKit/537.31 (KHTML, like Gecko) PhantomJS/1.9.0'

  };

  page.open(url, function (status) {

    var data;

    if (status === 'fail') {

      data = [

        'campaignId=',

        campaignId,

        '&url=',

        encodeURIComponent(url),

        '&id=',

        id,

        '&status=',

        0

      ].join('');

      postPage.open('http://localhost:' + pkg.port + '/bridge', 'POST', data, function () {});

    } else {

      page.render(imagePath);

      var html = page.content;

      // callback NodeJS

      data = [

        'campaignId=',

        campaignId,

        '&html=',

        encodeURIComponent(html),

        '&url=',

        encodeURIComponent(url),

        '&image=',

        encodeURIComponent(imagePath),

        '&id=',

        id,

        '&status=',

        1

      ].join('');

      postMan.post(data);

    }

    // release the memory

    page.close();

  });

}

var postMan = {

  postPage: null,

  posting: false,

  datas: [],

  len: 0,

  currentNum: 0,

  init: function (snapshot) {

    var postPage = webpage.create();

    postPage.customHeaders = {

      'secret': pkg.secret

    };

    postPage.open('http://localhost:' + pkg.port + '/bridge?campaignId=' + campaignId, function () {

      var urls = JSON.parse(postPage.plainText).urls

        , url;

      this.len = urls.length;

      if (this.len) {

        for (var i = this.len; i--;) {

          url = urls[i];

          snapshot(url.id, url.url, url.imagePath);

        }

      }

    });

    this.postPage = postPage;

  },

  post: function (data) {

    this.datas.push(data);

    if (!this.posting) {

      this.posting = true;

      this.fire();

    }

  },

  fire: function () {

    if (this.datas.length) {

      var data = this.datas.shift()

        , that = this;

      this.postPage.open('http://localhost:' + pkg.port + '/bridge', 'POST', data, function () {

        that.fire();

        // kill child process

        setTimeout(function () {

          if (++this.currentNum === this.len) {

            that.postPage.close();

            phantom.exit();

          }

        }, 500);

      });

    } else {

      this.posting = false;

    }

  }

};

postMan.init(snapshot);
效果
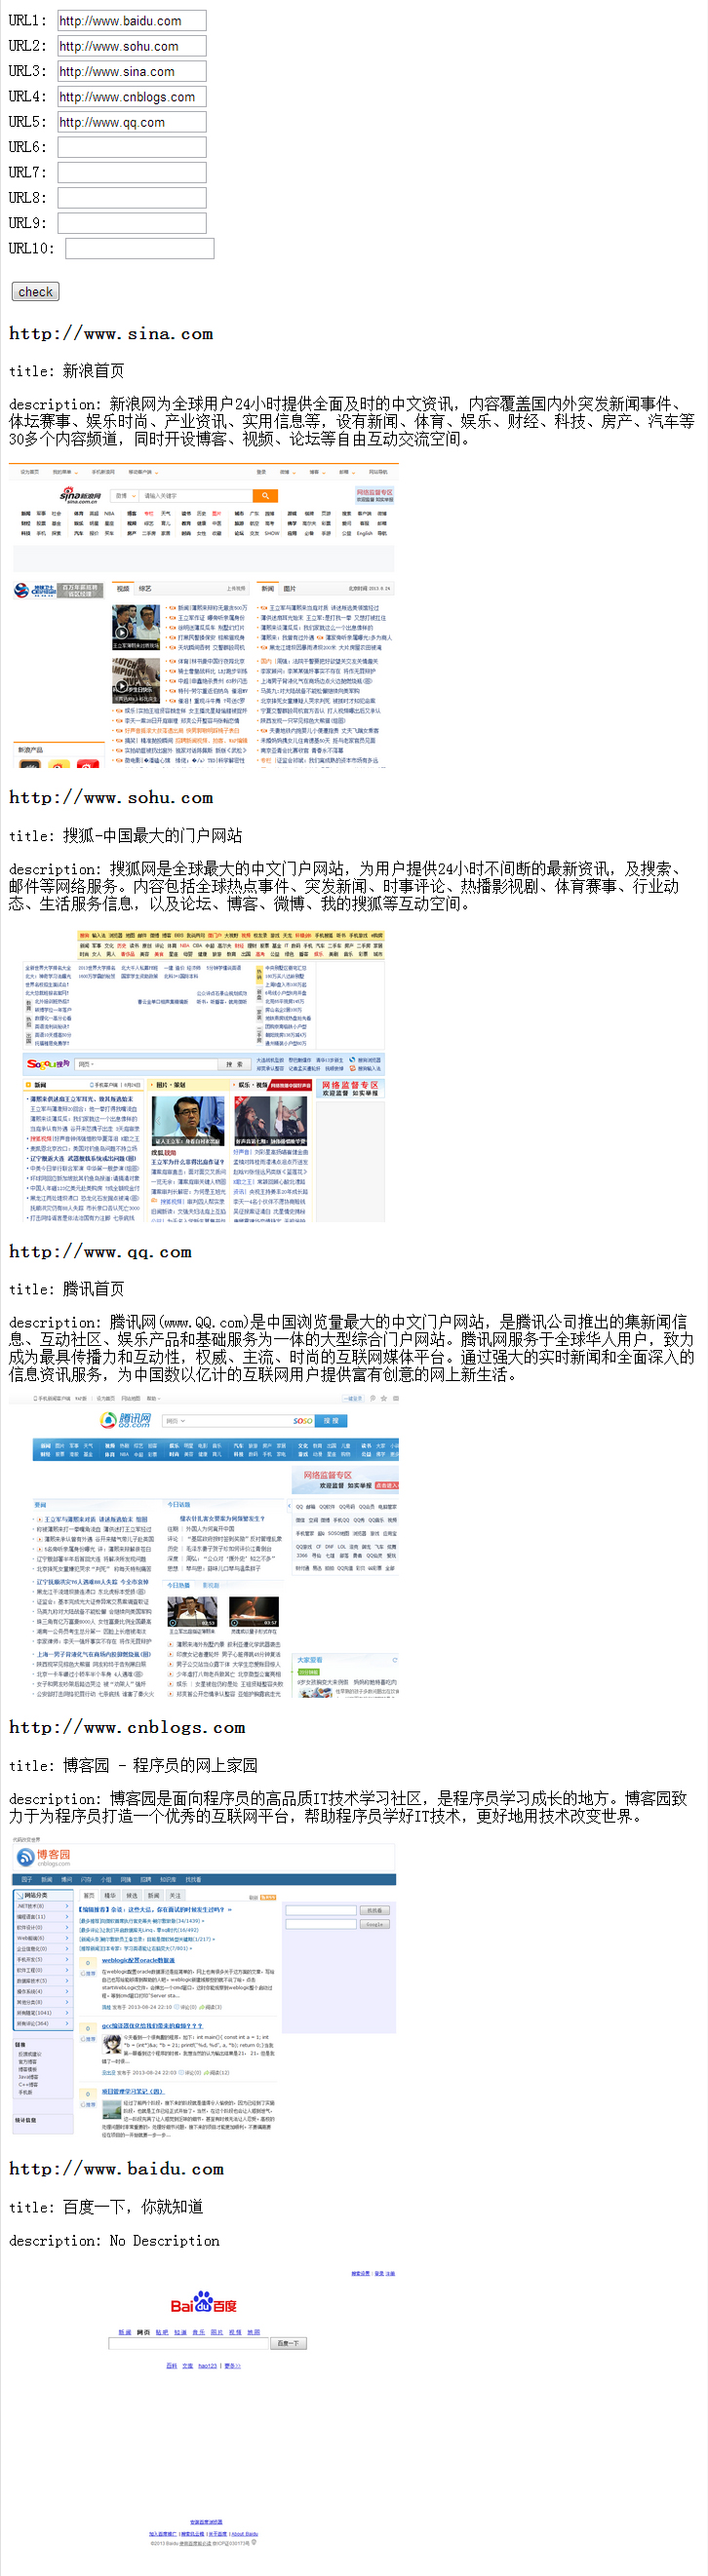
NodeJS + PhantomJS 抓取页面信息以及截图的更多相关文章
- CasperJS基于PhantomJS抓取页面
CasperJS基于PhantomJS抓取页面 Casperjs是基于Phantomjs的,而Phantom JS是一个服务器端的 JavaScript API 的 WebKit. CasperJS是 ...
- phantomjs 抓取房产信息
抓取https://sf.taobao.com/item_list.htm信息 driver=webdriver.PhantomJS(service_args=['--ssl-protocol=any ...
- 【cheerio】nodejs的抓取页面模块
http://baike.baidu.com/link?url=8V1CZsEzNE05ujOzISquom_pvFj16sWu1rRb8js11pmd9HNq7ePW_aKfG9oyXj6Txuu5 ...
- curl 抓取页面信息
<?php // 1. 初始化 $ch = curl_init(); // 2. 设置选项,包括URL curl_setopt($ch, CURLOPT_URL, "www" ...
- Fiddler 默认不能抓取页面信息的问题
先如下配置
- phantomjs 抓取、截图中文网站乱码的问题的解决
用phantomjs抓取html乱码的解决方案: phantomjs --output-encoding=gbk test.js http://webscan.360.cn/index/checkwe ...
- [Python爬虫] 之十一:Selenium +phantomjs抓取活动行中会议活动信息
一.介绍 本例子用Selenium +phantomjs爬取活动行(http://www.huodongxing.com/search?qs=数字&city=全国&pi=1)的资讯信息 ...
- NodeJs爬虫抓取古代典籍,共计16000个页面心得体会总结及项目分享
项目技术细节 项目大量用到了 ES7 的async 函数, 更直观的反应程序了的流程.为了方便,在对数据遍历的过程中直接使用了著名的async这个库,所以不可避免的还是用到了回调promise ,因为 ...
- 搭建谷歌浏览器无头模式抓取页面服务,laravel->php->python->docker !!!
背景: 公司管理系统需要获取企业微信页面的配置参数如企业名.logo.人数等信息并操作,来隐藏相关敏感信息并自定义简化企业号配置流程 第一版已经实现了扫码登录获取cookie,使用该cookie就能获 ...
随机推荐
- Flutter常用组件(Widget)解析-Text
单一格式的文本. 文本组件是以字符串形式显示的单一格式,这个文本字符串可以是多行显示也可以是单独一行显示,主要取决于你的布局限制. 这样式内容是可选择的,如果你省略了,则会使用文本的默认样式来显示.如 ...
- 【原创】ABP之IConventionalDependencyRegistra接口分析
类图: 作用: abp中默认把对象的注册分为5中约定注册方式: 1.AbpAspNetCoreConventionalRegistrar public class AbpAspNetCoreConve ...
- Bzoj4480: [Jsoi2013]快乐的jyy 广义后缀自动机 倍增 哈希 manacher
国际惯例的题面:有人说这是回文自动机的板子题,然而我是不会这种东西的.于是,我选择用更一般性的方法去解决这个题,就是那一堆东西了.首先,我们把两个串同时插入一个广义SAM里,拓扑排序维护每个节点的pa ...
- node+express上传图片
注意: 别用multer 上传文件了,太坑了,普通文本获取不到,折腾了半天没有解决,最后采用 multiparty 解决了: <!DOCTYPE html><html> < ...
- js获取判断苹果手机机型
原先获取不了苹果系列的型号,但转换思路,先判断是否是苹果,再用分辨率获取型号 //获取手机型号函数beginfunction getPhoneType(){ //正则,忽略大小写var pattern ...
- 添加 vip
两台机器:172.16.91.101 172.16.91.107 在91.101上增加虚拟ip,92网段的 ifconfig eth0:1 172.16.92.2 netmask 255.255.25 ...
- 树莓派.Qt.Creator安装方法
树莓派硬件: Raspberry Pi 3 B 树莓派系统: Linux version 4.9.59-v7+ (32位) Qt版本(x86版本--32位): 安装过程 可以查看软件仓库支持的版本: ...
- Structured Streaming教程(3) —— 与Kafka的集成
Structured Streaming最主要的生产环境应用场景就是配合kafka做实时处理,不过在Strucured Streaming中kafka的版本要求相对搞一些,只支持0.10及以上的版本. ...
- 各种组件的js 获取值 / js动态赋值
jQuery获取Select选择的Text和Value:语法解释:1. $("#select_id").change(function(){//code...}); //为Se ...
- 混沌的艺术--- YChaos通过数学公式生成混沌图像
艺术真得很难吗?也许如同编程一样容易.我写了一套软件,其功能是通过输入数学方程式,生成艺术图像.一提到数学有人可能会发怵,这里请不要担心,生成混沌的数学公式大都很是简单,基本上只用加.减.乘.除.余. ...