Eclipse利用Maven2搭建SpringMVC框架的Web工程
一、准备工作:
下载apache-maven--> 配置Maven_home -->下载Eclipse Maven插件
二、新建工程:
选择新建Maven Project archetype选择webapp-->输入group ID (src下包名)和Artifact ID (工程名)
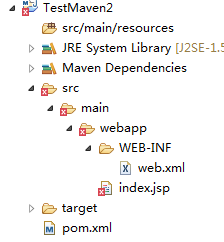
新建Maven工程目录如上图
三、补齐缺失的文件夹:
添加Server支持和缺失的源文件夹

四、添加springMvc支持和web容器支持(若没有,打包时会报错)
<project xmlns="http://maven.apache.org/POM/4.0.0" xmlns:xsi="http://www.w3.org/2001/XMLSchema-instance"

  xsi:schemaLocation="http://maven.apache.org/POM/4.0.0 http://maven.apache.org/maven-v4_0_0.xsd">

  <modelVersion>4.0.0</modelVersion>

  <groupId>com.maven.my</groupId>

  <artifactId>TestMaven2</artifactId>

  <packaging>war</packaging>

  <version>0.0.1-SNAPSHOT</version>

  <name>TestMaven2 Maven Webapp</name>

  <url>http://maven.apache.org</url>
<properties>
<spring.version>4.1.5.RELEASE</spring.version>
</properties>
  <dependencies>

    <dependency>

      <groupId>junit</groupId>

      <artifactId>junit</artifactId>

      <version>3.8.1</version>

      <scope>test</scope>

    </dependency>

     <dependency>

        <groupId>org.springframework</groupId>

        <artifactId>spring-webmvc</artifactId>

        <version>${spring.version}</version>

    </dependency>

    <dependency>

        <groupId>javax.servlet</groupId>

        <artifactId>javax.servlet-api</artifactId>

        <version>3.1.0</version>

    </dependency>

  </dependencies>

  <build>

    <finalName>TestMaven2</finalName>

  </build>

</project>
(五)修改工程配置:
在以上两个文件中修改jdk版本为1.7以上 web为3.0
六:添加springMvc配置:
web.xml
<?xml version="1.0" encoding="UTF-8"?>

<web-app xmlns:xsi="http://www.w3.org/2001/XMLSchema-instance"

         xmlns="http://java.sun.com/xml/ns/javaee" xmlns:web="http://java.sun.com/xml/ns/javaee/web-app_3_0.xsd"

         xsi:schemaLocation="http://java.sun.com/xml/ns/javaee http://java.sun.com/xml/ns/javaee/web-app_3_0.xsd"

         id="study" version="3.0">

         <display-name>Archetype Created Web Application</display-name>

         <description>sprintMVC环境搭建</description>

         <!-- 加载Spring配置文件 -->

         <context-param>

                   <param-name>contextConfigLocation</param-name>

                   <param-value>classpath:configs/beans.xml</param-value>

         </context-param>

         <!-- Spring监听 -->

         <listener>

                   <listener-class>org.springframework.web.context.ContextLoaderListener</listener-class>

         </listener>

         <!-- Spring MVC配置 -->

         <servlet>

                   <servlet-name>Dispatcher</servlet-name>

                   <servlet-class>org.springframework.web.servlet.DispatcherServlet</servlet-class>

                   <!-- 自定义spring mvc的配置文件名称和路径 -->

                   <init-param>

                            <param-name>contextConfigLocation</param-name>

                            <param-value>classpath:configs/beans-mvc.xml</param-value>

                   </init-param>

                   <load-on-startup>1</load-on-startup>

         </servlet>

         <!-- spring mvc 请求后缀 -->

         <servlet-mapping>

                   <servlet-name>Dispatcher</servlet-name>

                   <url-pattern>/</url-pattern>

         </servlet-mapping>

         <welcome-file-list>

                   <welcome-file>index.jsp</welcome-file>

         </welcome-file-list>

</web-app>
src/com/main/resources文件夹下的beans.xml和beans-mvc.xml
beans.xml:
<?xml version="1.0" encoding="UTF-8"?>

<beans xmlns="http://www.springframework.org/schema/beans"

    xmlns:context="http://www.springframework.org/schema/context"

    xmlns:xsi="http://www.w3.org/2001/XMLSchema-instance"

    xsi:schemaLocation="http://www.springframework.org/schema/beans

    http://www.springframework.org/schema/beans/spring-beans-3.0.xsd

    http://www.springframework.org/schema/context

    http://www.springframework.org/schema/context/spring-context-3.0.xsd" >

    <context:property-placeholder />

    <context:annotation-config />

</beans>
<?xml version="1.0" encoding="UTF-8"?>

<beans xmlns="http://www.springframework.org/schema/beans"

    xmlns:xsi="http://www.w3.org/2001/XMLSchema-instance" xmlns:aop="http://www.springframework.org/schema/aop"

    xmlns:util="http://www.springframework.org/schema/util" xmlns:context="http://www.springframework.org/schema/context"

    xmlns:p="http://www.springframework.org/schema/p" xmlns:mvc="http://www.springframework.org/schema/mvc"

    xmlns:task="http://www.springframework.org/schema/task"

    xsi:schemaLocation="

            http://www.springframework.org/schema/beans http://www.springframework.org/schema/beans/spring-beans.xsd

            http://www.springframework.org/schema/aop http://www.springframework.org/schema/aop/spring-aop.xsd

            http://www.springframework.org/schema/context http://www.springframework.org/schema/context/spring-context.xsd

            http://www.springframework.org/schema/util  http://www.springframework.org/schema/util/spring-util.xsd

            http://www.springframework.org/schema/cache http://www.springframework.org/schema/cache/spring-cache.xsd

            http://www.springframework.org/schema/jdbc http://www.springframework.org/schema/jdbc/spring-jdbc.xsd

            http://www.springframework.org/schema/mvc http://www.springframework.org/schema/mvc/spring-mvc.xsd

            ">

    <context:property-placeholder />

    <!-- MVC控制类扫描 -->

    <context:component-scan base-package="com.my.controller" />

    <mvc:annotation-driven />

    <!-- 视图解析器:定义跳转的文件的前后缀 -->

    <bean id="viewResolver" class="org.springframework.web.servlet.view.InternalResourceViewResolver">

        <property name="prefix" value="/view/" />

        <property name="suffix" value=".html" />  <!--可为空,方便实现自已的依据扩展名来选择视图解释类的逻辑  -->

    </bean>

    <mvc:default-servlet-handler />

</beans>
七:补齐自己的controller
package com.my.controller;

import javax.servlet.http.HttpServletRequest;

import org.springframework.stereotype.Controller;

import org.springframework.web.bind.annotation.RequestMapping;

@Controller

@RequestMapping("/user")

public class UserController {

    @RequestMapping(value="/getUserInfo")

    public String getUserInfo(HttpServletRequest request){

        System.out.println("==========");

        return "user";

    }

}
八:部署运行,输入http://localhost:8180/TestMaven2/user/getUserInfo访问。
------------------------------------------------------------------------------------------------------------------------------
一段可能会用到代码:maven依赖无法加入到工程时,在.classpath添加,很有用
<classpathentry kind="con" path="org.eclipse.m2e.MAVEN2_CLASSPATH_CONTAINER">

        <attributes>

            <attribute name="maven.pomderived" value="true"/>

            <attribute name="org.eclipse.jst.component.nondependency" value=""/>

        </attributes>

    </classpathentry>
Eclipse利用Maven2搭建SpringMVC框架的Web工程的更多相关文章
- 教你搭建SpringMVC框架( 更新中、附源码)
一.项目目录结构 二.SpringMVC需要使用的jar包 commons-logging-1.2.jar junit-4.10.jar log4j-api-2.0.2.jar log4j-core- ...
- 脚手架快速搭建springMVC框架项目
apid-framework脚手架快速搭建springMVC框架项目 rapid-framework介绍: 一个类似ruby on rails的java web快速开发脚手架,本着不重复发明轮 ...
- 教你搭建SpringMVC框架( 附源码)
一.项目目录结构 二.SpringMVC需要使用的jar包 commons-logging-1.2.jar junit-4.10.jar log4j-api-2.0.2.jar log4j-core- ...
- 大师养成计划之一:搭建springmvc框架
搭建spring-mvc框架 搭建spring-mvc框架步骤: 1.搭建web项目spring-mvc1 2.引入jar包 3.配置web.xml 3.1拷贝头文件: <web-app xml ...
- 搭建springmvc框架的另一种思路
在一个完整的项目里搭建springmvc框架的时候, 通常情况下,初学者在配置的时候,总是会把"中央控制器的名字"-servlet.xml文件放到/Webroot/WEB-INF下 ...
- 利用 nodeJS 搭建一个简单的Web服务器(转)
下面的代码演示如何利用 nodeJS 搭建一个简单的Web服务器: 1. 文件 WebServer.js: //-------------------------------------------- ...
- 使用eclipse创建在myeclipse中运行的web工程
今天在跟随慕课网学习java时,遇到课程中老师使用Myeclipse,我用的是eclipse,那么就使用eclipse创建在Myeclipse项目 参考: 如何在Eclipse配置Tomcat服务器 ...
- SpringMVC框架下Web项目的搭建与部署
这篇文章已被废弃. 现在,Deolin使用Maven构建项目,而不是下载Jar文件,使用Jetty插件调试项目,而不是外部启动Tomcat. SpringMVC比起Servlet/JSP方便了太多 W ...
- 简单搭建SpringMVC框架详解
在公司待了两年,用的一直是Spring+SpringMVC+Hibernate框架,都是公司自己搭建好的,自己从来没有主动搭建过,闲来无聊,自己搭建试试.一下即我搭建的过程以及搭建所遇到的问题,有部分 ...
随机推荐
- WebService 实例
使用Java WebService API实现 1.服务端接口: package com.h3c.itac.webservice; import javax.jws.WebService; @WebS ...
- Ineedle驱动方式dpdk测试性能
这次主要是测试在dpdk方案下,ineedle的处理包的性能. 发包工具: 使用立永当时写的一个发包工具:linux_pcap 做法:大概是从网上抓取了一些数据包,将源ip替换为随即ip,sip替换为 ...
- linux 分区 物理卷 逻辑卷
今天我们主要说说分区.格式化.SWAP.LVM.软件RAID的创建哈~ 格式化 查看当前分区:fdisk -l 这个命令我们以前是讲过的,我现在问下,ID那项是什么意思? 83 是代表EXT2和E ...
- Linux rpm 查询
[root@wang /]# rpm -qa // 查看安装所有包 [root@wang /]# rpm -qa |grep vim // 查询所安装的包 +包名 [root@wang /]# rpm ...
- 301重定向.htaccess规则(含二级目录跳转二级域名)
301重定向是一种非常重要的"自动转向"技术.网址重定向最为可行的一种办法.当用户或搜索引擎向网站服务器发出浏览请求时,服务器返回的HTTP数据流中头信息(header)中的状态码 ...
- 【简易版】IOS仿periscope自制狂赞飘桃心
periscope自制狂赞飘桃心 国外的IOS app“periscope”非常的火,观看手机视频直播的时候,点击屏幕任何一个地方,屏幕右下角就能飘出各种颜色的桃心,效果非常的炫! 为此我自制了一个仿 ...
- simple-spring-memcached缓存搭建
项目中使用的缓存经常是知道使用,没有试过搭建起它.刚好这次自己的毕业可以用来搭建缓存.其他不多说了,直接看操作吧.首先在pom.xml中依赖simple-spring-memcached的架包. &l ...
- 地铁 Dijkstra(优先队列优化) 湖南省第12届省赛
传送门:地铁 思路:拆点,最短路:拆点比较复杂,所以对边进行最短路,spfa会tle,所以改用Dijkstra(优先队列优化) 模板 /******************************** ...
- 微信支付 总提示get_brand_wcpay_request:fail 也不跳转支付页面 的解决方案
最近在做微信支付,帮客户部署好环境后,测试微信支付,发现点击支付后老是提示: get_brand_wcpay_request:fail, 于是找到代码中调用微信支付的代码段: WeixinJSBrid ...
- Windows系统小知识
前言 本文写作于Window10发布后的2015-08-01,新系统发布后我做了新系统的小白鼠,所以写此文以作记录. WIN10各版本下载地址:http://www.ithome.com/html/w ...