简单研究Android View绘制三 布局过程
2015-07-28 17:29:19
这一篇主要看看布局过程
一、布局过程肯定要不可避免的涉及到layout()和onLayout()方法,这两个方法都是定义在View.java中,源码如下:
     /**

      * Assign a size and position to a view and all of its

      * descendants

      *

      * <p>This is the second phase of the layout mechanism.

      * (The first is measuring). In this phase, each parent calls

      * layout on all of its children to position them.

      * This is typically done using the child measurements

      * that were stored in the measure pass().</p>

      *

      * <p>Derived classes should not override this method.

      * Derived classes with children should override

      * onLayout. In that method, they should

      * call layout on each of their children.</p>

      *

      * @param l Left position, relative to parent

      * @param t Top position, relative to parent

      * @param r Right position, relative to parent

      * @param b Bottom position, relative to parent

      */

     @SuppressWarnings({"unchecked"})

     public void layout(int l, int t, int r, int b) {

         if ((mPrivateFlags3 & PFLAG3_MEASURE_NEEDED_BEFORE_LAYOUT) != 0) {

             onMeasure(mOldWidthMeasureSpec, mOldHeightMeasureSpec);

             mPrivateFlags3 &= ~PFLAG3_MEASURE_NEEDED_BEFORE_LAYOUT;

         }

         int oldL = mLeft;

         int oldT = mTop;

         int oldB = mBottom;

         int oldR = mRight;

         boolean changed = isLayoutModeOptical(mParent) ?

                 setOpticalFrame(l, t, r, b) : setFrame(l, t, r, b);

         if (changed || (mPrivateFlags & PFLAG_LAYOUT_REQUIRED) == PFLAG_LAYOUT_REQUIRED) {

             /// M: Monitor onLayout time if longer than 3s print log.

             long logTime = System.currentTimeMillis();

             onLayout(changed, l, t, r, b);

             long nowTime = System.currentTimeMillis();

             if (nowTime - logTime > DBG_TIMEOUT_VALUE) {

                 Xlog.d(VIEW_LOG_TAG, "[ANR Warning]onLayout time too long, this =" + this + "time =" + (nowTime - logTime));

             }

             mPrivateFlags &= ~PFLAG_LAYOUT_REQUIRED;

             ListenerInfo li = mListenerInfo;

             if (li != null && li.mOnLayoutChangeListeners != null) {

                 ArrayList<OnLayoutChangeListener> listenersCopy =

                         (ArrayList<OnLayoutChangeListener>)li.mOnLayoutChangeListeners.clone();

                 int numListeners = listenersCopy.size();

                 for (int i = 0; i < numListeners; ++i) {

                     listenersCopy.get(i).onLayoutChange(this, l, t, r, b, oldL, oldT, oldR, oldB);

                 }

             }

         }

         mPrivateFlags &= ~PFLAG_FORCE_LAYOUT;

         mPrivateFlags3 |= PFLAG3_IS_LAID_OUT;

     }

     /**

      * Called from layout when this view should

      * assign a size and position to each of its children.

      *

      * Derived classes with children should override

      * this method and call layout on each of

      * their children.

      * @param changed This is a new size or position for this view

      * @param left Left position, relative to parent

      * @param top Top position, relative to parent

      * @param right Right position, relative to parent

      * @param bottom Bottom position, relative to parent

      */

     protected void onLayout(boolean changed, int left, int top, int right, int bottom) {

     }
简单的翻译一下layout()方法的那段注释哈~E文不好~
“指定一个view以及它的所有子孙节点的大小和位置,这是布局机制的第二阶段(第一阶段是测量),在这一阶段,父view调用所有子view的layout()方法以确定他们所在的位置,通常是使用子View存储的自身的尺寸。派生类不应该重写此方法,应该重写onLayout()方法,在派生类重写的onLayout()方法中,应该调用每一个子View的layout方法。”啰嗦一句,int l, int t, int r, int b都是相对于父节点的坐标值。
注意layout方法中的红色代码,调用了onLayout。而onLayout在view中实现为空。现在来看看ViewGroup中的这两个方法。
     /**

      * {@inheritDoc}

      */

     @Override

     public final void layout(int l, int t, int r, int b) {

         if (!mSuppressLayout && (mTransition == null || !mTransition.isChangingLayout())) {

             if (mTransition != null) {

                 mTransition.layoutChange(this);

             }

             super.layout(l, t, r, b);

         } else {

             // record the fact that we noop'd it; request layout when transition finishes

             mLayoutCalledWhileSuppressed = true;

         }

     }

     /**

      * {@inheritDoc}

      */

     @Override

     protected abstract void onLayout(boolean changed,

             int l, int t, int r, int b);
在ViewGroup的layout方法中,mSuppressLayout用来控制是否禁止调用layout(),该值由如下方法来控制:
     /**

      * Tells this ViewGroup to suppress all layout() calls until layout

      * suppression is disabled with a later call to suppressLayout(false).

      * When layout suppression is disabled, a requestLayout() call is sent

      * if layout() was attempted while layout was being suppressed.

      *

      * @hide

      */

     public void suppressLayout(boolean suppress) {

         mSuppressLayout = suppress;

         if (!suppress) {

             if (mLayoutCalledWhileSuppressed) {

                 requestLayout();

                 mLayoutCalledWhileSuppressed = false;

             }

         }

     }
这个方法不是对外公开的,所以不了解它也行。可以简单地理解ViewGroup的layout方法,它直接调用了父类View的layout()方法即可。至于onLayout方法,竟然被搞成了abstract的,这是逼着ViewGroup的子类必须得去实现啊~当然了,你必须得实现啊,你作为一个容器类,如何摆放你的子孙控件,是你义不容辞的责任啊。
至此我们已经明白了几点:
1. 派生类不需要重写layout(),而应该重写onLayout()方法,因为在layout()方法中就调用了onLayout()。
2. 在重写onLayout()方法时,我们需要显式的调用每一个childView的layout方法,把它摆放在合适的位置上。前提是在调用之前,得先计算好该childView的坐标。
3. 如果直接继承自View,那么可以不用重写onLayout()方法,比如ImageView、ImageButton等都没有重写该方法,所以不重写这个方法对于自定义View影响不大,至于TextView比较特殊,它重写了该方法,如下:
     @Override

     protected void onLayout(boolean changed, int left, int top, int right, int bottom) {

         super.onLayout(changed, left, top, right, bottom);

         if (mDeferScroll >= 0) {

             int curs = mDeferScroll;

             mDeferScroll = -1;

             bringPointIntoView(Math.min(curs, mText.length()));

         }

     }

     /**

      * Move the point, specified by the offset, into the view if it is needed.

      * This has to be called after layout. Returns true if anything changed.

      */

     public boolean bringPointIntoView(int offset) {

         if (isLayoutRequested()) {

             mDeferScroll = offset;

             return false;

         }

         boolean changed = false;

         Layout layout = isShowingHint() ? mHintLayout: mLayout;

         if (layout == null) return changed;

         int line = layout.getLineForOffset(offset);

         int grav;

         switch (layout.getParagraphAlignment(line)) {

             case ALIGN_LEFT:

                 grav = 1;

                 break;

             case ALIGN_RIGHT:

                 grav = -1;

                 break;

             case ALIGN_NORMAL:

                 grav = layout.getParagraphDirection(line);

                 break;

             case ALIGN_OPPOSITE:

                 grav = -layout.getParagraphDirection(line);

                 break;

             case ALIGN_CENTER:

             default:

                 grav = 0;

                 break;

         }

         // We only want to clamp the cursor to fit within the layout width

         // in left-to-right modes, because in a right to left alignment,

         // we want to scroll to keep the line-right on the screen, as other

         // lines are likely to have text flush with the right margin, which

         // we want to keep visible.

         // A better long-term solution would probably be to measure both

         // the full line and a blank-trimmed version, and, for example, use

         // the latter measurement for centering and right alignment, but for

         // the time being we only implement the cursor clamping in left to

         // right where it is most likely to be annoying.

         final boolean clamped = grav > 0;

         // FIXME: Is it okay to truncate this, or should we round?

         final int x = (int)layout.getPrimaryHorizontal(offset, clamped);

         final int top = layout.getLineTop(line);

         final int bottom = layout.getLineTop(line + 1);

         int left = (int) FloatMath.floor(layout.getLineLeft(line));

         int right = (int) FloatMath.ceil(layout.getLineRight(line));

         int ht = layout.getHeight();

         int hspace = mRight - mLeft - getCompoundPaddingLeft() - getCompoundPaddingRight();

         int vspace = mBottom - mTop - getExtendedPaddingTop() - getExtendedPaddingBottom();

         if (!mHorizontallyScrolling && right - left > hspace && right > x) {

             // If cursor has been clamped, make sure we don't scroll.

             right = Math.max(x, left + hspace);

         }

         int hslack = (bottom - top) / 2;

         int vslack = hslack;

         if (vslack > vspace / 4)

             vslack = vspace / 4;

         if (hslack > hspace / 4)

             hslack = hspace / 4;

         int hs = mScrollX;

         int vs = mScrollY;

         if (top - vs < vslack)

             vs = top - vslack;

         if (bottom - vs > vspace - vslack)

             vs = bottom - (vspace - vslack);

         if (ht - vs < vspace)

             vs = ht - vspace;

         if (0 - vs > 0)

             vs = 0;

         if (grav != 0) {

             if (x - hs < hslack) {

                 hs = x - hslack;

             }

             if (x - hs > hspace - hslack) {

                 hs = x - (hspace - hslack);

             }

         }

         if (grav < 0) {

             if (left - hs > 0)

                 hs = left;

             if (right - hs < hspace)

                 hs = right - hspace;

         } else if (grav > 0) {

             if (right - hs < hspace)

                 hs = right - hspace;

             if (left - hs > 0)

                 hs = left;

         } else /* grav == 0 */ {

             if (right - left <= hspace) {

                 /*

                  * If the entire text fits, center it exactly.

                  */

                 hs = left - (hspace - (right - left)) / 2;

             } else if (x > right - hslack) {

                 /*

                  * If we are near the right edge, keep the right edge

                  * at the edge of the view.

                  */

                 hs = right - hspace;

             } else if (x < left + hslack) {

                 /*

                  * If we are near the left edge, keep the left edge

                  * at the edge of the view.

                  */

                 hs = left;

             } else if (left > hs) {

                 /*

                  * Is there whitespace visible at the left?  Fix it if so.

                  */

                 hs = left;

             } else if (right < hs + hspace) {

                 /*

                  * Is there whitespace visible at the right?  Fix it if so.

                  */

                 hs = right - hspace;

             } else {

                 /*

                  * Otherwise, float as needed.

                  */

                 if (x - hs < hslack) {

                     hs = x - hslack;

                 }

                 if (x - hs > hspace - hslack) {

                     hs = x - (hspace - hslack);

                 }

             }

         }

         if (hs != mScrollX || vs != mScrollY) {

             if (mScroller == null) {

                 scrollTo(hs, vs);

             } else {

                 long duration = AnimationUtils.currentAnimationTimeMillis() - mLastScroll;

                 int dx = hs - mScrollX;

                 int dy = vs - mScrollY;

                 if (duration > ANIMATED_SCROLL_GAP) {

                     mScroller.startScroll(mScrollX, mScrollY, dx, dy);

                     awakenScrollBars(mScroller.getDuration());

                     invalidate();

                 } else {

                     if (!mScroller.isFinished()) {

                         mScroller.abortAnimation();

                     }

                     scrollBy(dx, dy);

                 }

                 mLastScroll = AnimationUtils.currentAnimationTimeMillis();

             }

             changed = true;

         }

         if (isFocused()) {

             // This offsets because getInterestingRect() is in terms of viewport coordinates, but

             // requestRectangleOnScreen() is in terms of content coordinates.

             // The offsets here are to ensure the rectangle we are using is

             // within our view bounds, in case the cursor is on the far left

             // or right.  If it isn't withing the bounds, then this request

             // will be ignored.

             if (mTempRect == null) mTempRect = new Rect();

             mTempRect.set(x - 2, top, x + 2, bottom);

             getInterestingRect(mTempRect, line);

             ///M: ALPS00605613 requestRectangleOnScreen() will return error result if setting the mTempRect to mScrollX, mScrollY

             //mTempRect.offset(mScrollX, mScrollY);

             if (requestRectangleOnScreen(mTempRect)) {

                 changed = true;

             }

         }

         return changed;

     }
有点没看明白bringPointIntoView方法的作用是什么,还得再研究。不过这不影响我们分析布局过程。
二、结合自己写的一个小Demo继续分析,代码如下:
MyLinear2.java
 public class MyLinear2 extends ViewGroup {

     private static final String TAG = "David_MyLinear2";

     public MyLinear2(Context context) {

         super(context);

     }

     public MyLinear2(Context context, AttributeSet attrs) {

         super(context, attrs);

     }

     @Override

     protected void onLayout(boolean changed, int l, int t, int r, int b) {

         int count = getChildCount();

         int cWidth = 0;

         int cHeight = 0;

         int top = 0;

         MarginLayoutParams params = null;

         Log.e(TAG + " onLayout", "l = " + l);

         Log.e(TAG + " onLayout", "t = " + t);

         Log.e(TAG + " onLayout", "r = " + r);

         Log.e(TAG + " onLayout", "b = " + b);

         for (int i = 0; i < count; i++) {

             Log.e(TAG + " onLayout", "====================i = " + i);

             View childView = getChildAt(i);

             cWidth = childView.getMeasuredWidth();

             cHeight = childView.getMeasuredHeight();

             params = (MarginLayoutParams) childView.getLayoutParams();

             Log.e(TAG + " onLayout", "params.height = " + params.height);

             Log.e(TAG + " onLayout", "params.width = " + params.width);

             int leftMargin = params.leftMargin;

             Log.e(TAG + " onLayout", "leftMargin = " + leftMargin);

             Log.e(TAG + " onLayout", "params.rightMargin = " + params.rightMargin);

             /*Log.e(TAG + " onLayout", "cWidth = " + cWidth);

             Log.e(TAG + " onLayout", "cHeight = " + cHeight);

             Log.e(TAG + " onLayout", "getWidth() = " + childView.getWidth());

             Log.e(TAG + " onLayout", "getHeight() = " + childView.getHeight());*/

             int cl = 0, ct = 0, cr = 0, cb = 0;

             cl = leftMargin;

             cr = cl + cWidth;

             ct = top;

             cb = cHeight + ct;

             /*Log.e(TAG + " onLayout", "cr = " + cr);

             Log.e(TAG + " onLayout", "ct = " + ct);

             Log.e(TAG + " onLayout", "cb = " + cb);

             Log.e(TAG + " onLayout", "top = " + top);*/

             childView.layout(cl, ct, cr, cb);

             top += cHeight;

         }

     }

     @Override

     public ViewGroup.LayoutParams generateLayoutParams(AttributeSet attrs) {

         Log.e(TAG, "generateLayoutParams attrs");

         return new MarginLayoutParams(getContext(), attrs);

     }

     @Override

     protected ViewGroup.LayoutParams generateDefaultLayoutParams() {

         Log.e(TAG, "generateDefaultLayoutParams");

         return new LayoutParams(LayoutParams.MATCH_PARENT, LayoutParams.MATCH_PARENT);

     }

     @Override

     protected boolean checkLayoutParams(LayoutParams p) {

         return super.checkLayoutParams(p);

     }

     @Override

     protected ViewGroup.LayoutParams generateLayoutParams(ViewGroup.LayoutParams p) {

         Log.e(TAG, "generateLayoutParams p");

         return new MarginLayoutParams(p);

     }

     @Override

     protected void onMeasure(int widthMeasureSpec, int heightMeasureSpec) {

         int measuredHeight = measureHeight(heightMeasureSpec);

         int measuredWidth = measureWidth(widthMeasureSpec);

         Log.e(TAG, "onMeasure measuredHeight = " + measuredHeight);

         Log.e(TAG, "onMeasure measuredWidth = " + measuredWidth);

         setMeasuredDimension(measuredWidth, measuredHeight);

         measureChildren(widthMeasureSpec, heightMeasureSpec);

     }

     private int measureHeight(int measureSpec) {

         int specMode = MeasureSpec.getMode(measureSpec);

         int specSize = MeasureSpec.getSize(measureSpec);

         int result = 500;

         if (specMode == MeasureSpec.AT_MOST){

             result = specSize;

         } else if (specMode == MeasureSpec.EXACTLY){

             result = specSize;

         }

         return result;

     }

     private int measureWidth(int measureSpec) {

         int specMode = MeasureSpec.getMode(measureSpec);

         int specSize = MeasureSpec.getSize(measureSpec);

         int result = 100;

         if (specMode == MeasureSpec.AT_MOST){

             result = specSize;

         } else if (specMode == MeasureSpec.EXACTLY){

             result = specSize;

         }

         return result;

     }

 }
MyLinear2时模仿纵向布局的LinearLayout。
MyTextView.java
 public class MyTextView extends View {

     private static final String TAG = "David___MyTextView";

     public MyTextView(Context context, AttributeSet attrs) {

         super(context, attrs);

     }

     public MyTextView(Context context) {

         super(context);

     }

     @Override

     protected void onDraw(Canvas canvas) {

         super.onDraw(canvas);

         Paint paint = new Paint();

         paint.setTextSize(22);

         paint.setTextAlign(Align.CENTER);

         Log.e(TAG, "onDraw getTop() = " + getTop());

         Log.e(TAG, "onDraw getLeft() = " + getLeft());

         canvas.drawText("nihao ----", getTop(), getLeft(), paint);

     }

     @Override

     protected void onLayout(boolean changed, int left, int top, int right, int bottom) {

         Log.e(TAG, "onLayout left = " + left);

         Log.e(TAG, "onLayout top = " + top);

         Log.e(TAG, "onLayout right = " + right);

         Log.e(TAG, "onLayout bottom = " + bottom);

         //super.onLayout(changed, left, top, right, bottom);

     }

     @Override

     protected void onMeasure(int widthMeasureSpec, int heightMeasureSpec) {

         int measuredHeight = measureHeight(heightMeasureSpec);

         int measuredWidth = measureWidth(widthMeasureSpec);

         Log.e(TAG, "onMeasure measuredHeight = " + measuredHeight);

         Log.e(TAG, "onMeasure measuredWidth = " + measuredWidth);

         setMeasuredDimension(measuredWidth, measuredHeight);

     }

     private int measureHeight(int measureSpec) {

         int specMode = MeasureSpec.getMode(measureSpec);

         int specSize = MeasureSpec.getSize(measureSpec);

         int result = 500;

         if (specMode == MeasureSpec.AT_MOST){

             result = specSize;

         } else if (specMode == MeasureSpec.EXACTLY){

             result = specSize;

         }

         return result;

     }

     private int measureWidth(int measureSpec) {

         int specMode = MeasureSpec.getMode(measureSpec);

         int specSize = MeasureSpec.getSize(measureSpec);

         int result = 500;

         if (specMode == MeasureSpec.AT_MOST){

             result = specSize;

         } else if (specMode == MeasureSpec.EXACTLY){

             result = specSize;

         }

         return result;

     }

 }
这是一个简易的View,先不要关心onDraw()方法。布局文件如下:
 <com.test.touch.MyLinear2 xmlns:android="http://schemas.android.com/apk/res/android"

     android:layout_width="300dp"

     android:layout_height="200dp"

     android:paddingTop="22dp"

     android:layout_marginLeft="10dp" >

     <com.test.touch.MyTextView

         android:layout_width="match_parent"

         android:layout_height="120dp"

         android:background="#0f0"

         android:layout_marginLeft="30dp"

         android:paddingTop="22dp"

         android:text="Hello World" />

     <TextView

         android:id="@+id/tv1"

         android:layout_width="match_parent"

         android:layout_height="110dp"

         android:background="#f00"

         android:gravity="center_vertical"

         android:layout_marginLeft="10dp"

         android:text="Hello World Text" />

23

     <com.test.touch.MyTextView

         android:layout_width="match_parent"

         android:layout_height="60dp"

         android:background="#00f"

         android:text="Hello World88" />

 </com.test.touch.MyLinear2>
OK,运行打印的日志如下:
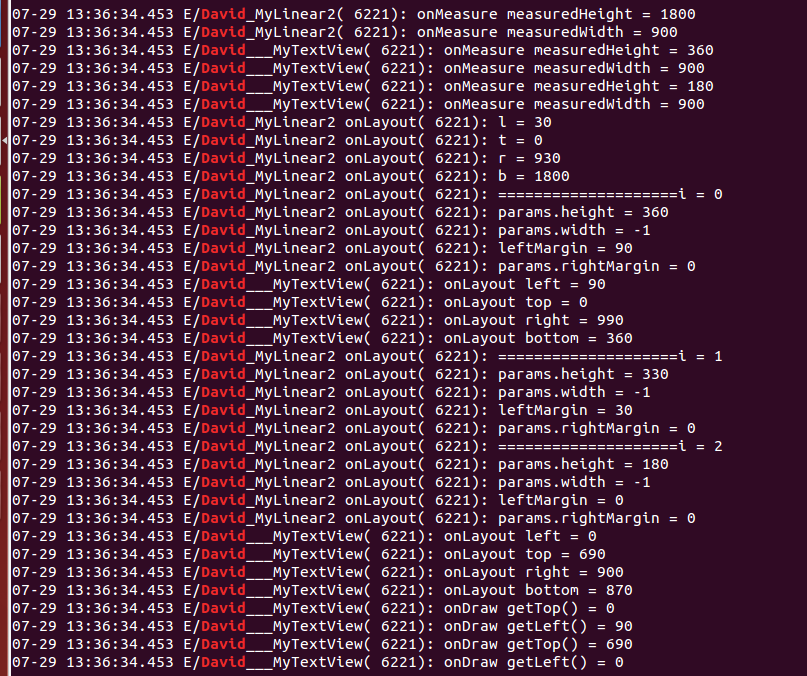
这段日志其实是会被打印好几遍的,我只截取了完整的一次日志。从日志可以看出,首先执行的是测量过程,这个之前分析过了,请参考http://www.cnblogs.com/wlrhnh/p/4680636.html。然后才是布局过程,由于我们在MyLinear2的onLayout()中显式调用childView的layout()方法,代码如下:
     @Override

     protected void onLayout(boolean changed, int l, int t, int r, int b) {

         int count = getChildCount();

         int cWidth = 0;

         int cHeight = 0;

         int top = 0;

         MarginLayoutParams params = null;

         Log.e(TAG + " onLayout", "l = " + l);

         Log.e(TAG + " onLayout", "t = " + t);

         Log.e(TAG + " onLayout", "r = " + r);

         Log.e(TAG + " onLayout", "b = " + b);

         for (int i = 0; i < count; i++) {

             Log.e(TAG + " onLayout", "====================i = " + i);

             View childView = getChildAt(i);

             cWidth = childView.getMeasuredWidth();

             cHeight = childView.getMeasuredHeight();

             params = (MarginLayoutParams) childView.getLayoutParams();

             Log.e(TAG + " onLayout", "params.height = " + params.height);

             Log.e(TAG + " onLayout", "params.width = " + params.width);

             int leftMargin = params.leftMargin;

             Log.e(TAG + " onLayout", "leftMargin = " + leftMargin);

             Log.e(TAG + " onLayout", "params.rightMargin = " + params.rightMargin);

             int cl = 0, ct = 0, cr = 0, cb = 0;

             cl = leftMargin;

             cr = cl + cWidth;

             ct = top;

             cb = cHeight + ct;

             childView.layout(cl, ct, cr, cb);

             top += cHeight;

         }

     }
所以日志中显示:先调用了ViewGroup的onLayout,然后遍历每一个childView,取出它们已经计算好的坐标值,按照ViewGroup的既定布局策略,给childView布局,调用他们的layout()方法,进而调用了onLayout()。而很多继承自View的组件,比如ImageView等,由于没有实现onLayout()方法,那么其实只调用了View的layout()和View的空实现的onLayout()方法。当然了,我在MyTextView中重写onLayout()只是为了打印日志而已,并没有做什么实际操作。在日志的最后,打印了onDraw()方法,可见,先测量、后布局、最后才统一draw,并不是布局完一个就draw一个。而且我发现一个有意思的现象,那就是如果你的父控件拥有的space不足以显示所有的子View,那么不能显示出来的子View的onDraw方法是不会被调用的,这点好理解~
三、关于LayoutParams
注意上面的一行红色代码,每个childView都有LayoutParams,而且可以强转为MarginLayoutParams呢?注意看这几行代码:
     @Override

     public ViewGroup.LayoutParams generateLayoutParams(AttributeSet attrs) {

         Log.e(TAG, "generateLayoutParams attrs");

         return new MarginLayoutParams(getContext(), attrs);

     }

     @Override

     protected ViewGroup.LayoutParams generateDefaultLayoutParams() {

         Log.e(TAG, "generateDefaultLayoutParams");

         return new LayoutParams(LayoutParams.MATCH_PARENT, LayoutParams.MATCH_PARENT);

     }

     @Override

     protected boolean checkLayoutParams(LayoutParams p) {

         return super.checkLayoutParams(p);

     }

     @Override

     protected ViewGroup.LayoutParams generateLayoutParams(ViewGroup.LayoutParams p) {

         Log.e(TAG, "generateLayoutParams p");

         return new MarginLayoutParams(p);

     }
看一下日志:
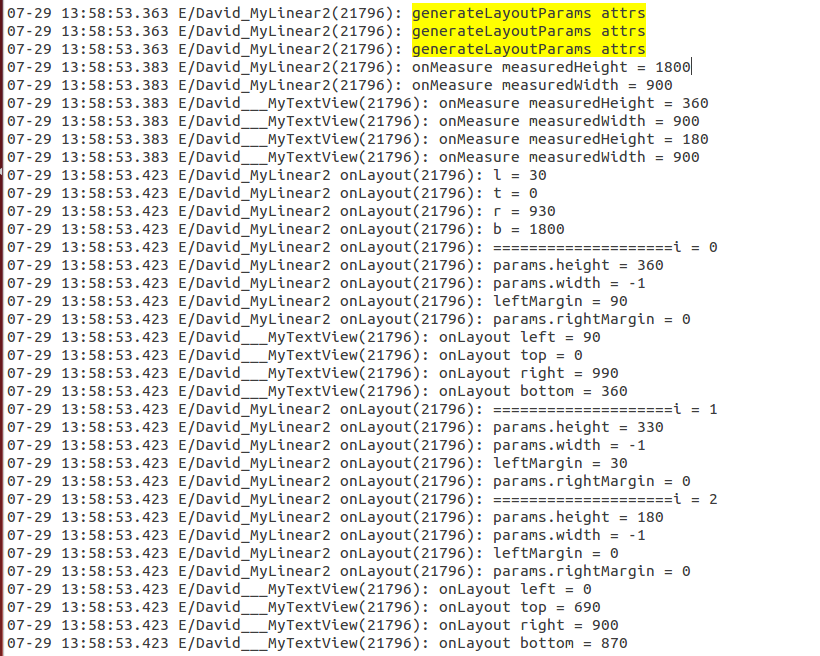
看黄色部分日志,主要执行了generateLayoutParams(AttributeSet attrs)方法,而且是先于测量过程执行的,这个方法我们有自己的实现,具体的请参考http://www.cnblogs.com/wlrhnh/p/4683542.html
简单的总结一下布局过程:
Android View绘制系统首先取到Activity布局的根View,当然这一般是一个ViewGroup了。先测量,后布局。布局的时候调用ViewGroup子类比如MyLinear2的layout()方法,由于ViewGroup强制子类实现onLayout()方法,所以会调到MyLinear2的onLayout()方法,在这个方法中,需要遍历子View,按照布局策略,计算每一个子View的坐标,然后将它放在合适的位置上。至于继承自View的子类,则不需要实现onLayout,毕竟onLayout的作是布局,这是容器类该干的事情。而子View要做的就是根据父View在指定给自己的空间中draw。
通过以上三篇文章,想必应该对Android系统测量、布局View的流程有了一个大概的了解,这是一条主线。当然了,这里面涉及到的细节其实有很多,最好的办法是自己去看源码喽~
项目代码和View.java ViewGroup.java LinearLayout.java Button.java等源码请下载
后记:分析完三步骤之后觉得不过瘾,想起网上有人写过这样的布局,就顺手写了个,抄袭人家的创意了,但是代码是自己的写的~
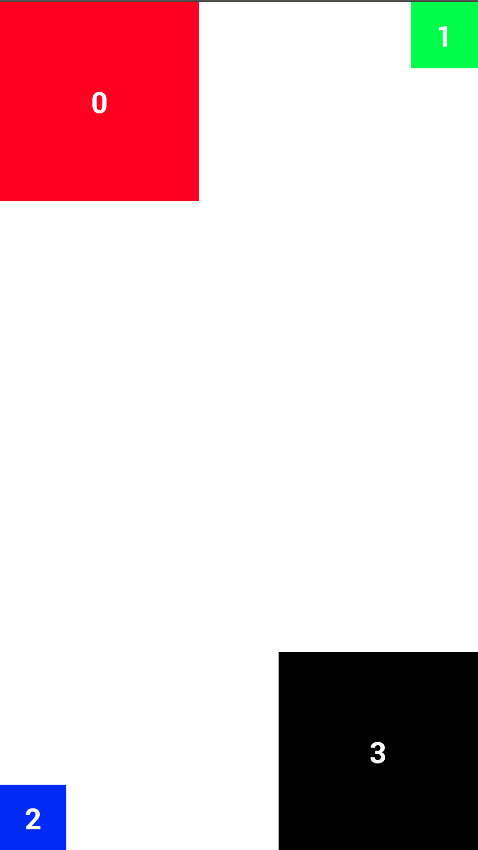
 public class MyLinear1 extends ViewGroup {

     private static final String TAG = "David_MyLinear1";

     public MyLinear1(Context context) {

         super(context);

     }

     public MyLinear1(Context context, AttributeSet attrs) {

         super(context, attrs);

     }

     @Override

     protected void onMeasure(int widthMeasureSpec, int heightMeasureSpec) {

         int measuredHeightSize = MeasureSpec.getSize(heightMeasureSpec);

         int measuredWidthSize = MeasureSpec.getSize(widthMeasureSpec);

         int measuredHeightMode = MeasureSpec.getMode(heightMeasureSpec);

         int measuredWidthMode = MeasureSpec.getMode(widthMeasureSpec);

         measureChildren(widthMeasureSpec, heightMeasureSpec);

         int lHeight = 0, rHeight = 0;

         int tWidth = 0, bWidth = 0;

         View childView = null;

         MarginLayoutParams params = null;

         for (int i = 0; i < getChildCount(); i++) {

             childView = getChildAt(i);

             params = (MarginLayoutParams) childView.getLayoutParams();

             switch (i) {

                 case 0:

                     lHeight += childView.getMeasuredHeight();

                     tWidth += childView.getMeasuredWidth();

                     break;

                 case 1:

                     rHeight += childView.getMeasuredHeight();

                     tWidth += childView.getMeasuredWidth();

                     break;

                 case 2:

                     lHeight += childView.getMeasuredHeight();

                     bWidth += childView.getMeasuredWidth();

                     break;

                 case 3:

                     rHeight += childView.getMeasuredHeight();

                     bWidth += childView.getMeasuredWidth();

                     break;

                 default:

                     break;

             }

         }

         int realHeightSize = Math.max(lHeight, rHeight);

         int realWidthSize = Math.max(bWidth, tWidth);

         int h = measuredHeightMode == MeasureSpec.EXACTLY ? measuredHeightSize : realHeightSize;

         int w = measuredWidthMode == MeasureSpec.EXACTLY ? measuredWidthSize : realWidthSize;

         setMeasuredDimension(w, h);

     }

     @Override

     protected void onLayout(boolean changed, int l, int t, int r, int b) {

         int realLeft = 0;

         int realTop = 0;

         int realRight = 0;

         int realBottom = 0;

         int count = getChildCount();

         View childView = null;

         MarginLayoutParams params = null;

         for (int i = 0; i < count; i++) {

             Log.e(TAG, "------------------------- i = " + i);

             childView = getChildAt(i);

             params = (MarginLayoutParams) childView.getLayoutParams();

             Log.d(TAG, "childView.getMeasuredWidth() = " + childView.getMeasuredWidth());

             Log.d(TAG, "childView.getMeasuredHeight() = " + childView.getMeasuredHeight());

             switch (i) {

                 case 0:

                     realLeft = l;

                     realTop = t;

                     realRight = realLeft + childView.getMeasuredWidth();

                     realBottom = realTop + childView.getMeasuredHeight();

                     break;

                 case 1:

                     realLeft = r - childView.getMeasuredWidth();

                     realTop = t;

                     realRight = realLeft + childView.getMeasuredWidth();

                     realBottom = realTop + childView.getMeasuredHeight();

                     break;

                 case 2:

                     realLeft = l;

                     realTop = b - childView.getMeasuredHeight();

                     realRight = realLeft + childView.getMeasuredWidth();

                     realBottom = realTop + childView.getMeasuredHeight();

                     break;

                 case 3:

                     realLeft = r - childView.getMeasuredWidth();

                     realTop = b - childView.getMeasuredHeight();

                     realRight = realLeft + childView.getMeasuredWidth();

                     realBottom = realTop + childView.getMeasuredHeight();

                     break;

                 default:

                     break;

             }

             childView.layout(realLeft, realTop, realRight, realBottom);

         }

     }

     @Override

     public ViewGroup.LayoutParams generateLayoutParams(AttributeSet attrs) {

         return new MarginLayoutParams(getContext(), attrs);

     }

 }
代码随手写的,有些问题考虑的还不够周全,各位自己完善吧~而且没有做注释,但是相信看完这三篇文章,不需要看注释了吧~
简单研究Android View绘制三 布局过程的更多相关文章
- 简单研究Android View绘制一 测量过程
2015-07-27 16:52:58 一.如何通过继承ViewGroup来实现自定义View?首先得搞清楚Android时如何绘制View的,参考Android官方文档:How Android Dr ...
- 简单研究Android View绘制二 LayoutParams
2015-07-28 17:23:20 本篇是关于LayoutParams相关 ViewGroup.LayoutParams文档解释如下: LayoutParams are used by views ...
- 源代码解析Android中View的layout布局过程
Android中的Veiw从内存中到呈如今UI界面上须要依次经历三个阶段:量算 -> 布局 -> 画图,关于View的量算.布局.画图的整体机制可參见博文 < Android中Vie ...
- Android View绘制过程
Android的View绘制是从根节点(Activity是DecorView)开始,他是一个自上而下的过程.View的绘制经历三个过程:Measure.Layout.Draw.基本流程如下图: per ...
- Android View 绘制过程
Android的View绘制是从根节点(Activity是DecorView)开始,他是一个自上而下的过程.View的绘制经历三个过程:Measure.Layout.Draw.基本流程如下图: per ...
- Android View绘制流程
框架分析 在之前的下拉刷新中,小结过触屏消息先到WindowManagerService(Wms)然后顺次传递给ViewRoot(派生自Handler),经decor view到Activity再传递 ...
- Android View绘制13问13答
1.View的绘制流程分几步,从哪开始?哪个过程结束以后能看到view? 答:从ViewRoot的performTraversals开始,经过measure,layout,draw 三个流程.draw ...
- Android View绘制和显示原理简介
现在越来越多的应用开始重视流畅度方面的测试,了解Android应用程序是如何在屏幕上显示的则是基础中的基础,就让我们一起看看小小屏幕中大大的学问.这也是我下篇文章--<Android应用流畅度测 ...
- Android View 绘制流程(Draw) 完全解析
前言 前几篇文章,笔者分别讲述了DecorView,measure,layout流程等,接下来将详细分析三大工作流程的最后一个流程——绘制流程.测量流程决定了View的大小,布局流程决定了View的位 ...
随机推荐
- Hibernate(开放源代码的对象关系映射框架)
Hibernate是一个开放源代码的对象关系映射框架,它对JDBC进行了非常轻量级的对象封装,它将POJO与数据库表建立映射关系,是一个全自动的orm框架,hibernate可以自动生成SQL语句,自 ...
- jquery.validate使用 - 常用验证脚本
一些常用的验证脚本 不会写js了,只能从网上找一些常用的验证脚本. // 手机号码验证jQuery.validator.addMethod("mobile", function(v ...
- Xcode8.0 去除控制台多余打印
选择Product->Scheme->Edit Scheme ...或者直接按 command + shift + < 快捷键,在弹出的窗口中Environment Variable ...
- JavaScript继承
最佳的继承范式 寄生组合继承 我们来看一下它的实现方式: function Object(o){ var TempObject = function(){}; TempObject.prototype ...
- js 定义方法的集中方式
1:调用关键字function来构造 如: function distance(x1,x2,y1,y2) { var dx = x2 - x1; var dy = y2 ...
- LTE Manual ——Logging(翻译)
LTE Manual ——Logging(翻译) (本文为个人学习笔记,如有不当的地方,欢迎指正!) 9 Logging ns-3 日志功能可以用于监测或调试仿真程序的进展.日志输出可以通过 ma ...
- Markdown学习和插件介绍
markdown能干啥 亲们github上的项目首页的 内容+样式,都是项目中README.md文件控制的.将md风格的代码,转化成html. 而且markdown语法非常简单,5-10分钟即可学会! ...
- 更改eclipse的Package Explorer的字体
说一个牛B的不像实力派的东西 — 更改eclipse的Package Explorer的字体1. 打开eclipse目录/Applications/Eclipse.app/Contents/Eclip ...
- 正则匹配中 ^ $ 和 \b 的区别
正则匹配中 ^ $ 和 \b 的区别 ^和$分别代表字符串的开始和结束,因此^\d$只能匹配包含一个数字的字符串\b代表单词边界,其前后必须是不同类型的字符,可以组成单词的字符为一种类型,不可 ...
- selenium提供了三种模式的断言:assert,verify,waitfor
Assert:失败时,该测试将终止 Verify:失败时,该测试继续执行,并将错误日志记录在日显示屏 Waitfor:等待某些条件变为真,一般使用在AJAX应用程序的测试 断言常用的有,具体见如下:a ...