SpringBoot整合Shiro 一:搭建环境
Java项目的安全框架一般使用 shiro 与 spring security
具体怎么选择可以参考文章:安全框架 Shiro 和 Spring Security 如何选择
我这里选择使用Shiro
环境搭建
创建SpringBoot项目
导入Maven依赖
<dependency>
<groupId>org.springframework.boot</groupId>
<artifactId>spring-boot-starter-web</artifactId>
</dependency>
<dependency>
<groupId>org.apache.shiro</groupId>
<artifactId>shiro-spring</artifactId>
<version>1.5.1</version>
</dependency>
<dependency>
<groupId>org.springframework.boot</groupId>
<artifactId>spring-boot-starter-thymeleaf</artifactId>
<version>2.2.5.RELEASE</version>
</dependency>
创建 Realm 类
需要继承 AuthorizingRealm
package com.zy.config;
import org.apache.shiro.authc.AuthenticationException;
import org.apache.shiro.authc.AuthenticationInfo;
import org.apache.shiro.authc.AuthenticationToken;
import org.apache.shiro.authz.AuthorizationInfo;
import org.apache.shiro.realm.AuthorizingRealm;
import org.apache.shiro.subject.PrincipalCollection;
public class UserRealm extends AuthorizingRealm {
//授权
@Override
protected AuthorizationInfo doGetAuthorizationInfo(PrincipalCollection principalCollection) {
System.out.println("执行了=>授权doGetAuthorizationInfo");
return null;
}
//认证
@Override
protected AuthenticationInfo doGetAuthenticationInfo(AuthenticationToken authenticationToken) throws AuthenticationException {
System.out.println("执行了=>认证doGetAuthenticationInfo");
return null;
}
}
Shiro配置类
步骤1
创建realm对象
//创建realm对象(步骤1)

 @Bean(name = "userRealm")

 public UserRealm userRealm(){

     return new UserRealm();

 }
步骤2
DefaultWebSecurityManager
--> import org.apache.shiro.web.mgt.DefaultWebSecurityManager;
//DefaultWebSecurityManager(步骤2)
@Bean(name = "defaultWebSecurityManager")
public DefaultWebSecurityManager defaultWebSecurityManager(@Qualifier("userRealm") UserRealm userRealm){
DefaultWebSecurityManager securityManager=new DefaultWebSecurityManager();
securityManager.setRealm(userRealm());
return securityManager;
}
步骤3
ShiroFilterFactoryBean
//ShiroFilterFactoryBean(步骤3)
@Bean(name = "shiroFilterFactoryBean")
//@Bean
public ShiroFilterFactoryBean shiroFilterFactoryBean(@Qualifier("defaultWebSecurityManager")DefaultWebSecurityManager defaultWebSecurityManager){
ShiroFilterFactoryBean bean=new ShiroFilterFactoryBean();
bean.setSecurityManager(defaultWebSecurityManager);
return bean;
}
ShiroConfig搭建完成
package com.zy.config;
import org.apache.shiro.spring.web.ShiroFilterFactoryBean;
import org.apache.shiro.web.mgt.DefaultWebSecurityManager;
import org.springframework.beans.factory.annotation.Qualifier;
import org.springframework.context.annotation.Bean;
import org.springframework.context.annotation.Configuration;
@Configuration
public class ShiroConfig {
//ShiroFilterFactoryBean(步骤3)
@Bean(name = "shiroFilterFactoryBean")
//@Bean
public ShiroFilterFactoryBean shiroFilterFactoryBean(@Qualifier("defaultWebSecurityManager")DefaultWebSecurityManager defaultWebSecurityManager){
ShiroFilterFactoryBean bean=new ShiroFilterFactoryBean();
bean.setSecurityManager(defaultWebSecurityManager);
return bean;
}
//DefaultWebSecurityManager(步骤2)
@Bean(name = "defaultWebSecurityManager")
public DefaultWebSecurityManager defaultWebSecurityManager(@Qualifier("userRealm") UserRealm userRealm){
DefaultWebSecurityManager securityManager=new DefaultWebSecurityManager();
securityManager.setRealm(userRealm());
return securityManager;
}
//创建realm对象(步骤1)
@Bean(name = "userRealm")
public UserRealm userRealm(){
return new UserRealm();
}
}
Controller
首先是index页面
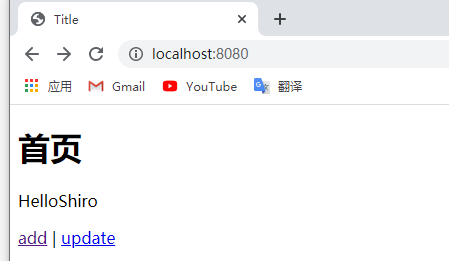
index.html
<!DOCTYPE html>
<html lang="en" xmlns:th="http://www.thymeleaf.org"
xmlns:shiro="http://www.thymeleaf.org/thymeleaf-extras-shiro">
<head>
<meta charset="UTF-8">
<title>Title</title>
</head>
<body>
<h1>首页</h1>
<p th:text="${msg}"></p>
<a th:href="@{/user/add}">add</a> | <a th:href="@{/user/update}">update</a>
</body>
</html>
对应Controller
@RequestMapping({"/","/index"})
public String toIndex(Model model){
model.addAttribute("msg","HelloShiro");
return "index";
}
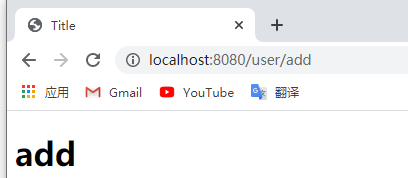
add页面
add.html
<!DOCTYPE html>
<html lang="en">
<head>
<meta charset="UTF-8">
<title>Title</title>
</head>
<body>
<h1>add</h1>
</body>
</html>
对应Controller
@RequestMapping("/user/add")
public String add(){
return "user/add";
}
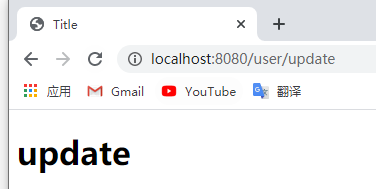
update页面
update.html
<!DOCTYPE html>
<html lang="en">
<head>
<meta charset="UTF-8">
<title>Title</title>
</head>
<body>
<h1>update</h1>
</body>
</html>
对应Controller
@RequestMapping("/user/update")
public String update(){
return "user/update";
}
MyController(总)
package com.zy.controller;
import org.springframework.stereotype.Controller;
import org.springframework.ui.Model;
import org.springframework.web.bind.annotation.RequestMapping;
@Controller
public class MyController {
@RequestMapping({"/","/index"})
public String toIndex(Model model){
model.addAttribute("msg","HelloShiro");
return "index";
}
@RequestMapping("/user/add")
public String add(){
return "user/add";
}
@RequestMapping("/user/update")
public String update(){
return "user/update";
}
}
测试
index界面
add界面
update界面
测试成功,搭建完成
SpringBoot整合Shiro 一:搭建环境的更多相关文章
- SpringBoot整合Shiro实现基于角色的权限访问控制(RBAC)系统简单设计从零搭建
SpringBoot整合Shiro实现基于角色的权限访问控制(RBAC)系统简单设计从零搭建 技术栈 : SpringBoot + shiro + jpa + freemark ,因为篇幅原因,这里只 ...
- SpringBoot整合Shiro+MD5+Salt+Redis实现认证和动态权限管理(上)----筑基中期
写在前面 通过前几篇文章的学习,我们从大体上了解了shiro关于认证和授权方面的应用.在接下来的文章当中,我将通过一个demo,带领大家搭建一个SpringBoot整合Shiro的一个项目开发脚手架, ...
- SpringBoot整合Shiro 四:认证+授权
搭建环境见: SpringBoot整合Shiro 一:搭建环境 shiro配置类见: SpringBoot整合Shiro 二:Shiro配置类 shiro整合Mybatis见:SpringBoot整合 ...
- SpringBoot整合Shiro 三:整合Mybatis
搭建环境见: SpringBoot整合Shiro 一:搭建环境 shiro配置类见: SpringBoot整合Shiro 二:Shiro配置类 整合Mybatis 添加Maven依赖 mysql.dr ...
- SpringBoot整合Shiro 二:Shiro配置类
环境搭建见上篇:SpringBoot整合Shiro 一:搭建环境 Shiro配置类配置 shiro的配置主要集中在 ShiroFilterFactoryBean 中 关于权限: anon:无需认证就可 ...
- 补习系列(6)- springboot 整合 shiro 一指禅
目标 了解ApacheShiro是什么,能做什么: 通过QuickStart 代码领会 Shiro的关键概念: 能基于SpringBoot 整合Shiro 实现URL安全访问: 掌握基于注解的方法,以 ...
- SpringBoot系列十二:SpringBoot整合 Shiro
声明:本文来源于MLDN培训视频的课堂笔记,写在这里只是为了方便查阅. 1.概念:SpringBoot 整合 Shiro 2.具体内容 Shiro 是现在最为流行的权限认证开发框架,与它起名的只有最初 ...
- springboot整合Shiro功能案例
Shiro 核心功能案例讲解 基于SpringBoot 有源码 从实战中学习Shiro的用法.本章使用SpringBoot快速搭建项目.整合SiteMesh框架布局页面.整合Shiro框架实现用身份认 ...
- SpringBoot 整合Shiro 一指禅
目标 了解ApacheShiro是什么,能做什么: 通过QuickStart 代码领会 Shiro的关键概念: 能基于SpringBoot 整合Shiro 实现URL安全访问: 掌握基于注解的方法,以 ...
- SpringBoot整合Shiro+MD5+Salt+Redis实现认证和动态权限管理|前后端分离(下)----筑基后期
写在前面 在上一篇文章<SpringBoot整合Shiro+MD5+Salt+Redis实现认证和动态权限管理(上)----筑基中期>当中,我们初步实现了SpringBoot整合Shiro ...
随机推荐
- 《手把手教你》系列技巧篇(三十五)-java+ selenium自动化测试-单选和多选按钮操作-下篇(详解教程)
1.简介 今天这一篇宏哥主要是讲解一下,如何使用list容器来遍历多选按钮.大致两部分内容:一部分是宏哥在本地弄的一个小demo,另一部分,宏哥是利用JQueryUI网站里的多选按钮进行实战. 2.d ...
- 高并发场景下JVM调优实践之路
一.背景 2021年2月,收到反馈,视频APP某核心接口高峰期响应慢,影响用户体验. 通过监控发现,接口响应慢主要是P99耗时高引起的,怀疑与该服务的GC有关,该服务典型的一个实例GC表现如下图: 可 ...
- python 修饰器(decorator)
转载:Python之修饰器 - 知乎 (zhihu.com) 什么是修饰器,为什么叫修饰器 修饰器英文是Decorator, 我们假设这样一种场景:古老的代码中有几个很是复杂的函数F1.F2.F3.. ...
- 双栈排序 牛客网 程序员面试金典 C++ Python
双栈排序 牛客网 程序员面试金典 C++ Python 题目描述 请编写一个程序,按升序对栈进行排序(即最大元素位于栈顶),要求最多只能使用一个额外的栈存放临时数据,但不得将元素复制到别的数据结构中. ...
- Python ImportError: No module named '_tkinter', please install the python3-tk package
ImportError: No module named '_tkinter', please install the python3-tk package 这个问题的原因是使用的python3环境内 ...
- hdu 1058 Humble Numbers(构造?枚举?)
题意: 一个数的质因子如果只是2,3,5,7中的若干个.则这个数叫做humble number. 例如:1, 2, 3, 4, 5, 6, 7, 8, 9, 10, 12, 14, 15, 16, 1 ...
- K8s 离线集群部署(二进制包无dashboard)
https://www.cnblogs.com/cocowool/p/install_k8s_offline.html https://www.jianshu.com/p/073577bdec98 h ...
- 了解一下Git的常用语句
简单学习了一下Git,整理了一点常用语句 http连接 git clone https://仓库地址 连接githup cd shop 进入文件夹 git config --global user.n ...
- springboot利用mock进行junit单元测试,测试controller
1 spring-boot-starter-test内置mockito,添加pom依赖 <dependency> <groupId>org.springframework.b ...
- Merge into用法总结
简单的说就是,判断表中有没有符合on()条件中的数据,有了就更新数据,没有就插入数据. 有一个表T,有两个字段a.b,我们想在表T中做Insert/Update,如果条件满足,则更新T中b的值,否则在 ...