MRCTF My secret
My secret
知识点:wireshark基本操作,shadowsocks3.0源码利用,拼图(os脚本编写能力),
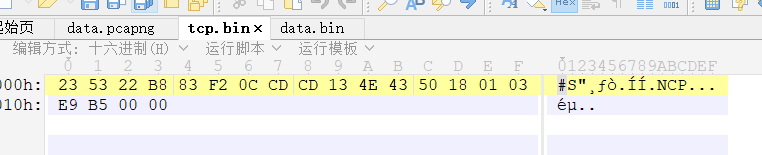
根据这里的信息可以知道,tcp所传输的源数据是在target address后面的数据。那么我们现在去寻找target address(即wireshark中的Destination)
那么我们已经找到了,即第一张图中的2f 5e ca a8。我们取走后面的数据存储为文件。
通过导出字节流文件可以得到一下两个文件
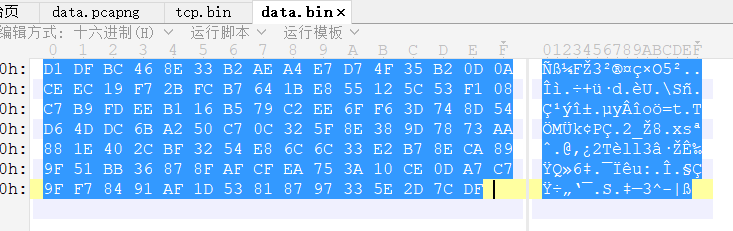
通过010拿走16进制编码数然后进行解密。
D1 DF BC 46 8E 33 B2 AE A4 E7 D7 4F 35 B2 0D 0A

CE EC 19 F7 2B FC B7 64 1B E8 55 12 5C 53 F1 08

C7 B9 FD EE B1 16 B5 79 C2 EE 6F F6 3D 74 8D 54

D6 4D DC 6B A2 50 C7 0C 32 5F 8E 38 9D 78 73 AA

88 1E 40 2C BF 32 54 E8 6C 6C 33 E2 B7 8E CA 89

9F 51 BB 36 87 8F AF CF EA 75 3A 10 CE 0D A7 C7

9F F7 84 91 AF 1D 53 81 87 97 33 5E 2D 7C DF
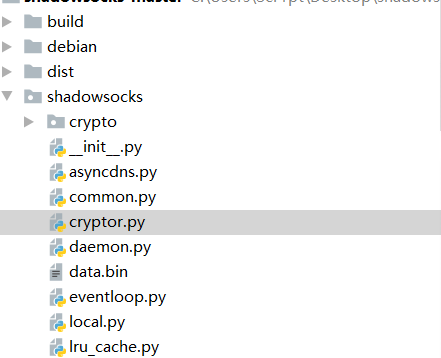
那么我的思路在这里就停滞了。经过师傅的提醒和帮助下,我下载了shadowsocks3.0版本的源码(python版),然后很容易找到一个显眼的cryptor.py文件。(这里有一个误区,如果你下载到的源码中没有题目所示的aes-256-gcm加密方法,后续是无法进行解密的。因此需要下载到相应的版本的shadowsocks3.0)
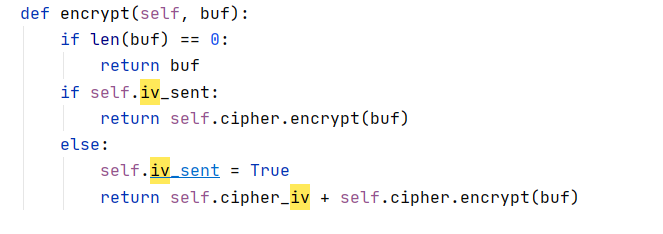
我们仔细看一下这个加密的算法。
加密算法如下。当设置了iv_sent时进行iv的设置,false时不设置iv
然后发现这里是自带decrypt函数的。那么数据包解密就简单多了。
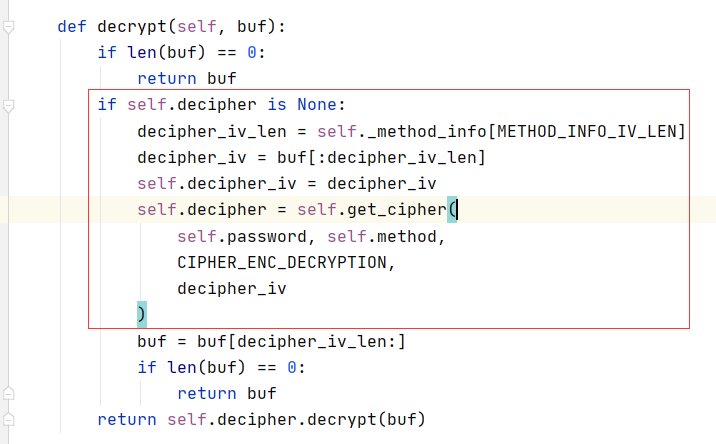
这个函数对数据进行了iv的判断和提取。我们只需要传入完整的数据包进行解密就可以了。
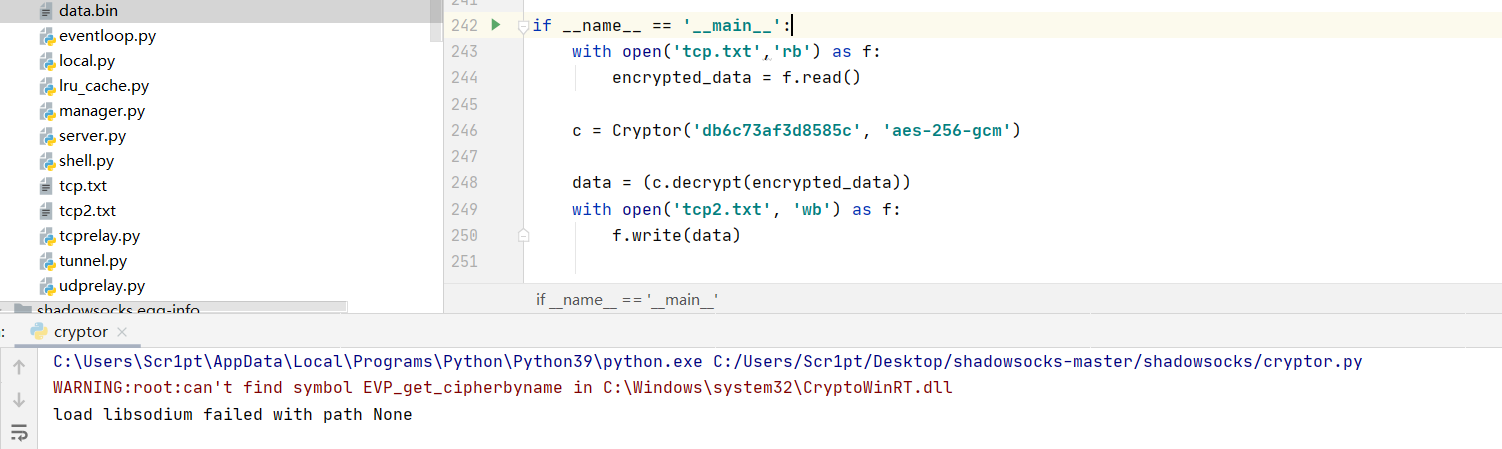
with open('tcp.txt','rb') as f:

    encrypted_data = f.read()

c = Cryptor('db6c73af3d8585c', 'aes-256-gcm')

data = (c.decrypt(encrypted_data))

with open('tcp2.txt', 'wb') as f:

    f.write(data)
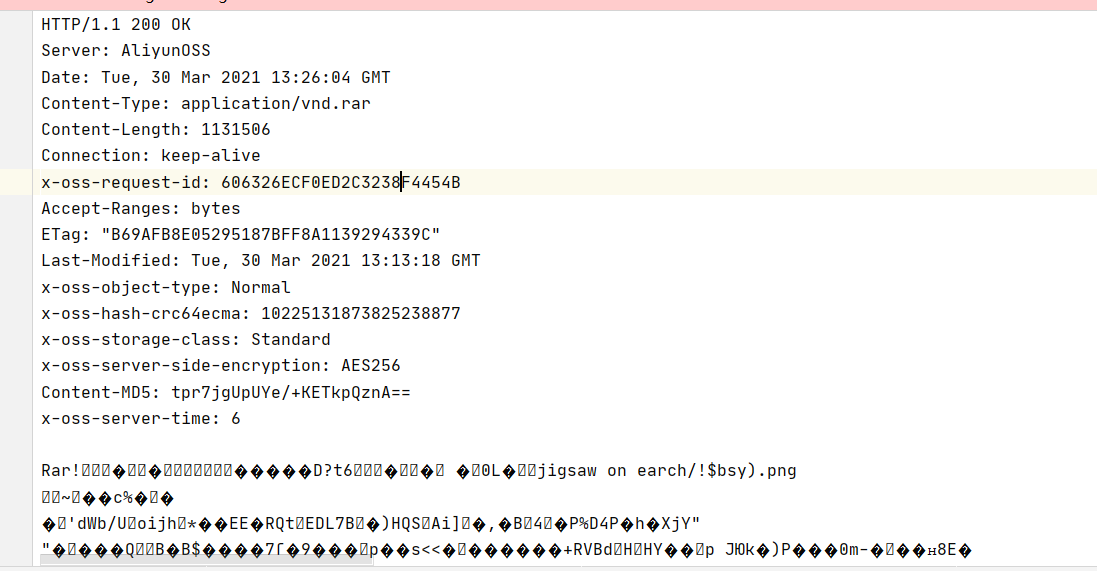
对数据进行解密,然后就可以在tcp2.txt中看到我们想要看到的数据包了!
那么数据该提取哪一部分呢?红色部分或者蓝色部分。也就是请求部分和响应部分。
拿到压缩包后就是一个2500个图片的拼图题。hint为gps。
我们在exiftool中可以找到图片的gps值。编写脚本进行提取并修改名字。(我写的脚本)
import os

import re

path = r"/root/Desktop/jigsaw on earch"  # 文件夹目录

files = os.listdir(path)  # 得到文件夹下的所有文件名称

for file in files:  # 遍历文件夹

	cmd=r"exiftool {0} | grep GPS\ Position".format(re.escape(file))

	#print(cmd)

	#print(file)

	gpsTemp = os.popen(cmd).read()

	for i in range(len(gpsTemp)):

		if gpsTemp[i]==':':

			num1 = int(gpsTemp[i+2:i+4].strip())

		if gpsTemp[i] == ',':

			num2 = int(gpsTemp[i+2:i+4].strip())

	fileName = num1*50+num2

	cmdNext = "mv {0} {1}\.png".format(re.escape(file),fileName)

	#print(cmdNext)

	os.system(cmdNext)

	#print(num1*50+num2)

	#print(gpsTemp)
后面拼图脚本不会写了。
师傅放了wp出来。看了一下,真复杂。看不懂。先进行rename
import os

import piexif

from PIL import Image

file = os.listdir('jigsaw')

def calc_file(x, y):

    num = str(y * 50 + x).zfill(4)

    return f'jigsaw/{num}.png'

for i in file:

    img = Image.open(f'jigsaw/{i}')

    exif_dict = piexif.load(img.info['exif'])

    img.close()

    latitude = exif_dict['GPS'][piexif.GPSIFD.GPSLatitude]

    longtitude = exif_dict['GPS'][piexif.GPSIFD.GPSLongitude]

    y = latitude[0][0]

    x = longtitude[0][0]

    file = calc_file(x, y)

    os.rename(f'jigsaw/{i}', file)
然后利用拼图脚本进行拼图
from PIL import Image

from tqdm import tqdm

x_sum = 50

y_sum = 50

ori_width = 60

ori_height = 60

jigsaw_width = 20

width = ori_width + jigsaw_width * 2

height = ori_height + jigsaw_width * 2

def calc_file(x, y):

    num = str(y * x_sum + x).zfill(4)

    return f'jigsaw/{num}.png'

def check_info(file):

    img_info = [0, 0, 0, 0]

    img = Image.open(file)

    pix_out1 = img.getpixel((width // 2, 0))[3]

    pix_out2 = img.getpixel((width - 1, height // 2))[3]

    pix_out3 = img.getpixel((width // 2, height - 1))[3]

    pix_out4 = img.getpixel((0, height // 2))[3]

    pix_out = [pix_out1, pix_out2, pix_out3, pix_out4]

    pix_in1 = img.getpixel((width // 2, jigsaw_width))[3]

    pix_in2 = img.getpixel((width - jigsaw_width - 1, height // 2))[3]

    pix_in3 = img.getpixel((width // 2, height - jigsaw_width - 1))[3]

    pix_in4 = img.getpixel((jigsaw_width, height // 2))[3]

    pix_in = [pix_in1, pix_in2, pix_in3, pix_in4]

    for i in range(4):

        if pix_out[i] == 0 and pix_in[i] == 0:

            img_info[i] = -1

        elif pix_out[i] != 0 and pix_in[i] != 0:

            img_info[i] = 1

        elif pix_out[i] == 0 and pix_in[i] != 0:

            img_info[i] = 0

        else:

            raise Exception("Invalid jigsaw!", file)

    return img_info

def init_table():

    info_table = []

    for y in range(y_sum):

        row_info = []

        for x in range(x_sum):

            file = calc_file(x, y)

            img_info = check_info(file)

            row_info.append(img_info)

        info_table.append(row_info)

    return info_table

def cut(direction, file):

    if direction == 0:

        left_top_x = (ori_width - jigsaw_width) // 2 + jigsaw_width

        left_top_y = 0

    elif direction == 1:

        left_top_x = ori_width + jigsaw_width

        left_top_y = (ori_height - jigsaw_width) // 2 + jigsaw_width

    elif direction == 2:

        left_top_x = (ori_width - jigsaw_width) // 2 + jigsaw_width

        left_top_y = ori_height + jigsaw_width

    elif direction == 3:

        left_top_x = 0

        left_top_y = (ori_height - jigsaw_width) // 2 + jigsaw_width

    right_bottom_x = left_top_x + jigsaw_width

    right_bottom_y = left_top_y + jigsaw_width

    img = Image.open(file)

    cut_img = img.crop((left_top_x, left_top_y, right_bottom_x, right_bottom_y))

    blank_img = Image.new('RGBA', (jigsaw_width, jigsaw_width), (0, 0, 0, 0))

    img.paste(blank_img, (left_top_x, left_top_y))

    img.save(file)

    return cut_img

def paste(direction, file, cut_img):

    if direction == 0:

        left_top_x = (ori_width - jigsaw_width) // 2 + jigsaw_width

        left_top_y = jigsaw_width

    elif direction == 1:

        left_top_x = ori_width

        left_top_y = (ori_height - jigsaw_width) // 2 + jigsaw_width

    elif direction == 2:

        left_top_x = (ori_width - jigsaw_width) // 2 + jigsaw_width

        left_top_y = ori_height

    elif direction == 3:

        left_top_x = jigsaw_width

        left_top_y = (ori_height - jigsaw_width) // 2 + jigsaw_width

    img = Image.open(file)

    img.paste(cut_img, (left_top_x, left_top_y))

    img.save(file)

def recover_jigsaw(info_table):

    for y in tqdm(range(y_sum)):

        for x in range(x_sum):

            img_info = info_table[y][x]

            for direction in range(4):

                if img_info[direction] != 'free':

                    file = calc_file(x, y)

                    if direction == 0:

                        x2 = x

                        y2 = y - 1

                        file2 = calc_file(x2, y2)

                        direction2 = 2

                    elif direction == 1:

                        x2 = x + 1

                        y2 = y

                        file2 = calc_file(x2, y2)

                        direction2 = 3

                    elif direction == 2:

                        x2 = x

                        y2 = y + 1

                        file2 = calc_file(x2, y2)

                        direction2 = 0

                    elif direction == 3:

                        x2 = x - 1

                        y2 = y

                        file2 = calc_file(x2, y2)

                        direction2 = 1

                    if img_info[direction] == 1:

                        cut_img = cut(direction, file)

                        paste(direction2, file2, cut_img)

                    elif img_info[direction] == -1:

                        cut_img = cut(direction2, file2)

                        paste(direction, file, cut_img)

                    info_table[y2][x2][direction2] = 'free'

                    img_info[direction] = 'free'

def remove_border(file):

    img = Image.open(file)

    new_img = img.crop((jigsaw_width, jigsaw_width, width - jigsaw_width, height - jigsaw_width))

    new_img.save(file)

if __name__ == '__main__':

    info_table = init_table()

    recover_jigsaw(info_table)

    for i in range(x_sum * y_sum):

        file = 'jigsaw/' + str(i).zfill(4) + '.png'

        remove_border(file)

扫描后得到flag
MRCTF{795c666e-6244-4768-981d-3b******2c}
MRCTF My secret的更多相关文章
- Android Secret Code
我们很多人应该都做过这样的操作,打开拨号键盘输入*#*#4636#*#*等字符就会弹出一个界面显示手机相关的一些信息,这个功能在Android中被称为android secret code,除了这些系 ...
- ASP.NET OAuth:access token的加密解密,client secret与refresh token的生成
在 ASP.NET OWIN OAuth(Microsoft.Owin.Security.OAuth)中,access token 的默认加密方法是: 1) System.Security.Crypt ...
- Lucky 2048 - The secret of being lucky
Lucky 2048 uses a normal distribution to create "lucky" start. Generally speaking, it prov ...
- Secret Codes
Secret Codes This is a list of codes that can be entered into the dialer to output the listed info ...
- 微信企业号开发之-如何获取secret 序列号
最近有项目基于微信企业号开发,简单记录下如何查看企业号secert 工具/原料 微信企业号 方法/步骤 用管理员的帐号登录后,选择[设置]-[权限管理]进入管理组设置界面 在左边点击[ ...
- hdu.1111.Secret Code(dfs + 秦九韶算法)
Secret Code Time Limit: 2000/1000 MS (Java/Others) Memory Limit: 65536/32768 K (Java/Others) Tota ...
- 2078 Problem H Secret Message 中石油-未提交-->已提交
题目描述 Jack and Jill developed a special encryption method, so they can enjoy conversations without wo ...
- Rails4 中 因为secret key 引起在production环境下无法运行
错误信息 Missing `secret_key_base` for 'production' environment, set this value in `config/secrets.yml` ...
- URAL 1932 The Secret of Identifier 题解
http://acm.timus.ru/problem.aspx?space=1&num=1932 B - The Secret of Identifier Time Limit:1000MS ...
随机推荐
- taro coding specification
taro coding specification https://nervjs.github.io/taro/docs/spec-for-taro.html 跨平台开发 https://nervjs ...
- Bootstrap5 多级dropdown
<div class="dropdown"> <a class="btn dropdown-toggle"> Dropdown link ...
- web performance optimise & css
web performance optimise & css 俄罗斯套娃 clients hints https://cloudinary.com/blog/automatic_respons ...
- 智能合约稳定币USDN的价值在哪里?
近几年来,区块链和数字货币市场快速发展,客观上需要价格相对稳定的交易媒介和贮藏手段,从而推动以链上资产或链下资产抵押型稳定币和算法型稳定币出现,以实现币价相对稳定的数字货币.市场上开始出现了诸如USD ...
- 实现TensorRT-7.0插件自由!(如果不踩坑使用TensorRT插件功能)
本系列为新TensorRT的第一篇,为什么叫新,因为之前已经写了两篇关于TensorRT的文章,是关于TensorRT-5.0版本的.好久没写关于TensorRT的文章了,所幸就以新来开头吧~ 接下来 ...
- Maven的-pl -am -amd参数
本文转载自Maven的-pl -am -amd参数学习 昨天maven的deploy任务需要只选择单个模块并且把它依赖的模块一起打包,第一时间便想到了-pl参数,然后就开始处理,但是因为之前只看了一下 ...
- Flutter 中不得不会的 mixin
mixin 是 Dart 中非常重要的概念,对于未接触过此概念的Coder来说尤其重要,最近看源码的时候,由于对 mixin 不熟悉导致理解出现偏差,走了很多弯路,所以这篇文章介绍一下 mixin 概 ...
- KMP算法,你想知道的都在这里!
简洁 我相信很多人都听说过KMP算法(PS:在上数据结构的时候,这个算法自始至终都没想明白) 大家也知道KMP算法是用来寻找目标子串的算法,但是都没有真正搞懂KMP.之前,我也是如此,我疑惑的有: N ...
- apiAutoTest:支持自定义函数,用例中可调用
0. 前言 apiAutoTest从去年8月以来开源至今,也更新了不少内容,一起来看看吧 第一个版本 - 2020/08/08 增加实际响应存储数据的方法,并在字典可以处理依赖见tools/svae_ ...
-
转: 微信已支持发送最大 200MB 的视频了,并且不会被压缩 来自腾讯微信团队的视频消息,目前 iOS 版本的微信已支持发送最大 200MB 的视频与图片了,并且不会被压缩.安卓版本未来一段时间会支 ...