spring-cloud-oauth2 认证授权
什么是OAuth2?
OAuth2是一个关于授权的开放标准,核心思路是通过各类认证手段(具体什么手段OAuth2不关心)认证用户身份,并颁发token(令牌),使得第三方应用可以使用该令牌在限定时间、限定范围访问指定资源。主要涉及的RFC规范有RFC6749(整体授权框架),RFC6750(令牌使用),RFC6819(威胁模型)这几个,一般我们需要了解的就是RFC6749。获取令牌的方式主要有四种,分别是授权码模式,简单模式,密码模式和客户端模式。这里要先明确几个OAuth2中的几个重要概念:
- resource_owner : 拥有被访问资源的用户
- user-agent: 一般来说就是浏览器
- client : 第三方应用
- Authorization server : 认证服务器,用来进行用户认证并颁发token
- Resource server: 资源服务器,拥有被访问资源的服务器,需要通过token来确定是否有权限访问
我们在浏览器端或者APP端做登录的时候时常会遇到 QQ登录、微信登陆、微博登录 等等。这一类称之为第三方登录。在APP端 往往会采用OAuth2。以QQ登录为准,通常是点击了QQ登录,首先跳转到QQ登录授权页面进行扫码授权。然后跳回原来网页设定好的一个回调地址。这其实就完成了OAuth的整个授权流程。OAuth在"客户端"与"服务提供商"之间,设置了一个授权层(authorization layer)。"客户端"不能直接登录"服务提供商",只能登录授权层,以此将用户与客户端区分开来。"客户端"登录授权层所用的令牌(token),与用户的密码不同。用户可以在登录的时候,指定授权层令牌的权限范围和有效期。"客户端"登录授权层以后,"服务提供商"根据令牌的权限范围和有效期,向"客户端"开放用户储存的资料。
OAuth2 运行流程:
OAuth 2.0的运行流程如下图,摘自RFC6749。
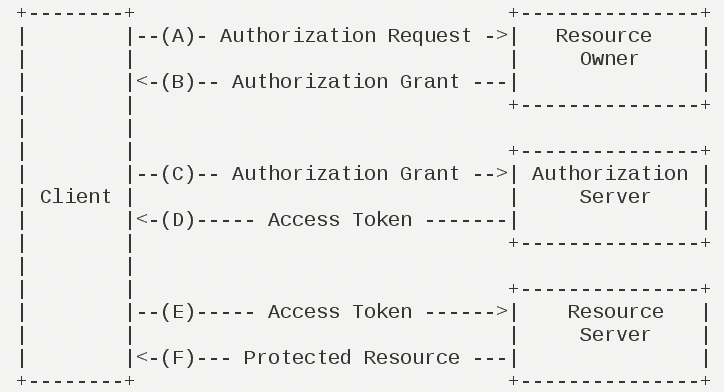
- 用户打开客户端以后,客户端要求用户给予授权。( QQ登录跳转到授权页面)
- 用户同意给予客户端授权。 (用户扫码确定授权)
- 客户端使用上一步获得的授权,向认证服务器申请令牌。(跳转到回调地址,且携带一个 code )
- 认证服务器对客户端进行认证以后,确认无误,同意发放令牌。 (通过上一步得到的code 进行授权码认证)
- 客户端使用令牌,向资源服务器申请获取资源。 (用换取到的 access_token 进行访问资源)
- 资源服务器确认令牌无误,同意向客户端开放资源。 (token 认证通过 返回数据)。
授权方式:
客户端必须得到用户的授权(authorization grant),才能获得令牌(access token)。OAuth 2.0定义了四种授权方式。
- 授权码模式(authorization code)
- 简化模式(implicit)
- 密码模式(resource owner password credentials)
- 客户端模式(client credentials)
本文主要介绍 授权码模式 跟 密码模式。
授权认证服务实现:
搭建认证服务 Authorization server:
1.导入依赖(包括后续要用到的一些依赖),这里 springboot 2.0.1 、springCloud 版本为 Finchley.SR3:
<dependencies>

        <dependency>

            <groupId>org.springframework.cloud</groupId>

            <artifactId>spring-cloud-starter-oauth2</artifactId>

        </dependency>

        <!-- https://mvnrepository.com/artifact/org.springframework.cloud/spring-cloud-starter-security -->

        <dependency>

            <groupId>org.springframework.cloud</groupId>

            <artifactId>spring-cloud-starter-security</artifactId>

            <version>2.2.1.RELEASE</version>

        </dependency>

        <dependency>

            <groupId>com.alibaba</groupId>

            <artifactId>fastjson</artifactId>

        </dependency>

        <dependency>

            <groupId>commons-lang</groupId>

            <artifactId>commons-lang</artifactId>

            <version>2.6</version>

        </dependency>

        <dependency>

            <groupId>commons-collections</groupId>

            <artifactId>commons-collections</artifactId>

            <version>3.2.1</version>

        </dependency>

        <dependency>

            <groupId>org.springframework.boot</groupId>

            <artifactId>spring-boot-starter-data-redis</artifactId>

        </dependency>

        <dependency>

            <groupId>org.springframework.session</groupId>

            <artifactId>spring-session-data-redis</artifactId>

        </dependency>

        <dependency>

            <groupId>org.springframework.security.oauth</groupId>

            <artifactId>spring-security-oauth2</artifactId>

            <version>2.3.3.RELEASE</version>

        </dependency>

        <dependency>

            <groupId>io.jsonwebtoken</groupId>

            <artifactId>jjwt</artifactId>

            <version>0.7.0</version>

        </dependency>

    </dependencies>
2. 认证服务器配置,要实现认证服务器其实很简单,只要打上 @EnableAuthorizationServer 注解,然后继承 AuthorizationServerConfigurerAdapter 进行一些简单的配置即可。
@Configuration

@EnableAuthorizationServer

public class WuzzAuthorizationServerConfig extends AuthorizationServerConfigurerAdapter {

    //http://localhost:8766/oauth/authorize?client_id=wuzzClientId&response_type=code&redirect_uri=http://www.baidu.com&scope=all

    @Override

    public void configure(ClientDetailsServiceConfigurer clients) throws Exception {

        clients.inMemory().withClient("wuzzClientId")//客户端得ID,比如我们在QQ互联中心申请得。可以写多个。配置 循环

                .secret(passwordEncoder().encode("wuzzSecret")) // 客户端密钥,需要进行加密

                .accessTokenValiditySeconds(7200)// token 有效时常  0 永久有效

                .authorizedGrantTypes("password", "implicit", "refresh_token", "authorization_code")// 支持得授权类型

                .redirectUris("http://www.baidu.com")//回调地址

                .scopes("all", "read", "write");//拥有的 scope  可选

    }

    @Override

    public void configure(AuthorizationServerEndpointsConfigurer endpoints) throws Exception {

        endpoints.userDetailsService(userDetailsService()) // 用户信息得服务,一版是都数据库

                .authenticationManager(authenticationManager())// 认证管理器。

                .allowedTokenEndpointRequestMethods(HttpMethod.GET, HttpMethod.POST);

    }

    @Override

    public void configure(AuthorizationServerSecurityConfigurer security) throws Exception {

        security.allowFormAuthenticationForClients()//允许表单登录

                .checkTokenAccess("permitAll()"); //开启/oauth/check_token验证端口认证权限访问

    }

    @Bean // 注入认证管理器

    public AuthenticationManager authenticationManager() {

        AuthenticationManager authenticationManager = new AuthenticationManager() {

            @Override

            public Authentication authenticate(Authentication authentication) throws AuthenticationException {

                return daoAuthenticationProvider().authenticate(authentication);

            }

        };

        return authenticationManager;

    }

    @Bean//注入认证器

    public AuthenticationProvider daoAuthenticationProvider() {

        DaoAuthenticationProvider daoAuthenticationProvider = new DaoAuthenticationProvider();

        daoAuthenticationProvider.setUserDetailsService(userDetailsService());

        daoAuthenticationProvider.setHideUserNotFoundExceptions(false);

        daoAuthenticationProvider.setPasswordEncoder(passwordEncoder());

        return daoAuthenticationProvider;

    }

    @Bean//注入 用户信息服务

    public UserDetailsService userDetailsService() {

        return new MyUserDetailService();

    }

    @Bean//注入密码加密

    public PasswordEncoder passwordEncoder() {

        return new BCryptPasswordEncoder();

    }

}
3.由于 OAuth2 依赖于 Security 得配置,所以我们这里还需要配置一下 Security :
@Configuration

public class WebSecurityConfig extends WebSecurityConfigurerAdapter {

    @Override

    protected void configure(HttpSecurity http) throws Exception {

        http.authorizeRequests().antMatchers("/**").fullyAuthenticated().and().httpBasic();

    }

}
4.自定义的用户信息服务类,由于Oauth 的用户需要有个 ROLE_USER 角色 才可以访问,所以这里写死。
public class MyUserDetailService implements UserDetailsService {

    private Logger logger = LoggerFactory.getLogger(getClass());

    @Autowired

    private PasswordEncoder passwordEncoder;

    @Override

    public UserDetails loadUserByUsername(String username) throws UsernameNotFoundException {

        logger.info("表单登录用户名:" + username);

        // 根据用户名查找用户信息

        //根据查找到的用户信息判断用户是否被冻结

        String password = passwordEncoder.encode("123456");

        logger.info("数据库密码是:" + password);

        return new User(username, password,

                true, true, true, true,

                AuthorityUtils.commaSeparatedStringToAuthorityList("admin,ROLE_USER"));

    }

}
5.启动主类即可进行访问。
授权码模式:
授权码需要访问接口 : http://localhost:8766/oauth/authorize?client_id=wuzzClientId&response_type=code&redirect_uri=http://www.baidu.com&scope=all
其中 client_id 为认证服务器为每个对接的第三方提供的唯一ID。response_type 返回类型,写死为 code 。redirect_uri 回调地址。
访问该地址,如果用户当前未登录将会跳转到用户登录页面进行登录。然后将会跳转到下面这个页面。询问用户是否为 wuzzClientId这个应用授权。

点击授权,将会跳转到回调地址页,由于没有备案域名,这里直接跳到百度:
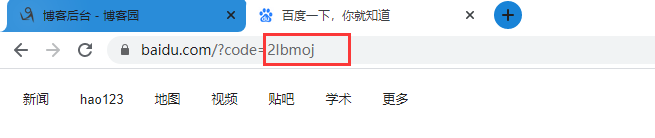
可以看到这里后面携带了 一个 code 参数,这个参数就是认证服务器为第三方提供的授权码。然后再用这个授权码去换取 access_token。我这里就用 postman 进行测试:
换取 access_token得地址为 /oauth/token,首先需要填入认证服务器颁发的 clientId、client-secret
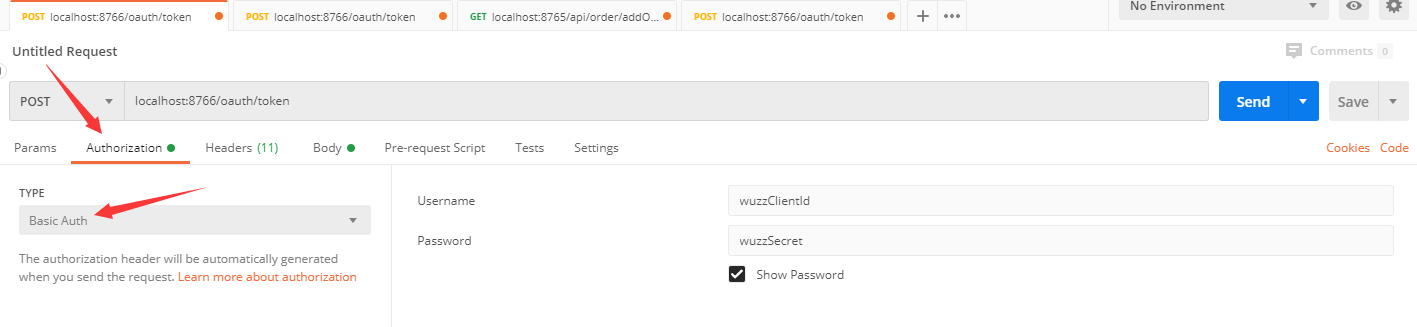
然后填写参数 ,发送请求。注意这里前三个参数是必填的。
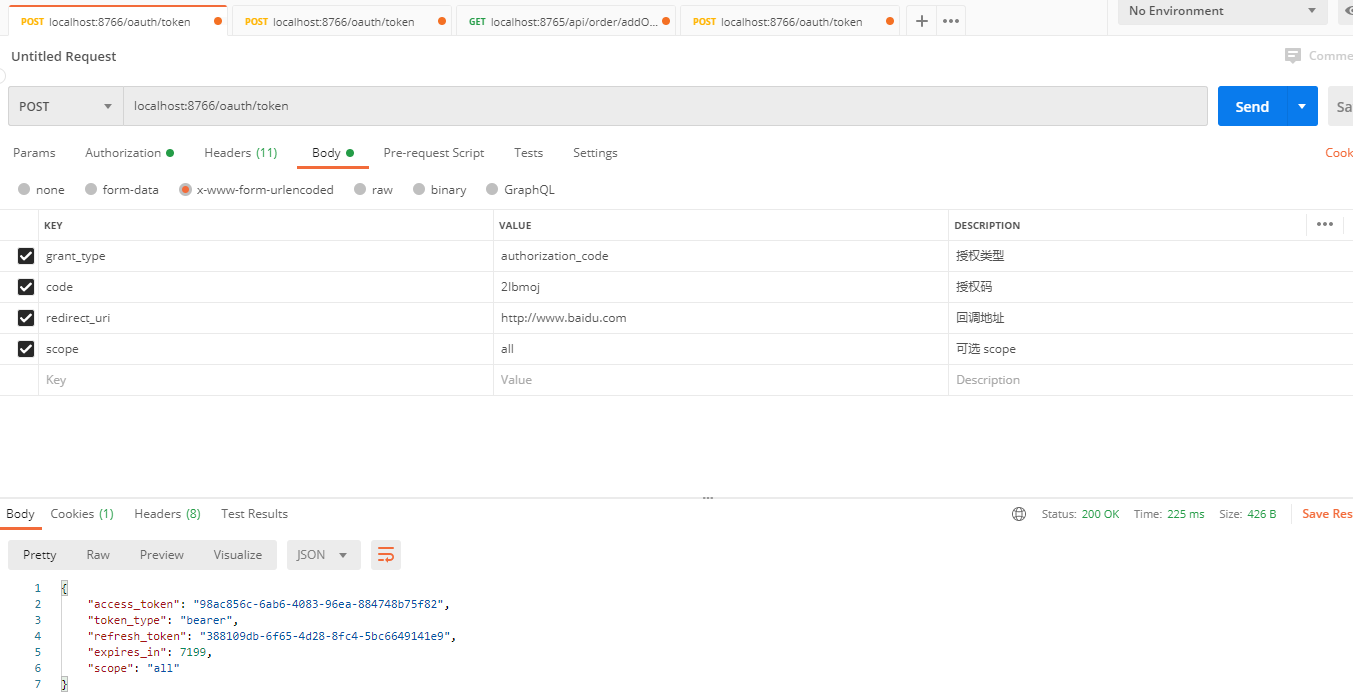
可以看到这样就可以成功的获取到 access_token 了。然后第三方用户就可以通过这个 token 去资源服务器上获取授权的用户信息了。后续会提到这个token 怎么用。
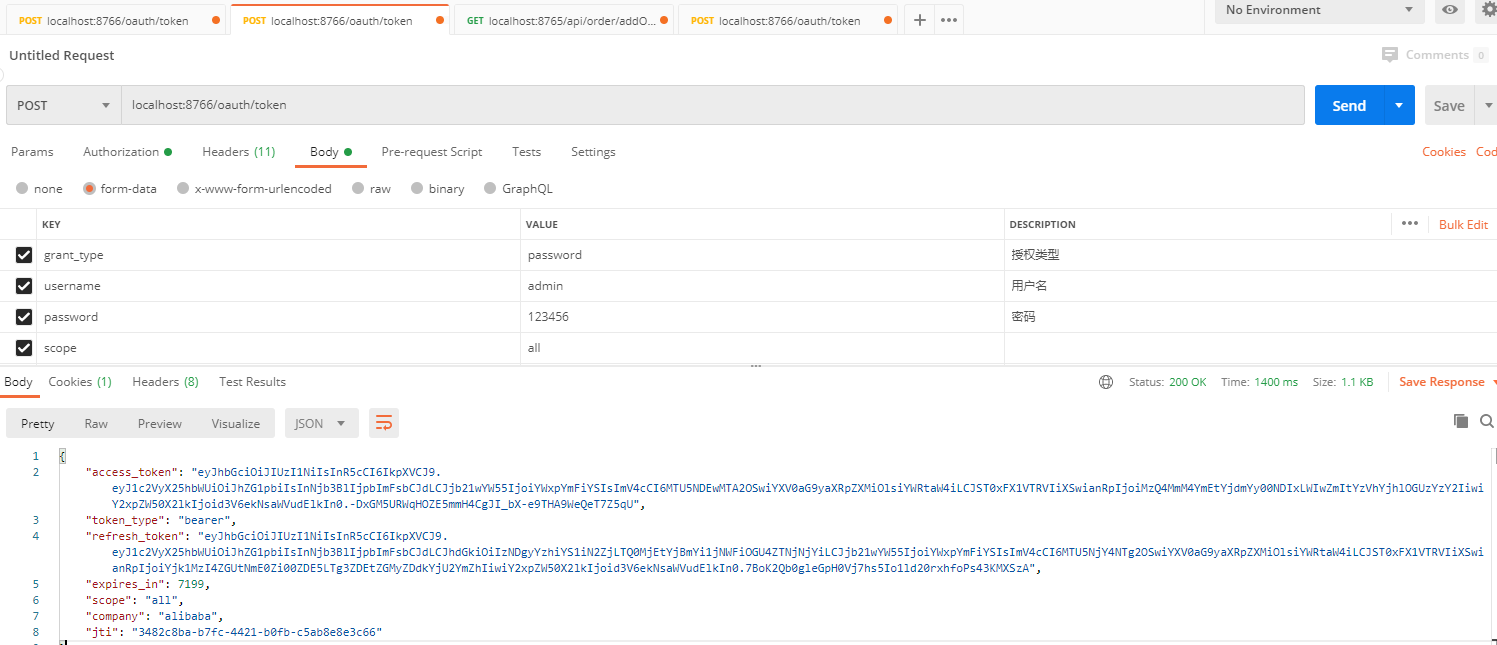
密码模式:
相比授权码授权方式来说,密码模式相对简单,我们只需要修改授权类型,增加 用户名、密码 字段:
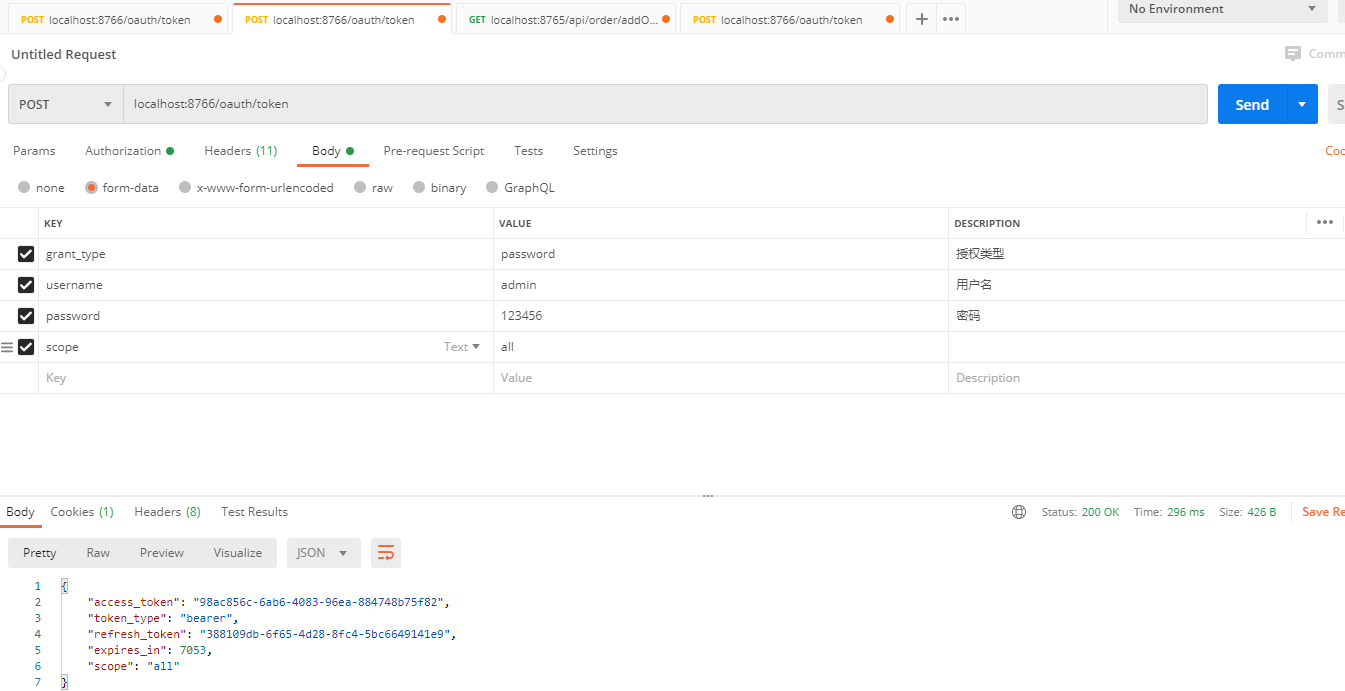
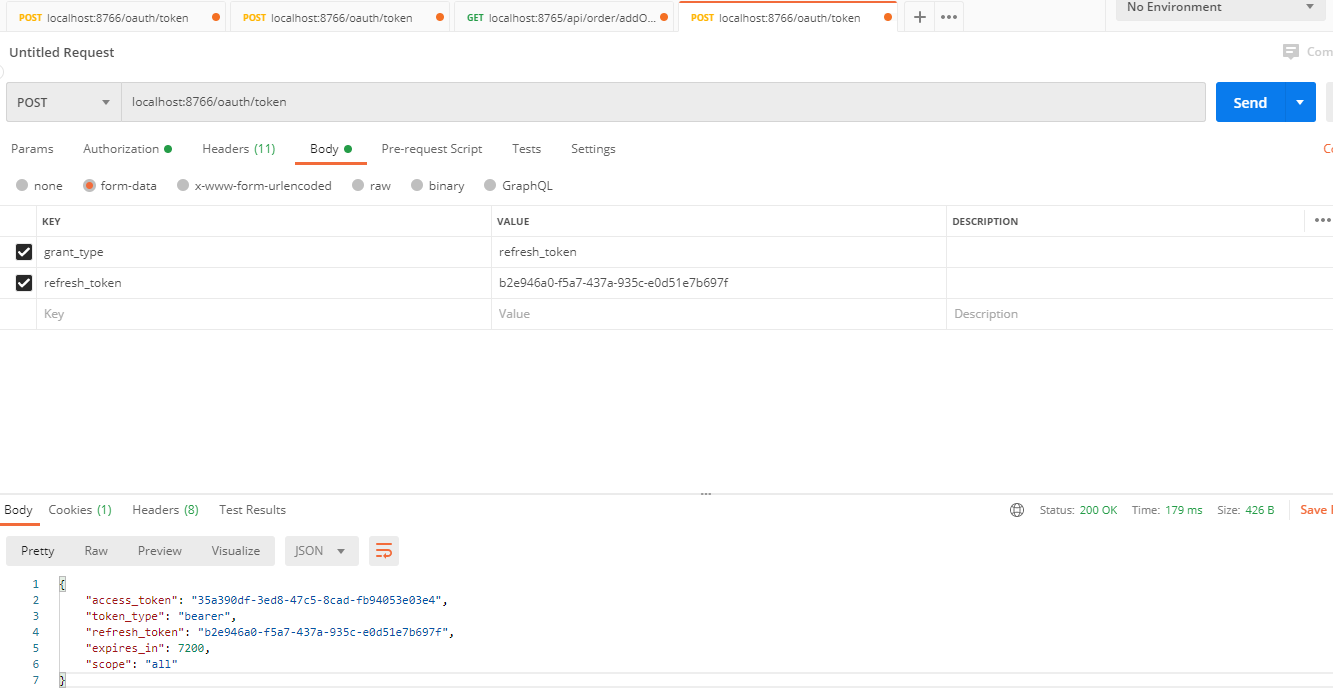
细心的小伙伴可能会发现,我这里用的是同一个用户 admin 去获取token,获取到的 access_token、refresh_token 都是一样的 ,唯独 expires_in(过期时间)逐渐减少。这是Oauth 提供的机制。在这个 expires_in 时间内 access_token都是有效的。当然,refresh_token 用于刷新 access_token,避免了用户的频繁认证,刷新token请求如下:
资源服务器 Resource server:
1.配置资源服务器就更简单了,新建一个 Springboot 标准工程,导入与认证服务器一样的依赖,然后定义一个类,打上 @EnableResourceServer 注解,实现 ResourceServerConfigurerAdapter 进行简单配置:
@Configuration

@EnableResourceServer

public class WuzzResourceServerConfig extends ResourceServerConfigurerAdapter {

    @Override

    public void configure(HttpSecurity http) throws Exception {

        //配置受保护的资源

        http.authorizeRequests().antMatchers("/api/order/**").authenticated();

    }

}
2.配置文件:
server.port = 8765

#check_token url

security.oauth2.resource.token-info-uri= http://localhost:8766/oauth/check_token

security.oauth2.resource.prefer-token-info= true

# authorize url

security.oauth2.client.access-token-uri=http://localhost:8766/oauth/authorize

#用户认证地址 check_token

security.oauth2.client.user-authorization-uri=http://localhost:8766/oauth/check_token

security.oauth2.client.client-id=wuzzClientId

security.oauth2.client.client-secret=wuzzSecret
3.提供一个测试接口
@RestController

@RequestMapping("/api/order")

public class OrderController {


    @RequestMapping("addOrder")

    public String addOrder(){

        return "addOrder";

    }

}
4.启动服务,当然,你想直接访问这个接口显然是不行的
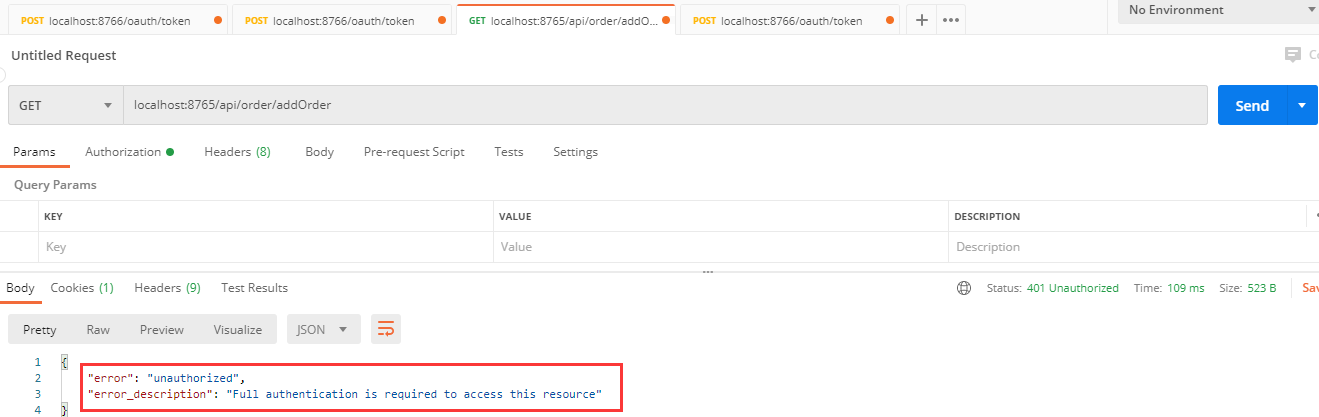
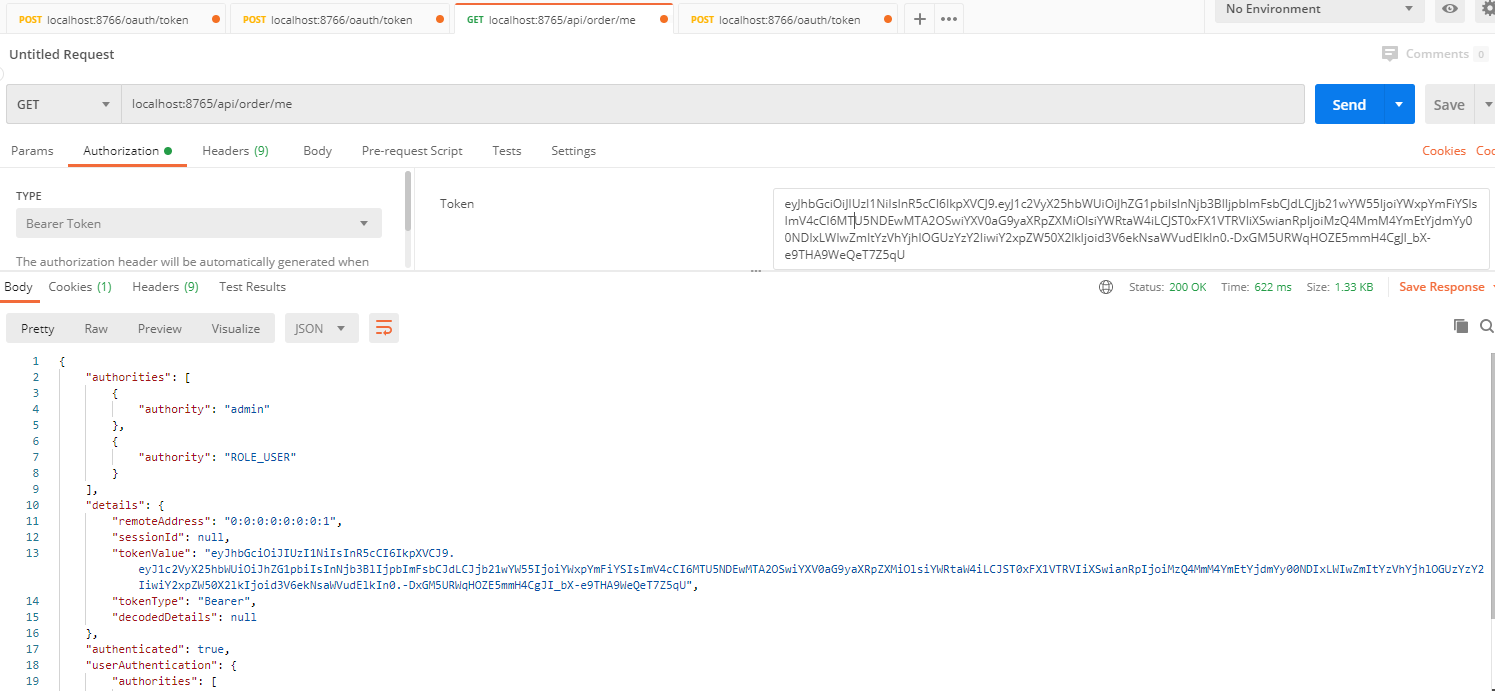
这个时候我们带上之前获取到的 token ,过期的话重新获取一个:
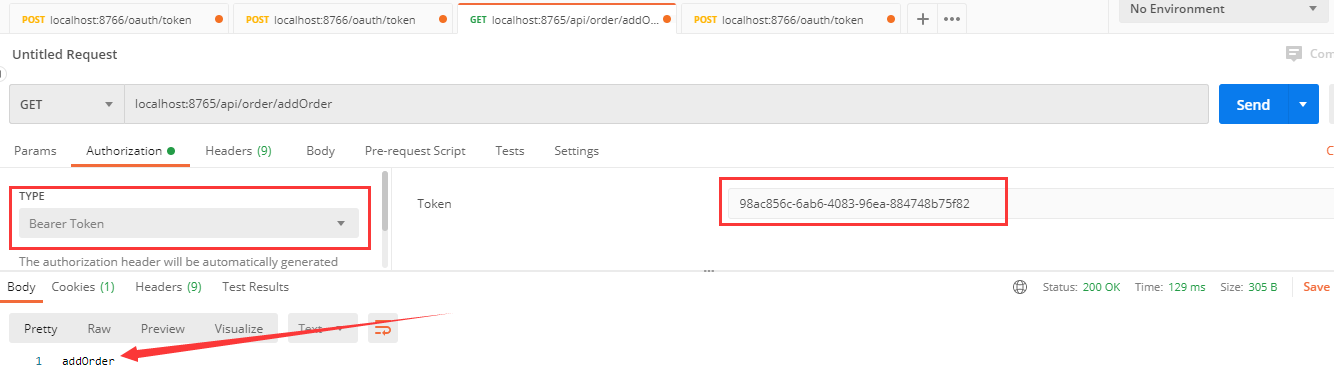
这样就实现了资源服务器与认证服务器的打通。
Token 存储:
OAuth2存储token值的方式由多种,所有的实现方式都是实现了TokenStore接口
- InMemoryTokenStore:token存储在本机的内存之中
- JdbcTokenStore:token存储在数据库之中
- JwtTokenStore:token不会存储到任何介质中
- RedisTokenStore:token存储在Redis数据库之中
这里使用 Redis 进行存储演示:
1.配置 redis :
# Redis服务地址

spring.redis.host=192.168.1.101

# Redis服务端口

spring.redis.port=6379

# Redis 连接密码

spring.redis.password=wuzhenzhao
2.新增Redis连接工厂:
@Configuration

public class TokenStoreConfig {

    @Autowired

    private RedisConnectionFactory redisConnectionFactory;

    @Bean

    public TokenStore redisTokenStore() {

        return new RedisTokenStore(redisConnectionFactory);

    }

}
3.配置,再 WuzzAuthorizationServerConfig 中新增如下配置。
// 自定义token存储类型

@Autowired

private TokenStore tokenStore;

@Override

public void configure(AuthorizationServerEndpointsConfigurer endpoints) throws Exception {

  endpoints.userDetailsService(userDetailsService()) // 用户信息得服务,一版是都数据库

    .authenticationManager(authenticationManager())// 认证管理器。

    .allowedTokenEndpointRequestMethods(HttpMethod.GET, HttpMethod.POST)

    .tokenStore(tokenStore);

}
4.启动服务并且通过密码授权获取 access_token.然后查看Redis 上的数据变化:

可以发现 token 已经被存储到了 redis上面,然后我们把认证服务器重启,然后拿着哲哥 access_token 去访问资源服务器,发现依旧可以访问得到。Redis token 配置成功。
JWT 整合:
JSON Web Token(JWT)是一个开放的行业标准(RFC 7519),它定义了一种自包含、可拓展、密签协议格式,用于在通信双方传递json对象,传递的信息经过数字签名可以被验证和信任。JWT可以使用HMAC算法或使用RSA的公钥/私钥对来签名,防止被篡改。
JWT 的几个特点
- JWT 默认是不加密,但也是可以加密的。生成原始 Token 以后,可以用密钥再加密一次。
- JWT 不加密的情况下,不能将秘密数据写入 JWT。
- JWT 不仅可以用于认证,也可以用于交换信息。有效使用 JWT,可以降低服务器查询数据库的次数。
- JWT 的最大缺点是,由于服务器不保存 session 状态,因此无法在使用过程中废止某个 token,或者更改 token 的权限。也就是说,一旦 JWT 签发了,在到期之前就会始终有效,除非服务器部署额外的逻辑。
- JWT 本身包含了认证信息,一旦泄露,任何人都可以获得该令牌的所有权限。为了减少盗用,JWT 的有效期应该设置得比较短。对于一些比较重要的权限,使用时应该再次对用户进行认证。
- 为了减少盗用,JWT 不应该使用 HTTP 协议明码传输,要使用 HTTPS 协议传输。
它是一个很长的字符串,中间用点(.)分隔成三个部分。注意,JWT 内部是没有换行的,这里只是为了便于展示,将它写成了几行。JWT 的三个部分依次如下。
- Header(头部)
- Payload(负载)
- Signature(签名)
如下就是一个 JWT :
eyJhbGciOiJIUzI1NiIsInR5cCI6IkpXVCJ9.
eyJ1c2VyX25hbWUiOiJhZG1pbiIsInNjb3BlIjpbImFsbCJdLCJjb21wYW55IjoiYWxpYmFiYSIsImV4cCI6MTU5NDEwMTA2OSwiYXV0aG9yaXRpZXMiOlsiYWRtaW4iLCJST0xFX1VTRVIiXSwianRpIjoiMzQ4MmM4YmEtYjdmYy00NDIxLWIwZmItYzVhYjhlOGUzYzY2IiwiY2xpZW50X2lkIjoid3V6ekNsaWVudElkIn0.
-DxGM5URWqHOZE5mmH4CgJI_bX-e9THA9WeQeT7Z5qU
像这个 token 我们可以借助第三方进行解码 : https://www.jsonwebtoken.io/ .通过该网址就可以看到包含的所有信息。
1.注入 Jwt 相关类:
@Configuration

public class TokenStoreConfig {

    @Autowired

    private RedisConnectionFactory redisConnectionFactory;

    @Bean

    @ConditionalOnProperty(prefix = "wuzz", name = "storeType", havingValue = "redis")

    public TokenStore redisTokenStore() {

        return new RedisTokenStore(redisConnectionFactory);

    }

    @Configuration

    @ConditionalOnProperty(prefix = "wuzz", name = "storeType", havingValue = "jwt", matchIfMissing = true)

    public static class JwtTokenConfig {

        //自包含、可拓展、密签

        //https://www.jsonwebtoken.io/  解码

        //{

        // "exp": 1593785308,

        // "user_name": "admin",

        // "authorities": [

        //  "admin",

        //  "ROLE_USER"

        // ],

        // "jti": "e2e5e811-b235-49b8-8678-5bf22e265415",

        // "client_id": "wuzzClientId",

        // "scope": [

        //  "all"

        // ]

        //}

        @Bean// 注入 jwt 存储 token

        public TokenStore jwtTokenStore() {

            return new JwtTokenStore(jwtAccessTokenConverter());

        }

        @Bean// 注入转换器

        public JwtAccessTokenConverter jwtAccessTokenConverter() {

            JwtAccessTokenConverter accessTokenConverter = new JwtAccessTokenConverter();

            accessTokenConverter.setSigningKey("wuzz");// 盐

            return accessTokenConverter;

        }

        @Bean//添加 token 包含信息

        @ConditionalOnMissingBean(name = "jwtTokenEnhancer")

        public TokenEnhancer jwtTokenEnhancer() {

            return new WuzzJwtTokenEnhancer();

        }

    }

}
2.配置文件新增:
wuzz.storeType=jwt
3.在 WuzzAuthorizationServerConfig 中配置:
// 自定义token存储类型

    @Autowired

    private TokenStore tokenStore;

    // jwt token

    @Autowired(required = false)

    private JwtAccessTokenConverter jwtAccessTokenConverter;

    //jwt token 附加信息

    @Autowired(required = false)

    private TokenEnhancer jwtTokenEnhancer;

    @Override

    public void configure(AuthorizationServerEndpointsConfigurer endpoints) throws Exception {

        endpoints.userDetailsService(userDetailsService()) // 用户信息得服务,一版是都数据库

                .authenticationManager(authenticationManager())// 认证管理器。

                .allowedTokenEndpointRequestMethods(HttpMethod.GET, HttpMethod.POST)

                .tokenStore(tokenStore);

        if (jwtAccessTokenConverter != null && jwtTokenEnhancer != null) {

            TokenEnhancerChain tokenEnhancerChain = new TokenEnhancerChain();

            List<TokenEnhancer> enhancers = new ArrayList<>();

            enhancers.add(jwtTokenEnhancer);

            enhancers.add(jwtAccessTokenConverter);

            tokenEnhancerChain.setTokenEnhancers(enhancers);

            endpoints.tokenEnhancer(tokenEnhancerChain)

                    .accessTokenConverter(jwtAccessTokenConverter);

        }

    }
4. 自定义 token 附加信息实现:
public class WuzzJwtTokenEnhancer implements TokenEnhancer {

    @Override

    public OAuth2AccessToken enhance(OAuth2AccessToken oAuth2AccessToken, OAuth2Authentication oAuth2Authentication) {

        Map<String, Object> info = new HashMap<String, Object>();

        info.put("company", "alibaba");

        ((DefaultOAuth2AccessToken) oAuth2AccessToken).setAdditionalInformation(info);

        return oAuth2AccessToken;

    }

}
5.启动认证服务器用密码认证方式获取一下 access_token ,发现token已经发生了变化,而且我们在token里增加的属性也显示出来了:
我们可以通过在资源服务器中写一个解析这个 token的方法:
@RequestMapping(value = "/me", method = {RequestMethod.GET})

    public Object me(Authentication user, HttpServletRequest request) throws UnsupportedEncodingException {

        String header = request.getHeader("Authorization");

        String token = StringUtils.substringAfter(header, "Bearer ");

        Claims claims = Jwts.parser().setSigningKey("wuzz".getBytes("UTF-8")).parseClaimsJws(token).getBody();

        String company = (String) claims.get("company");

        System.out.println(company);

        return user;

    }
然后请求该接口可以获取到相关的信息。
整合 JdbcClientDetailsService :
在上文中我们讲 client的信息都是写死在配置里面,显然在生产环境下是不合理的,OAuth2 提供了相应的配置。
1.导入依赖:
<dependency>

            <groupId>mysql</groupId>

            <artifactId>mysql-connector-java</artifactId>

        </dependency>

        <dependency>

            <groupId>org.springframework.boot</groupId>

            <artifactId>spring-boot-starter-jdbc</artifactId>

        </dependency>
2.修改配置:
@Autowired

private DataSource dataSource;

@Override

public void configure(ClientDetailsServiceConfigurer clients) throws Exception {

//        clients.inMemory().withClient("wuzzClientId")//客户端得ID,比如我们在QQ互联中心申请得。可以写多个。配置 循环

//                .secret(passwordEncoder().encode("wuzzSecret")) // 客户端密钥,需要进行加密

//                .accessTokenValiditySeconds(7200)// token 有效时常  0 永久有效

//                .authorizedGrantTypes("password", "implicit", "refresh_token", "authorization_code")// 支持得授权类型

//                .redirectUris("http://www.baidu.com")//回调地址

//                .scopes("all", "read", "write");//拥有的 scope  可选

  clients.withClientDetails(new JdbcClientDetailsService(dataSource));

}
3.新增数据库配置:
#解决springboot2.0 后内存数据库H2与actuator不能同时使用报datasource循环依赖

spring.cloud.refresh.refreshable=none

spring.datasource.driver-class-name=com.mysql.jdbc.Driver

spring.datasource.url=jdbc:mysql://192.168.1.101:3306/study?useUnicode=true&characterEncoding=utf-8

spring.datasource.username=root

spring.datasource.password=123456
4.数据库新增对应表,并添加一条数据:
-- ----------------------------

-- Table structure for oauth_client_details

-- ----------------------------

DROP TABLE IF EXISTS `oauth_client_details`;

CREATE TABLE `oauth_client_details`  (

  `client_id` varchar(48) CHARACTER SET utf8 COLLATE utf8_general_ci NOT NULL,

  `resource_ids` varchar(256) CHARACTER SET utf8 COLLATE utf8_general_ci NULL DEFAULT NULL,

  `client_secret` varchar(256) CHARACTER SET utf8 COLLATE utf8_general_ci NULL DEFAULT NULL,

  `scope` varchar(256) CHARACTER SET utf8 COLLATE utf8_general_ci NULL DEFAULT NULL,

  `authorized_grant_types` varchar(256) CHARACTER SET utf8 COLLATE utf8_general_ci NULL DEFAULT NULL,

  `web_server_redirect_uri` varchar(256) CHARACTER SET utf8 COLLATE utf8_general_ci NULL DEFAULT NULL,

  `authorities` varchar(256) CHARACTER SET utf8 COLLATE utf8_general_ci NULL DEFAULT NULL,

  `access_token_validity` int(11) NULL DEFAULT NULL,

  `refresh_token_validity` int(11) NULL DEFAULT NULL,

  `additional_information` varchar(4096) CHARACTER SET utf8 COLLATE utf8_general_ci NULL DEFAULT NULL,

  `autoapprove` varchar(256) CHARACTER SET utf8 COLLATE utf8_general_ci NULL DEFAULT NULL,

  PRIMARY KEY (`client_id`) USING BTREE

) ENGINE = InnoDB CHARACTER SET = utf8 COLLATE = utf8_general_ci ROW_FORMAT = Compact;

-- ----------------------------

-- Records of oauth_client_details

-- ----------------------------

INSERT INTO `oauth_client_details` VALUES ('wuzzClientId', NULL, '$2a$10$L2juyPBc606/9xkmFWu5S.5PBjfz6IXxtUnl8Bk9B2s9Bbn1TPO.2', 'all', 'password', 'http://www.baidu.com', NULL, NULL, NULL, NULL, NULL);
5.重启服务,按照原来的方式通过用户名密码进行授权,也是可以实现的。
spring-cloud-oauth2 认证授权的更多相关文章
- Spring Cloud下基于OAUTH2认证授权的实现
GitHub(spring -boot 2.0.0):https://github.com/bigben0123/uaa-zuul 示例(spring -boot 2.0.0): https://gi ...
- 微信授权就是这个原理,Spring Cloud OAuth2 授权码模式
上一篇文章Spring Cloud OAuth2 实现单点登录介绍了使用 password 模式进行身份认证和单点登录.本篇介绍 Spring Cloud OAuth2 的另外一种授权模式-授权码模式 ...
- vue+uni-app商城实战 | 第一篇:【有来小店】微信小程序快速开发接入Spring Cloud OAuth2认证中心完成授权登录
一. 前言 本篇通过实战来讲述如何使用uni-app快速进行商城微信小程序的开发以及小程序如何接入后台Spring Cloud微服务. 有来商城 youlai-mall 项目是一套全栈商城系统,技术栈 ...
- Spring Cloud实战 | 第九篇:Spring Cloud整合Spring Security OAuth2认证服务器统一认证自定义异常处理
本文完整代码下载点击 一. 前言 相信了解过我或者看过我之前的系列文章应该多少知道点我写这些文章包括创建 有来商城youlai-mall 这个项目的目的,想给那些真的想提升自己或者迷茫的人(包括自己- ...
- Spring Cloud OAuth2.0 微服务中配置 Jwt Token 签名/验证
关于 Jwt Token 的签名与安全性前面已经做了几篇介绍,在 IdentityServer4 中定义了 Jwt Token 与 Reference Token 两种验证方式(https://www ...
- Spring Cloud OAuth2(一) 搭建授权服务
概要 本文内容主要为spring cloud 授权服务的搭建,采用jwt认证. GitHub 地址:https://github.com/fp2952/spring-cloud-base/tree/m ...
- Spring Cloud OAuth2 实现用户认证及单点登录
文章较长,建议推荐,建议转发,建议收藏,建议关注公众号哈. OAuth 2 有四种授权模式,分别是授权码模式(authorization code).简化模式(implicit).密码模式(resou ...
- spring cloud oauth2 实现用户认证登录
spring-cloud-oauth2 实现用户认证及单点登录 需求 在微服务架构中,我们有很多业务模块,每个模块都需要有用户认证,权限校验.有时候也会接入来自第三方厂商的应用.要求是只登录一次, ...
- SpringCloud(10)使用Spring Cloud OAuth2和JWT保护微服务
采用Spring Security AOuth2 和 JWT 的方式,避免每次请求都需要远程调度 Uaa 服务.采用Spring Security OAuth2 和 JWT 的方式,Uaa 服务只验证 ...
- SpringCloud(9)使用Spring Cloud OAuth2保护微服务系统
一.简介 OAth2是一个标准的授权协议. 在认证与授权的过程中,主要包含以下3种角色. 服务提供方 Authorization Server. 资源持有者 Resource Server. 客户端 ...
随机推荐
- Baidu Apollo use: command " rosbag " not fonud
https://github.com/ApolloAuto/apollo/issues/181 1.If using dev docker env, you need run apollo.sh bu ...
- Iterable object of JavaScript
数组是可迭代的,所以数组可以用于for of,字符串也是可迭代的,所以字符串也可以用作for of,那么,对象呢? 试一试: var somebody = { start:0, end:100 } f ...
- java基础第11期——Stream流、方法引用、junit单元测试
1.Stream流 Stream流与io流是不同的东西,用于解决集合类库已有的弊端, 1.1 获取Stream流: Collection集合的Stream方法,注意Map集合要经过转化 default ...
- winform解析json API数据
{ "retCode" : "SUCCESS", "msg" : "", "data" : { ...
- MySQL like查询使用索引
在使用msyql进行模糊查询的时候,很自然的会用到like语句,通常情况下,在数据量小的时候,不容易看出查询的效率,但在数据量达到百万级,千万级的时候,查询的效率就很容易显现出来.这个时候查询的效率就 ...
- IVMS-5000海康平台安装
某学校系统因中勒索病毒重装监控系统平台 一 安装前准备 二 数据库安装 采用免安装版本安装,原先平台采用免安装版mysql 5.6.24 ,学校IT管理员将数据库文件完全复制,用虚拟机将数据库搭 ...
- Gitlab与Sonarqube整合-代码提交自动检测
目录 概述 准备工作 postgres sonarqube gitlab gitlab-runner Gitlab-runner容器 注册Gitlab-runner Sonarqube gitlab ...
- 剑指 Offer 14- II. 剪绳子 II + 贪心 + 数论 + 快速幂
剑指 Offer 14- II. 剪绳子 II 题目链接 因为有取模的操作,动态规划中max不能用了,我们观察:正整数从1开始,但是1不能拆分成两个正整数之和,所以不能当输入. 2只能拆成 1+1,所 ...
- [个人总结]pytorch中model.eval()会对哪些函数有影响?
来源于知乎:pytorch中model.eval()会对哪些函数有影响? - 蔺笑天的回答 - 知乎 https://www.zhihu.com/question/363144860/answer/9 ...
- [数据结构与算法-15]单源最短路径(Dijkstra+SPFA)
单源最短路径 问题描述 分别求出从起点到其他所有点的最短路径,这次主要介绍两种算法,Dijkstra和SPFA.若无负权优先Dijkstra算法,存在负权选择SPFA算法. Dijkstra算法 非负 ...