JUnit5编写基本测试
JUnit5的测试不是通过名称,而是通过注解来标识的。
测试类与方法
Test Class:测试类,必须包含至少一个test方法,包括:
- 最外层的class
staticmember class@Nestedclass
Test Method:测试方法,包括:
@Test@RepeatedTest@ParameterizedTest@TestFactory@TestTemplate
Lifecycle Method:生命周期方法,包括:
@BeforeAll@AfterAll@BeforeEach@AfterEach
注意:
- Test Method和Lifecycle Method不能是
abstract,也不能return。它们可以在当前测试类中声明,也可以继承自父类或接口。 - Test class、Test Method和Lifecycle Method都不能是private。
示例代码:
import static org.junit.jupiter.api.Assertions.fail;

import static org.junit.jupiter.api.Assumptions.assumeTrue;

import org.junit.jupiter.api.AfterAll;

import org.junit.jupiter.api.AfterEach;

import org.junit.jupiter.api.BeforeAll;

import org.junit.jupiter.api.BeforeEach;

import org.junit.jupiter.api.Disabled;

import org.junit.jupiter.api.Test;

class StandardTests {

    @BeforeAll

    static void initAll() {

    }

    @BeforeEach

    void init() {

    }

    @Test

    void succeedingTest() {

    }

    @Test

    void failingTest() {

        fail("a failing test");

    }

    @Test

    @Disabled("for demonstration purposes")

    void skippedTest() {

        // not executed

    }

    @Test

    void abortedTest() {

        assumeTrue("abc".contains("Z"));

        fail("test should have been aborted");

    }

    @AfterEach

    void tearDown() {

    }

    @AfterAll

    static void tearDownAll() {

    }

}
自定义显示名字
Test class和test method可以使用@DisplayName自定义在测试报告中的显示名字,支持空格、特殊字符和emoji表情符号。
示例:
import org.junit.jupiter.api.DisplayName;

import org.junit.jupiter.api.Test;

@DisplayName("A special test case")

class DisplayNameDemo {

    @Test

    @DisplayName("Custom test name containing spaces")

    void testWithDisplayNameContainingSpaces() {

    }

    @Test

    @DisplayName("╯°□°)╯")

    void testWithDisplayNameContainingSpecialCharacters() {

    }

    @Test

    @DisplayName("")

    void testWithDisplayNameContainingEmoji() {

    }

}
除了@DisplayName,@DisplayNameGeneration 注解能用来对显示名字做统一处理,JUnit Jupiter自带了一些生成器:
- Standard 匹配标准行为
- Simple 删除没有参数的方法后面的括号
- ReplaceUnderscores 用空格替换下划线
- IndicativeSentences 把test class和test method名字连接起来
示例代码:
import org.junit.jupiter.api.DisplayName;

import org.junit.jupiter.api.DisplayNameGeneration;

import org.junit.jupiter.api.DisplayNameGenerator;

import org.junit.jupiter.api.IndicativeSentencesGeneration;

import org.junit.jupiter.api.Nested;

import org.junit.jupiter.api.Test;

import org.junit.jupiter.params.ParameterizedTest;

import org.junit.jupiter.params.provider.ValueSource;

class DisplayNameGeneratorDemo {

    @Nested

    @DisplayNameGeneration(DisplayNameGenerator.ReplaceUnderscores.class)

    class A_year_is_not_supported {

        @Test

        void if_it_is_zero() {

        }

        @DisplayName("A negative value for year is not supported by the leap year computation.")

        @ParameterizedTest(name = "For example, year {0} is not supported.")

        @ValueSource(ints = { -1, -4 })

        void if_it_is_negative(int year) {

        }

    }

    @Nested

    @IndicativeSentencesGeneration(separator = " -> ", generator = DisplayNameGenerator.ReplaceUnderscores.class)

    class A_year_is_a_leap_year {

        @Test

        void if_it_is_divisible_by_4_but_not_by_100() {

        }

        @ParameterizedTest(name = "Year {0} is a leap year.")

        @ValueSource(ints = { 2016, 2020, 2048 })

        void if_it_is_one_of_the_following_years(int year) {

        }

    }

}
@IndicativeSentencesGeneration可以自定义separator和generator。
结果:
+-- DisplayNameGeneratorDemo [OK]

  +-- A year is not supported [OK]

  | +-- A negative value for year is not supported by the leap year computation. [OK]

  | | +-- For example, year -1 is not supported. [OK]

  | | '-- For example, year -4 is not supported. [OK]

  | '-- if it is zero() [OK]

  '-- A year is a leap year [OK]

    +-- A year is a leap year -> if it is divisible by 4 but not by 100. [OK]

    '-- A year is a leap year -> if it is one of the following years. [OK]

      +-- Year 2016 is a leap year. [OK]

      +-- Year 2020 is a leap year. [OK]

      '-- Year 2048 is a leap year. [OK]
除了注解,也能通过配置设定全局的默认Generator,比如在 src/test/resources/junit-platform.properties文件中:
junit.jupiter.displayname.generator.default = \

    org.junit.jupiter.api.DisplayNameGenerator$ReplaceUnderscores
既可以指定现有Generator,也可以指定实现了DisplayNameGenerator接口的类。
自定义显示名字的优先级是:
@DisplayName@DisplayNameGenerationjunit.jupiter.displayname.generator.defaultorg.junit.jupiter.api.DisplayNameGenerator.Standard
断言(Assertions)
JUnit5的断言是包含在org.junit.jupiter.api.Assertions中的静态方法,比如assertTrue、assertEquals、assertNotNull、assertAll、assertThrows、assertTimeout、assertTimeoutPreemptively等。
示例代码如下:
import static java.time.Duration.ofMillis;

import static java.time.Duration.ofMinutes;

import static org.junit.jupiter.api.Assertions.assertAll;

import static org.junit.jupiter.api.Assertions.assertEquals;

import static org.junit.jupiter.api.Assertions.assertNotNull;

import static org.junit.jupiter.api.Assertions.assertThrows;

import static org.junit.jupiter.api.Assertions.assertTimeout;

import static org.junit.jupiter.api.Assertions.assertTimeoutPreemptively;

import static org.junit.jupiter.api.Assertions.assertTrue;

import java.util.concurrent.CountDownLatch;

import example.domain.Person;

import example.util.Calculator;

import org.junit.jupiter.api.Test;

class AssertionsDemo {

    private final Calculator calculator = new Calculator();

    private final Person person = new Person("Jane", "Doe");

    @Test

    void standardAssertions() {

        assertEquals(2, calculator.add(1, 1));

        assertEquals(4, calculator.multiply(2, 2),

                "The optional failure message is now the last parameter");

        assertTrue('a' < 'b', () -> "Assertion messages can be lazily evaluated -- "

                + "to avoid constructing complex messages unnecessarily.");

    }

    @Test

    void groupedAssertions() {

        // In a grouped assertion all assertions are executed, and all

        // failures will be reported together.

        assertAll("person",

            () -> assertEquals("Jane", person.getFirstName()),

            () -> assertEquals("Doe", person.getLastName())

        );

    }

    @Test

    void dependentAssertions() {

        // Within a code block, if an assertion fails the

        // subsequent code in the same block will be skipped.

        assertAll("properties",

            () -> {

                String firstName = person.getFirstName();

                assertNotNull(firstName);

                // Executed only if the previous assertion is valid.

                assertAll("first name",

                    () -> assertTrue(firstName.startsWith("J")),

                    () -> assertTrue(firstName.endsWith("e"))

                );

            },

            () -> {

                // Grouped assertion, so processed independently

                // of results of first name assertions.

                String lastName = person.getLastName();

                assertNotNull(lastName);

                // Executed only if the previous assertion is valid.

                assertAll("last name",

                    () -> assertTrue(lastName.startsWith("D")),

                    () -> assertTrue(lastName.endsWith("e"))

                );

            }

        );

    }

    @Test

    void exceptionTesting() {

        Exception exception = assertThrows(ArithmeticException.class, () ->

            calculator.divide(1, 0));

        assertEquals("/ by zero", exception.getMessage());

    }

    @Test

    void timeoutNotExceeded() {

        // The following assertion succeeds.

        assertTimeout(ofMinutes(2), () -> {

            // Perform task that takes less than 2 minutes.

        });

    }

    @Test

    void timeoutNotExceededWithResult() {

        // The following assertion succeeds, and returns the supplied object.

        String actualResult = assertTimeout(ofMinutes(2), () -> {

            return "a result";

        });

        assertEquals("a result", actualResult);

    }

    @Test

    void timeoutNotExceededWithMethod() {

        // The following assertion invokes a method reference and returns an object.

        String actualGreeting = assertTimeout(ofMinutes(2), AssertionsDemo::greeting);

        assertEquals("Hello, World!", actualGreeting);

    }

    @Test

    void timeoutExceeded() {

        // The following assertion fails with an error message similar to:

        // execution exceeded timeout of 10 ms by 91 ms

        assertTimeout(ofMillis(10), () -> {

            // Simulate task that takes more than 10 ms.

            Thread.sleep(100);

        });

    }

    @Test

    void timeoutExceededWithPreemptiveTermination() {

        // The following assertion fails with an error message similar to:

        // execution timed out after 10 ms

        assertTimeoutPreemptively(ofMillis(10), () -> {

            // Simulate task that takes more than 10 ms.

            new CountDownLatch(1).await();

        });

    }

    private static String greeting() {

        return "Hello, World!";

    }

}
假设(Assumptions)
JUnit5的断言是包含在org.junit.jupiter.api.Assumptions中的静态方法,比如assumeTrue、assumingThat等。
示例代码:
import static org.junit.jupiter.api.Assertions.assertEquals;

import static org.junit.jupiter.api.Assumptions.assumeTrue;

import static org.junit.jupiter.api.Assumptions.assumingThat;

import example.util.Calculator;

import org.junit.jupiter.api.Test;

class AssumptionsDemo {

    private final Calculator calculator = new Calculator();

    @Test

    void testOnlyOnCiServer() {

        assumeTrue("CI".equals(System.getenv("ENV")));

        // remainder of test

    }

    @Test

    void testOnlyOnDeveloperWorkstation() {

        assumeTrue("DEV".equals(System.getenv("ENV")),

            () -> "Aborting test: not on developer workstation");

        // remainder of test

    }

    @Test

    void testInAllEnvironments() {

        assumingThat("CI".equals(System.getenv("ENV")),

            () -> {

                // perform these assertions only on the CI server

                assertEquals(2, calculator.divide(4, 2));

            });

        // perform these assertions in all environments

        assertEquals(42, calculator.multiply(6, 7));

    }

}
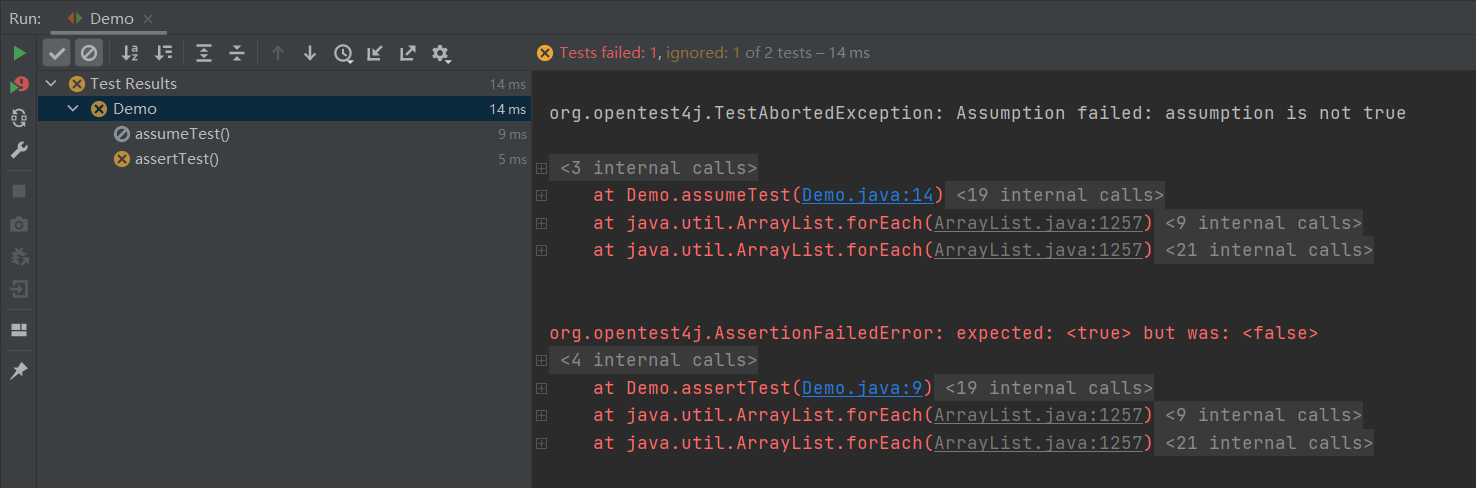
Assertions与Assumptions区别
Assertions如果失败,test会被标记为failed。Assumptions如果失败,test会被标记为ignored,测试不会执行。
示例:
import org.junit.jupiter.api.Test;

import static org.junit.jupiter.api.Assertions.assertTrue;

import static org.junit.jupiter.api.Assumptions.assumeTrue;

public class Demo {

    @Test

    void assertTest() {

        assertTrue(false);

    }

    @Test

    void assumeTest() {

        assumeTrue(false);

    }

}
结果:
禁用测试
@Disabled能用来禁用test class或test method,建议在括号内填写上禁用理由。
示例:
import org.junit.jupiter.api.Disabled;

import org.junit.jupiter.api.Test;

@Disabled("Disabled until bug #99 has been fixed")

class DisabledClassDemo {

    @Test

    void testWillBeSkipped() {

    }

}
import org.junit.jupiter.api.Disabled;

import org.junit.jupiter.api.Test;

class DisabledTestsDemo {

    @Disabled("Disabled until bug #42 has been resolved")

    @Test

    void testWillBeSkipped() {

    }

    @Test

    void testWillBeExecuted() {

    }

}
小结
本文首先介绍了如何使用测试类与方法,来编写一个JUnit5的基本测试,然后介绍了如何自定义测试报告中的显示名字。使用断言(Assertions)可以把test标记为failed,使用假设(Assumptions)可以把test标记为ignored。最后介绍了如何禁用测试。除了基本测试,JUnit5还能编写带条件的测试。
参考资料:
https://junit.org/junit5/docs/current/user-guide/#writing-tests
https://stackoverflow.com/questions/44628483/assume-vs-assert-in-junit-tests
JUnit5编写基本测试的更多相关文章
- 新书《编写可测试的JavaScript代码 》出版,感谢支持
本书介绍 JavaScript专业开发人员必须具备的一个技能是能够编写可测试的代码.不管是创建新应用程序,还是重写遗留代码,本书都将向你展示如何为客户端和服务器编写和维护可测试的JavaScript代 ...
- 编写可测试的JavaScript代码
<编写可测试的JavaScript代码>基本信息作者: [美] Mark Ethan Trostler 托斯勒 著 译者: 徐涛出版社:人民邮电出版社ISBN:9787115373373上 ...
- 使用FsCheck编写Property-based测试
使用FsCheck编写Property-based的测试 在编写基于Property-based的单元测试一文中,我们介绍了什么是Property-based测试.同时我们也总结了Property-b ...
- 编写Avocado测试
编写Avocado测试 现在我们开始使用python编写Avocado测试,测试继承于avocado.Test. 基本例子 创建一个时间测试,sleeptest,测试非常简单,只是sleep一会: i ...
- springboot快速入门02--Controller编写和测试
02springboot快速入门--Controller编写和测试 1.新建一个HelloController import org.springframework.boot.SpringApplic ...
- Shell脚本的编写及测试
Shell脚本的编写及测试 1.1问题 本例要求两个简单的Shell脚本程序,任务目标如下: 编写一 ...
- 098 01 Android 零基础入门 02 Java面向对象 03 综合案例(学生信息管理) 02 案例分析及实现 02 编写并测试Subject类
098 01 Android 零基础入门 02 Java面向对象 03 综合案例(学生信息管理) 02 案例分析及实现 02 编写并测试Subject类 本文知识点:编写并测试Subject类 说明: ...
- 099 01 Android 零基础入门 02 Java面向对象 03 综合案例(学生信息管理) 02 案例分析及实现 03 编写并测试Student类
099 01 Android 零基础入门 02 Java面向对象 03 综合案例(学生信息管理) 02 案例分析及实现 03 编写并测试Student类 本文知识点:编写并测试Subject类 说明: ...
- JUnit5的条件测试、嵌套测试、重复测试
条件测试 JUnit5支持条件注解,根据布尔值判断是否执行测试. 自定义条件 @EnabledIf和@DisabledIf注解用来设置自定义条件,示例: @Test @EnabledIf(" ...
随机推荐
- RHCE脚本题目详解
目录 RHCE脚本题目详解 题目一 shell脚本之if语句实现: shell脚本之case语句实现: 题目二 实现 测试 解析 写在后面 RHCE脚本题目详解 题目一 在system1上创建一个名为 ...
- zabbix添加菜单栏
1.更改字体(中文乱码多半是因为字体不支持中文) define('ZBX_GRAPH_FONT_NAME', 'DejaVuSans'); // font file name define('ZBX_ ...
- groovy脚本语言基础1
一 搭建groovy环境 安装JDK [root@node1 ~]# yum -y install java-11-openjdk 官网下载groovySDK下载 https://groovy.ap ...
- Docker镜像的仓库及底层依赖的核心技术(3)
一.docker镜像的仓库 仓库分为公共仓库和私有仓库 DockerHub的官方仓库:https://hub.docker.com DockerPool社区仓库:https://dl.dockerpo ...
- 032.Python魔术方法__new__和单态模式
一 __new__ 魔术方法 1.1 介绍 触发时机:实例化类生成对象的时候触发(触发时机在__init__之前) 功能:控制对象的创建过程 参数:至少一个cls接受当前的类,其他根据情况决定 返回值 ...
- zabbix监控之邮件报警通知
zabbix官网的操作指南:https://www.zabbix.com/documentation/4.0/zh/manual 首先我们需要创建一个需要被监控的主机,并设置相应的监控项.当监控项收集 ...
- Centos 7.4搭建es7.12.0+Skywalking7.8.5
Skywalking整体架构图和分布式追踪系统原理:https://blog.csdn.net/weixin_39866487/article/details/111581322 软件包版本1.ela ...
- 11.8 iotop:动态显示磁盘I/O统计信息
iotop命令是一款实时监控磁盘I/O的工具,但必须以root用户的身份运行.使用iotop命令可以很方便地查看每个进程使用磁盘I/O的情况. 最小化安装系统一般是没有这个命令的,需要使用yum命令额 ...
- 6.1 tar:打包备份
tar命令 在Linux系统里,tar是将多个文件打包在一起,并且可以实现解压打包的文件的命令.是系统管理员最常用的命令之一,tar命令不但可以实现对多个文件进行打包,还可以对多个文件打包后进 ...
- 我的Python书被台湾的出版社引进版权了,书的名字也更吸引人了
我去年出了一本Python书,基于股票大数据分析的Python入门实战,在这本书里,我是用股票范例讲述Pythorn的爬虫,数据分析和机器学习知识点,如下是京东的连接. https://item.jd ...