Springboot集成Swagger实战
1.介绍
本文将通过实战介绍Springboot如何集成swagger2,以用户管理模块为例,实现项目接口文档的在线管理。
项目源码
本文只列出核心部分,详细请看源码:
https://gitee.com/indexman/boot_swagger_demo
2.Swagger是干什么的?
Swagger 是一个用于生成、描述和调用 RESTful 接口的 Web 服务。通俗的来讲,Swagger 就是将项目中所有(想要暴露的)接口展现在页面上,并且可以进行接口调用和测试的服务。
官网地址:https://swagger.io/
其主要作用:
在线API文档:将项目中所有的接口展现在页面上,这样后端程序员就不需要专门为前端使用者编写专门的接口文档。
实时更新:当接口更新之后,只需要修改代码中的 Swagger 描述就可以实时生成新的接口文档了,从而规避了接口文档老旧不能使用的问题。
接口测试:通过 Swagger 页面,我们可以直接进行接口调用,降低了项目开发阶段的调试成本。
3.开发步骤
闲言少叙,直奔主题。
3.1 添加pom依赖
<?xml version="1.0" encoding="UTF-8"?>

<project xmlns="http://maven.apache.org/POM/4.0.0" xmlns:xsi="http://www.w3.org/2001/XMLSchema-instance"

         xsi:schemaLocation="http://maven.apache.org/POM/4.0.0 https://maven.apache.org/xsd/maven-4.0.0.xsd">

    <modelVersion>4.0.0</modelVersion>

    <parent>

        <groupId>org.springframework.boot</groupId>

        <artifactId>spring-boot-starter-parent</artifactId>

        <version>2.5.1</version>

        <relativePath/> <!-- lookup parent from repository -->

    </parent>

    <groupId>com.laoxu.demo</groupId>

    <artifactId>boot_swagger_demo</artifactId>

    <version>0.0.1-SNAPSHOT</version>

    <name>boot_swagger_demo</name>

    <description>Demo project for Spring Boot</description>

    <properties>

        <java.version>1.8</java.version>

        <project.build.sourceEncoding>UTF-8</project.build.sourceEncoding>

        <swagger.version>2.9.2</swagger.version>

    </properties>

    <dependencies>

        <dependency>

            <groupId>org.springframework.boot</groupId>

            <artifactId>spring-boot-starter</artifactId>

        </dependency>

        <dependency>

            <groupId>org.springframework.boot</groupId>

            <artifactId>spring-boot-starter-web</artifactId>

        </dependency>

        <!--swagger-->

        <dependency>

            <groupId>io.springfox</groupId>

            <artifactId>springfox-swagger2</artifactId>

            <version>${swagger.version}</version>

        </dependency>

        <!--swagger ui-->

        <dependency>

            <groupId>io.springfox</groupId>

            <artifactId>springfox-swagger-ui</artifactId>

            <version>${swagger.version}</version>

        </dependency>

        <dependency>

            <groupId>org.projectlombok</groupId>

            <artifactId>lombok</artifactId>

            <optional>true</optional>

        </dependency>

        <dependency>

            <groupId>org.springframework.boot</groupId>

            <artifactId>spring-boot-starter-test</artifactId>

            <scope>test</scope>

        </dependency>

    </dependencies>

    <build>

        <plugins>

            <plugin>

                <groupId>org.springframework.boot</groupId>

                <artifactId>spring-boot-maven-plugin</artifactId>

            </plugin>

        </plugins>

    </build>

</project>
3.2 修改启动类,添加@EnableSwagger2
@EnableSwagger2

@SpringBootApplication

public class BootSwaggerDemoApplication {

    public static void main(String[] args) {

        SpringApplication.run(BootSwaggerDemoApplication.class, args);

    }

}
3.3 编写配置类
@Configuration

public class Swagger2Config {

    @Bean

    public Docket adminApiConfig(){

        return new Docket(DocumentationType.SWAGGER_2)

                .groupName("")

                .apiInfo(adminApiInfo())

                .select()

                .paths(Predicates.and(PathSelectors.regex("/api/.*")))

                .build();

    }

    private ApiInfo adminApiInfo(){

        return new ApiInfoBuilder()

                .title("用户管理系统-API文档")

                .description("本文档描述了用户管理系统接口定义")

                .version("1.0")

                .contact(new Contact("test", "http//www.baidu.com", "indeman@126.com"))

                .build();

    }

}
3.4 添加User实体
@ApiModel(value="User对象", description="用户")

@Data

public class User {

    private int id;

    private String name;

    private String city;

    @JsonFormat(shape = JsonFormat.Shape.STRING, pattern="yyyy-MM-dd")

    private Date birthday;

    public User(){}

    public User(int id, String name, String city, Date birthday) {

        this.id = id;

        this.name = name;

        this.city = city;

        this.birthday = birthday;

    }

}
3.5 添加用户接口
@Api(description="用户管理")

@RestController

@RequestMapping("/api/user")

public class UserController {

    @Autowired

    UserService userService;

    @ApiOperation("根据ID查询用户")

    @GetMapping("/{id}")

    public ResultBean getOne(@ApiParam(name="id",value = "用户ID",required = true)

                                 @PathVariable Integer id){

        User user = userService.getById(id);

        ResultBean result = new ResultBean(0,"查询成功",1, user);

         return result;

    }

    @ApiOperation("分页查询")

    @GetMapping("/list")

    public ResultBean list(@ApiParam(name="页码",value = "page",required = false)

                           @RequestParam(defaultValue = "1") Integer page,

                           @ApiParam(name="页行数",value = "limit",required = false)

                           @RequestParam(defaultValue = "10") Integer limit){

        List<User> users = userService.getPager(page,limit);

        int count = userService.getAllUsers().size();

        ResultBean result = new ResultBean(0,"查询成功",count,users);

        return result;

    }

    @ApiOperation("修改用户")

    @PostMapping("/save")

    public ResultBean save(@ApiParam(name="用户实体",value = "user实体",required = true)

                           @RequestBody User user){

        // 判断是新增还是修改

        if(user.getId()==0){

            userService.addUser(user);

        }else{

            userService.updateUser(user);

        }

        return new ResultBean(200,"保存成功",0,"");

    }

    @ApiOperation("删除用户(多个)")

    @PostMapping("/remove")

    public ResultBean modify(@ApiParam(name="用户ID数组",value = "ids",required = true)

                                 @RequestBody int[] ids){

        userService.delUsers(ids);

        return new ResultBean(200,"删除成功",0,"");

    }

}
4.启动工程,访问接口文档
访问:http://localhost:9001/swagger-ui.html#/
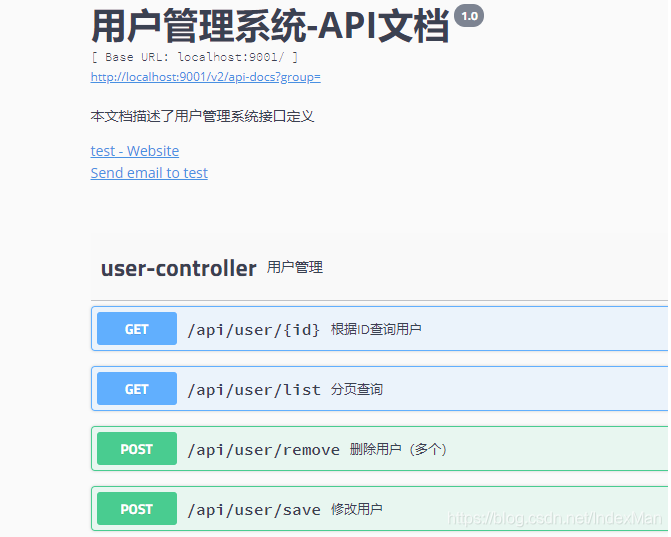
可以看到用户controller的几个接口定义都在里面了。
5.测试接口
这里挑选第一个接口测试一下,见下图:
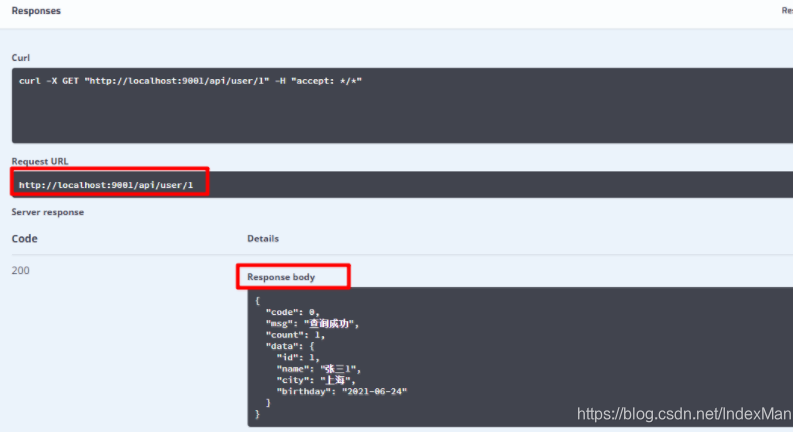
可以看到还是很方便的。
Springboot集成Swagger实战的更多相关文章
- springboot集成swagger实战(基础版)
1. 前言说明 本文主要介绍springboot整合swagger的全过程,从开始的swagger到Knife4j的进阶之路:Knife4j是swagger-bootstarp-ui的升级版,包括一些 ...
- spring-boot 集成 swagger 问题的解决
spring-boot 集成 swagger 网上有许多关于 spring boot 集成 swagger 的教程.按照教程去做,发现无法打开接口界面. 项目由 spring mvc 迁移过来,是一个 ...
- 20190909 SpringBoot集成Swagger
SpringBoot集成Swagger 1. 引入依赖 // SpringBoot compile('org.springframework.boot:spring-boot-starter-web' ...
- SpringBoot集成Swagger,Postman,newman,jenkins自动化测试.
环境:Spring Boot,Swagger,gradle,Postman,newman,jenkins SpringBoot环境搭建. Swagger简介 Swagger 是一款RESTFUL接口的 ...
- springboot集成swagger添加消息头(header请求头信息)
springboot集成swagger上篇文章介绍: https://blog.csdn.net/qiaorui_/article/details/80435488 添加头信息: package co ...
- springboot 集成 swagger 自动生成API文档
Swagger是一个规范和完整的框架,用于生成.描述.调用和可视化RESTful风格的Web服务.简单来说,Swagger是一个功能强大的接口管理工具,并且提供了多种编程语言的前后端分离解决方案. S ...
- SpringBoot集成Swagger接口管理工具
手写Api文档的几个痛点: 文档需要更新的时候,需要再次发送一份给前端,也就是文档更新交流不及时. 接口返回结果不明确 不能直接在线测试接口,通常需要使用工具,比如postman 接口文档太多,不好管 ...
- springboot 集成swagger ui
springboot 配置swagger ui 1. 添加依赖 <!-- swagger ui --> <dependency> <groupId>io.sprin ...
- SpringBoot整合Swagger实战
源码地址:https://github.com/laolunsi/spring-boot-examples 目前SpringBoot常被用于开发Java Web应用,特别是前后端分离项目.为方便前后端 ...
- Java SpringBoot集成RabbitMq实战和总结
目录 交换器.队列.绑定的声明 关于消息序列化 同一个队列多消费类型 注解将消息和消息头注入消费者方法 关于消费者确认 关于发送者确认模式 消费消息.死信队列和RetryTemplate RPC模式的 ...
随机推荐
- Jquery - 获取所有子节点 ( 并删除 )
1,获取所有子节点 $(".parent").find('.child') 2,获取所有子节点,通过上层 div 的类名 , 获取上层 div 节点 $(".pare ...
- MySQL复习——20211027
MYSQL MySQL创建数据库 我们可以在登录MySQL服务后,使用create命令创建数据库,语法如下: CREATE DATABASE 数据库名; 使用root用户登录,root用户拥有最高权限 ...
- [粘贴]关于preparedStatement
作者:wuxinliulei链接:https://www.zhihu.com/question/37043270/answer/83914933来源:知乎著作权归作者所有.商业转载请联系作者获得授权, ...
- [转帖]SQL Server索引的维护 - 索引碎片、填充因子
https://www.cnblogs.com/kissdodog/archive/2013/06/14/3135412.html 这两个问题都和页密度有关,虽然两者的表现形式在本质上有所区别,但是故 ...
- [转帖]MegaCli命令
MegaCli命令 设置jbod模式 1.3 LSI 9260/9261 raid卡配置 LSI 9260/9261 raid卡支持0.1.10.5.6.50.60 常用命令: 清除raid卡原有的配 ...
- [转帖]GC 日志
https://www.xjx100.cn/news/188814.html?action=onClick 垃圾回收器的发展历史 1999年:随JDK1.3.1一起来的串行方式Serial GC(第一 ...
- [转帖]【JVM】JDK命令行工具
在JDK/bin目录下我发现了许多命令行工具 这些命令有哪些作用呢,接下来我就来详细介绍一下 常用JDK命令行工具 命令名称 全称 用途 jstat JVM Statistics Monitoring ...
- 使用TFS CI 又想保留服务运行状态的简单方法
最近公司使用TFS-CI的方式定期部署测试环境, 但是发现TFS-CI 运行完之后会清理agent所在的测试环境. 运行的进程都会被killed 1. 第一种方法: 本来第一反应 是使用systemd ...
- 下载 ingres-nginx
https://quay.io/repository/kubernetes-ingress-controller/nginx-ingress-controller-arm64?tag=latest&a ...
- hadoop实践02---eclipse操作hdfs的api上传文件
1.eclipse中编写代码后双击main方法--->Run as ---> java application ,然后指定的文件 就会提交到hdfs中. 2.查看文件:http://192 ...