
从.Net到Java学习第六篇——SpringBoot+mongodb&Thymeleaf&模型验证
SpringBoot整合mongodb
MongoDB 是一个介于关系数据库和非关系数据库之间的产品,是非关系数据库当中功能最丰富,最像关系数据库的。
如果你没用过MongoDB,可以先去看下我的文章:https://www.cnblogs.com/jiekzou/category/851166.html
接上一篇,修改pom.xml,添加mongodb的依赖
        <!--mongodb-->

        <dependency>

            <groupId>org.springframework.boot</groupId>

            <artifactId>spring-boot-starter-data-mongodb</artifactId>

        </dependency>
添加mongodb数据库连接,修改application.yml
spring:

  profiles:

    active: dev

  #  mongodb

  data:

    mongodb:

      database: test

      port: 27017

      host: 192.168.1.18
修改原来的Person实体类
public class Person {

    @Id

    private Long id;

    public Long getId() {

        return id;

    }

    public void setId(Long id) {

        this.id = id;

    }

    private String name;

    private String sex;

    public Person() {

    }

    public Person(Long id,String name, String sex) {

        this.id=id;

        this.name = name;

        this.sex = sex;

    }

    public String getName() {

        return name;

    }

    public void setName(String name) {

        this.name = name;

    }

    public String getSex() {

        return sex;

    }

    public void setSex(String sex) {

        this.sex = sex;

    }
新建包repository,然后在包下创建一个数据操作层接口PersonRepository,继承MongoRepository,代码如下:
public interface PersonRepository extends MongoRepository<Person,Long> {

}
创建一个controller类PersonController进行增删改查测试
@RestController

public class PersonController {

    @Autowired

    private PersonRepository userRepository;

    @GetMapping("save")

    public String save() {

        Person userInfo = new Person(System.currentTimeMillis(),"李寻欢","男");

        userRepository.save(userInfo);

        return "success";

    }

    @GetMapping("getUserList")

    public List<Person> getUserList() {

        List<Person> userInfoList = userRepository.findAll();

        return userInfoList;

    }

    @GetMapping("delete")

    public String delete(Long id) {

        userRepository.delete(id);

        return "success";

    }

    @GetMapping("update")

    public String update(Long id, String username, String password) {

        Person userInfo = new Person(id, username, password);

        userRepository.save(userInfo);

        return "success";

    }

}
访问http://localhost:8083/boot/save,刷几遍,添加几条数据
然后再访问http://localhost:8083/boot/getUserList查看数据

当然,我们也可以使用可视化的mongodb管理工具去查看,这里我使用的是robo3t

在配置了mysql、mongodb等数据库连接之后我们发现,基本上我们都离不开如下几个步骤:
- 加入对应依赖
- 配置文件配置对应数据库信息
- 数据操作层继承想要的repository
SpringBoot引用Thymeleaf
Thymeleaf就是一个模板引擎和.net的razor一样。Spring boot 推荐用来代替jsp。
Thymeleaf的优点
- Thymeleaf 在有网络和无网络的环境下皆可运行,即它可以让美工在浏览器查看页面的静态效果,也可以让程序员在服务器查看带数据的动态页面效果。(当有数据返回到页面时,Thymeleaf 标签会动态地替换掉静态内容,使页面动态显示。)
- Thymeleaf 开箱即用的特性。(它提供标准和spring标准两种方言,可以直接套用模板实现JSTL、 OGNL表达式效果。)
- Thymeleaf 提供spring标准方言和一个与 SpringMVC 完美集成的可选模块,可以快速的实现表单绑定、属性编辑器、国际化等功能。
另外,Thymeleaf是一个XML/XHTML/HTML5模板引擎,可用于Web与非Web环境中的应用开发。它是一个开源的Java库,基于Apache License 2.0许可,由Daniel Fernández创建,该作者还是Java加密库Jasypt的作者。
由于Thymeleaf使用了XML DOM解析器,因此它并不适合于处理大规模的XML文件。也就是说它的性能是有一定问题的,如果文件较大的情况下。
关于Thymeleaf的语法可以参考官网:https://www.thymeleaf.org/documentation.html
SpringBoot引用Thymeleaf依赖
修改pom.xml,添加如下依赖
        <!--thymeleaf-->

        <dependency>

            <groupId>org.springframework.boot</groupId>

            <artifactId>spring-boot-starter-thymeleaf</artifactId>

        </dependency>
这里有个坑,默认情况下hymeleaf中所有的标签都必须成对出现,否则IDEA运行时就会报错:" 必须由匹配的结束标记终止..“。
据说spring boot 2.0已结修复了这个标签的问题,但是我这里目前用的版本是低于2.0的,所以需要额外处理。
继续添加依赖
        <dependency>

            <groupId>net.sourceforge.nekohtml</groupId>

            <artifactId>nekohtml</artifactId>

            <version>1.9.22</version>

        </dependency>
然后修改application.yml中的配置,
spring:

  profiles:

    active: dev

  thymeleaf:

    mode: LEGACYHTML5
新建一个控制器类来做测试,AreaPageController,
@Controller

public class AreaPageController{

    @Autowired

    private AreaService areaService;

    @GetMapping("/addArea")

    public String addArea(Model model) {

        model.addAttribute("area", new Area());

        return "addArea";

    }

    @RequestMapping(value = "/addArea",method = RequestMethod.POST, produces = {"application/json;charset=UTF-8"})

    public String addArea(@Valid @ModelAttribute Area area, BindingResult bindingResult){

        if (bindingResult.hasErrors()) {

            return "addArea";

        }else{

            Map<String,Object> modelMap= new HashMap<String,Object>() ;

            modelMap.put("success",areaService.addArea(area));

            return "result";

        }

    }

}
修改之前的Area实体类,这东西就跟.net mvc 里面的模型验证一样
package com.yujie.model;

import org.hibernate.validator.constraints.NotEmpty;

import javax.validation.constraints.Max;

import javax.validation.constraints.Min;

import javax.validation.constraints.NotNull;

import javax.validation.constraints.Size;

import java.util.Date;

public class Area {

    private Integer areaId;

    @NotEmpty

    @Size(min=2, max=30)

    private String areaName;

    @NotNull

    @Min(1)

    @Max(200)

    private Integer priority;

    private Date createTime;

    private Date lastEditTime;
  ......

}
templates目录是存放html文件的,在templates目录下面新建一个html文件addArea.html,这个就相当于.net mvc中的razor视图。
<!DOCTYPE html>

<html xmlns:th="http://www.thymeleaf.org"><!--引入thymeleaf-->

<head>

    <meta charset="UTF-8" />

    <title>添加区域</title></head>

<link href="https://cdn.bootcss.com/bootstrap/3.3.7/css/bootstrap.min.css" rel="stylesheet" />

<body>

    <h2 style="color:green;text-align: center;">添加区域</h2>

    <form class="form-horizontal" role="form" action="#" th:action="@{/addArea}" th:object="${area}" method="post">

        <div class="form-group"><label for="name" class="col-sm-2 control-label">区域名称:</label>

            <div class="col-sm-8"><input type="text" th:field="*{areaName}" class="form-control" id="areaName"

                                          placeholder="输入区域名称"></div>

            <label class="col-sm-2" style="color:red" th:if="${#fields.hasErrors('areaName')}" th:errors="*{areaName}">区域名称错误</label></div>

        <div class="form-group"><label for="priority" class="col-sm-2 control-label">优先级</label>

            <div class="col-sm-8"><input type="text" th:field="*{priority}" class="form-control" id="priority"

                                          placeholder="输入优先级"></div>

            <label class="col-sm-2" style="color:red" th:if="${#fields.hasErrors('priority')}" th:errors="*{priority}">优先级错误</label></div>

        <div class="form-group">

            <div class="col-sm-12" style="text-align: center">

                <button type="submit" class="btn btn-primary" id="btn">Submit</button>

                <input type="reset" class="btn btn-warning" value="Reset"/></div>

        </div>

    </form>

</body>

</html>
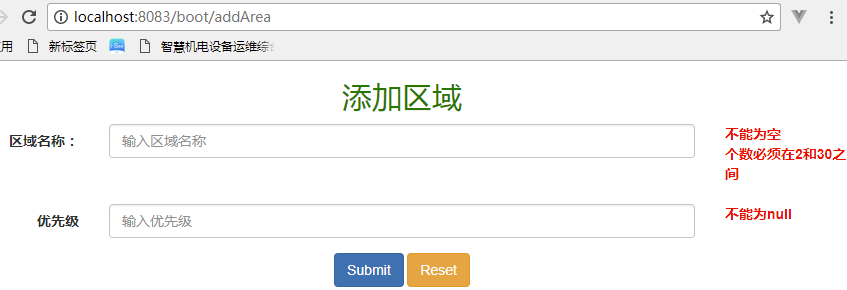
运行结果如下:
其它学习资料:Spring Web MVC框架(十二) 使用Thymeleaf
从.Net到Java学习第六篇——SpringBoot+mongodb&Thymeleaf&模型验证的更多相关文章
- 从.Net到Java学习第十一篇——SpringBoot登录实现
从.Net到Java学习系列目录 通过前面10篇文章的学习,相信我们对SpringBoot已经有了一些了解,那么如何来验证我们的学习成果呢?当然是通过做项目来证明啦!所以从这一篇开始我将会对之前自己做 ...
- 从.Net到Java学习第八篇——SpringBoot实现session共享和国际化
从.Net到Java学习系列目录 SpringBoot Session共享 修改pom.xml添加依赖 <!--spring session--> <dependency> & ...
- 从.Net到Java学习第七篇——SpringBoot Redis 缓存穿透
从.Net到Java学习系列目录 场景描述:我们在项目中使用缓存通常都是先检查缓存中是否存在,如果存在直接返回缓存内容,如果不存在就直接查询数据库然后再缓存查询结果返回.这个时候如果我们查询的某一个数 ...
- Java学习第六篇:集合类
一.Java集合类框架 Java集合大致可分为Set.List和Map三种体系,其中Set代表无序.不可重复的集合:List代表有序.重复的集合:而Map则代表具有映射关系的集合:从Java5以后,J ...
- Java 学习 第六篇;接口
1: 接口定义修饰符 interface 接口名{ 常量定义: 抽象方法定义:}修饰符 interface 接口名 extends 父接口表{ 常量定义: 抽象方法定义:}-> 修饰符可以是pu ...
- 201671010140. 2016-2017-2 《Java程序设计》java学习第六章
java学习第六章 本周对与java中的接口,lambda表达式与内部类进行了学习,以下是我在学习中的一些体会: 1.接口: <1>.接口中的所有常量必须是public sta ...
- Java 学习(六)
Java 学习(六) 标签(空格分隔): Java 枚举 JDK1.5引入了新的类型--枚举.在 Java 中它虽然算个"小"功能,却给我的开发带来了"大"方便 ...
- Java学习之反射篇
Java学习之反射篇 0x00 前言 今天简单来记录一下,反射与注解的一些东西,反射这个机制对于后面的java反序列化漏洞研究和代码审计也是比较重要. 0x01 反射机制概述 Java反射是Java非 ...
- Java学习之jackson篇
Java学习之jackson篇 0x00 前言 本篇内容比较简单,简单记录. 0x01 Json 概述 概述:JSON(JavaScript Object Notation, JS 对象简谱) 是一种 ...
随机推荐
- Servlet, Struts2和SpringMVC 并发访问线程安全问题
第一部分: Servlet不是线程安全的. 要解释Servlet为什么不是线程安全的,需要了解Servlet容器(即Tomcat)使如何响应HTTP请求的. 当Tomcat接收到Client的HTTP ...
- [Swift]LeetCode8. 字符串转整数 (atoi) | String to Integer (atoi)
Implement atoi which converts a string to an integer. The function first discards as many whitespace ...
- [Swift]LeetCode13. 罗马数字转整数 | Roman to Integer
Roman numerals are represented by seven different symbols: I, V, X, L, C, D and M. Symbol Value I 1 ...
- [Swift]LeetCode542. 01 矩阵 | 01 Matrix
Given a matrix consists of 0 and 1, find the distance of the nearest 0 for each cell. The distance b ...
- TCP/IP 详解常用术语
业务需要,最近看TCP/IP 这本书,专业名词太多了,总结一下,给后来着参考,直接使用. 后续会在读书时慢慢添加. ACK:(ACKnowledgment)TCP首部中的确认标志. ARP:地址解析协 ...
- MySQL优化之my.conf配置详解
最近项目不太忙,所以有时间静心来研究下mysql的优化,对于MySQL的设置是否合理优化,直接影响到网站的速度和承载量!同时,MySQL也是优化难度最大的一个部分,不但需要理解一些MySQL专业知识, ...
- Python内置函数(14)——delattr
英文文档: delattr(object, name) This is a relative of setattr(). The arguments are an object and a strin ...
- 上下div高度动态自适应--另类处理方案
这段时间在工作中遇到一个看似较为棘手的问题.问题描述:查询报表页面分为上下两部分,上部分为条件输入区域,下部分为报表展示区域.客户要求做到默认满屏(但要动态适应不同的窗体大小,也就是浏览器窗体用户会手 ...
- qt 坐标变换
原文链接:Qt学习之路(28): 坐标变换 同很多坐标系统一样,QPainter的默认坐标的原点(0, 0)位于屏幕的左上角,X轴正方向是水平向右,Y轴正方向是竖直向下.在这个坐标系统中,每个像素 ...
- 【朝花夕拾】Android性能篇之(一)序言及JVM
序言 笔者从事Anroid开发有些年头了,深知掌握Anroid性能优化方面的知识的必要性,这是一个程序员必须修炼的内功.在面试中,它是面试官的挚爱,在工作中,它是代码质量的拦路虎,其重要 ...