SpringBoot入门教程(七)整合themeleaf+bootstrap
Thymeleaf是用于Web和独立环境的现代服务器端Java模板引擎。Thymeleaf的主要目标是将优雅的自然模板带到您的开发工作流程中—HTML能够在浏览器中正确显示,并且可以作为静态原型,从而在开发团队中实现更强大的协作。Thymeleaf能够处理HTML,XML,JavaScript,CSS甚至纯文本。
Spring-boot-starter-web集成了Tomcat以及Spring MVC,会自动配置相关东西,Thymeleaf是用的比较广泛的模板引擎.
v更新pom.xml
        <dependency>

            <groupId>org.springframework.boot</groupId>

            <artifactId>spring-boot-starter-thymeleaf</artifactId>

        </dependency>
v更新application.properties
#thymeleaf

spring.thymeleaf.cache=false

spring.thymeleaf.prefix=classpath:/templates/

spring.thymeleaf.check-template-location=true

spring.thymeleaf.suffix=.html

spring.thymeleaf.encoding=UTF-8

spring.thymeleaf.mode=HTML5
v创建Controller
之所以新建Controller,而不是复用之前的IndexController,是因为IndexController使用的是@RESTController注解的方式。
1. 使用@Controller 注解,在对应的方法上,视图解析器可以解析return 的jsp,html页面,并且跳转到相应页面。若返回json等内容到页面,则需要加@ResponseBody注解
2. @RestController注解,相当于@Controller+@ResponseBody两个注解的结合,返回json数据不需要在方法前面加@ResponseBody注解了,但使用@RestController这个注解,就不能返回jsp,html页面,视图解析器无法解析jsp,html页面
新建UserController:
package com.demo.controller;

import com.demo.pojo.UserPosition;

import com.demo.service.UserService;

import org.springframework.beans.factory.annotation.Autowired;

import org.springframework.stereotype.Controller;

import org.springframework.ui.Model;

import org.springframework.web.bind.annotation.RequestMapping;

import java.math.BigDecimal;

import java.util.List;

/**

 * Created by toutou on 2018/10/20.

 */

@Controller

public class UserController {

    @Autowired

    UserService userService;

    @RequestMapping(value = "/mynearby")

    public String myNearby(Model model, double lon, double lat)

    {

        double r = 6371;//地球半径千米

        double dis = 2; //半径 单位:km

        double dlng =  2*Math.asin(Math.sin(dis/(2*r))/Math.cos(lat*Math.PI/180));

        dlng = dlng*180/Math.PI;//角度转为弧度

        double dlat = dis/r;

        dlat = dlat*180/Math.PI;

        double minlat =lat-dlat;

        double maxlat = lat+dlat;

        double minlng = lon -dlng;

        double maxlng = lon + dlng;

        List<UserPosition> list = userService.getVicinity(BigDecimal.valueOf(minlng), BigDecimal.valueOf(maxlng), BigDecimal.valueOf(minlat), BigDecimal.valueOf(maxlat));

        model.addAttribute("myinfo",list);

        return "mynearby";

    }

}
v创建页面
/src/main/resources/templates/mynearby.html
<!DOCTYPE html>
<html xmlns="http://www.w3.org/1999/xhtml" xmlns:th="http://www.thymeleaf.org" >
<html lang="en">
<head>
<meta content="text/html;charset=UTF-8"/>
<meta name="viewport" content="width=device-width,initial-scale=1"/>
<link href="https://cdn.bootcss.com/twitter-bootstrap/3.3.7/css/bootstrap.min.css" rel="stylesheet">
<link href="https://cdn.bootcss.com/twitter-bootstrap/3.3.7/css/bootstrap-theme.min.css" rel="stylesheet">
<title>附近的小区</title>
</head>
<body>
<br/>
<div class="panel panel-primary">
<div class="panel-heading">
<h3 class="panel-title">我的坐标</h3>
</div>
<div class="panel-body">
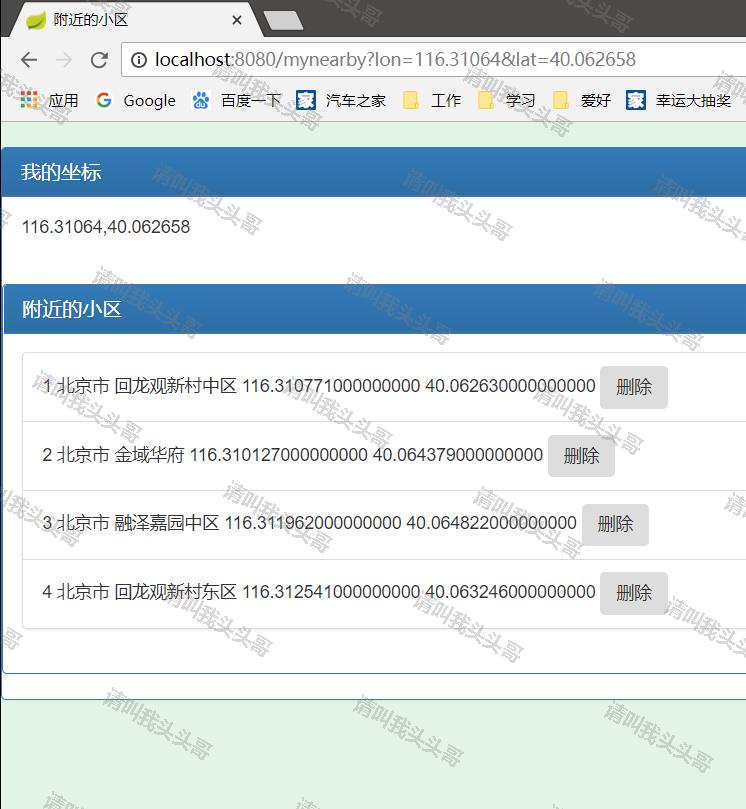
<span>116.31064,40.062658</span>
</div>
<br/>
<div th:if="${not #lists.isEmpty(myinfo)}">
<div class="panel panel-primary">
<div class="panel-heading">
<h3 class="panel-title">附近的小区</h3>
</div>
<div class="panel-body">
<ul class="list-group">
<li class="list-group-item" th:each="item : ${myinfo}">
<span th:text="${item.id}"></span>
<span th:text="${item.city}"></span>
<span th:text="${item.position}"></span>
<span th:text="${item.longitude}"></span>
<span th:text="${item.latitude}"></span>
<button class="btn">删除</button>
</li>
</ul>
</div>
</div>
</div>
</div>
<script src="https://cdn.bootcss.com/jquery/3.3.1/jquery.min.js"></script>
<script src="https://cdn.bootcss.com/twitter-bootstrap/3.3.7/js/bootstrap.min.js"></script>
<script th:inline="javascript">
// var single = [[${singlePerson}]];
// console.log(single.name+"/"+single.age);
$(function(){
$(".btn").click(function(){
alert("删除功能完善中...");
});
});
</script>
</body>
</html>
xmlns:th="http://www.thymeleaf.org"命名空间,将镜头转化为动态的视图,需要进行动态处理的元素使用“th:”前缀;两个link引入bootstrap框架,通过@{}引入web静态资源(括号里面是资源路径)访问model中的数据通过${}访问.
运行效果:
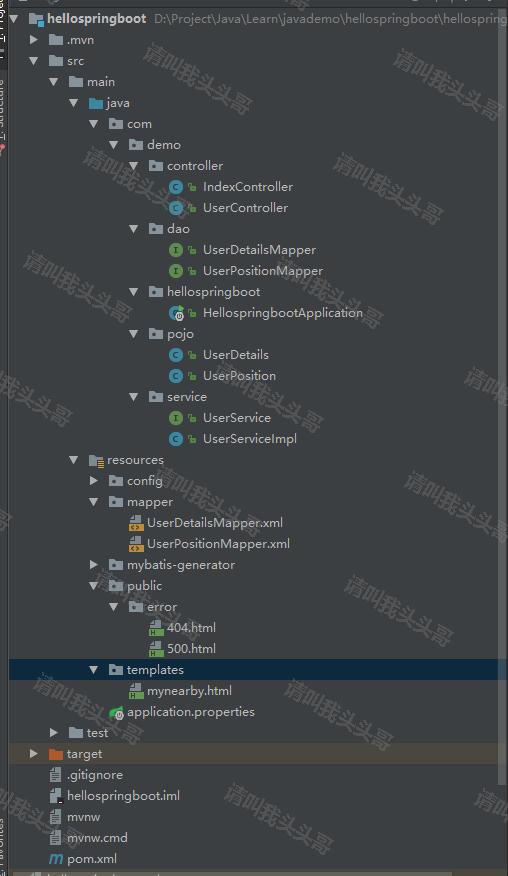
目录结构:
v源码地址
https://github.com/toutouge/javademosecond/tree/master/hellospringboot
作 者:请叫我头头哥
出 处:http://www.cnblogs.com/toutou/
关于作者:专注于基础平台的项目开发。如有问题或建议,请多多赐教!
版权声明:本文版权归作者和博客园共有,欢迎转载,但未经作者同意必须保留此段声明,且在文章页面明显位置给出原文链接。
特此声明:所有评论和私信都会在第一时间回复。也欢迎园子的大大们指正错误,共同进步。或者直接私信我
声援博主:如果您觉得文章对您有帮助,可以点击文章右下角【推荐】一下。您的鼓励是作者坚持原创和持续写作的最大动力!
SpringBoot入门教程(七)整合themeleaf+bootstrap的更多相关文章
- SpringBoot进阶教程(七十四)整合ELK
在上一篇文章<SpringBoot进阶教程(七十三)整合elasticsearch >,已经详细介绍了关于elasticsearch的安装与使用,现在主要来看看关于ELK的定义.安装及使用 ...
- SpringBoot进阶教程(七十一)详解Prometheus+Grafana
随着容器技术的迅速发展,Kubernetes已然成为大家追捧的容器集群管理系统.Prometheus作为生态圈Cloud Native Computing Foundation(简称:CNCF)中的重 ...
- 无废话ExtJs 入门教程七[登陆窗体Demo:Login]
无废话ExtJs 入门教程七[登陆窗体Demo:Login] extjs技术交流,欢迎加群(201926085) 在这节我们通过前几节讲的内容做一个登陆页面,把前几节讲的内容贯穿一下. 1.代码如下: ...
- SpringBoot入门教程(二)CentOS部署SpringBoot项目从0到1
在之前的博文<详解intellij idea搭建SpringBoot>介绍了idea搭建SpringBoot的详细过程, 并在<CentOS安装Tomcat>中介绍了Tomca ...
- RabbitMQ入门教程(七):主题交换机Topics
原文:RabbitMQ入门教程(七):主题交换机Topics 版权声明:本文为博主原创文章,遵循CC 4.0 BY-SA版权协议,转载请附上原文出处链接和本声明. 本文链接:https://blog. ...
- SpringBoot进阶教程(七十)SkyWalking
流行的APM(Application Performance Management工具有很多,比如Cat.Zipkin.Pinpoint.SkyWalking.优秀的监控工具还有很多,其它比如还有za ...
- SpringBoot进阶教程(七十三)整合elasticsearch
Elasticsearch 是一个分布式.高扩展.高实时的搜索与数据分析引擎.它能很方便的使大量数据具有搜索.分析和探索的能力.充分利用Elasticsearch的水平伸缩性,能使数据在生产环境变得更 ...
- springBoot入门教程(图文+源码+sql)
springBoot入门 1 springBoot 1.1 SpringBoot简介 Spring Boot让我们的Spring应用变的更轻量化.比如:你可以仅仅依靠一个Java类来运行一个Spr ...
- Spring Cloud 入门教程(七): 熔断机制 -- 断路器
对断路器模式不太清楚的话,可以参看另一篇博文:断路器(Curcuit Breaker)模式,下面直接介绍Spring Cloud的断路器如何使用. SpringCloud Netflix实现了断路器库 ...
随机推荐
- [enum]enum的用法
ENUM概况 enum枚举类型是C/C++中的一种数据类型,与struct和class一样是用户自定义的类型,其特点在于enum类型的变量取值是有限的,是可以一一列举出来的. ENUM定义 C++ e ...
- 计蒜客 等边三角形 dfs
题目: https://www.jisuanke.com/course/2291/182238 思路: 1.dfs(int a,int b,int c,int index)//a,b,c三条边的边长, ...
- 最简单的原生js和jquery插件封装
最近在开发过程中用别人的插件有问题,所以研究了一下,怎么封装自己的插件. 如果是制作jquery插件的话.就将下面的extend方法换成 $.extend 方法,其他都一样. 总结一下实现原理: 将 ...
- Linux 下的两个特殊的文件 -- /dev/null 和 /dev/zero 简介及对比
1.概论 -- 来自维基的解释 /dev/null : 在类Unix系统中,/dev/null,或称空设备,是一个特殊的设备文件,它丢弃一切写入其中的数据(但报告写入操作成功),读取它则会立即得到一 ...
- PHP 清除 Excel 导入的数据空格
处理excel中的数据时,遇到了页面中显示为空格,审查元素时却显示为换行,使用replace函数也不管用,反正就是不知道是什么东西,看起来像空格 中文空格这里面有好几种:没有简单的解决问题的方式,比如 ...
- BurpSuite 代理设置的小技巧
原文:https://www.anquanke.com/post/id/85925 作者:三思之旅 预估稿费:300RMB 投稿方式:发送邮件至linwei#360.cn,或登陆网页版在线投稿 在We ...
- 32、可以拿来用的JavaScript实用功能代码
可以拿来用的JavaScript实用功能代码(可能会有些bug,用时稍微修改下,我用了几个还可以) 转载自 1.原生JavaScript实现字符串长度截取 function cutstr(str, l ...
- python从入门到实践-4章操作列表
magicians = ['alice','david','carolina']for magician in magicians: print(magician) print(magician.ti ...
- react基础篇 整理(一)
备注不知道为啥不能到出图片,详细知识自己百度一下就可以了,很简单的.画这个是为了更好的梳理知识,公司有个App项目,项目可控,所以尝试一下用React-native去做一下试试.
- js杨辉三角控制台输出
function Yang(line){ var arr=new Array() ;i<=line;i++){ ]==undefined){arr[i-]=[];} ){arr[]=[i]}){ ...