
Python3+Flask安装使用教程
一、环境配置
当前我的开发环境是Miniconda3+PyCharm。开发环境其实无所谓,自己使用Python3+Nodepad都可以。安装Flask库:
pip install Flask
二、第一个应用程序
将以下内容保存为helloworld.py:
# 导入Flask类

from flask import Flask

# 实例化,可视为固定格式

app = Flask(__name__)

# route()方法用于设定路由;类似spring路由配置

@app.route('/helloworld')

def hello_world():

    return 'Hello, World!'

if __name__ == '__main__':

    # app.run(host, port, debug, options)

    # 默认值:host="127.0.0.1", port=5000, debug=False

    app.run(host="0.0.0.0", port=5000)
直接运行该文件,然后访问:http://127.0.0.1:5000/helloworld。结果如下图:

三、get和post实现
3.1 创建用到的模板文件
Flask默认到templates目录下查找模板文件,在上边htlloworld.py同级目录下创建templates文件夹。
在templates文件夹下创建get.html,写入以下内容:
<!DOCTYPE html>

<html>

<head>

<meta charset="utf-8">

<title>get请求示例</title>

</head>

<body>

    <form action="/deal_request" method="get">

        <input type="text" name="q" />

        <input type="submit" value="搜索" />

    </form>

</body>

</html>
再在templates文件夹下创建post.html,写入以下内容:
<!DOCTYPE html>

<html>

<head>

<meta charset="utf-8">

<title>post请求示例</title>

</head>

<body>

    <form action="/deal_request" method="post">

        <input type="text" name="q" />

        <input type="submit" value="搜索" />

    </form>

</body>

</html>
最后在templates文件夹下创建result.html,写入以下内容:
<!-- Flask 使用Jinja2模板引擎,Jinja2模板引擎源于Django板模所以很多语法和Django是类似的 -->

<h1>{{ result }}</h1>
3.2 编写相关的处理方法
在helloworld.py中添加get_html()、post_html()和deal_request()三个方法,更多说明见注释。当前helloworld.py内容如下:
# 导入Flask类

from flask import Flask

from flask import render_template

from flask import request

# 实例化,可视为固定格式

app = Flask(__name__)

# route()方法用于设定路由;类似spring路由配置

#等价于在方法后写:app.add_url_rule('/', 'helloworld', hello_world)

@app.route('/helloworld')

def hello_world():

    return 'Hello, World!'

# 配置路由,当请求get.html时交由get_html()处理

@app.route('/get.html')

def get_html():

    # 使用render_template()方法重定向到templates文件夹下查找get.html文件

    return render_template('get.html')

# 配置路由,当请求post.html时交由post_html()处理

@app.route('/post.html')

def post_html():

    # 使用render_template()方法重定向到templates文件夹下查找post.html文件

    return render_template('post.html')

# 配置路由,当请求deal_request时交由deal_request()处理

# 默认处理get请求,我们通过methods参数指明也处理post请求

# 当然还可以直接指定methods = ['POST']只处理post请求, 这样下面就不需要if了

@app.route('/deal_request', methods = ['GET', 'POST'])

def deal_request():

    if request.method == "GET":

        # get通过request.args.get("param_name","")形式获取参数值

        get_q = request.args.get("q","")

        return render_template("result.html", result=get_q)

    elif request.method == "POST":

        # post通过request.form["param_name"]形式获取参数值

        post_q = request.form["q"]

        return render_template("result.html", result=post_q)

if __name__ == '__main__':

    # app.run(host, port, debug, options)

    # 默认值:host=127.0.0.1, port=5000, debug=false

    app.run()
3.3 查看运行效果
重新运行helloworld.py。
当前目录结构如下(.idea目录不用管):
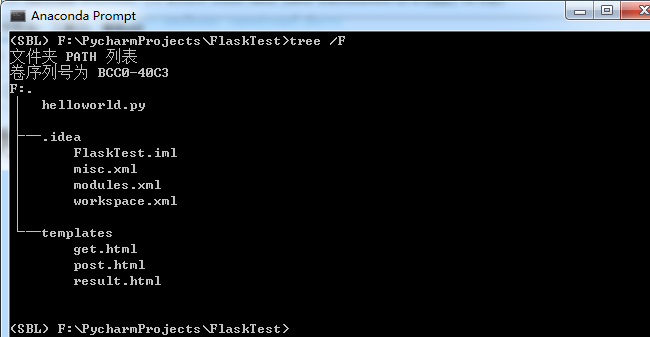
get.html如下:

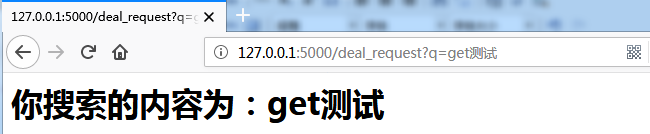
get查询结果如下:
post.html如下:

post查询结果如下:

四、restful
4.1 安装flask-restful
restful我这里通过Flask-RESTful实现。
pip install flask-restful
4.2 实现rest代码
修改helloworld.py,添加三处,具体见注释
# 导入Flask类

from flask import Flask

from flask import render_template

from flask import request

# 添加位置一。从Flask-RESTful中导入以下三项

from flask_restful import Api

from flask_restful import Resource

from flask_restful import reqparse

# 实例化,可视为固定格式

app = Flask(__name__)

# 添加位置二。

# 实例化一个api用于配置rest路由

# 实例化一个参数解析类,用于rest获取get和post提交的参数

api = Api(app)

parser = reqparse.RequestParser()

# 注册q参数parser才能解析get和post中的q参数。这种注册才能解析的要求是否有点孤儿

parser.add_argument('q', type=str, help='Rate to charge for this resource')

# route()方法用于设定路由;类似spring路由配置

#等价于在方法后写:app.add_url_rule('/', 'helloworld', hello_world)

@app.route('/helloworld')

def hello_world():

    return 'Hello, World!'

# 配置路由,当请求get.html时交由get_html()处理

@app.route('/get.html')

def get_html():

    # 使用render_template()方法重定向到templates文件夹下查找get.html文件

    return render_template('get.html')

# 配置路由,当请求post.html时交由post_html()处理

@app.route('/post.html')

def post_html():

    # 使用render_template()方法重定向到templates文件夹下查找post.html文件

    return render_template('post.html')

# 配置路由,当请求deal_request时交由deal_request()处理

# 默认处理get请求,我们通过methods参数指明也处理post请求

# 当然还可以直接指定methods = ['POST']只处理post请求, 这样下面就不需要if了

@app.route('/deal_request', methods = ['GET', 'POST'])

def deal_request():

    if request.method == "GET":

        # get通过request.args.get("param_name","")形式获取参数值

        get_q = request.args.get("q","")

        return render_template("result.html", result=get_q)

    elif request.method == "POST":

        # post通过request.form["param_name"]形式获取参数值

        post_q = request.form["q"]

        return render_template("result.html", result=post_q)

# 添加位置三。

# 添加rest类(是类而不是和Flask一样直接是方法)

class Rest(Resource):

    # get提交时的处理方法

    def get(self):

        result = {}

        args = parser.parse_args()

        result["method"] = "get"

        result["q"] = args["q"]

        return result

    # post提交时的处理方法

    def post(self):

        result = {}

        # 此种方法即可解析通过普通post提交也可解析json格式提交

        args = parser.parse_args()

        result["method"] = "post"

        result["q"] = args["q"]

        return result

# 配置路由

api.add_resource(Rest, '/rest')

if __name__ == '__main__':

    # app.run(host, port, debug, options)

    # 默认值:host=127.0.0.1, port=5000, debug=false

    app.run()
4.3 查看运行结果
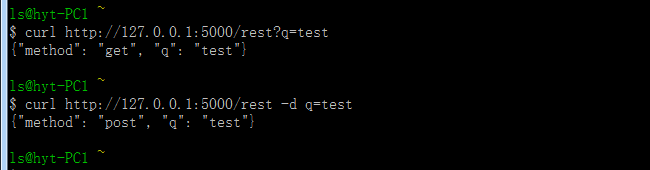
即然是restful我们也就不写html了,直接用curl模拟提交。重新运行helloworld.py,请求如下图(之前非rest的get和post当然也还能正常访问):
五、Flask与Django比较
我们经常会听说这样的一个观点:Django是Python最流行的Web框架但配置比较复杂,Flask是一个轻量级的框架配置比较简单如果项目比较小推荐使用Flask。
5.1 Django配置复杂
如果对Django不是很了解,可以参看“Python3+PyCharm+Django+Django REST framework开发教程”和“Python3+Django get/post请求实现教程”。
仅从文章长度看就比这篇长很多,所以Django比Flask复杂(得多)是肯定的。更具体比较如下:
| 比较项 | Django | Flask | 复杂度比较 | 说明 |
| 项目创建 | Django需要用命令创建项目 | Flask直接编写文件就可运行 | Django复杂 | Django需要用命令创建项目是因为要创建出整个项目框架 |
| 路由 | Django使用专门的urls.py文件 | Flask直接使用@app.route() | Django笨重 | Django类似Strut2的配置Flask类似Spring的配置,Flask感觉更好 |
| get和post | request.GET['name']和request.POST["name"] | request.args.get("name","")和request.form["q"] | 差不多 | Flask格式上不统一 |
| restful | 使用django-resful框架 | 使用flask-restful框架 | 差不多 | Flask使用方法flask-rest使用类格式不统一;flask-restful需要注册参数有点孤儿 |
| 数据库操作 | django集成了对数据库的操作 | Flask没集成对数据库的操作要另行直连或使用sqlalchemy | 差不多 | django复杂很大程度来源于对数据库的集成。 |
5.2 Flask适合使用场景
Django复杂来源于其“可能用到的功能都先集成”,Flask的轻量来源其“暂时不用的功能都先不做处理”。随着项目规模的扩大最终Django有的东西Flask也都需要有,而且由于没做统一规划Flask将处于劣势位置。
个人认为Flask适用以下两个场景:
一是开发者没有Spring等企业级框架开发经验,不然Django很多项为什么要配置为什么这样配置不那样配置比较难理解。
二是项目大概是十来个页面、就只有两三张数据表甚至不用数据库的规模,在这种程度下减少的配置工作还算能抵得过增加的开发工作量。
如果之前用过Spring之类的框架写过代码的话个人还是推荐不管项目大小都直接用Django,主要是Flask不统一的格式让人很难受。
参考:
http://flask.pocoo.org/docs/1.0/quickstart/#
https://flask-restful.readthedocs.io/en/latest/
Python3+Flask安装使用教程的更多相关文章
- 2018超详细sublime text3+python3.x安装配置教程(附常用插件安装教程)
导读 本文是关于2018年7月最新版sublime text3+pythin3.x下载及安装配置教程,sublime text3版本为3176,python版本为3.7,安装环境是基于windows1 ...
- python3 Flask安装
虚拟环境 建议在开发环境和生产环境下都使用虚拟环境来管理项目的依赖. 为什么要使用虚拟环境?随着你的 Python 项目越来越多,你会发现不同的项目会需要 不同的版本的 Python 库.同一个 Py ...
- Python3+Appium安装使用教程
一.安装 我们知道selenium是桌面浏览器自动化操作工具(Web Browser Automation) appium是继承selenium自动化思想旨在使手机app操作也能自动化的工具(Mobi ...
- Python3+mitmproxy安装使用教程(Windows)
一.安装 1.1 安装mitmproxy 直接使用pip安装即可 pip install mitmproxy pip本质上会一是安装mitmproxy库的相关代码,二是安装mitmproxy.exe/ ...
- Python3+Scapy安装使用教程
一.说明 之前写DoS程序的时候(见"拒绝服务(DoS)理解.防御与实现"),数据包完全是自己构造的,这其中的难处一是要清楚各层协议的字段.字段长度.字段是数值还是字符.大头还是小 ...
- Python3+slowloris安装使用教程
一.说明 今天提到slowloris,这东西看着很眼熟,应该是以前局方打算用来刷竞赛积分的工具.我总觉得DoS没什么意思,但记不得怎么用了所以还是研究一下. 二.安装 slowloris就是一个pyt ...
- Python3+mitmproxy安装使用教程(Windows)(转载)
mitmproxy 是用于MITM的proxy,MITM中间人攻击.说白了就是服务器和客户机中间通讯多增加了一层.跟Fiddler和Charles最大的不同就是,mitmproxy可以进行二次开发,尤 ...
- Python3 turtle安装和使用教程
Python3 turtle安装和使用教程 Turtle库是Python语言中一个很流行的绘制图像的函数库,想象一个小乌龟,在一个横轴为x.纵轴为y的坐标系原点,(0,0)位置开始,它根据一组函数 ...
- python3.8安装flask出现错误“ModuleNotFoundError: No module named '_ctypes'”
本想在CentOS下配置flask+nginx+uwsgi环境,结果安装最基础的flask包都出了问题...以下是我的环境: 服务器:阿里云ECS CentOS7 python版本:3.8.0 问题描 ...
随机推荐
- random模块、time模块、sys模块、os模块
一.random模块 1.随机取小数 (数学计算) print(random.random()) #取0-1之间的小数 print(random.uniform(3,6)) #uniform( ...
- 牛客OI周赛7-提高组 A 小睿睿的等式
链接:https://ac.nowcoder.com/acm/contest/371/A来源:牛客网 小睿睿在游戏开始时有n根火柴棒,他想知道能摆成形如“A+B=n”的等式且使用的火柴棒数也恰好等于n ...
- vue强制刷新组件
<component v-if="hackReset"></component>(组件名称) data:hackReset (事件执行) this.hack ...
- 基础JAVA程序设计(多个类与方法的实现2)
设计一个类代表二维空间的一个点(Point),要求:两个成员变量:x坐标和y坐标. 设计一个类代表二维空间的一个圆(Circle),要求:两个成员变量:一个是圆心,一个是半径:提供计算圆面积的方法:提 ...
- 第一次跑eureka
- 创建您的 ActiveReports Web端在线报表设计器
概述 ActiveReports Web端在线报表设计器已经正式上线!看到它这么帅气.实用,你是不是也想自己动手创建一个? 现在我们就来教您,如何创建一个简单的 ActiveReports Web端在 ...
- zabbix服务器与客户端(Linux+Windows)的搭建
zabbix监控搭建 一.搭建LNMP环境(MySQL) 创建数据库以及授权zabbix账户 mysql> create database zabbix character set utf8; ...
- Tensorflow训练和预测中的BN层的坑
以前使用Caffe的时候没注意这个,现在使用预训练模型来动手做时遇到了.在slim中的自带模型中inception, resnet, mobilenet等都自带BN层,这个坑在<实战Google ...
- threejs绕轴转,粒子系统,控制器操作等(二)
前言:threejs系列的第二篇文章,也是一边学习一边总结: 1,一个物体绕着另一个物体转动 上一篇文中主要是物体自转,为了描述一个一个物体绕另一个物体转,这里我描述了一个月球绕地球公转,并且自转的场 ...
- 记录一下最近的解决的坑爹bug
最近解决的bug长得都很别致啊,记录一下 一 :天气插件引用报403 项目里有一个天气插件引用一直报403 后来确定原因是headers里缺少referer源,无法访问资源的服务器,再后来又发现项目引 ...