搭建Apache服务器并使用自签证书实现https访问
实验环境:两台Centos7.2的虚拟机,一台作CA服务器,一台作Apache服务器,此处安装httpd-2.4.6的版本.
1)CA服务器
# 私钥一般存放位置:/etc/pki/CA/private
[root@happiness ~]# cd /etc/pki/CA/private
# 生成私钥
[root@happiness private]# (umask ; openssl genrsa -out /etc/pki/CA/private/cakey.pem )
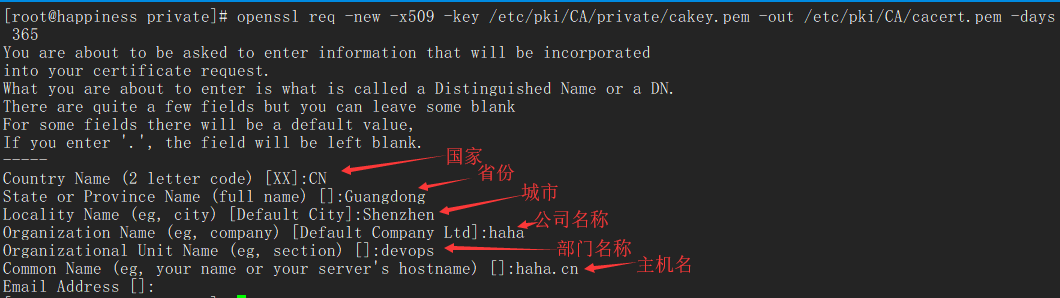
# 生成自签证书,有效期365天
[root@happiness private]# openssl req -new -x509 -key /etc/pki/CA/private/cakey.pem -out /etc/pki/CA/cacert.pem -days
-new:生成新证书签署请求;
-x509:生成自签格式证书,专用于创建私有CA时使用;
-key:生成请求时用到的私有文件路径;
-out:生成的请求文件路径;如果自签操作将直接生成签署过的证书;
-days:证书的有效时长,单位是day
# 为CA提供所需的文件
[root@happiness CA]# touch /etc/pki/CA/{serial,index.txt
[root@happiness CA]# echo 01 > /etc/pki/CA/serial
2)Apache服务器
Centos7.2已经默认安装好httpd-2.4.6和openssl,如果没有安装可以配置好yum源进行安装。
  [root@happiness ~]# mkdir /etc/httpd/ssl

  [root@happiness ~]# cd /etc/httpd/ssl

# 生成私钥

  [root@happiness ssl]# (umask 077;openssl genrsa -out /etc/httpd/ssl/httpd.key 2048)

# 生成证书签署请求

  [root@happiness ssl]# openssl req -new -key /etc/httpd/ssl/httpd.key -out /etc/httpd/ssl/httpd.csr -days 365
  注意:此处生成请求时填写的信息,需要跟CA生成证书时的信息保持一致。

# 把证书请求发给CA服务器

  [root@happiness ssl]# scp httpd.csr root@192.168.4.119:/tmp/
3)CA服务器
# 签署证书

  [root@happiness ~]# openssl ca -in /tmp/httpd.csr -out /etc/pki/CA/certs/httpd.crt -days 365

# 传输给Apache服务器

  [root@happiness ~]# spc /etc/pki/CA/certs/httpd.crt root@192.168.4.50:/etc/httpd/ssl/
4)Apache服务器
# httpd-2.4.6默认没安装ssl模块,自行安装

  [root@happiness ~]# yum install mod_ssl -y

# 安装后生成的文件信息

  [root@happiness ~]# rpm -ql mod_ssl

  /etc/httpd/conf.d/ssl.conf

  /etc/httpd/conf.modules.d/00-ssl.conf

  /usr/lib64/httpd/modules/mod_ssl.so

  /usr/libexec/httpd-ssl-pass-dialog

  /var/cache/httpd/ssl

# 编辑ssl配置文件

  [root@happiness ~]# vim /etc/httpd/conf.d/ssl.conf

# 编辑httpd配置文件
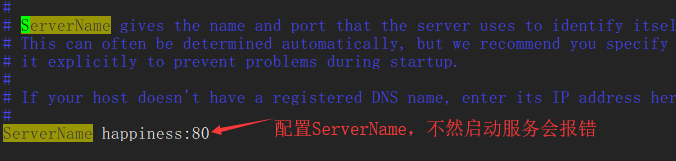
[root@happiness ~]# vim /etc/httpd/conf/httpd.conf
# 启动httpd服务

  [root@happiness ~]# systemctl start httpd
5)浏览器测试

后话:
实验过程中,由于自己在/etc/httpd/conf/httpd.conf配置中又添加了"Listen 443",导致启动httpd无法启动服务,查看错误日志:cat /var/log/httpd/error_log。

安装mod_ssl模块后生成的配置文件/etc/httpd/conf.d/ssl.conf中,已经启用监听443端口,无须在主配置文件httpd.conf再添加。

搭建Apache服务器并使用自签证书实现https访问的更多相关文章
- 编译Nginx, 并使用自签证书实现https访问
1. 编译安装nginx1.8.1 [root@centos7 nginx-1.8.1]# ./configure --prefix=/usr/local/nginx.1.8.1 --with-htt ...
- WampServer 给电脑搭建apache服务器和php环境
WampServer 给电脑搭建apache服务器和php环境 前端不仅要做页面展示层,还负责着数据交互的部分,不要等到后端人员做好工作了前端才开始对接,那样太被动了. 前端在完成静态页面的编码后,就 ...
- 在centos 7云服务器上搭建Apache服务器并访问到你的网站
网站是指在互联网上根据一定的规则,用HTML等语言制作的网页的集合.网站的目的是用来展示一些信息,如果是个人网站则是为了展示自己的一些想被人知道的东西,例如自己的一些作品,又或者是通过网站来达到盈利的 ...
- Mac 下搭建 Apache 服务器
Apache作为最流行的Web服务器端软件之一,它的优点与地位不言而喻.下面介绍下在Mac下搭建Apache服务器的步骤: (1)“前往” –>”个人” (2)在你的个人目录下新建一个文件夹,改 ...
- mac下搭建Apache服务器环境
mac下自带了一个Apache服务环境,所以不需要另外去下载,直接配置就好了. 一.启动Apache服务 在终端下输入 sudo apachectl start , 启动Apache服务.在浏览器输入 ...
- 在centos7云服务器上搭建Apache服务器并访问到你的网站
使用X-shell ssh安全连接到云服务器 https://mail.qq.com/cgi-bin/mail_spam?action=check_link&url=https://www.n ...
- linux 搭建apache 服务器
1.查看apache服务器 /etc/init.d/httpd status 若没有,则使用yum -y install httpd 安装软件 2.设置开机启动 chkconfig httpd o ...
- Apache环境修改.htaccess文件实现子目录强制HTTPS访问
如果要在Apache环境下实现子目录强制HTTPS地址访问,该怎么实现呢?在此文章中将与大家一起分享如何在Apache环境下修改.htaccess文件来实现子目录强制HTTPS地址访问. 1.根目录域 ...
- linux篇-centos7搭建apache服务器(亲测可用)
1安装apache yum install httpd httpd-devel -y 2开启服务器 systemctl start httpd.service 3开机自启 systemctl enab ...
随机推荐
- linux php多版本
ecshop还非php5.2 解压 gzip -cd php-5.2.14-fpm-0.5.14.diff.gz | patch -d php-5.2.14 -p1 打上php-fpm补丁再安装php ...
- Spring boot Jackson基本演绎法&devtools热部署
1.针对POJO中的User类添加一些注解,使其某些数据不显示或者格式化某些数据类型,如下图: 2.启动Application,然后进入浏览器访问http://localhost:8080/user/ ...
- 【JAVA语法】01Java-变量与数据类型
数据类型初阶 基本数据类型的包装类 整数类型&浮点类型&字符类型 大小类型转换 通过Scanner从控制台获取数据 变量相关基础算法 Java的错误类型 字符串String 补充-Pa ...
- html 标签 显示模式
1.html 标签模式分为三类:块级标签,行内标签(内联),行内块标签 a. 块级标签 典型代表:div.h1~h6.p.ul.ol.li.dl.dt.dd等. 特点:可以设置宽高,独占一行 b.行内 ...
- Jenkins 修改主目录正解 workspace
方法一: 停止Jenkins服务 net stop Jenkins 找到Jenkins安装目录,Config.config文件,找到WorkSpaceDir配置,修改为目标地址,保存. 启用Jenki ...
- redis 存取问题
今天在写短信接口时候,要把验证码存到缓存里面.因为之前别人已经写的有案例,按照之前写的,获取 值.存到数据库,存到redis. 因为有过期时间,需要传过期时间.但是怎么都是不出来... 源码: @Ov ...
- “云中论道”之——使用开源技术和Azure公有云服务快速搭建云端IoT解决方案(上)
“云中论道”技术课堂第一课开讲啦!微软各路技术咖们齐聚一堂,为大家带来干货不断!作为“云中论道“课堂的开课之作,我们首先邀请到了微软Azure专家级的架构师:槐长清,他为我们带来了关于“使用开源技术和 ...
- SQL Server ->> SQL Server 2016功能改进之 -- Update Statistics
1) 以前SQL Server更新一张表/索引的间隔是固定的,创建时更新一次,到了500行时更新第二次,接下来就是呈百分比式的间隔去更新,距离数据修改量达到表的行数量的的20%再次触发更新.但是这样的 ...
- C#连接SQL Server测试
string con, sql; con = "Server=192.168.31.26;Database=TestDB;user=kala;pwd=Password"; sql ...
- 【Leetcode】【Medium】Permutations
Given a collection of numbers, return all possible permutations. For example,[1,2,3] have the follow ...