SpringBoot自动化配置之二:自动配置(AutoConfigure)原理、EnableAutoConfiguration、condition
自动配置绝对算得上是Spring Boot的最大亮点,完美的展示了CoC约定优于配置; Spring Boot能自动配置Spring各种子项目(Spring MVC, Spring Security, Spring Data, Spring Cloud, Spring Integration, Spring Batch等)以及第三方开源框架所需要定义的各种Bean。 Spring Boot内部定义了各种各样的XxxxAutoConfiguration配置类,预先定义好了各种所需的Bean。只有在特定的情况下这些配置类才会被起效。
一、概述
SpringBoot的Auto-configuration的核心实现都位于spring-boot-autoconfigure-xxx.jar;其中SpringBoot将依据classpath里面的依赖内容来自动配置bean到IoC容器,Auto-configuration会尝试推断哪些beans是用户可能会需要的。
自动化配置并不是spring boot才有的,从spring framework3.1开始,这个特性就有了,像@EnableAspectJAutoProxy、@EnableAsync都是从spring 3.1开始就有了。org.springframework.context.annotation包下面拥有自动配置的所有的相关的基础设施。
基础设施
org.springframework.context.annotation包下面提供了各种基于注解配置的基础设施:
1. @Profile:可跟@Bean配合、
2. @Bean、@Scope、@DependsOn、@Primary、@Lazy、@Role、@Description:
3. @Conditional、Condition:@Conditional注解标识在类或者方法上,标识在方法上,符合条件,创建该方法的返回值类型的Bean;标识在类上,符合条件全部创建。
4. @Import(@ImportResource):
5. @Configuration表示的Class(@EnableLoadTimeWeaving)、ImportSelector接口实现(@EnableAsync)或者ImportBeanDefinitionRegistrar接口实现(@EnableAspectJAutoProxy)
6. ImportSelector、DeferredImportSelector:
7. ImportRegistry
8. ImportBeanDefinitionRegistrar:用来手动注册bean定义的, 可以实现类似于Mybatis-Spring提供的扫描Mapper接口并注册其bean定义, 事实上@MapperScan注解就@Import了MapperScannerRegistrar这个类, 而这个类实现了上面的接口, 来扫描Mapper并注册bean定义.再多说点吧, Spring解析Java配置类的时候, 会判断类是不是标注了@Import注解, 然后会判断, 如果Import注解的value是ImportBeanDefinitionRegistrar类型, 会存到一个变量, 后面初始化bean工程完成后, 会回调ImportBeanDefinitionRegistrar.
9. @Configuration:跟@Controller、@Servcice和@Repository是一样的套路,都用@Component注解了,作为特定类型的组件
10. @PropertySource
11. Condition、ConfigurationCondition、@Conditional
spring boot autoconfigure
Spring Boot AutoConfigure替代了XML风格的配置文件,带来了前所未有的体验。Spring Boot AutoConfigure模块基于Spring Framework和Spring Boot提供的基础设施,构建类配置Bean+属性文件配置行为的配置方式,Java类配置Bean为我们提供了更好的编程体验,属性文件配置行为的方式使这种方式拥有跟XML外部配置文件配置方式同样的灵活性。
org.springframework.boot.autoconfigure
首先,Spring Boot AutoConfigure在Spring Framework和Spring Boot提供的基础设施上做了很多的扩展工作:
1. 顺序控制:AutoConfigureOrder、AutoConfigureAfter、AutoConfigureBefore;
2. AutoConfigurationPackage:在spring boot mian class上标识EnableAutoConfiguration之后,所有子包下面的spring 组件都能被扫描到,就是这个注解的能力;
3. EnableAutoConfiguration/ImportAutoConfiguration:EnableAutoConfiguration开启自动配置,自动应用spring.factories中配置的各种*AutoConfiguration;ImportAutoConfiguration跟EnableAutoConfiguration相比,只是没有自动配置的功能,给ImportAutoConfiguration传入谁的AutoConfiguration就应用谁的,单元测试等的场景用到的比较多;
4. 其他的一些工具类,过滤器之类的东西大家可以自己去看下
org.springframework.boot.autoconfigure.context.condition
ConditionalOnCloudPlatform:是否在云环境下,spring boot cloud模块提供了两种实现,CLOUD_FOUNDRY和HEROKU,国内应该用不到这个注解了
ConditionalOnJava:指定的Java版本
ConditionalOnWebApplication:是Web环境的时候
ConditionalOnNotWebApplication:不是web环境的时候
ConditionalOnJndi:JNDI环境下使用
ConditionalOnClass:classpath中存在某个类
ConditionalOnMissingClass:classpath中不存在某个类
ConditionalOnBean:BeanFactory中存在某个类的Bean
ConditionalOnMissingBean:BeanFactory中不存在某个类的Bean
ConditionalOnExpression:SpEL的结果
ConditionalOnProperty:Environment中是否有某个属性的配置信息
ConditionalOnResource:classpath中是否存在指定名称的资源
ConditionalOnSingleCandidate:指定的类在BeanFactory中只有一个候选的bean,或者有多个候选的bean,但是其中一个指定了primary时
各种*AutoConfiguration的实现:
所有的*AutoConfiguration的具体实现包括两部分,一个是标识了@Configuration注解的配置类,另一个是Property文件。有些模块比较复杂,像security的oauth2模块,主要文件也是这两类,剩下的是一些工具。
*AutoConfiguration也是Configuration,被@Configuration注解,只不过spring boot autoconfigure模块内置的 *AutoConfiguration被配置到了 spring.factories文件中,启动的时候自动配置。
自动配置是Spring Boot的最大亮点,完美的展示了CoC约定优于配置。
二、源码解析
2.1、从SpringBoot启动时的自动配置加载过程
查看源码可以看看自动配置类是如何被引入的。
a) 应用入口
@SpringBootApplication

public class SpringBootDemoApplication {

    public static void main(String[] args) {

        SpringApplication.run(SpringBootDemoApplication.class, args);

    }

}
b) 类注解 @SpringBootApplication = @EnableAutoConfiguration + @ComponentScan + @Configuration(而其中的@EnableAutoConfiguration 则正是实现Auto Config的关键之所在)
@SpringBootConfiguration

@EnableAutoConfiguration

@ComponentScan(excludeFilters = {

        @Filter(type = FilterType.CUSTOM, classes = TypeExcludeFilter.class),

        @Filter(type = FilterType.CUSTOM, classes = AutoConfigurationExcludeFilter.class) })

public @interface SpringBootApplication {

    // ...

}

@Configuration

public @interface SpringBootConfiguration {

    // ...

}
c)开启自动配置注解 @EnableAutoConfiguration,是auto config 关键所在。
@AutoConfigurationPackage

@Import(EnableAutoConfigurationImportSelector.class)

public @interface EnableAutoConfiguration {

    // ...

}
d)导入配置类 EnableAutoConfigurationImportSelector extends AutoConfigurationImportSelector
@EnableAutoConfiguration 注解会导入AutoConfigurationImportSelector类的实例被引入到Spring容器中,而该类的继承链如下:
public class AutoConfigurationImportSelector

        implements DeferredImportSelector, BeanClassLoaderAware, ResourceLoaderAware,

        BeanFactoryAware, EnvironmentAware, Ordered {
因此对于 AutoConfigurationImportSelector类, 我们重点关注的是其实现自ImportSelector接口的方法selectImports,而直接继承的DeferredImportSelector作为一个标志性接口,主要作用是为了Defer(推迟;延期;)。
在我们继续探索之前,让我们暂停一下,先来回顾下Spring是如何执行到这里来的,即如何调用到AutoConfigurationImportSelector.selectImports方法的。
在selectImports方法上打个断点,启动任意一个springboot项目,调用链如下图:
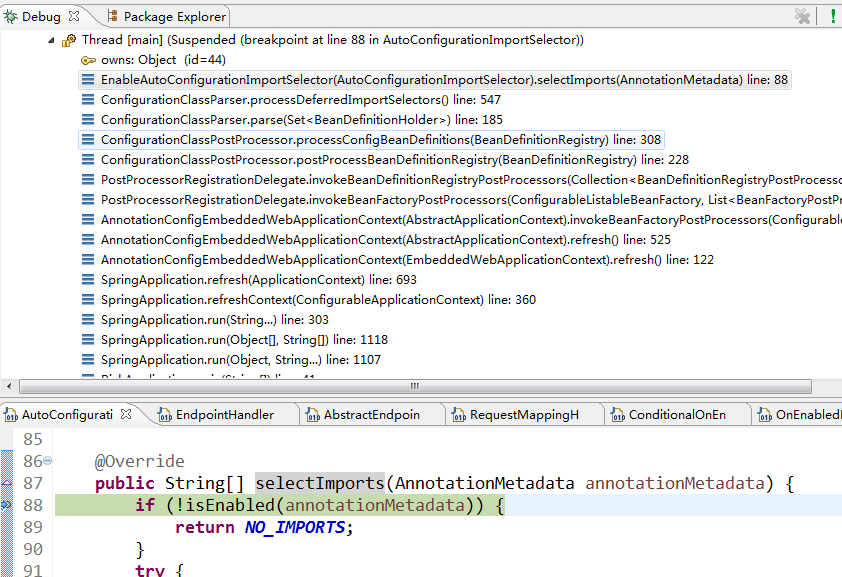
从上述堆栈中我们可以看到 ConfigurationClassParser.parse() 被调用,而其参数candidates ,作为一个集合参数其中只包含我们在启动SpringBoot时传入的那个AutoConfigSpringBootApplication类包裹所形成的BeanDefinitionHolder实例。
该ConfigurationClassParser.parse(Set<BeanDefinitionHolder> configCandidates)方法最终会调用到自身内部私有的processDeferredImportSelectors()方法:
// 本方法位于 protected 访问级别的 ConfigurationClassParser 中

private void processDeferredImportSelectors() {

    // @EnableAutoConfiguration注解上修饰的@Import(AutoConfigurationImportSelector.class) 注解的解析是由 ConfigurationClassParser.parse中开始调度完成(本类中的processImports方法), 进而载入到本类的 deferredImportSelectors 字段中。

    // 这里要特别注意,正因为AutoConfigurationImportSelector是一个DeferredImportSelector实例,所以其生效时机晚于@Import生效的时机,这也使得逻辑时序可以正确地运行下去。

    List<DeferredImportSelectorHolder> deferredImports = this.deferredImportSelectors;

    this.deferredImportSelectors = null;

    Collections.sort(deferredImports, DEFERRED_IMPORT_COMPARATOR);

    for (DeferredImportSelectorHolder deferredImport : deferredImports) {

        // 这里取到的configClass就是我们自定义的 AutoConfigSpringBootApplication

        ConfigurationClass configClass = deferredImport.getConfigurationClass();

        try {

            // 核心逻辑就是下面这两句了

            // 首先是这行, 负责回调我们上面使用@Import导入的AutoConfigurationImportSelector里的逻辑实现, 详情将在本文接下来的内容

            // 最终的返回值是经过筛选,满足要求的类名

            String[] imports = deferredImport.getImportSelector().selectImports(configClass.getMetadata());

            // configClass 就是我们传递给 SpringApplication.run 的AutoConfigSpringBootApplication类

            // 该方法最终会跳转到 本类内部的doProcessConfigurationClass方法中,来将相应Bean注册进容器, Auto Config完成。

            processImports(configClass, asSourceClass(configClass), asSourceClasses(imports), false);

        }

        catch  {

            // 异常处理略

        }

    }

}
绕了一圈终于回到本小节原本关注的内容——有关AutoConfigurationImportSelector实现的selectImports方法:
// AutoConfigurationImportSelector (位于package - org.springframework.boot.autoconfigure, 所以是SpringBoot自带的)

@Override

public String[] selectImports(AnnotationMetadata annotationMetadata) {

    if (!isEnabled(annotationMetadata)) {

        return NO_IMPORTS;

    }

    try {

        // 加载 META-INF/spring-autoconfigure-metadata.properties 中的相关配置信息, 注意这主要是供Spring内部使用的

        AutoConfigurationMetadata autoConfigurationMetadata = AutoConfigurationMetadataLoader

                .loadMetadata(this.beanClassLoader);

        AnnotationAttributes attributes = getAttributes(annotationMetadata);

        // 获取所有通过META-INF/spring.factories配置的, 此时还不会进行过滤和筛选

        // KEY为 : org.springframework.boot.autoconfigure.EnableAutoConfiguration

        List<String> configurations = getCandidateConfigurations(annotationMetadata,

                attributes);

        // 开始对上面取到的进行过滤,去重,排序等操作

        configurations = removeDuplicates(configurations);

        configurations = sort(configurations, autoConfigurationMetadata);

        Set<String> exclusions = getExclusions(annotationMetadata, attributes);

        checkExcludedClasses(configurations, exclusions);

        configurations.removeAll(exclusions);

        configurations = filter(configurations, autoConfigurationMetadata);

        fireAutoConfigurationImportEvents(configurations, exclusions);

        // 这里返回的满足条件, 通过筛选的配置类

        return configurations.toArray(new String[configurations.size()]);

    }

    catch (IOException ex) {

        throw new IllegalStateException(ex);

    }

}
A、getCandidateConfigurations()方法:
    protected List<String> getCandidateConfigurations(AnnotationMetadata metadata,

            AnnotationAttributes attributes) {

        // 获取所有通过META-INF/spring.factories配置的, 此时还不会进行过滤和筛选KEY为:org.springframework.boot.autoconfigure.EnableAutoConfiguration的配置的value(类路径+类名称)

        List<String> configurations = SpringFactoriesLoader.loadFactoryNames(

                getSpringFactoriesLoaderFactoryClass(), getBeanClassLoader());

        Assert.notEmpty(configurations,

                "No auto configuration classes found in META-INF/spring.factories. If you "

                        + "are using a custom packaging, make sure that file is correct.");

        return configurations;

    }

    //返回EnableAutoConfiguration.class

    protected Class<?> getSpringFactoriesLoaderFactoryClass() {

        return EnableAutoConfiguration.class;

    }

    public static List<String> loadFactoryNames(Class<?> factoryClass, ClassLoader classLoader) {

        //此时为org.springframework.boot.autoconfigure.EnableAutoConfiguration

        String factoryClassName = factoryClass.getName();

        try {

            //配置项的默认位置META-INF/spring.factories

            Enumeration<URL> urls = (classLoader != null ? classLoader.getResources(FACTORIES_RESOURCE_LOCATION) :

                    ClassLoader.getSystemResources(FACTORIES_RESOURCE_LOCATION));

            List<String> result = new ArrayList<String>();

            while (urls.hasMoreElements()) {

                URL url = urls.nextElement();

                //从多个配置文件中查找,例如我的有:spring-boot-admin-starter-client-1.5.6.jar!/META-INF/spring.factories和stat-log-0.0.1-SNAPSHOT.jar!/META-INF/spring.factories

                Properties properties = PropertiesLoaderUtils.loadProperties(new UrlResource(url));

                String factoryClassNames = properties.getProperty(factoryClassName);

                result.addAll(Arrays.asList(StringUtils.commaDelimitedListToStringArray(factoryClassNames)));

            }

            return result;

        }

        catch (IOException ex) {

            throw new IllegalArgumentException("Unable to load [" + factoryClass.getName() +

                    "] factories from location [" + FACTORIES_RESOURCE_LOCATION + "]", ex);

        }

    }
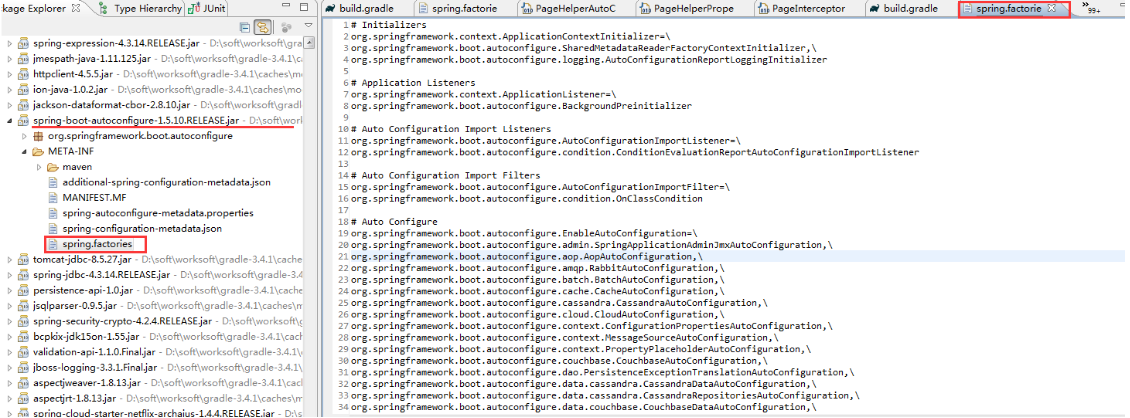
看上面的源码可知通过SpringFactoriesLoader.loadFactoryNames()把多个jar的/META-INF/spring.factories配置文件中的有EnableAutoConfiguration配置项都抓出来。
spring.factories的位置截图如下:
B、在完成了对spring.factories中所有的EnableAutoConfiguration的解析后,对其过滤,去重,排序等操作等,返回。
C、ConfigurationClassParser.processImports(),ConfigurationClassParser工具类自身的逻辑并不注册bean定义,它的主要任务是发现@Configuration注解的所有配置类并将这些配置类交给调用者(调用者会通过其他方式注册其中的bean定义),而对于非@Configuration注解的其他bean定义,比如@Component注解的bean定义,该工具类使用另外一个工具ComponentScanAnnotationParser扫描和注册它们。
以上正是Springboot完成Auto Config功能的关键点之一了。在本实现中,SpringBoot只是告知Spring需要去加载(Import)哪些Config类,剩下的工作依然是Spring那已经经过千锤百炼的逻辑来完成; 这正是 “微核 + 扩展”的优秀架构设计经验的极致体现。
2.2、springboot自动配置DIY
通过上面的源码分析,可以将如下的spring.factories的所有配置类如下:
spring-boot-1.5.10.RELEASE.jar/META-INF/spring.factories
# Application Context Initializers

org.springframework.context.ApplicationContextInitializer=\

org.springframework.boot.context.ConfigurationWarningsApplicationContextInitializer,\

org.springframework.boot.context.ContextIdApplicationContextInitializer,\

org.springframework.boot.context.config.DelegatingApplicationContextInitializer,\

org.springframework.boot.context.embedded.ServerPortInfoApplicationContextInitializer
spring-boot-autoconfigure-1.5.10.RELEASE.jar/META-INF/spring.factories
# Initializers

org.springframework.context.ApplicationContextInitializer=\

org.springframework.boot.autoconfigure.SharedMetadataReaderFactoryContextInitializer,\

org.springframework.boot.autoconfigure.logging.AutoConfigurationReportLoggingInitializer
相应在做war时也是把当前的SpringBootDemoApplication作为source传给了ServletInitializer。
那么,我们可以这样启动springboot,注解类不用SpringApplication,配置类也可自行导入
2.3、关键类EnableAutoConfiguration
2.3.1、EnableAutoConfiguration源码解析
@Target(ElementType.TYPE)

@Retention(RetentionPolicy.RUNTIME)

@Documented

@Inherited

@AutoConfigurationPackage

@Import(AutoConfigurationImportSelector.class)

public @interface EnableAutoConfiguration {

    String ENABLED_OVERRIDE_PROPERTY = "spring.boot.enableautoconfiguration";

    Class<?>[] exclude() default {};

    String[] excludeName() default {};

}
从上往下:
- 首先,最关键的要属@Import(AutoConfigurationImportSelector.class),借助AutoConfigurationImportSelector,@EnableAutoConfiguration可以帮助SpringBoot应用将所有符合条件的@Configuration配置都加载到当前SpringBoot创建并使用的IoC容器。(Import主要是配合Configuration来使用的,用来导出更多的Configuration类,ConfigurationClassPostProcessor会读取Import的内容来实现具体的逻辑。)借助于Spring框架原有的一个工具类:SpringFactoriesLoader的支持,@EnableAutoConfiguration可以智能的自动配置(扫描每个jar中的spring.factories)!
- 再看EnableAutoConfiguration的方法,就两个方法exclude和excludeName,作用是自动配置过程中包含和排查指定的类。
2.3.2、自定义EnableAutoConfiguration示例
1、自定义EnableAutoConfiguration,这里Import了MyEnableAutoConfigurationImport。

package com.dxz.autoconfig;

import java.lang.annotation.Documented;

import java.lang.annotation.ElementType;

import java.lang.annotation.Inherited;

import java.lang.annotation.Retention;

import java.lang.annotation.RetentionPolicy;

import java.lang.annotation.Target;

import org.springframework.boot.autoconfigure.AutoConfigurationPackage;

import org.springframework.context.annotation.Import;

@Target(ElementType.TYPE)

@Retention(RetentionPolicy.RUNTIME)

@Documented

@Inherited

@AutoConfigurationPackage

@Import(MyEnableAutoConfigurationImport.class)

public @interface MyEnableAutoConfiguration {

}
2、自定义EnableAutoConfigurationImport,注入了ClassLoader,并调用SpringFactoriesLoader.loadFactoryNames()方法,导出Configuration的类。
package com.dxz.autoconfig;

import java.util.List;

import org.springframework.beans.factory.BeanClassLoaderAware;

import org.springframework.boot.autoconfigure.EnableAutoConfiguration;

import org.springframework.context.annotation.DeferredImportSelector;

import org.springframework.core.io.support.SpringFactoriesLoader;

import org.springframework.core.type.AnnotationMetadata;

public class MyEnableAutoConfigurationImport implements DeferredImportSelector, BeanClassLoaderAware {

    private ClassLoader classLoader;

    public void setBeanClassLoader(ClassLoader classLoader) {

        this.classLoader = classLoader;

    }

    public String[] selectImports(AnnotationMetadata importingClassMetadata) {

        List<String> beanNames = SpringFactoriesLoader.loadFactoryNames(EnableAutoConfiguration.class, classLoader);

        return beanNames.toArray(new String[beanNames.size()]);

    }

}
3、入口类,这里使用了MyEnableAutoConfiguration注解。
package com.dxz.autoconfig;

import java.util.HashMap;

import java.util.Map;

import org.springframework.boot.SpringApplication;

import org.springframework.context.annotation.Configuration;

import org.springframework.stereotype.Controller;

import org.springframework.web.bind.annotation.RequestMapping;

import org.springframework.web.bind.annotation.ResponseBody;

@Configuration

@MyEnableAutoConfiguration

public class CustomizeEnableAutoConfigure {

    public static void main(String[] args) {

        SpringApplication application = new SpringApplication(CustomizeEnableAutoConfigure.class);

        application.run(args);

    }

    @Controller

    public static class MyController {

        @RequestMapping

        @ResponseBody

        public Map index() {

            Map<String, String> map = new HashMap<String, String>();

            map.put("hello", "world2");

            return map;

        }

    }

}
结果:

2.4、condition包
2.4.1、condition示例讲解
package org.springframework.boot.autoconfigure.condition。提供这些condition主要目的:上面我们讨论的AutoConfigurationImportSelector只能告诉Spring哪些类需要加载,但判断所配置的类是否可以被加载(即Auto Config里的Auto)是一个非常繁琐的逻辑,如果由某个中央控制系统来处理的话,必然会造成代码耦合和复杂性猛增,因此SpringBoot最终使用了一贯的做法——将判断是否加载的权限下放给了各个需要进行自动配置的需求方本身,这样在springboot中扩展了很多condition。
基于Spring的@Conditional,SpringBoot提供了丰富的条件配置
@ConditionalOnClass : classpath中存在该类时起效

@ConditionalOnMissingClass : classpath中不存在该类时起效

@ConditionalOnBean : DI容器中存在该类型Bean时起效

@ConditionalOnMissingBean : DI容器中不存在该类型Bean时起效

@ConditionalOnSingleCandidate : DI容器中该类型Bean只有一个或@Primary的只有一个时起效

@ConditionalOnExpression : SpEL表达式结果为true时

@ConditionalOnProperty : 参数设置或者值一致时起效

@ConditionalOnResource : 指定的文件存在时起效

@ConditionalOnJndi : 指定的JNDI存在时起效

@ConditionalOnJava : 指定的Java版本存在时起效

@ConditionalOnWebApplication : Web应用环境下起效

@ConditionalOnNotWebApplication : 非Web应用环境下起效

@AutoConfigureAfter:在指定的配置类初始化后再加载

@AutoConfigureBefore:在指定的配置类初始化前加载

@AutoConfigureOrder:数越小越先初始化
2.4.2、condition示例讲解
1)@ConditionalOnBean/@ConditionalOnMissingBean当容器中存在/不存在某个bean时,加上此注解的bean被自动注入
package org.springframework.boot.autoconfigure.condition;

@Target({ ElementType.TYPE, ElementType.METHOD })

@Retention(RetentionPolicy.RUNTIME)

@Documented

@Conditional(OnBeanCondition.class)

public @interface ConditionalOnBean {

    Class<?>[] value() default {};

    String[] type() default {};

    Class<? extends Annotation>[] annotation() default {};

    String[] name() default {};

    SearchStrategy search() default SearchStrategy.ALL;

}
2)@ConditionalOnJava根据当前使用的JDK版本,判断是否自动注入
    //使用jdk8才注入此bean

    @Bean

    @ConditionalOnJava(ConditionalOnJava.JavaVersion.EIGHT)

    public Runnable runnableBean2() {

        return () ->{};

    }
3)@ConditionalOnProperty来控制Configuration是否生效
@Retention(RetentionPolicy.RUNTIME)

@Target({ ElementType.TYPE, ElementType.METHOD })

@Documented

@Conditional(OnPropertyCondition.class)

public @interface ConditionalOnProperty {

    String[] value() default {}; //数组,获取对应property名称的值,与name不可同时使用

    String prefix() default "";//property名称的前缀,可有可无

    String[] name() default {};//数组,property完整名称或部分名称(可与prefix组合使用,组成完整的property名称),与value不可同时使用

    String havingValue() default "";//可与name组合使用,比较获取到的属性值与havingValue给定的值是否相同,相同才加载配置

    boolean matchIfMissing() default false;//缺少该property时是否可以加载。如果为true,没有该property也会正常加载;反之报错

    boolean relaxedNames() default true;//是否可以松散匹配,至今不知道怎么使用的

}
如果该值为空,则返回false;
如果值不为空,则将该值与havingValue指定的值进行比较,如果一样则返回true;否则返回false。
如果返回值为false,则该configuration不生效;为true则生效。
@Configuration

//在application.properties配置"mf.assert",对应的值为true

@ConditionalOnProperty(prefix="mf",name = "assert", havingValue = "true")

public class AssertConfig {

    @Autowired

    private HelloServiceProperties helloServiceProperties;

    @Bean

    public HelloService helloService(){

        HelloService helloService = new HelloService();

        helloService.setMsg(helloServiceProperties.getMsg());

        return helloService;

    }

}
2.4.2.3、示例:(参考网络)
2.4.2.3.1)、通过SpringBoot自带的注解ConditionalOnProperty实现
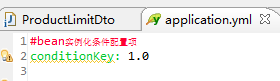
#bean实例化条件配置项

conditionKey: 1.0
ManageImpl1.java代码如下:(MyManage接口、ManageImpl2省略)
package com.dxz.palmpay.condition;

import javax.annotation.PostConstruct;

import org.springframework.boot.autoconfigure.condition.ConditionalOnProperty;

import org.springframework.stereotype.Component;

//仅当conditionKey==1.0的时候实例化这个类

@ConditionalOnProperty(name = "conditionKey", havingValue = "1.0")

@Component

public class ManageImpl1 implements MyManage {

    @Override

    public void sayHello() {

        System.out.println("我是实现类01");

    }

    //为了效果,创建后打印一些信息

    @PostConstruct

    public void init() {

        this.sayHello();

    }

}
 该配置放在配置中心同样有效。
2.4.2.3.2)、自定义条件注解
(1)思路
- name:String类型,用来接受application.properties的配置项的key
- havingValue:String数组类型,用来和name对应key的Value进行匹配
(2)定义注解
package com.dxz.palmpay.condition;

import org.springframework.context.annotation.Conditional;

import java.lang.annotation.*;

@Retention(RetentionPolicy.RUNTIME)

@Target({ ElementType.TYPE, ElementType.METHOD })

@Documented

@Conditional(CustomOnPropertyCondition.class)

public @interface CustomConditionalOnProperty {

    String name() default "";

    //havingValue数组,支持or匹配

    String[] havingValue() default {};

}
(3)定义注解的匹配规则
package com.dxz.palmpay.condition;

import org.springframework.context.annotation.Condition;

import org.springframework.context.annotation.ConditionContext;

import org.springframework.core.type.AnnotatedTypeMetadata;

import java.util.Map;

/**

 * 自定义条件注解的验证规则

 */

public class CustomOnPropertyCondition implements Condition {

    @Override

    public boolean matches(ConditionContext conditionContext, AnnotatedTypeMetadata annotatedTypeMetadata) {

        Map<String, Object> annotationAttributes = annotatedTypeMetadata

                .getAnnotationAttributes(CustomConditionalOnProperty.class.getName());

        String propertyName = (String) annotationAttributes.get("name");

        String[] values = (String[]) annotationAttributes.get("havingValue");

        if (0 == values.length) {

            return false;

        }

        String propertyValue = conditionContext.getEnvironment().getProperty(propertyName);

        // 有一个匹配上就ok

        for (String havingValue : values) {

            if (propertyValue.equalsIgnoreCase(havingValue)) {

                return true;

            }

        }

        return false;

    }

}
@Component

@CustomConditionalOnProperty(name = "db.version", havingValue = {"3"})

public class ManageImpl3 implements MyManage {

@Component

@CustomConditionalOnProperty(name = "db.version", havingValue = {"1","2","4"})

public class ManageImpl4 implements MyManage {
自定义Condition注解,主要就2步
(1)定义一个条件注解(2)定义一个条件的校验规则
参考:https://blog.csdn.net/lqzkcx3/article/details/82807888
参考:https://www.cnblogs.com/zeng1994/p/8c10310d8a042d56eddd40635afb6e93.html
SpringBoot自动化配置之二:自动配置(AutoConfigure)原理、EnableAutoConfiguration、condition的更多相关文章
- springboot核心技术(二)-----自动配置原理、日志
自动配置原理 配置文件能配置的属性参照 1.自动配置原理: 1).SpringBoot启动的时候加载主配置类,开启了自动配置功能 @EnableAutoConfiguration 2).@Enable ...
- SpringBoot入门(四)——自动配置
本文来自网易云社区 SpringBoot之所以能够快速构建项目,得益于它的2个新特性,一个是起步依赖前面已经介绍过,另外一个则是自动配置.起步依赖用于降低项目依赖的复杂度,自动配置负责减少人工配置的工 ...
- SpringBoot | 4.1 SpringMVC的自动配置
目录 前言 1. SpringMVC框架的设计与流程 1.1 SpringMVC框架的示意图 1.2 SpringMVC的组件流程 2. *自动配置的源码分析 2.1 导入Web场景启动器 2.2 找 ...
- 接管SpringBoot对Activiti的数据源自动配置
SpringBoot的自动配置真的让人又爱又恨,但还是爱更多一点. SpringBoot想要帮我们自动配置好一切,但是有时候配置的却并不是我们需要的,甚至有时候会默默的坑我们. 我的项目是一个多数据源 ...
- springboot web项目创建及自动配置分析(thymeleaf+flyway)
@ 目录 源码分析 webjars thymeleaf thymeleaf语法 springmvc 启动配置原理 集成flyway插件 springboot 创建web项目只需要引入对应的web-st ...
- Spring Boot学习一之配置类及自动配置
一.配置类 1. 导入其他配置类 你不需要将所有的 @Configuration 放进一个单独的类, @Import 注解可以用来导入其他配置类.另外,你也可以使用 @ComponentScan 注解 ...
- SpringBoot 2.X集成 jdbc自动配置原理探究
前言 Springboot对于数据访问层,不管是 SQL还是 NOSQL,Spring Boot 底层都是采用 Spring Data 的方式统一处理.Spring Data 是 Spring 家族中 ...
- SpringBoot中对SpringMVC的自动配置
https://docs.spring.io/spring-boot/docs/1.5.10.RELEASE/reference/htmlsingle/#boot-features-developin ...
- 面试官:给我讲讲SpringBoot的依赖管理和自动配置?
1.前言 从Spring转到SpringBoot的xdm应该都有这个感受,以前整合Spring + MyBatis + SpringMVC我们需要写一大堆的配置文件,堪称配置文件地狱,我们还要在pom ...
- springboot(八) 嵌入式Servlet容器自动配置原理和容器启动原理
1.嵌入式Servlet容器自动配置原理 1.1 在spring-boot-autoconfigure-1.5.9.RELEASE.jar => springboot自动配置依赖 jar包下,E ...
随机推荐
- LVS 学习
参考网站:http://www.linuxvirtualserver.org 一,部分概念 服务器集群系统: 通过高性能网络或局域网互联的服务器集群正成为实现高可伸缩的.高可用网络服务的有效结构,这种 ...
- JAVA大文件上传断点续传解决方案
javaweb上传文件 上传文件的jsp中的部分 上传文件同样可以使用form表单向后端发请求,也可以使用 ajax向后端发请求 1.通过form表单向后端发送请求 <form id=" ...
- CF603E Pastoral Oddities 优先队列+结论+LCT维护生成树
首先,一个神奇的结论:一个合法的方案存在的条件是每一个联通块的节点数都是偶数个的. 这个可以用数学归纳法简单证一证. 证出这个后,我们只需动态加入每一个边,并查看一下有哪些边能够被删除(删掉后联通块依 ...
- Codeforces 622F The Sum of the k-th Powers ( 自然数幂和、拉格朗日插值法 )
题目链接 题意 : 就是让你求个自然数幂和.最高次可达 1e6 .求和上限是 1e9 分析 : 题目给出了最高次 k = 1.2.3 时候的自然数幂和求和公式 可以发现求和公式的最高次都是 k+1 ...
- c++复习——一个小疑问
C++中,子类为什么不能访问基类的private数据? emmm 来自一个vegetable dog的疑问: 首先基类可以通过调用自身public成员函数来访问private 而子类又可 ...
- qt 程序发布
Qt 程序发布步骤: 注意5.5 以后不再支持 WinXP 1) dll 抽取工具 windeployqt.exe 2) Windows脚本 实例: D:\Qt\Qt5.5.0\5.5\mingw49 ...
- Implement TensorFlow's next_batch for own data
The version of numpy data import numpy as np class Dataset: def __init__(self, data): self._index_in ...
- 五、smarty模板继承特性
1.如何去实现模板之间的继承 继承是发生在模板之间的事,和PHP程序没有关系的 方法一: 在模板中使用<{extends}>函数实现模板的继承 <{extends file=”模板文 ...
- nginx-location正则表达式匹配规则及动静分离
nginx-location正则表达式匹配规则及动静分离 发表于 2018年03月5日 | 分类于 nginx| 0 nginx,location常用正则表达式,及nginx动静分离 nginx ...
- Shell实现交互式登陆一台同时管理多台机器
最近为了检测公司服务器的硬盘需要开10多台服务器的僚机来检测服务器,可是这10来台都是操作一样的命令,挨个操作下去太麻烦了 然后就想到了交互式登陆 这里需要创建一个Ip文件夹把你的Ip账户密码都放进去 ...