react教程 — 组件的生命周期 和 执行顺序
一、组件执行的生命周期: 参考 https://www.cnblogs.com/soyxiaobi/p/9559117.html 或 https://www.cnblogs.com/kdcg/p/9182393.html(含生命周期函数 传进来的参数)
1、初始没有改变state、props 的生命周期:
constructor、componentWillMount、render 、【子组件对应这4个周期函数】、componentDidMount 依次执行
2、改变 state 后的生命周期:
a、父组件的 state 改变:
shouldComponentUpdate、componentWillUpdate、render、【子组件的 componentWillReceiveProps、子组件对应父组件这4个周期函数】、componentDidUpdate
父组件的的state改变,会引起子组件 state 相关的生命周期函数运行。
b、子组件的 state 改变:
shouldComponentUpdate、componentWillUpdate、render、componentDidUpdate
子组件的state改变,不会引起父组件的变化。
3、改变 props 后的 生命周期:【props改变,不会引起父子组件的任何变化,state变化才引起子组件的变化】
父组件传递给子组件的props改变,不会引起任何变化。只有父组件state改变,父组件render函数运行,所有子组件递归更新。
所以父组件传递给子组件的props值,一般使用state的值,不然给子组件的props值改变了,但是没有办法传递到子组件中,得等触发了父组件的render函数,才能把数据传递给子组件。
父组件的 state 设置,都会触发子组件的 componentWillReceiveProps 生命周期函数,且把函数参数是props值。
代码演示:
父组件
import React from 'react'

import Two from './component/two'

class DataFlow extends React.Component{

    constructor(props){

        super(props)

        console.log('constructor');

    }

    state = {

        name: 'ydfd'

    }

    componentWillMount(){ // 渲染前的时刻,即 render前执行

        console.log('componentWillMount');

    }

    componentDidMount(){ // 渲染后的时刻,即 render后执行

        console.log('componentDidMount')

    }

    componentWillReceiveProps (){

        console.log('componentWillReceiveProps')

    }

    componentWillUnmount(){ // 组件的卸载

        console.log('componentWillUnmount')

    }

    // 组件自身的 state 更新了,那么会依次执行  shouldComponentUpdate 、 componentWillUpdate 、render 和  componentDidUpdate 。

    shouldComponentUpdate(){ // 是一个特别的方法,当方法返回  false 的时候,组件不再向下执行生命周期方法。

        console.log('shouldComponentUpdate')

        return true

    }

    componentWillUpdate(){ // 更新过程中渲染前的时刻,不能在这里执行  setState

        console.log('componentWillUpdate');

    }

    componentDidUpdate(){ // 更新过程中渲染后的时刻

        console.log('componentDidUpdate');

    }

    click(){

        this.setState({

            name: 'yuu'

        })

    }

    render(){

        console.log('顶级组件 render 方法')

        return (

            <div className="fatherBox">

                <h1>顶层组件</h1>

                    <p>{this.state.name}</p>

                <button onClick={this.click.bind(this)}>触发事件</button>

                <Two name={this.state.name}></Two>

            </div>

        )

    }

}

export default DataFlow;
子组件
import React from 'react'

class Two extends React.Component{

    constructor(props){

        super(props)

        console.log('child === constructor');

    }

    componentWillMount(){ // 渲染前的时刻,即 render前执行

        console.log('child === componentWillMount');

    }

    componentDidMount(){ // 渲染后的时刻,即 render后执行

        console.log('child === componentDidMount')

    }

    componentWillReceiveProps (newProps){

        console.log('child === componentWillReceiveProps',newProps)

    }

    componentWillUnmount(){ // 组件的卸载

        console.log('child === componentWillUnmount')

    }

    // 组件自身的 state 更新了,那么会依次执行  shouldComponentUpdate 、 componentWillUpdate 、render 和  componentDidUpdate 。

    shouldComponentUpdate(){ // 是一个特别的方法,当方法返回  false 的时候,组件不再向下执行生命周期方法。

        console.log('child === shouldComponentUpdate')

        return true

    }

    componentWillUpdate(){ // 更新过程中渲染前的时刻,不能在这里执行  setState

        console.log('child === componentWillUpdate');

    }

    componentDidUpdate(){ // 更新过程中渲染后的时刻

        console.log('child === componentDidUpdate');

    }

    render(){

        console.log('二级组件 render 方法')

        return (

            <div className="twoBox">

                <h2>二级组件</h2>

                <p>{this.props.name}</p>

            </div>

        )

    }

}

export default Two;
二、生命周期 图示: https://www.jianshu.com/p/514fe21b9914
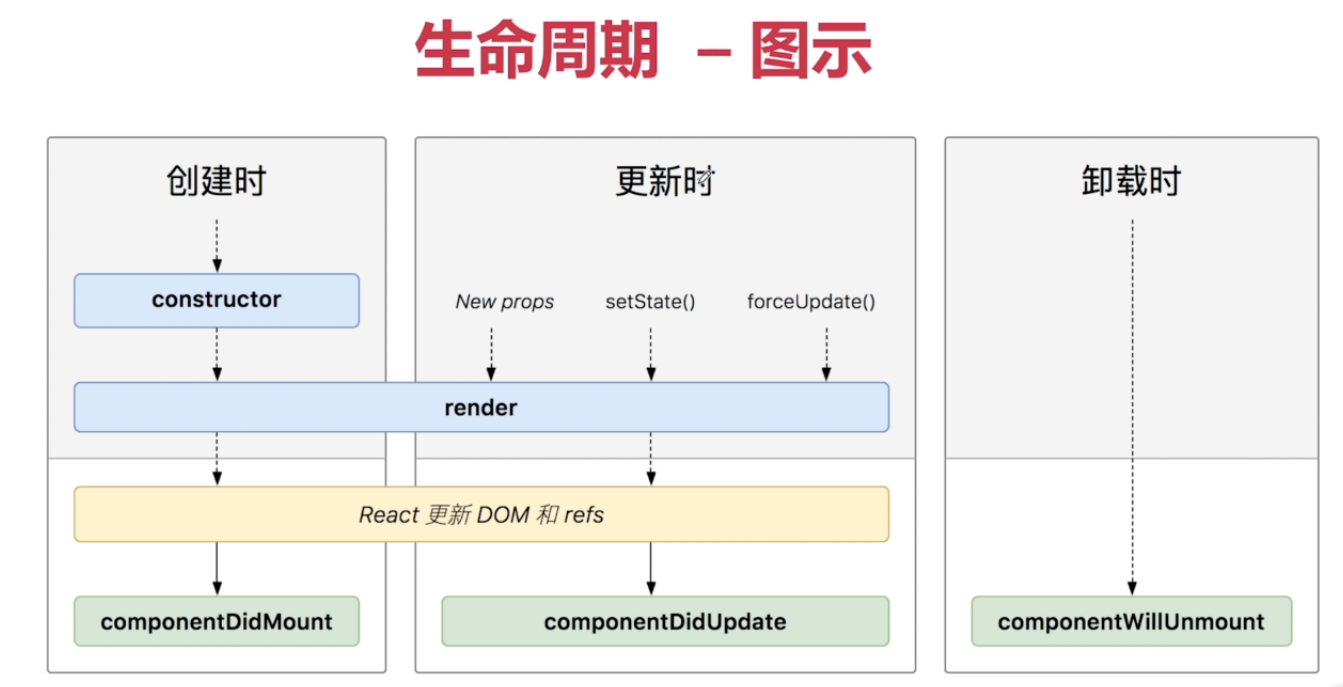
a、组件初始化阶段:
constructor
b、组件的挂载(Mounting)阶段:
componentWillMount:【新版已经改名】
render:
componentDidMount:组件挂载到DOM后调用,且只会被调用一次
c、组件的更新(update)阶段:
a、
三、各生命周期 中 设置 调用 setState设置 state 的结果:https://www.jianshu.com/p/e09cbecca1d1
1、constructor:这里不会使用 setState 设置state 值,直接初始化。
2、componentWillMount: 只是把state合并到初始化状态中,而根本不会触发render ;在这里更新state,就等同于直接写在this.state中,所以,在此生命周期中的setState根本没有意义;
3、shouldComponentUpdate: 禁止使用。
4、componentWillUpdate: 禁止使用
5、render :render 中不能 setState 设置state,不然就会报错。 render 是 props、state 的纯函数。
6、componentDidMount:正常使用。 初始化时传递给子组件的数据,不要在 这里设置。不然,初始化时,有效数据并没有子组件,而是更新时传递过去。
总结:
生命周期中setState的使用情况:
无意义使用:componentWillMount,componentWillUnmount;
有条件使用:componentDidUpdate;
禁止使用:componentWillUpdate,shouldComponentUpdate;
正常使用:componentWIllReceiveProps,componentDidMount。
生命周期中setState是否触发更新:
componentWillMount和componentWillReceiveProps中,setState会被react内部处理,而不触发render;
其他生命周期均正常出发更新渲染。
上面讲的是class组件的执行过程,函数组件是没有生命周期的。但是函数组件 的 父组件,render执行,子组件都会重新渲染的,即子组件的组件函数重新执行。
将上面的子组件改成 函数组件
import React from 'react';

function Test(){

    console.log('函数组件内');

    return (

        <div id="home-container">

        <button onClick={testClick}>

             子组件按钮

     </button>

</div>

    )

}

export default Test;
父组件的state改变,会引起子组件的Test函数重新执行。
react教程 — 组件的生命周期 和 执行顺序的更多相关文章
- reactjs入门到实战(七)---- React的组件的生命周期
React的组件的生命周期有三个状态分别是:挂载(生产组件示例化.准备挂载到页面.挂载到页面).更新(更新值.更新DOM).和卸载(卸载后). >>>其他 getInitia ...
- 附实例!图解React的生命周期及执行顺序
本文由云+社区发表 作者:前端林子 1.七个可选的生命周期 可以结合下图来看: (1) componentWillMount() 仅在render()方法前被调用一次,如果在该方法中调用了setSta ...
- react native组件的生命周期
react native组件的生命周期 一.当页面第一次加载时,会依次调用: constructor() componentWillMount(): 这个函数调用时机是在组件创建,并初始化了状态之后, ...
- Android React Native组件的生命周期及回调函数
熟悉android的童鞋应该都清楚,android是有生命周期的,其很多组件也是有生命周期.今天小编和大家分享的React Native组件的生命周期,还不了解的童鞋,赶紧来围观吧 在android开 ...
- 【RN - 基础】之React Native组件的生命周期
下图描述了React Native中组件的生命周期: 从上图中可以看到,React Native组件的生命周期可以分为初始化阶段.存在阶段和销毁阶段. 实例化阶段 实例化阶段是React Native ...
- Spring的Bean的生命周期方法执行顺序测试
通过一个简单的Maven工程来演示Spring的Bean生命周期函数的执行顺序. 下面是工程的目录结构: 直接贴代码: pom.xml文件内容: <?xml version="1.0& ...
- React Native组件、生命周期及属性传值props详解
创建组件的三种方式 第一种:通过ES6的方式创建 /** * 方式一 :ES6 */ export default class HelloComponent extends Component { r ...
- React:组件的生命周期
在组件的整个生命周期中,随着该组件的props或者state发生改变,其DOM表现也会有相应的变化.一个组件就是一个状态机,对于特定地输入,它总返回一致的输出. 一个React组件的生命周期分为三个部 ...
- Unity脚本生命周期与执行顺序
文章目录 脚本生命周期 MonoBehavior生命周期图 脚本执行顺序 自定义执行顺序 在Unity中,脚本可以理解为附加在游戏对象上的用于定义游戏对象行为的指令代码.必须绑定在游戏对象上才能开始它 ...
随机推荐
- ICPC2019上海区域赛 部分题解(正在更新)
K. Color Graph 题意: 给定一个简单图,点个数<=16,删去部分边后,使得该图中无边数为奇数得环,问剩下的边数最大为多少? 思路: 如果一个图中无奇数边的环,那么这个图一定是个二分 ...
- webStom常用快捷键备忘
Ctrl+W 选中代码,连续按会有其他效果 Ctrl+/ 或 Ctrl+Shift+/ 注释(// 或者/…/ ) Ctrl+X 删除行Ctrl+D 复制行 ctrl+shift+ 箭头 上下移动块代 ...
- 2019牛客暑期多校训练营(第一场) - E - ABBA - 贪心 - dp - 组合
https://ac.nowcoder.com/acm/contest/881/E 从dp的角度来看是比较正常的.无后效性来源于前面只要的合法的方案分配,那么对后面造成的影响就只有A,B的数目. 从贪 ...
- python模块 __name=='__main__' 用法
python模块 __name=='__main__' 用法1.ceshi_mod1.pydef test1(): print('111111')def test2(): print('2222')i ...
- linux php 中session 多站点共享session问题
linux php 中session默认file 假如修改为redis php.ini session.save_handler = "files"; session.save_p ...
- P2619 [国家集训队2]Tree I(最小生成树+二分)
P2619 [国家集训队2]Tree I 每次二分一个$x$,每条白边加上$x$,跑最小生成树 统计一下满足条件的最小值就好了. to me:注意二分不要写挂 #include<iostream ...
- Maven入门指南10:Maven的生命周期和插件
一个完整的项目构建过程通常包括清理.编译.测试.打包.集成测试.验证.部署等步骤,Maven从中抽取了一套完善的.易扩展的生命周期.Maven的生命周期是抽象的,其中的具体任务都交由插件来完成.Mav ...
- 如何在C#中使用sqlite,一个简单的类
</pre><pre name="code" class="csharp"> using System.Collections.Gene ...
- 转载一篇别人分享的VSFTPD.CONF的中文解释方便以后查询
# 服务器以standalong模式运行,这样可以进行下面的控制 listen=YES # 接受匿名用户 anonymous_enable=YES # 匿名用户login时不询问口令 no_anon_ ...
- [SCOI2003]字符串折叠(区间dp)
P4302 [SCOI2003]字符串折叠 题目描述 折叠的定义如下: 一个字符串可以看成它自身的折叠.记作S = S X(S)是X(X>1)个S连接在一起的串的折叠.记作X(S) = SSSS ...