vue-cli脚手架(框架)
一、创建vue项目
npm install vue-cli -g   #-g全局

(sudo)npm install vue-cli -g   #mac笔记本

vue-init webpack myvue  #项目的名字

cd muvue

npm install

npm run dev
二、目录结构的说明
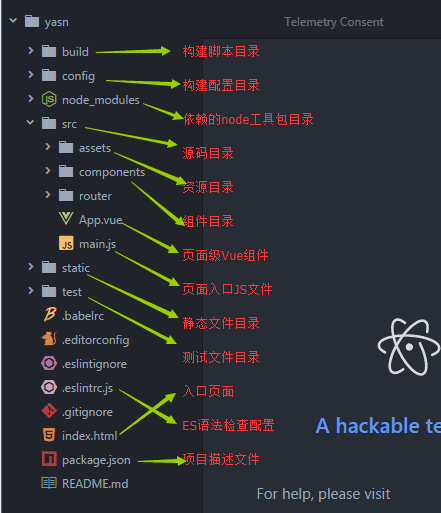
出现下面这样的图就说明成功了

三、import和require的区别
import一定要放在文件顶部,他相当于一个指针引用了文件,并没有吧文件包含进来,需要调用文件时才引入
require可以吧文件放在任何位置,他是吧文件直接包含进来
四、设置文件路径的流程
1)建立组件(.vue的文件)

2)配置路由(index.js文件中配置)

3)<router-link></router-link>

4)<router-view></router-view>

5)import 包名 from "组件路径"

6)comonents进行注册
五、实现异步加载
//异步

vue-resource:实现异步加载数据(已经弃用)

axios:实现异步加载数据

npm install axios --save-dev

npm install vue-axios --save-dev
六、VUE的生命周期
1、定义vue对象并实例化
2、执行created函数
3、编译模板,只会编译template的模板
4、吧HTML元素渲染到页面当中
5、执行mounted函数,(加载)相当于onload
6、如果有元素的更新,就执行update函数
7、销毁实例
六、项目实战
仿抽屉网站
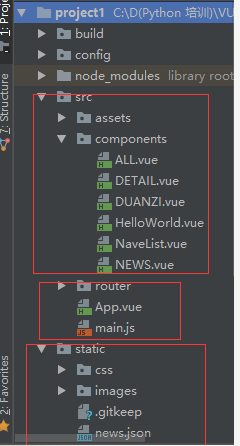
ALL.vue
 <template>

   <div class='box'>

     <ul>

       <li v-for='item in arr'>

         <div class='p1'>

           <router-link :to="{path:'/detail',query:{ids:item.id}}">{{item.content}} </router-link>

         </div>

         <div class="p2">

           <img :src="item.imgUrl">

         </div>

       </li>

     </ul>

   </div>

 </template>

 <script>

   export default {

     name: 'HelloWorld',

     data () {

       return {

         arr: []

       }

     },

     mounted () {

       var url = '../../static/news.json'

       var self=this;

       this.$axios.get(url)

         .then(function (response) {

           console.log(response.data.result.data);

           self.arr = response.data.result.data;

         })

         .catch(function (error) {

           console.log(error);

         })

     }

   }

 </script>

 <!-- Add "scoped" attribute to limit CSS to this component only -->

 <style scoped>

   h1, h2 {

     font-weight: normal;

   }

   ul {

     list-style-type: none;

     padding: 0;

   }

   li {

     display: inline-block;

     margin: 0 10px;

   }

   a {

     color: #42b983;

   }

 .box{

   width: 980px;

 }

 .p1{

   float:left;

   width:780px;

 }

  img{

   float:right;

  }

 </style>
DETAIL.vue
 <template>

   <div class="box">

     <h1>我是详细页面{{id}}</h1>

     <ul>

       <li>

         <div class="p1">

           {{obj.content}}

         </div>

         <div class="p2">

           <img :src="obj.imgUrl">

         </div>

       </li>

     </ul>

   </div>

 </template>

 <script>

   export default {

     name: 'Detail',

     data () {

       return {

           obj:{} ,

           id:this.$route.query.ids

       }

     },

     mounted(){

       var url = "../../static/news.json"

       var self =this;

       this.$axios.get(url,{

           params:{id:this.id}

       })

         .then(function (response) {

           //console.log(response.data.result.data);

           self.obj = response.data.result.data[0];

         })

         .catch(function (error) {

           console.log(error);

         })

     }

   }

 </script>

 <!-- Add "scoped" attribute to limit CSS to this component only -->

 <style scoped>

   h1, h2 {

     font-weight: normal;

   }

   ul {

     list-style-type: none;

     padding: 0;

   }

   li {

     display: inline-block;

     margin: 0 10px;

   }

   a {

     color: #42b983;

   }

   .box{

     width: 980px;

   }

   .p1{

     float:left;

     width:700px;

   }

   .p2{

     float:right;

   }

 </style>
DUANZI.vue
 <template>

   <div>

     <h1> 我是段子手</h1>

   </div>

 </template>

 <script>

 export default {

   name: 'HelloWorld',

   data () {

     return {

     }

   }

 }

 </script>

 <!-- Add "scoped" attribute to limit CSS to this component only -->

 <style scoped>

 h1, h2 {

   font-weight: normal;

 }

 ul {

   list-style-type: none;

   padding: 0;

 }

 li {

   display: inline-block;

   margin: 0 10px;

 }

 a {

   color: #42b983;

 }

 </style>
NaveList.vue
 <template>

   <div>

     <router-link to="/">首页</router-link>

     <router-link to="/news">新闻</router-link>

     <router-link to="/duanzi">段子</router-link>

   </div>

 </template>

 <script>

 export default {

   name: 'HelloWorld',

   data () {

     return {

     }

   }

 }

 </script>

 <!-- Add "scoped" attribute to limit CSS to this component only -->

 <style scoped>

 h1, h2 {

   font-weight: normal;

 }

 ul {

   list-style-type: none;

   padding: 0;

 }

 li {

   display: inline-block;

   margin: 0 10px;

 }

 a {

   color: #42b983;

 }

 </style>
NEWS.vue
 <template>

   <div>

     <h1> 我是新闻</h1>

   </div>

 </template>

 <script>

 export default {

   name: 'HelloWorld',

   data () {

     return {

     }

   }

 }

 </script>

 <!-- Add "scoped" attribute to limit CSS to this component only -->

 <style scoped>

 h1, h2 {

   font-weight: normal;

 }

 ul {

   list-style-type: none;

   padding: 0;

 }

 li {

   display: inline-block;

   margin: 0 10px;

 }

 a {

   color: #42b983;

 }

 </style>
index.js
 import Vue from 'vue'

 import Router from 'vue-router'

 import HelloWorld from '@/components/HelloWorld'

 import ALL from '@/components/All'

 import NEWS from '@/components/NEWS'

 import DUANZI from '@/components/duanzi'

 import Detail from '@/components/Detail'

 Vue.use(Router)

 export default new Router({

   routes: [

     {

       path: '/hw',

       name: 'HelloWorld',

       component: HelloWorld

     },

     {

       path: '/',

       name: 'ALL',

       component: ALL

     },

     {

       path: '/news',

       name: 'NEWS',

       component: NEWS

     },

     {

       path: '/duanzi',

       name: 'duanzi',

       component: DUANZI

     },

     {

       path: '/detail',

       name: 'Detail',

       component: Detail

     },

   ]

 })
App.vue
 <template>

   <div id="app">

   <NavList></NavList>

     <router-view></router-view>

   </div>

 </template>

 <script>

 import NavList from './components/NavList'

 export default {

   name: 'App',

   components: {NavList}

 }

 </script>

 <style>

 #app {

   font-family: 'Avenir', Helvetica, Arial, sans-serif;

   -webkit-font-smoothing: antialiased;

   -moz-osx-font-smoothing: grayscale;

   text-align: center;

   color: #2c3e50;

   margin-top: 60px;

 }

 </style>
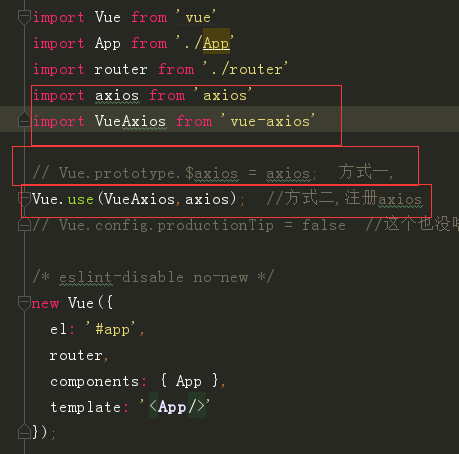
main.js
 // The Vue build version to load with the `import` command

 // (runtime-only or standalone) has been set in webpack.base.conf with an alias.

 import Vue from 'vue'

 import App from './App'

 import router from './router'

 import axios from 'axios'

 import VueAxios from 'vue-axios'

 Vue.prototype.$axios = axios;

 //Vue.use(axios, VueAxios)

 //Vue.config.productionTip = false

 /* eslint-disable no-new */

 new Vue({

   el: '#app',

   router,

   components: { App },

   template: '<App/>'

 })
项目需要注意的问题
T67M.gif) ndle.js打包时出错的解决方法需要修改为: require("style-loader!css-loader!./style.css")
ndle.js打包时出错的解决方法需要修改为: require("style-loader!css-loader!./style.css")如果想把地址栏中的 #去掉,如:http://localhost:8080/#/news,需要在
router文件夹下的index.js文件中,加入 mode: "history"
问题三:引入axios的2种方法:
需要在main.js中进行设置:这2种方法都可以,但引用顺序不能翻转。
vue-cli脚手架(框架)的更多相关文章
- 13. Vue CLI脚手架
一. Vue CLI 介绍 1. 什么是Vue CLI? Vue CLI 是一个基于 Vue.js 进行快速开发的完整系统.Vue CLI 致力于将 Vue 生态中的工具基础标准化.它确保了各种构建工 ...
- 使用Vue CLI脚手架搭建vue项目
本次是使用@vue/cli 3.11.0版本搭建的vue项目 1. 首先确保自己的电脑上的Node.js的版本是8.9版本或者以上 2. 全局安装vue/cli npm install @vue/cl ...
- vue.cli脚手架初次使用图文教程
vue-cli作用 vue-cli作为vue的脚手架,可以帮助我们在实际开发中自动生成vue.js的模板工程. vue-cli使用 !!前提:需要vue和webpack 安装全局vue-cli npm ...
- vue cli脚手架使用
1.安装nodejs,npm https://www.cnblogs.com/xidianzxm/p/12036880.html 2.安装vue cli sudo npm install -g @vu ...
- vue.js---利用vue cli脚手架工具+webpack创建项目遇到的坑
1.Eslint js代码规范报错 WARNING Compiled with 2 warnings 10:43:26 ✘ http://eslint.org/docs/rules/quotes St ...
- node.js和vue cli脚手架下载安装配置方法
一.node.js安装以及环境配置 1.下载vue.js 下载地址: https://nodejs.org/en/ 2.安装node.js 下载完成后,双击安装包开始安装.安装地址最好换成自己指定的地 ...
- vue cli 脚手架上多页面开发 支持webpack2.x
A yuri demo for webpack2 vue multiple page.我看到有一些项目多页面项目是基于webapck1.0的,我这个是在webpack2.x上布置修改. 项目地址: ...
- 用 vue cli 脚手架搭建单页面 Vue 应用(进阶2)
1.配置 Node 环境. 自行百度吧. 安装好了之后,打开 cmd .运行 node -v .显示版本号,就是安装成功了. 注:不要安装8.0.0以上的版本,和 vue-cli 不兼容. 我使用的 ...
- vue cli脚手架项目利用webpack给生产环境和发布环境配置不同的接口地址或者不同的变量值。
废话不多说,直接进入正题,此文以配置不同的接口域名地址为例子 项目根目录下有一个config文件夹,基础项目的话里面至少包括三个文件, 1.dev.env.js 2.index.js 3.prod.e ...
- 关于Vue.cli 脚手架环境中引入Bootstrap时,table表格样式缺失的解决办法
Vue+bootstrap不能正常使用table的样式 环境:下载官网的本地bootstrap包,然后在vue 的index.html引入bootstrap的css和js环境 问题描述:1. vue里 ...
随机推荐
- 第26月第22天 iOS瘦身之armv7 armv7s arm64选用 iOS crash
1.iOS瘦身之armv7 armv7s arm64选用 机器对指令集的支持是向下兼容的,因此armv7的指令集是可以运行在iphone5S以上的,只是效率没那么高而已~ 但是由于苹果要求必须支持ar ...
- script标签
script 元素既可以包含脚本语句,也可以通过 src 属性指向外部脚本文件.默认情况下script标签的会阻止文档渲染,相关脚本会立即下载并执行. 属性 在HTML5中script主要有以下几个属 ...
- Codeforces Round #545 (Div. 2)(B. Circus)
题目链接:http://codeforces.com/contest/1138/problem/B 题目大意:贼绕口的题目,就是给你两个字符串s1,s2,然后每一个人代表一列,第一列代表技能一每个人是 ...
- vue购物车实战项02
1.数据循环.绑定 v- 绑定的属性 都是变量 ( 小程序这块需要花括号 不同点) 2.列表点击 当绑定变量为一个对象的时候{} 属性根据里面的属性值 bool 值 是否返回 当前的属性 转化成cl ...
- LaTeX IEEE模板
因为课程作业的要求需要完成一篇IEEE格式的论文,所以选择入门LaTeX.但是期间遇到了各种各样莫名其妙的坑.前前后后挣扎了两个多星期终于完成了IEEE模板的设置.下面详细记录一下让我深恶痛绝的心路历 ...
- openstack-----各种系统镜像制作
本章内容 1.centos镜像制作 2.windows镜像制作 3.ubunt镜像制作 一.centos7镜像制作 1.检查系统是否支持kvm: egrep "(vmx|svm)&q ...
- 2016521-Java-第八周学习总结
课本知识点 start() run()定义线程线程对象被调度之后所执行的操作 -sleep(int millsecond),必须在try-catch语句块中调用sleep方法 sAlive() 线程同 ...
- 20165325 2017-2018-2 《Java程序设计》结对编程_第一周:四则运算
一.码云链接 项目名称FAO 码云链接 二.需求分析 实现一个命令行程序: 自动生成小学四则运算题目(加.减.乘.除) 支持整数 支持多运算符(比如生成包含100个运算符的题目) 支持真分数 统计正确 ...
- unity开发笔记
debug代码 Debug.Log("普通信息"); Debug.LogWarning("警告信息"); Debug ...
- linux系统的三种网络连接模式
VMWare提供了三种工作模式,它们是bridged(桥接模式).NAT(网络地址转换模式)和host-only(主机模式).要想在网络管理和维护中合理应用它们,你就应该先了解一下这三种工作模式. 1 ...