editormd实现Markdown编辑器写文章功能
想在项目里引入Markdown编辑器实现写文章功能,网上找到一款开源的插件editormd.js
介绍网站:https://pandao.github.io/editor.md/examples/index.html
源码:https://github.com/pandao/editor.md,插件代码已经开源到github上了。
可以先git clone下载下来
git clone https://github.com/pandao/editor.md.git
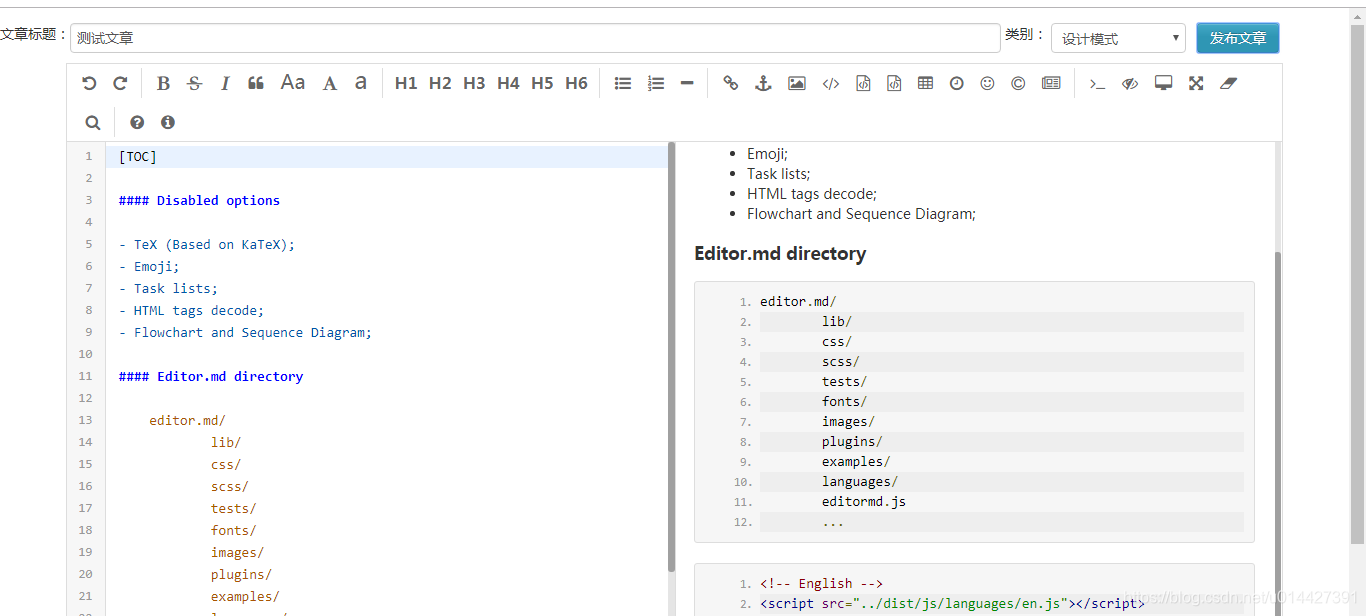
现在介绍一下怎么引入JavaWeb项目里,可以在Webapp(WebContent)文件夹下面,新建一个plugins的文件夹,然后再新建editormd文件夹,文件夹命名的随意。
在官方网站也给出了比较详细的使用说明,因为我需要的个性化功能不多,所以下载下来的examples文件夹下面找到simple.html文件夹
加上样式css文件
<link href="<%=basePath %>plugins/editormd/css/editormd.min.css"

	rel="stylesheet" type="text/css" />
关键的JavaScript脚本
<script type="text/javascript"

	src="<%=basePath %>static/js/jquery-1.8.3.js"></script>

<script type="text/javascript"

	src="<%=basePath %>plugins/editormd/editormd.min.js"></script>

<script type="text/javascript">

	var testEditor;

	$(function() {

	    testEditor = editormd("test-editormd", {

	        width   : "90%",

	        height  : 640,

	        syncScrolling : "single",

	        path    : "<%=basePath %>plugins/editormd/lib/"

	    });

	});

</script>
写个jsp页面
<%@ page language="java" contentType="text/html; charset=UTF-8"

		 pageEncoding="UTF-8"%>

<%@ taglib prefix="c" uri="http://java.sun.com/jsp/jstl/core"%>

<%@ taglib prefix="fmt" uri="http://java.sun.com/jsp/jstl/fmt"%>

<%

	String path = request.getContextPath();

	String basePath = request.getScheme()+"://"+request.getServerName()+":"+request.getServerPort()+path+"/";

%>

<!DOCTYPE html>

<html>

<head>

<base href="<%=basePath %>">

<meta http-equiv="Content-Type" content="text/html; charset=UTF-8">

<title>Nicky's blog 写文章</title>

<link rel="icon" type="image/png" href="static/images/logo/logo.png">

<link href="<%=basePath %>plugins/editormd/css/editormd.min.css"

	rel="stylesheet" type="text/css" />

<link href="<%=basePath %>static/css/bootstrap.min.css"

	rel="stylesheet" type="text/css"  />

<style type="text/css">

	#articleTitle{

		width: 68%;

		margin-top:15px;

	}

	#articleCategory{

		margin-top:15px;

		width:10%;

	}

	#btnList {

		position:relative;

		float:right;

		margin-top:15px;

		padding-right:70px;

	}

</style>

</head>

<body>

	<div id="layout">

		<header>

			文章标题:<input type="text" id="articleTitle" />

			类别:

			<select id="articleCategory"></select>

			<span id="btnList">

				<button type="button" id="publishArticle" onclick="writeArticle.doSubmit();" class="btn btn-info">发布文章</button>

			</span>

		</header>

		<div id="test-editormd">

			<textarea id="articleContent" style="display: none;">

</textarea>

</div>

    </div>

<script type="text/javascript"

	src="<%=basePath %>static/js/jquery-1.8.3.js"></script>

<script type="text/javascript"

	src="<%=basePath %>plugins/editormd/editormd.min.js"></script>

<script type="text/javascript">

	var testEditor;

	$(function() {

	    testEditor = editormd("test-editormd", {

	        width   : "90%",

	        height  : 640,

	        syncScrolling : "single",

	        path    : "<%=basePath %>plugins/editormd/lib/"

	    });

	    categorySelect.init();

	});

	/* 文章类别下拉框数据绑定 */

	var categorySelect = {

		init: function () {//初始化数据

			$.ajax({

                type: "GET",

                url: 'articleSort/listArticleCategory.do',

                dataType:'json',

                contentType:"application/json",

                cache: false,

                success: function(data){

                	//debugger;

                	data = eval(data) ;

                    categorySelect.buildOption(data);

                }

            });

		},

		buildOption: function (data) {//构建下拉框数据

            //debugger;

            var optionStr ="";

            for(var i=0 ; i < data.length; i ++) {

                optionStr += "<option value="+data[i].typeId+">";

                optionStr += data[i].name;

                optionStr +="</option>";

            }

            $("#articleCategory").append(optionStr);

        }

	}

	/* 发送文章*/

	var writeArticle = {

	    doSubmit: function () {//提交

	        if (writeArticle.doCheck()) {

	            //debugger;

                var title = $("#articleTitle").val();

                var content = $("#articleContent").val();

                var typeId = $("#articleCategory").val();

                $.ajax({

                    type: "POST",

                    url: '<%=basePath %>article/saveOrUpdateArticle.do',

					data: {'title':title,'content':content,'typeId':typeId},

                    dataType:'json',

                    //contentType:"application/json",

                    cache: false,

                    success: function(data){

                        //debugger;

						if ("success"== data.result) {

						   alert("保存成功!");

							setTimeout(function(){

								window.close();

							},3000);

						}

                    }

                });

			}

        },

		doCheck: function() {//校验

            //debugger;

			var title = $("#articleTitle").val();

			var content = $("#articleContent").val();

			if (typeof(title) == undefined || title == null || title == "" ) {

                alert("请填写文章标题!");

			    return false;

			}

			if(typeof (content) == undefined || content == null || content == "") {

                alert("请填写文章内容!");

                return false;

			}

			return true;

        }

	}

</script>

</body>

</html>
然后后台只要获取一下参数就可以,注意的是path参数要改一下
testEditor = editormd("test-editormd", {

	        width   : "90%",

	        height  : 640,

	        syncScrolling : "single",

	        path    : "<%=basePath %>plugins/editormd/lib/"

	    });
SpringMVC写个接口获取参数进行保存,项目用了Spring data Jpa来实现
package net.myblog.entity;

import javax.persistence.*;

import java.util.Date;

/**

 * 博客系统文章信息的实体类

 * @author Nicky

 */

@Entity

public class Article {

	/** 文章Id,自增**/

	private int articleId;

	/** 文章名称**/

	private String articleName;

	/** 文章发布时间**/

	private Date articleTime;

	/** 图片路径,测试**/

	private String imgPath;

	/** 文章内容**/

	private String articleContent;

	/** 查看人数**/

	private int articleClick;

	/** 是否博主推荐。0为否;1为是**/

	private int articleSupport;

	/** 是否置顶。0为;1为是**/

	private int articleUp;

	/** 文章类别。0为私有,1为公开,2为仅好友查看**/

	private int articleType;

	private int typeId;

	private ArticleSort articleSort;

	@GeneratedValue(strategy=GenerationType.IDENTITY)

	@Id

	public int getArticleId() {

		return articleId;

	}

	public void setArticleId(int articleId) {

		this.articleId = articleId;

	}

	@Column(length=100, nullable=false)

	public String getArticleName() {

		return articleName;

	}

	public void setArticleName(String articleName) {

		this.articleName = articleName;

	}

	@Temporal(TemporalType.DATE)

	@Column(nullable=false, updatable=false)

	public Date getArticleTime() {

		return articleTime;

	}

	public void setArticleTime(Date articleTime) {

		this.articleTime = articleTime;

	}

	@Column(length=100)

	public String getImgPath() {

		return imgPath;

	}

	public void setImgPath(String imgPath) {

		this.imgPath = imgPath;

	}

	@Column(nullable=false)

	public String getArticleContent() {

		return articleContent;

	}

	public void setArticleContent(String articleContent) {

		this.articleContent = articleContent;

	}

	public int getArticleClick() {

		return articleClick;

	}

	public void setArticleClick(int articleClick) {

		this.articleClick = articleClick;

	}

	public int getArticleSupport() {

		return articleSupport;

	}

	public void setArticleSupport(int articleSupport) {

		this.articleSupport = articleSupport;

	}

	public int getArticleUp() {

		return articleUp;

	}

	public void setArticleUp(int articleUp) {

		this.articleUp = articleUp;

	}

	@Column(nullable=false)

	public int getArticleType() {

		return articleType;

	}

	public void setArticleType(int articleType) {

		this.articleType = articleType;

	}

	public int getTypeId() {

		return typeId;

	}

	public void setTypeId(int typeId) {

		this.typeId = typeId;

	}

	@JoinColumn(name="articleId",insertable = false, updatable = false)

	@ManyToOne(fetch=FetchType.LAZY)

	public ArticleSort getArticleSort() {

		return articleSort;

	}

	public void setArticleSort(ArticleSort articleSort) {

		this.articleSort = articleSort;

	}

}
Repository接口:
package net.myblog.repository;

import java.util.Date;

import java.util.List;

import net.myblog.entity.Article;

import org.springframework.data.domain.Page;

import org.springframework.data.domain.PageRequest;

import org.springframework.data.domain.Pageable;

import org.springframework.data.jpa.repository.Query;

import org.springframework.data.repository.PagingAndSortingRepository;

import org.springframework.data.repository.query.Param;

public interface ArticleRepository extends PagingAndSortingRepository<Article,Integer>{

	...

}
业务Service类:
package net.myblog.service;

import net.myblog.entity.Article;

import net.myblog.repository.ArticleRepository;

import org.springframework.beans.factory.annotation.Autowired;

import org.springframework.data.domain.Page;

import org.springframework.data.domain.PageRequest;

import org.springframework.data.domain.Sort.Direction;

import org.springframework.stereotype.Service;

import org.springframework.transaction.annotation.Transactional;

import java.util.Date;

import java.util.List;

@Service

public class ArticleService {

	@Autowired ArticleRepository articleRepository;

	/**

	 * 保存文章信息

	 * @param article

	 * @return

	 */

	@Transactional

	public Article saveOrUpdateArticle(Article article) {

		return articleRepository.save(article);

	}

}
Controller类:
package net.myblog.web.controller.admin;

import com.alibaba.fastjson.JSONObject;

import net.myblog.core.Constants;

import net.myblog.entity.Article;

import net.myblog.service.ArticleService;

import net.myblog.service.ArticleSortService;

import net.myblog.web.controller.BaseController;

import org.springframework.beans.factory.annotation.Autowired;

import org.springframework.data.domain.Page;

import org.springframework.data.domain.Sort.Direction;

import org.springframework.stereotype.Controller;

import org.springframework.ui.Model;

import org.springframework.web.bind.annotation.RequestMapping;

import org.springframework.web.bind.annotation.RequestMethod;

import org.springframework.web.bind.annotation.RequestParam;

import org.springframework.web.bind.annotation.ResponseBody;

import org.springframework.web.servlet.ModelAndView;

import javax.servlet.http.HttpServletRequest;

import java.util.Date;

@Controller

@RequestMapping("/article")

public class ArticleAdminController extends BaseController{

	@Autowired

    ArticleService articleService;

	@Autowired

    ArticleSortService articleSortService;

	/**

	 * 跳转到写文章页面

	 * @return

	 */

	@RequestMapping(value="/toWriteArticle",method=RequestMethod.GET)

	public ModelAndView toWriteArticle() {

		ModelAndView mv = this.getModelAndView();

		mv.setViewName("admin/article/article_write");

		return mv;

	}

	/**

	 * 修改更新文章

	 */

	@RequestMapping(value = "/saveOrUpdateArticle", method = RequestMethod.POST)

	@ResponseBody

	public String saveOrUpdateArticle (@RequestParam("title")String title , @RequestParam("content")String content,

        @RequestParam("typeId")String typeIdStr) {

	    int typeId = Integer.parseInt(typeIdStr);

	    Article article = new Article();

	    article.setArticleName(title);

	    article.setArticleContent(content);

	    article.setArticleTime(new Date());

	    article.setTypeId(typeId);

   		JSONObject result = new JSONObject();

	    try {

            this.articleService.saveOrUpdateArticle(article);

            result.put("result","success");

            return result.toJSONString();

        } catch (Exception e) {

	        error("保存文章报错:{}"+e);

			result.put("result","error");

			return result.toJSONString();

        }

	}

}
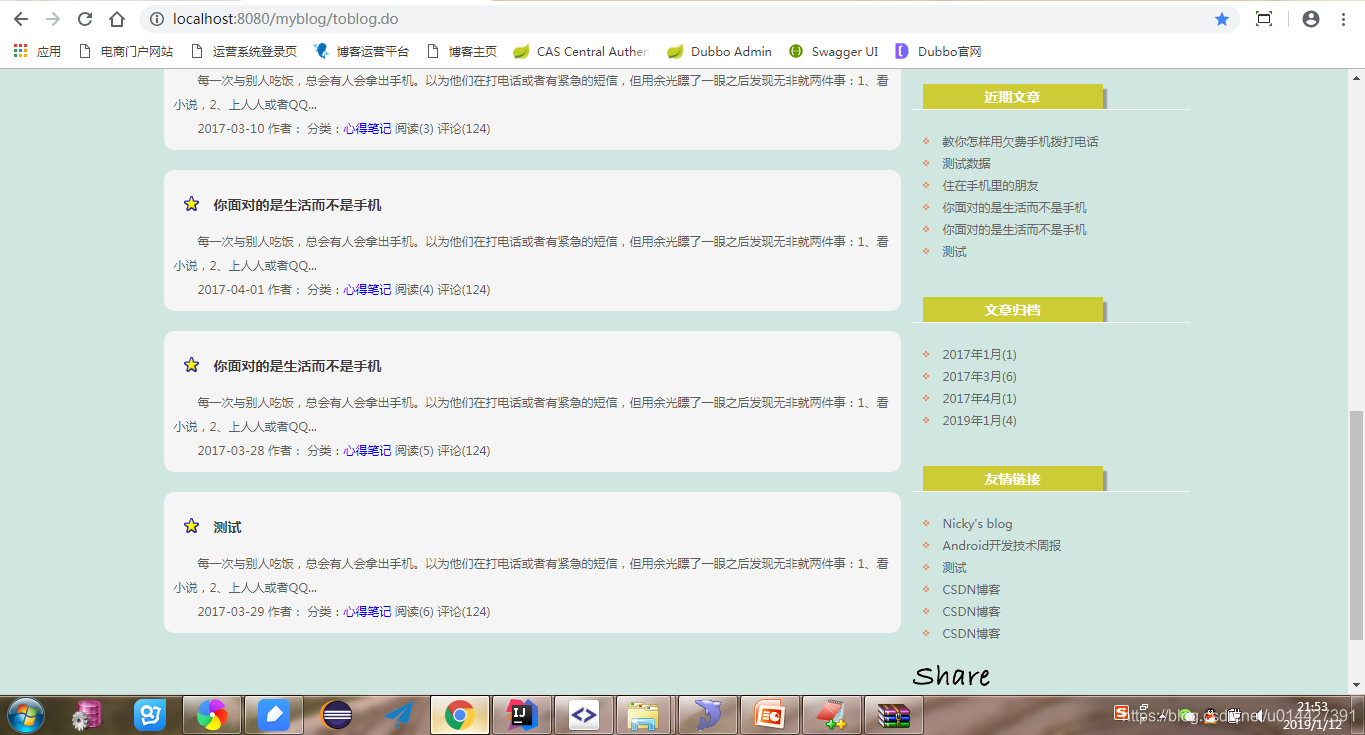
然后就在自己的项目里集成成功了,项目链接:https://github.com/u014427391/myblog,自己做的一款开源博客,前端的感谢一个个人网站分享的模板做的,http://www.yangqq.com/download/div/2013-06-15/272.html,感谢作者
editormd实现Markdown编辑器写文章功能的更多相关文章
- 使用Markdown编辑器写博客
使用Markdown编辑器写博客 本Markdown编辑器使用StackEdit修改而来,用它写博客,将会带来全新的体验哦: Markdown和扩展Markdown简洁的语法 代码块高亮 图片链接和图 ...
- 欢迎使用 Markdown 编辑器写博客
本Markdown编辑器使用StackEdit修改而来,用它写博客,将会带来全新的体验哦: Markdown和扩展Markdown简洁的语法 代码块高亮 图片链接和图片上传 LaTex数学公式 UML ...
- 用nw.js开发markdown编辑器-已完成功能介绍
这里文章都是从个人的github博客直接复制过来的,排版可能有点乱. 原始地址 http://benq.im/2015/10/29/hexomd-introduction 文章目录 1. 功能列表 ...
- 如何使用markdown编辑器编写文章
1 设置markdown编辑器为默认编辑器 进入我的博客,点击管理 点击选项,勾选markdown编辑器即可 2 markdown 语法 注意,文章中的# - 1. > 只有在段落开头且符号后需 ...
- # 欢迎使用Markdown编辑器写博客
似的发射点 甜甜 他inn他 absct{ for i 士大夫似的 胜多负少 import os import sys import subprocess import textwrap if sys ...
- CSDN 支持Markdown写文章了!
开源中国等其他技术博客很早就支持markdown格式写文章了,今天发现csdn竟然也可以了,不仅支持而且可以在线预览,本地导入导出,远程导入. 这些对于程序员写东西都非常好用,不用总是花时间来排版了. ...
- SimpleMarkdown - 一款简单的Markdown编辑器
源码地址: https://github.com/zhuangZhou/SimpleMarkdown 预览地址: http://hawkzz.com:8000 作者网站:http://hawkzz.c ...
- 任由文字肆意流淌,更自由的开源 Markdown 编辑器
对于创作平台来说内容编辑器是十分重要的功能,强大的编辑器可以让创作者专注于创作"笔"下生花.而最好取悦程序员创作者的方法之一就是支持 Markdown 写作,因为大多数程序员都是用 ...
- [CSDN_Markdown] 使用CSDN Markdown编辑器
简介 最近CSDN支持Markdown语法写博客了,甚是欢喜.前几天写了一篇实验了下,感觉不错.准备写几篇文章介绍一下如何使用CSDN的Markdown编辑器写博客,不求全面,但求够用,望大家批评指正 ...
随机推荐
- java webservice生成客户端代码并调用
wsimport简介 在JDK的bin文件夹中,有一个wsimport.exe工具,可依据wsdl文件生成相应的类文件,将生存在本地这些类文件拷贝到需要使用的项目中,就可以像调用本地的类一样调用web ...
- hbase_基本命令
hbase 区分大小写. 1) create '表名','列族名' --多个列族名用逗号分隔 2) list desc(查询表名详细信息) 3) put '表名','行健','列族:列名',' ...
- Mysql常用命令 详细整理版
Mysql常用命令 show databases; 显示数据库 create database name; 创建数据库 use databasename; 选择数据库 drop database na ...
- 口试C#概念
C#概念 装箱拆箱: 值类型与引用类型:值类型:System.ValueType(继承自System.Object)引用类型:System.Object 反射:反射提供一种编程方式,让程序员可以在程序 ...
- Linux 第十六天
十六.服务管理 1.服务分类 1)RPM包默认安装的服务:包括独立的服务.基于xinetd的服务 2)源码包安装的服务 3)RPM安装服务和源码包安装服务的区别就是安装位置的不同 >源码包安装在 ...
- nlp L1
前向最大匹配: 最大匹配出的词必须保证下一个扫描不是词表中的词或词的前缀才可以结束. 正向最大匹配算法:从左到右将待分词文本中的几个连续字符与词表匹配,如果匹配上,则切分出一个词.但这里有一个问题:要 ...
- ubuntu installs matlab2017a
cd mkdir matlab sudo mount -o loop *1.iso matlab sudo ./matlab/install ... sudo mount -o loop *2.iso ...
- U-Boot Makefile分析(3) rules.mk分析
浏览各个子Makefile可以发现,他们都会在文件的后面包含rules.mk,这个文件的作用就是更新源文件的依赖,并生成各种.depend文件. _depend: $(obj).depend # Sp ...
- Forward团队-爬虫豆瓣top250项目-最终程序
托管平台地址:https://github.com/xyhcq/top250 小组名称:Forward团队 小组成员合照: 程序运行方法: 在python中打开程序并运行:或者直接执行程序即可运行 程 ...
- Connect To Ubuntu 16.04 / 17.10 / 18.04 Desktop Via Remote Desktop Connection (RDP) With Xrdp
[1] https://websiteforstudents.com/connect-to-ubuntu-16-04-17-10-18-04-desktop-via-remote-desktop-co ...