
开源组件ELK日志系统配置与管理
ELK日志系统介绍
开源实时日志分析ELK平台能够完美的解决我们上述的问题,ELK由ElasticSearch、Logstash和Kiabana三个开源工具组成。官方网站:https://www.elastic.co/products
1、Elasticsearch是个开源分布式搜索引擎,它的特点有:分布式,零配置,自动发现,索引自动分片,索引副本机制,restful风格接口,多数据源,自动搜索负载等
2、Logstash是一个完全开源的工具,他可以对你的日志进行收集、过滤,并将其存储供以后使用(如,搜索)
3、Kibana 也是一个开源和免费的工具,它Kibana可以为 Logstash 和 ElasticSearch 提供的日志分析友好的 Web 界面,可以帮助您汇总、分析和搜索重要数据日志
安装环境准备
首先需要下载好相关的软件安装包
官方网站:https://www.elastic.co
https://artifacts.elastic.co/downloads/logstash/logstash-5.3.1.tar.gz
https://artifacts.elastic.co/downloads/elasticsearch/elasticsearch-5.3.1.tar.gz
https://artifacts.elastic.co/downloads/kibana/kibana-5.3.1-linux-x86_64.tar.gz
安装配置JAVA环境
JDK版本:jdk-8u144-linux-x64.tar.gz

[root@centos7-1 ~]# cat /etc/redhat-release

CentOS Linux release 7.4.1708 (Core)

[root@centos7-1 ~]# uname -r

3.10.0-693.el7.x86_64

[root@centos7-1 ~]# tar zxf jdk-8u144-linux-x64.tar.gz -C /usr/local/

[root@centos7-1 ~]# ln -s /usr/local/jdk1.8.0_144 /usr/local/jdk

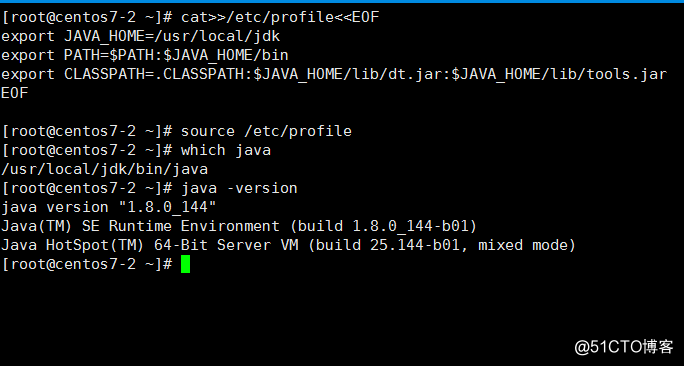
[root@centos7-1 ~]# cat >>/etc/profile <<EOF

export JAVA_HOME=/usr/local/jdk

export PATH=$PATH: $JAVA_HOME/bin

export CLASSPATH=.CLASSPATH:$JAVA_HOME/lib/dt.jar:$JAVA_HOME/lib/tools.jar

EOF

[root@centos7-1 ~]# source /etc/profile

[root@centos7-1 ~]# java -version

java version "1.8.0_144"

Java(TM) SE Runtime Environment (build 1.8.0_144-b01)

Java HotSpot(TM) 64-Bit Server VM (build 25.144-b01, mixed mode)
安装Elasticserach
修改系统参数
[root@centos7-1 config]# vim /etc/sysctl.conf

#增加下面的配置

vm.max_map_count=655360

[root@centos7-1 config]# sysctl -p

vm.max_map_count = 655360

[root@centos7-1 config]# tail -5 /etc/security/limits.conf

* soft nofile 65536

* hard nofile 131072

* soft nproc 65536

* hard nproc 131072

# End of file
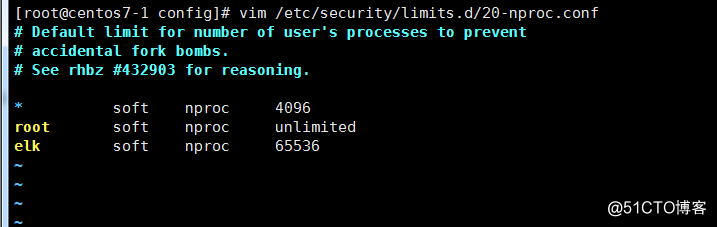
[root@centos7-1 config]# vim /etc/security/limits.d/20-nproc.conf

#增加下面的配置

elk        soft    nproc     65536
创建用户与目录
[root@centos7-1 config]# useradd elk

[root@centos7-1 config]# mkdir /elk/data /elk/logs -p

[root@centos7-1 config]# chown -R elk.elk /elk/

[root@centos7-1 config]# chown -R elk.elk /usr/local/elasticsearch/
安装与配置
[root@centos7-1 ~]# tar zxf elasticsearch-5.3.1.tar.gz -C /usr/local/

[root@centos7-1 ~]# ln -s /usr/local/elasticsearch-5.3.1 /usr/local/elasticsearch

[root@centos7-1 ~]# cd /usr/local/elasticsearch/config/
修改配置文件
[root@centos7-1 config]# egrep -v "^#|^$" elasticsearch.yml

cluster.name: myelk    #集群名

node.name: centos7-1

path.data: /elk/data

path.logs: /elk/logs

network.host: 0.0.0.0

http.port: 9200

discovery.zen.ping.unicast.hosts: ["host1", "host2"]
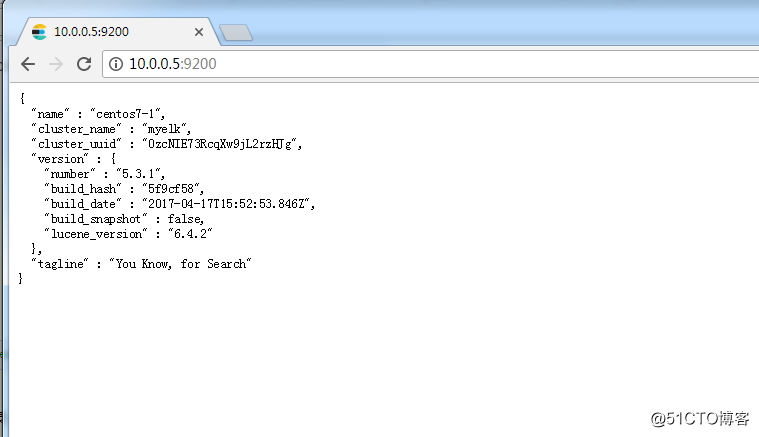
启动服务
[root@centos7-1 config]# su - elk

[elk@centos7-1 ~]$ who

root     pts/0        2017-10-13 22:22 (10.0.0.1)

[elk@centos7-1 ~]$ cd /usr/local/elasticsearch/bin/

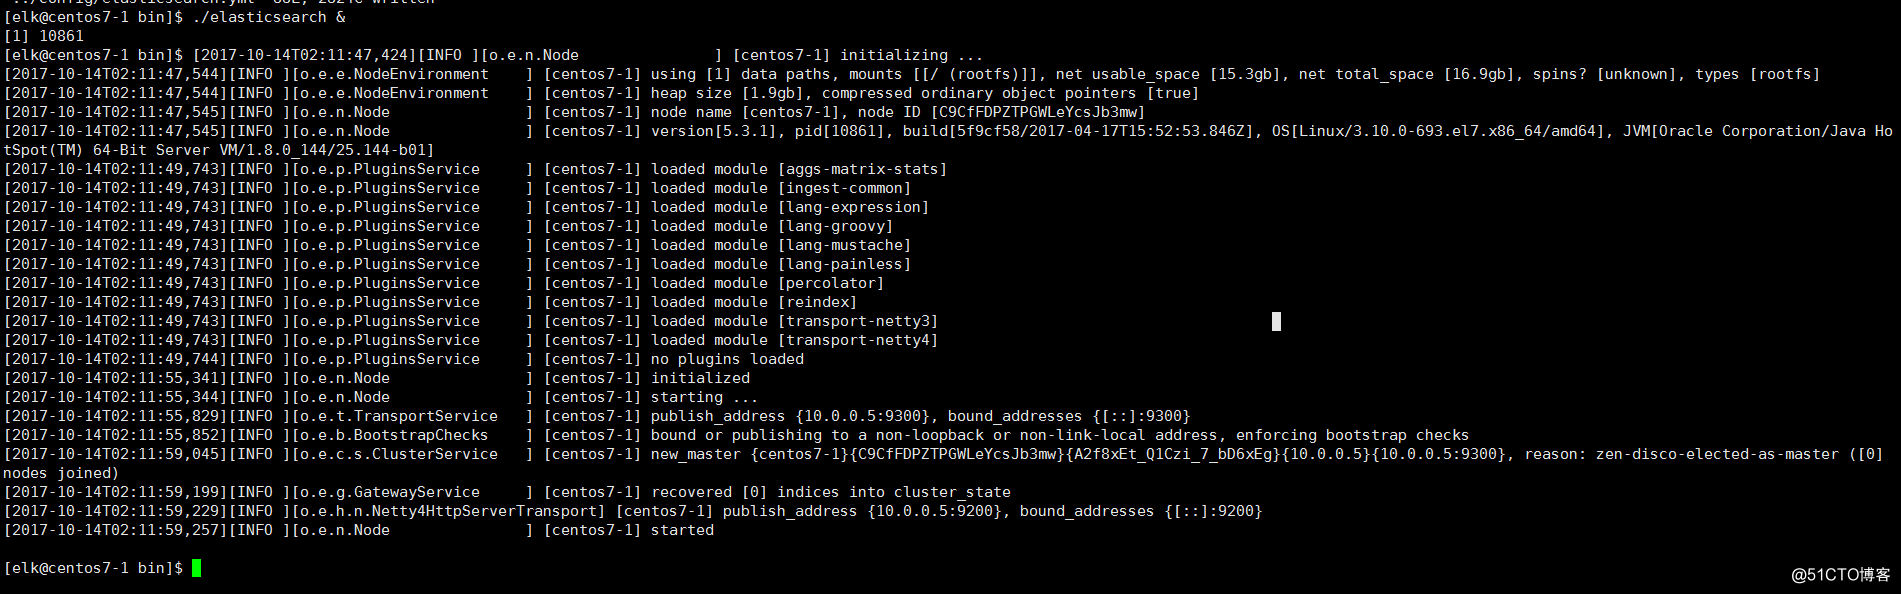
[elk@centos7-1 bin]$ ./elasticsearch&
安装Logstash
[root@centos7-1 ~]# tar zxf logstash-5.3.1.tar.gz -C /usr/local/

[root@centos7-1 ~]# /usr/local/logstash-5.3.1/bin/logstash -e 'input { stdin { } } output { stdout {} }'

Sending Logstash's logs to /usr/local/logstash-5.3.1/logs which is now configured via log4j2.properties

[2017-10-16T01:39:36,983][INFO ][logstash.setting.writabledirectory] Creating directory {:setting=>"path.queue", :path=>"/usr/local/logstash-5.3.1/data/queue"}

[2017-10-16T01:39:37,181][INFO ][logstash.agent  ] No persistent UUID file found. Generating new UUID {:uuid=>"a2e3b22a-4785-42f6-a073-f7fad4d60a44", :path=>"/usr/local/logstash-5.3.1/data/uuid"}

[2017-10-16T01:39:37,623][INFO ][logstash.pipeline] Starting pipeline {"id"=>"main", "pipeline.workers"=>1, "pipeline.batch.size"=>125, "pipeline.batch.delay"=>5, "pipeline.max_inflight"=>125}

[2017-10-16T01:39:37,700][INFO ][logstash.pipeline  ] Pipeline main started

The stdin plugin is now waiting for input:

[2017-10-16T01:39:38,042][INFO ][logstash.agent  ] Successfully started Logstash API endpoint {:port=>9600}

hello

2017-10-16T05:39:45.692Z centos7-1 hello
创始配置文件
[root@centos7-1 logstash-5.3.1]# cd config/

[root@centos7-1 config]# ll

total 20

-rw-rw-r-- 1 root root 1738 Apr 17 12:07 jvm.options

-rw-rw-r-- 1 root root 3958 Apr 17 12:07 log4j2.properties

-rw-rw-r-- 1 root root 4433 Apr 17 12:07 logstash.yml

-rw-rw-r-- 1 root root 1701 Apr 17 12:07 startup.options

[root@centos7-1 config]# vim logstash.conf

input { stdin { } }

output {

    stdout { codec=> rubydebug }

}
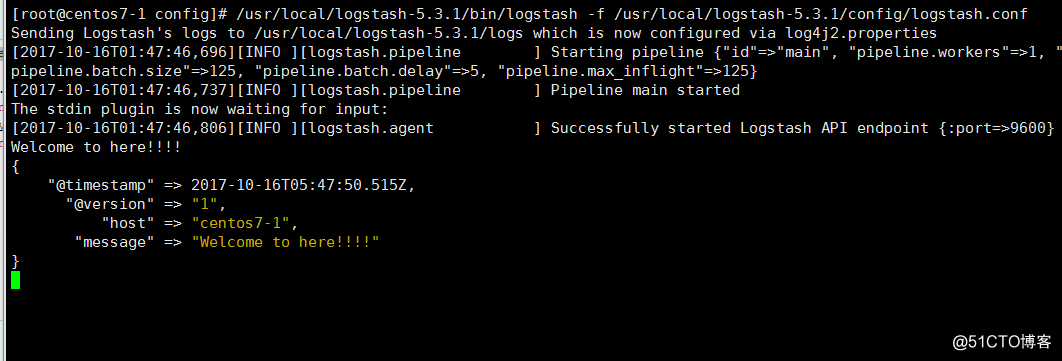
Logstash 使用 input 和 output 定义收集日志时的输入和输出的相关配置,本例中 input 定义了一个叫 "stdin" 的 input , output 定义一个叫 "stdout" 的 output 。无论我们输入什么字符, Logstash 都会按照某种格式来返回我们输入的字符,其中 output 被定义为 "stdout" 并使用了 codec 参数来指定 logstash 输出格式
[root@centos7-1 config]# /usr/local/logstash-5.3.1/bin/logstash -f /usr/local/logstash-5.3.1/config/logstash.conf
安装Kibana
[root@centos7-1 ~]# tar zxf kibana-5.3.1-linux-x86_64.tar.gz -C /usr/local/

[root@centos7-1 ~]# cd /usr/local/kibana-5.3.1-linux-x86_64/config/

[root@centos7-1 config]# vim kibana.yml

# Kibana is served by a back end server. This setting specifies the port to use.

server.port: 5601

# To allow connections from remote users, set this parameter to a non-loopback address.

server.host: "10.0.0.5"

# The URL of the Elasticsearch instance to use for all your queries.

elasticsearch.url: "http://10.0.0.5:9200"

# Kibana uses an index in Elasticsearch to store saved searches, visualizations and

# dashboards. Kibana creates a new index if the index doesn't already exist.

kibana.index: ".kibana"
启动服务
[root@centos7-1 config]# /usr/local/kibana-5.3.1-linux-x86_64/bin/kibana &
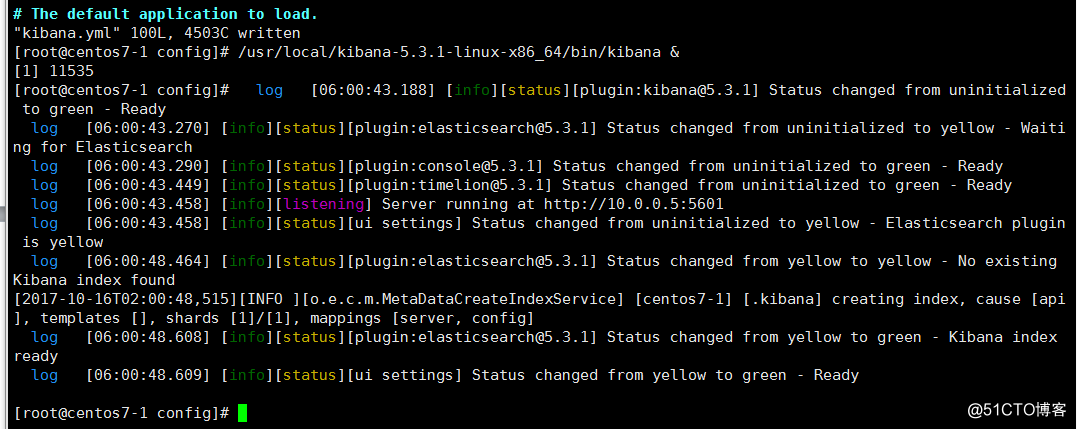
[root@centos7-1 config]# lsof -i :5601

COMMAND   PID USER   FD   TYPE DEVICE SIZE/OFF NODE NAME

node  11535 root  12u  IPv4  30703  0t0  TCP centos7-1:esmagent (LISTEN)
登陆WEB界面
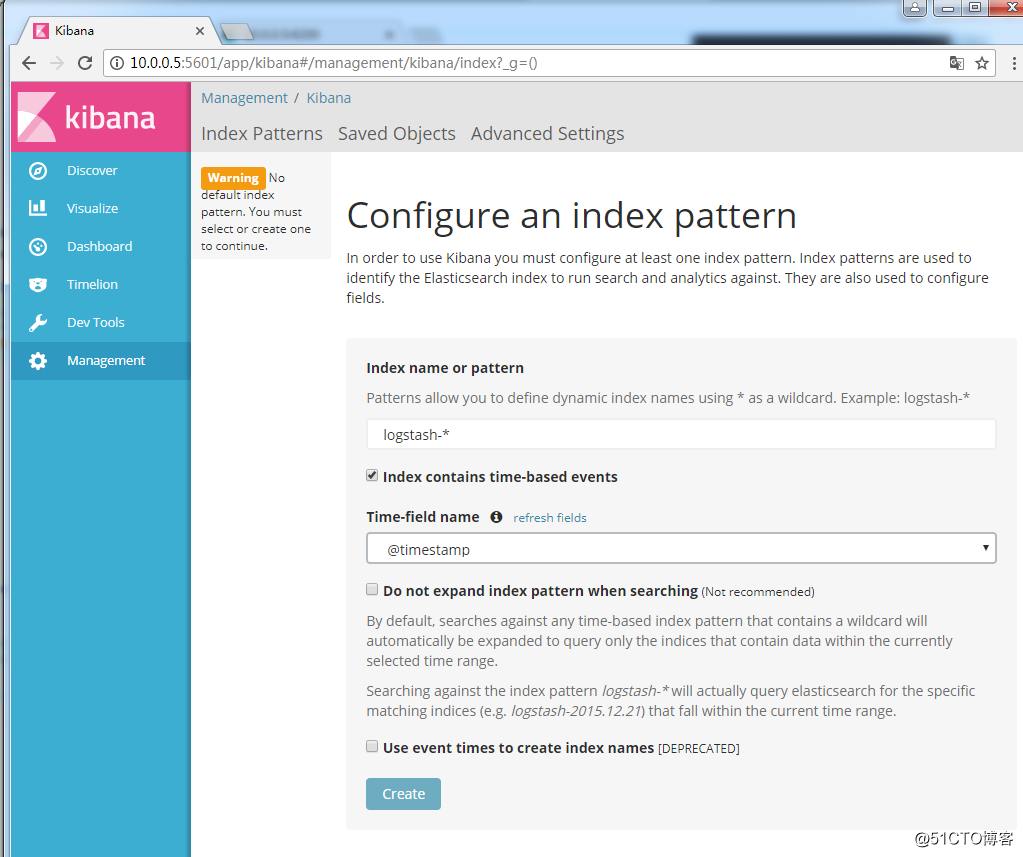
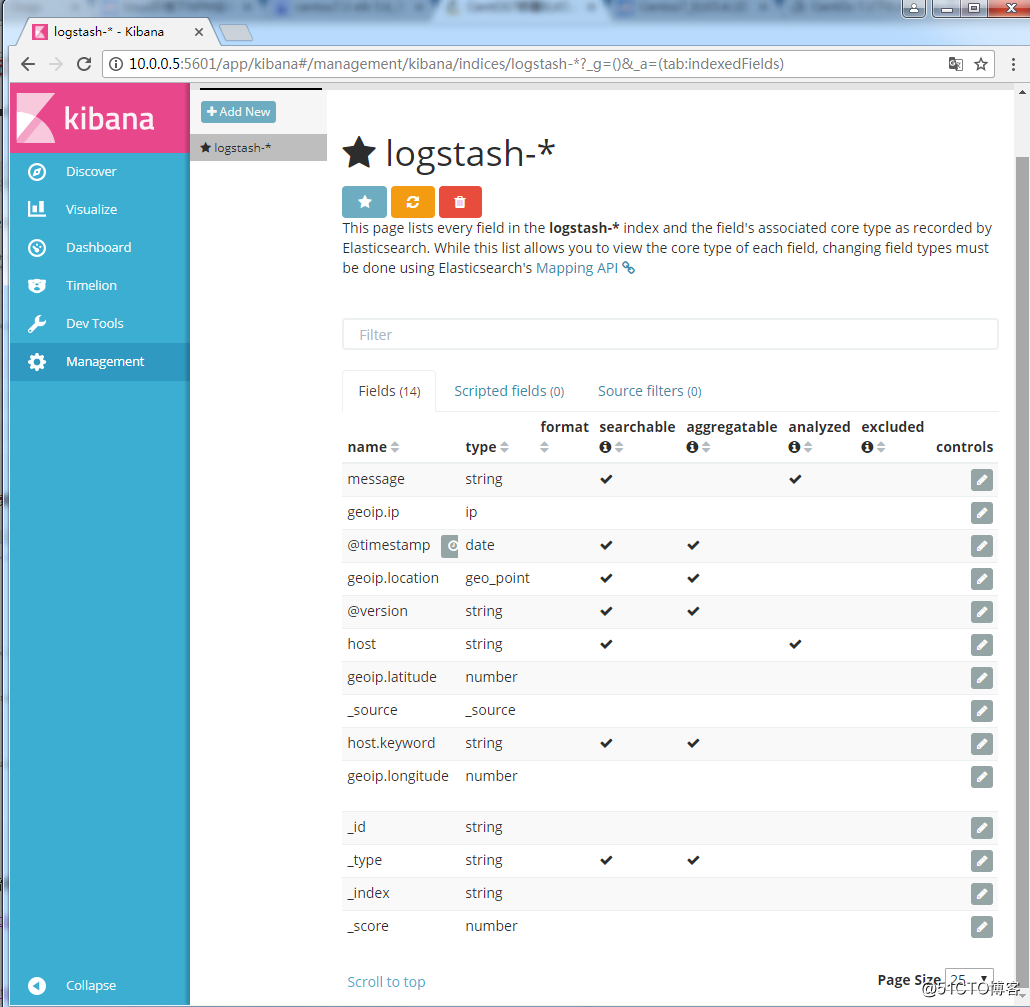
测试Kibana与Elasticsearch连接
相关组件安装完成后,就需要测试下几个组件之间能否相互协同工作,也就是能正常收集日志,存储日志并展示日志信息
[root@centos7-1 config]# cd /usr/local/logstash-5.3.1/config/

[root@centos7-1 config]# vim logstash.conf

input {

       stdin { }

      }

output {

    elasticsearch {

         action => "index"

         hosts => "10.0.0.5:9200"

         index => "logstash-%{+YYYY-MM}"

   }

}

[root@centos7-1 config]# /usr/local/logstash-5.3.1/bin/logstash -f /usr/local/logstash-5.3.1/config/logstash.conf
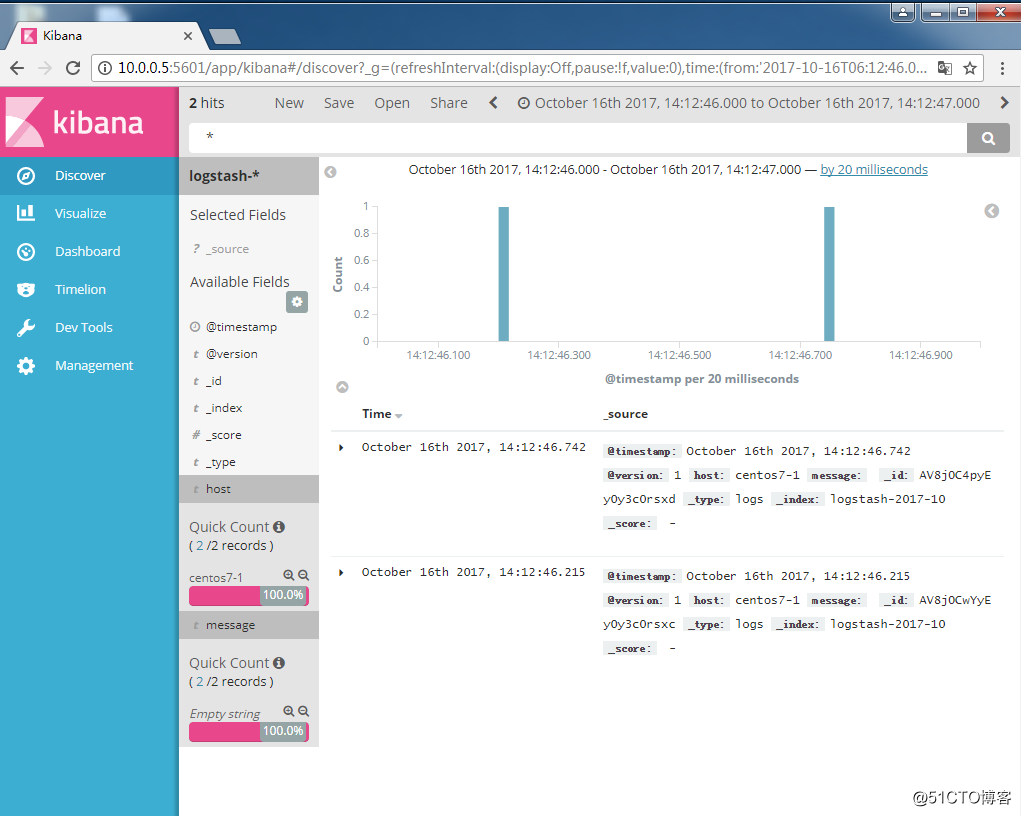
登陆WEB查看是否有日志产生

开源组件ELK日志系统配置与管理的更多相关文章
- 小白都会超详细--ELK日志管理平台搭建教程
目录 一.介绍 二.安装JDK 三.安装Elasticsearch 四.安装Logstash 五.安装Kibana 六.Kibana简单使用 系统环境:CentOS Linux release 7.4 ...
- 架构之ELK日志分析系统
ELK多种架构及优劣 既然要谈ELK在大数据运维系统中的应用,那么ELK架构就不得不谈.本章节引出四种笔者曾经用过的ELK架构,并讨论各种架构所适合的场景和优劣供大家参考. 先大致介绍ELK组件.EL ...
- elk日志分析平台安装
ELK安装 前言 什么是ELK? 通俗来讲,ELK是由Elasticsearch.Logstash.Kibana 三个开源软件的组成的一个组合体,这三个软件当中,每个软件用于完成不同的功能,ELK 又 ...
- Docker 运行ELK日志监测系统,汉化Kibana界面
1.ELK日志监控简介 ELK由Elasticsearch.Logstash和Kibana三部分组件组成: Elasticsearch是个开源分布式搜索引擎,它的特点有:分布式,零配置,自动发现,索引 ...
- ElasticSearch实战系列九: ELK日志系统介绍和安装
前言 本文主要介绍的是ELK日志系统入门和使用教程. ELK介绍 ELK是三个开源软件的缩写,分别表示:Elasticsearch , Logstash, Kibana , 它们都是开源软件.新增了一 ...
- ELK 日志分析系统概述及部署
ELK 日志分析系统概述及部署 1.ELK概述: ELK简介 : ELK平台是一套完整的日志集中处理解决方案,将 ElasticSearch.Logstash 和 Kiabana 三个开源工具配合使用 ...
- SpringCloud微服务实战——搭建企业级开发框架(三十八):搭建ELK日志采集与分析系统
一套好的日志分析系统可以详细记录系统的运行情况,方便我们定位分析系统性能瓶颈.查找定位系统问题.上一篇说明了日志的多种业务场景以及日志记录的实现方式,那么日志记录下来,相关人员就需要对日志数据进行 ...
- ELK日志分析系统的应用
收集和分析日志是应用开发中至关重要的一环,互联网大规模.分布式的特性决定了日志的源头越来越分散, 产生的速度越来越快,传统的手段和工具显得日益力不从心.在规模化场景下,grep.awk 无法快速发挥作 ...
- SpringBoot使用ELK日志收集
本文介绍SpringBoot应用配合ELK进行日志收集. 1.有关ELK 1.1 简介 在之前写过一篇文章介绍ELK日志收集方案,感兴趣的可以去看一看,点击这里-----> <ELK日志分 ...
随机推荐
- git 入门教程之配置 git
配置 git 安装完成后,还需要最后一步配置就可以愉快使用了,在命令行输入: git config --global user.name "your username" git c ...
- codeforces 735D Taxes(数论)
Maximal GCD 题目链接:http://codeforces.com/problemset/problem/735/D ——每天在线,欢迎留言谈论. 题目大意: 给你一个n(2≤n≤2e9) ...
- javascript的隐式类型转换
首先简单了解js的typeof,会返回六种类型 即 number string boolen function object undefined 也就是六种基本数据类型 显示类型转换大概有以下几种: ...
- Oracle解锁scott用户
解决: (1)conn sys/sys as sysdba;//以DBA的身份登录 (2)alter user scott account unlock;// 然后解锁 (3)conn scott/t ...
- Oracle EBS 查看执行计划
explain plan forSELECT MMT.TRANSACTION_ID,GIR.JE_HEADER_ID,GIR.JE_LINE_NUMFROM GL_IMPORT_REFERENCE ...
- 洗礼灵魂,修炼python(89)-- 知识拾遗篇 —— 进程
进程 1.含义:计算机中的程序关于某数据集合上的一次运行活动,是系统进行资源分配和调度的基本单位.说白了就是一个程序的执行实例. 执行一个程序就是一个进程,比如你打开浏览器看到我的博客,浏览器本身是一 ...
- 6. svg学习笔记-路径
路径相比于多边形<polygon>元素具有更强绘图能力,<polygon>元素可以绘制任意的多边形,而路径可以绘制任意的轮廓线,是线段,曲线,圆弧的组合形式.svg中可以使用& ...
- PHP实现邮件的自动发送
最近做一个邮箱验证的功能,研究了一会,搞定了邮件的自动发送.下面用qq邮箱作为演示,一步一步来解释: 代码下载地址 首先,就是做到邮件的发送,代码如下: <?php//邮件发送require ' ...
- June 9. 2018, Week 23rd, Saturday
I know nothing except the fact of my ignorance. 除了自己的无知,我一无所知. Believe it or not, true wisdom exists ...
- JavaScript字符集
引言 JavaScript程序使用Unicode字符集编写.Unicode是ASCII和Latin-1的超集,并支持地球上几乎所有在使用的语言.ECMAScript3要求JavaScript的实现必须 ...