
Android TabHost的使用 顶部选项卡
用TabHost 来实现顶部选项卡,上代码:activity_main.xml
<?xml version="1.0" encoding="utf-8"?>

<android.support.constraint.ConstraintLayout xmlns:android="http://schemas.android.com/apk/res/android"

    xmlns:app="http://schemas.android.com/apk/res-auto"

    xmlns:tools="http://schemas.android.com/tools"

    android:layout_width="match_parent"

    android:layout_height="match_parent"

    tools:context=".MainActivity">

    <TabHost

        android:id="@+id/tabMenu"

        android:layout_width="match_parent"

        android:layout_height="0dp">

        <LinearLayout

            android:layout_width="match_parent"

            android:layout_height="match_parent"

            android:orientation="vertical">

            <TabWidget

                android:id="@android:id/tabs"

                android:layout_width="match_parent"

                android:layout_height="wrap_content" />

            <FrameLayout

                android:id="@android:id/tabcontent"

                android:layout_width="match_parent"

                android:layout_height="match_parent">

                <LinearLayout

                    android:id="@+id/tab1"

                    android:layout_width="match_parent"

                    android:layout_height="match_parent"

                    android:orientation="vertical">

                </LinearLayout>

                <LinearLayout

                    android:id="@+id/tab2"

                    android:layout_width="match_parent"

                    android:layout_height="match_parent"

                    android:orientation="vertical">

                </LinearLayout>

                <LinearLayout

                    android:id="@+id/tab3"

                    android:layout_width="match_parent"

                    android:layout_height="match_parent"

                    android:orientation="vertical">

                </LinearLayout>

            </FrameLayout>

        </LinearLayout>

    </TabHost>

</android.support.constraint.ConstraintLayout>
主方法MainActivity.java
package action.sun.com.tabhost;

import android.support.v7.app.AppCompatActivity;

import android.os.Bundle;

import android.util.Log;

import android.widget.TabHost;

public class MainActivity extends AppCompatActivity {

    private TabHost tabhost;

    @Override

    protected void onCreate(Bundle savedInstanceState) {

        super.onCreate(savedInstanceState);

        setContentView(R.layout.activity_main);

        //得到TabHost对象实例

        tabhost =(TabHost) findViewById(R.id.tabMenu);

        //调用 TabHost.setup()

        tabhost.setup();

        //创建Tab标签

        tabhost.addTab(tabhost.newTabSpec("one").setIndicator("红色").setContent(R.id.tab1));

        tabhost.addTab(tabhost.newTabSpec("two").setIndicator("黄色").setContent(R.id.tab2));

        tabhost.addTab(tabhost.newTabSpec("three").setIndicator("黄色").setContent(R.id.tab3));

        tabhost.setOnTabChangedListener(new TabHost.OnTabChangeListener() {

            @Override

            public void onTabChanged(String s) {

                Log.d("xxx", "onTabChanged: ="+s);

                if (s.equals("one")){

                    //可是让viewpage的视图显示出来

                    //viewPager.setCurrentItem(0);

                }else if (s.equals("two")){

                    ////可是让viewpage的视图显示出来

                   // viewPager.setCurrentItem(1);

                }

            }

        });

    }

}
代码很简单,实现效果:
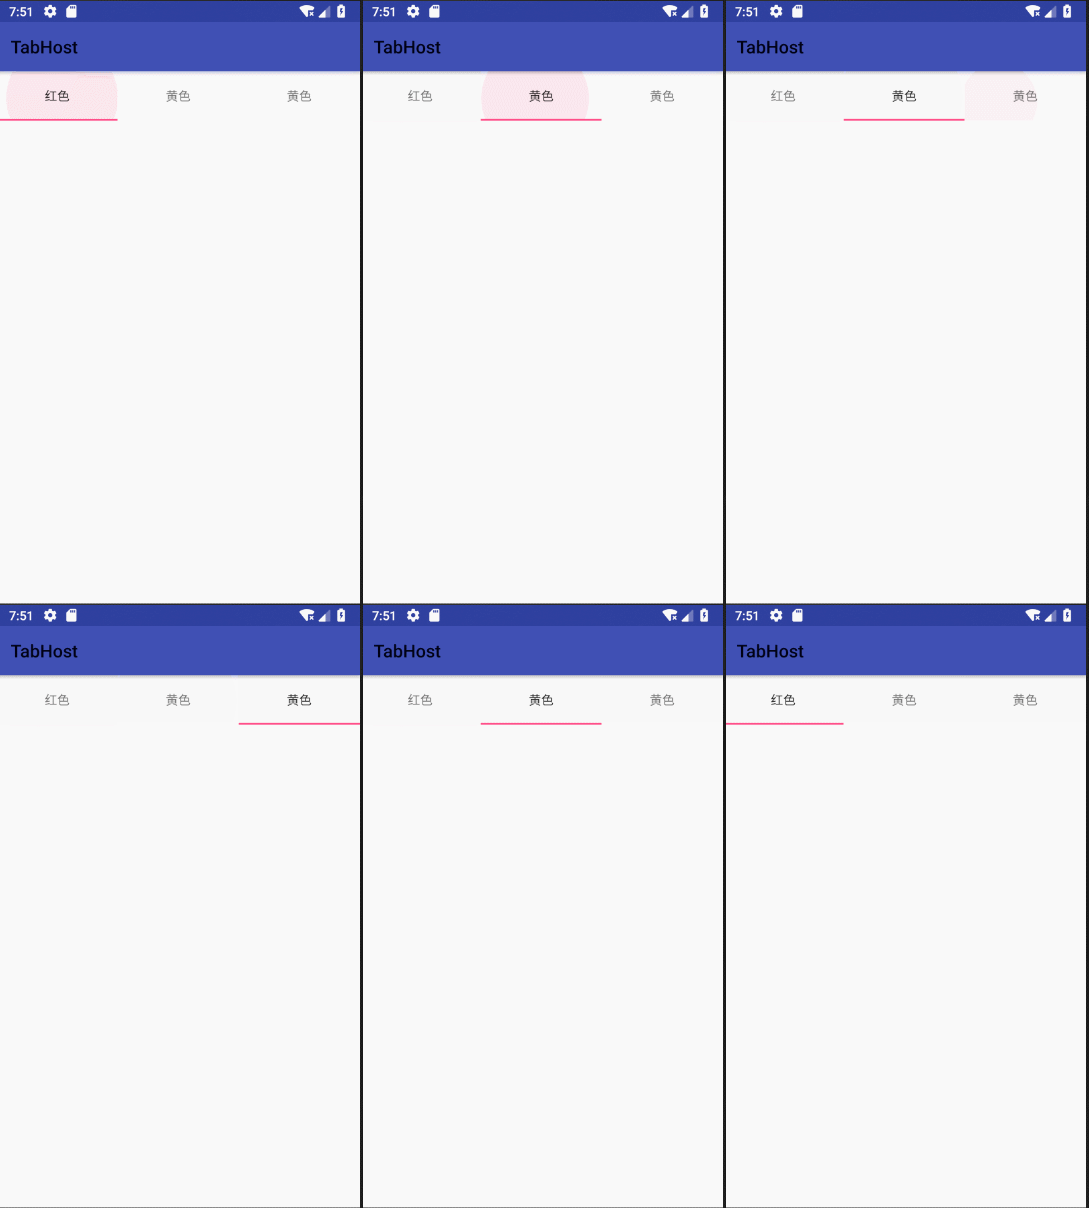
Android TabHost的使用 顶部选项卡的更多相关文章
- Android应用底部导航栏(选项卡)实例
现在很多android的应用都采用底部导航栏的功能,这样可以使得用户在使用过程中随意切换不同的页面,现在我采用TabHost组件来自定义一个底部的导航栏的功能. 我们先看下该demo实例的框架图: 其 ...
- Android TabHost使用
TabHost是Android中自带的选项卡控件,效果图如下: 主布局文件 <RelativeLayout xmlns:android="http://schemas.android. ...
- TabTopLayout【自定义顶部选项卡区域(固定宽度且居中)】
版权声明:本文为HaiyuKing原创文章,转载请注明出处! 前言 自定义顶部选项卡并居中显示.结合显示/隐藏view的方式实现切换功能(正常情况下可能是切换fragment). 效果图 代码分析 T ...
- TabTopUnderLineLayout【自定义顶部选项卡(带下划线)】
版权声明:本文为HaiyuKing原创文章,转载请注明出处! 前言 自定义顶部选项卡布局LinearLayout类,实现带下划线样式的效果. 备注:如果配合Fragment的话,MainActivit ...
- TabTopAutoLayout【自定义顶部选项卡区域(带下划线)(动态选项卡数据且可滑动)】
版权声明:本文为HaiyuKing原创文章,转载请注明出处! 前言 自定义顶部选项卡布局LinearLayout类,实现带下划线且可滑动效果.[实际情况中建议使用RecyclerView] 备注:如果 ...
- Android开发学习之TabView选项卡具体解释 -- 基于Android4.4
版权声明:本文为博主原创文章,未经博主同意不得转载. https://blog.csdn.net/he90227/article/details/24474197 直接上代码 -- 基于Android ...
- android去掉滑动到顶部和底部的阴影
android去掉滑动到顶部和底部的阴影 <ListView android:id="@+id/listView" android:layout_width="ma ...
- Android tabhost下的activity怎样获取传来的值
android tabhost下的activity怎样获取传来的值,具体解决方案如下: 解决方案: 其他activity设置intent:Intent intent=new Intent(); int ...
- Android - TabHost 与 Fragment 制作页面切换效果
Android - TabHost 与 Fragment 制作页面切换效果 Android API 19 , API 23 三个标签页置于顶端 效果图: 在文件BoardTabHost.java中定义 ...
随机推荐
- 【C语言】练习1-21
题目来源:<The C programming language>中的习题 练习1-21:编写程序entab,将空格串替换为最好数量的制表符和空格,但要保持单词之间的间隔不变. 思路: 对 ...
- nginx 配置支持URL HTML5 History 模式 与 设置代理
拾人牙慧:https://segmentfault.com/q/1010000007140360 nginx 配置支持URL HTML5 History 模式 location / { try_fil ...
- Centos 7搭建Gitlab服务器超详细(转)
一. 安装并配置必要的依赖关系 在CentOS系统上安装所需的依赖:ssh,防火墙,postfix(用于邮件通知) ,wget,以下这些命令也会打开系统防火墙中的HTTP和SSH端口访问. 1.安装s ...
- 颠覆Git 命令使用体验的神器 - tig
颠覆 Git 命令使用体验的神器 -- tig tig, 就是把 Git 这个单词倒过来念, 它是一个命令行工具, 日常使用中我用它来取代 Git 最高频的几个操作, 如 git log, g ...
- wpf 添加滚动条 ScrollViewer
在WPF中有些控件没有滚动条,微软提供了控件ScrollViewer,这个控件是设置滚动条 <ScrollViewer Name="scrollViewer1" /> ...
- 复习下C 链表操作(单向循环链表、查找循环节点)
循环链表 稍复杂点. 肯能会有0 或 6 字型的单向循环链表. 接下来创建 单向循环链表 并 查找单向循环链表中的循环节点. 这里已6字型单向循环链表为例. //创建 循环链表 Student * ...
- CentOS 7 安装中文环境
centos升级到7后,系统设置好多和6有了很大的区别,中文支持就有很大的变化. 1.安装中文语言包. yum install kde-l10n-Chinese 2.安装(已经安装的要重新安装)gli ...
- Atitit 软件项目系统托盘图标解决方案
Atitit 软件项目系统托盘图标解决方案 1.1. Nodejs node-webkit还实现了本地化的API,例如菜单栏,系统的托盘图标支持1 1.2. Java c# qt c++1 1.3 ...
- 【iOS XMPP】使用XMPPFramewok(二):用户登录
转自:http://www.cnblogs.com/dyingbleed/archive/2013/05/10/3069397.html 用户登录 准备工作 比较知名的开源XMPP服务器:一个是Ope ...
- 使用 nw-builder 构建跨平台桌面应用程序
NW.js 是一个使用 Web 技术创建本地应用的框架,如 HTML.JavaScript 和 CSS.简单地说,当你在使用普通的流程开发一个 Web 应用时,开发完成后,运行一个生成器,将所有东西编 ...