
Android Fragment之间传值
首先来介绍的是我们的默认的布局

<LinearLayout xmlns:android="http://schemas.android.com/apk/res/android"

    android:layout_width="fill_parent"

    android:layout_height="fill_parent"

    android:orientation="horizontal" >

    <fragment

        android:id="@+id/fragment1"

        android:name="com.example.chuang.frgone"

        android:layout_width="0dp"

        android:layout_weight="1"

        android:layout_height="match_parent" />

    <fragment

        android:id="@+id/fragment2"

        android:name="com.example.chuang.frgtwo"

         android:layout_weight="1"

        android:layout_width="0dp"

        android:layout_height="match_parent" />

</LinearLayout>
需要注意的属性也就fragment中的那个name属性,这个属性很关键,作用就是在这个布局被加载时,fragment自动实例化对应的类

既然要加载两个类文件,所以就必须加载对应的布局,
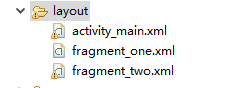
fragment_one 的布局文件:
<?xml version="1.0" encoding="utf-8"?>

<LinearLayout xmlns:android="http://schemas.android.com/apk/res/android"

    android:layout_width="match_parent"

    android:layout_height="match_parent"

    android:orientation="vertical" >

    <ListView

        android:id="@+id/ls_show"

        android:layout_width="match_parent"

        android:layout_height="wrap_content" >

    </ListView>

</LinearLayout>
fragment_two 的布局文件:
<?xml version="1.0" encoding="utf-8"?>

<LinearLayout xmlns:android="http://schemas.android.com/apk/res/android"

    android:layout_width="match_parent"

    android:layout_height="match_parent"

    android:orientation="vertical" >

    <TextView

        android:id="@+id/tv_show"

        android:layout_width="wrap_content"

        android:layout_height="wrap_content"

        android:text="TextView" />

</LinearLayout>
然后我们需要做的就是将布局文件和类进行绑定
package com.example.chuang;

import android.app.Fragment;

import android.os.Bundle;

import android.view.LayoutInflater;

import android.view.View;

import android.view.ViewGroup;

public class frgtwo extends Fragment {

    @Override

    public View onCreateView(LayoutInflater inflater, ViewGroup container,

            Bundle savedInstanceState) {

        // TODO Auto-generated method stub

        return inflater.inflate(R.layout.fragment_two, container);

    }

}
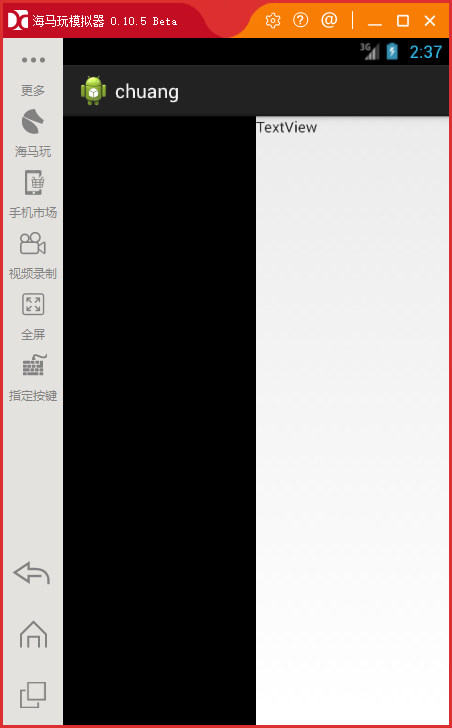
其他的绑定也是类似的,运行的效果如下图,在这里为你看清楚,我在Fragment_one中添加了背景颜色,
为了方便测试,我们定义了如下的字段
package com.example.chuang;

import java.util.ArrayList;

import android.app.Fragment;

import android.os.Bundle;

import android.view.LayoutInflater;

import android.view.View;

import android.view.ViewGroup;

import android.widget.ArrayAdapter;

import android.widget.ListView;

public class frgone extends Fragment {

private ListView ls=null;

    @Override

    public View onCreateView(LayoutInflater inflater, ViewGroup container,

            Bundle savedInstanceState) {

        View v=inflater.inflate(R.layout.fragment_one, container);

        ls=(ListView)v.findViewById(R.id.ls_show);

        ls.setAdapter(new ArrayAdapter(getActivity(),android.R.layout.simple_list_item_1,GetArray()));

        return v;

    }

    private ArrayList<String> GetArray()

    {

        ArrayList<String> al=new ArrayList<String>();

        al.add("我就是我");

        al.add("点亮我的新");

        al.add("你的心,我的鑫");

        return al;

    }

}
效果图如下
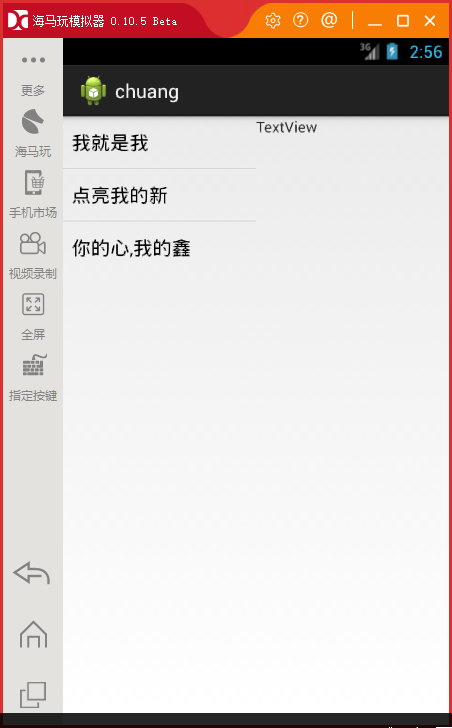
那现在我们要做的呢就是在左边点击,右边显示,也就是实现Fragment之间的传值
第一种方法,也就是利用回调
package com.example.chuang;

import java.util.ArrayList;

import android.app.Activity;

import android.app.Fragment;

import android.os.Bundle;

import android.view.LayoutInflater;

import android.view.View;

import android.view.ViewGroup;

import android.widget.AdapterView;

import android.widget.AdapterView.OnItemClickListener;

import android.widget.ArrayAdapter;

import android.widget.ListView;

public class frgone extends Fragment {

private CallBack back=null;

private ListView ls=null;

    @Override

    public View onCreateView(LayoutInflater inflater, ViewGroup container,

            Bundle savedInstanceState) {

        View v=inflater.inflate(R.layout.fragment_one, container);

        ls=(ListView)v.findViewById(R.id.ls_show);

        ls.setAdapter(new ArrayAdapter(getActivity(),android.R.layout.simple_list_item_1,GetArray()));

        ls.setOnItemClickListener(new OnItemClickListener() {

            @Override

            public void onItemClick(AdapterView<?> parent, View view,

                    int position, long id) {

                if(back!=null)

                {

                    back.SetTeee(String.valueOf( parent.getItemAtPosition(position)));

                    //back.SetTeee(getString(getId()));

                }

            }

        });

        return v;

    }

    private ArrayList<String> GetArray()

    {

        ArrayList<String> al=new ArrayList<String>();

        al.add("我就是我");

        al.add("点亮我的新");

        al.add("你的心,我的鑫");

        return al;

    }

public interface CallBack

{

    void SetTeee(String s);

}

@Override

    public void onAttach(Activity activity) {

        super.onAttach(activity);

        if(activity instanceof CallBack)

        {

            back=(CallBack)activity;

        }

    }

}
然后是主Activity的代码
    @Override

    public void SetTeee(String s) {

        View v= this.findViewById(R.id.fragment2);

        TextView t=(TextView)v.findViewById(R.id.tv_show);

        t.setText(s);

    }
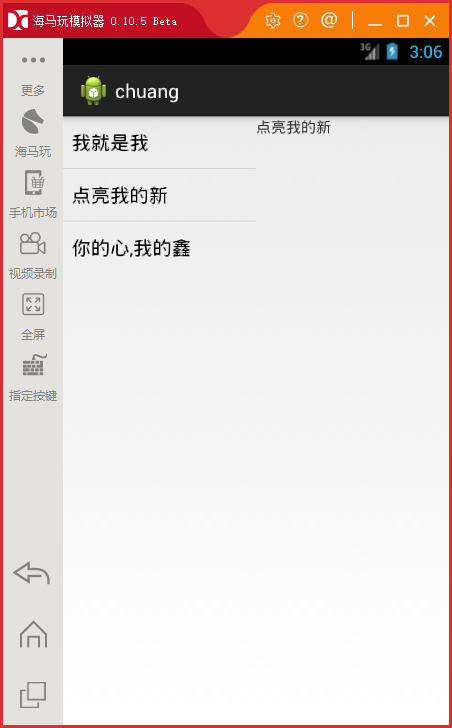
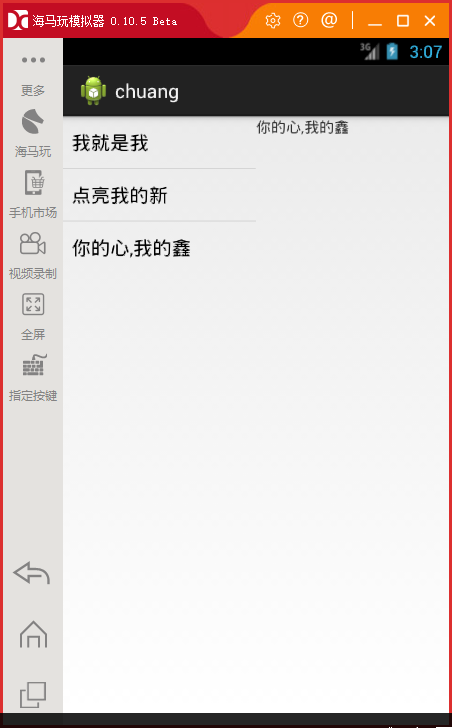
效果图如下,这样我们就实现了第一种方法
第二种方法
使用第二种方法,我们首先需要来了解一下Fragment 和Activity的生命周期
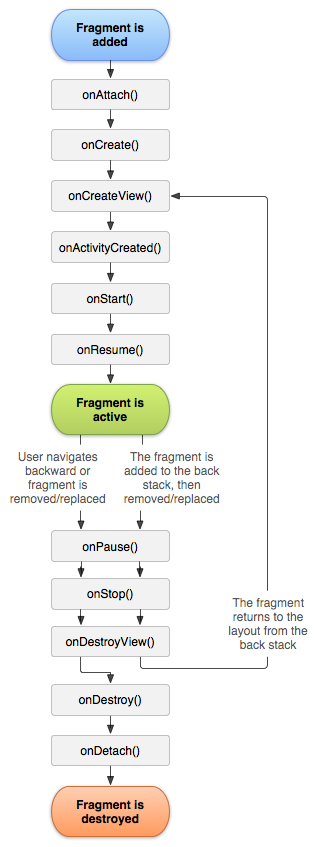
我们可以根据上面的那个图,可以知道,只有当fragment创建完毕,活动就会通知他们调用onActivityCreated()方法,来告知
所以我们就可以在这里获取到主活动里面的一切,不是想干嘛就干嘛吗0-0!
贴上代码
package com.example.chuang;

import java.util.ArrayList;

import android.app.Activity;

import android.app.Fragment;

import android.os.Bundle;

import android.view.LayoutInflater;

import android.view.View;

import android.view.ViewGroup;

import android.widget.AdapterView;

import android.widget.AdapterView.OnItemClickListener;

import android.widget.ArrayAdapter;

import android.widget.ListView;

import android.widget.TextView;

public class frgone extends Fragment {

private CallBack back=null;

private ListView ls=null;

private TextView tv=null;

    @Override

    public View onCreateView(LayoutInflater inflater, ViewGroup container,

            Bundle savedInstanceState) {

        View v=inflater.inflate(R.layout.fragment_one, container);

        ls=(ListView)v.findViewById(R.id.ls_show);

        ls.setAdapter(new ArrayAdapter(getActivity(),android.R.layout.simple_list_item_1,GetArray()));

        ls.setOnItemClickListener(new OnItemClickListener() {

            @Override

            public void onItemClick(AdapterView<?> parent, View view,

                    int position, long id) {

                if(back!=null)

                {

                    if(tv!=null)

                    tv.setText(String.valueOf( parent.getItemAtPosition(position)));

                }

            }

        });

        return v;

    }

    @Override

        public void onActivityCreated(Bundle savedInstanceState) {

            super.onActivityCreated(savedInstanceState);

        View v=    getActivity().findViewById(R.id.fragment2);

        tv=((TextView)v.findViewById(R.id.tv_show));

        }

    private ArrayList<String> GetArray()

    {

        ArrayList<String> al=new ArrayList<String>();

        al.add("我就是我");

        al.add("点亮我的新");

        al.add("你的心,我的鑫");

        return al;

    }
第三种方法,那就是在Activity中来管理两个Fragment,当然做法也是非常的简单,只需要在Activity的start生命周期后就可以
Android Fragment之间传值的更多相关文章
- [转][译][Android基础]Android Fragment之间的通信
2014-2-14 本篇文章翻译自Android官方的培训教程,我也是初学者,觉得官方的Training才是最好的学习材料,所以边学边翻译,有翻译不好的地方,请大家指正. 如果我们在开发过程中为了重用 ...
- Android Fragment之间的通信(用fragment替换掉XML布局文件中的一个线性布局)
1.XML布局 (1)主界面 <?xml version="1.0" encoding="utf-8"?> <LinearLayout xml ...
- Android Fragment之间传递List数据
要说的是在两个Fragment之间传递List数据,比如有个List<User>,以及传递字符串数据,比如testId,该如何从FragmentA传递到FragmentB呢? 下面这个例子 ...
- Android - fragment之间数据传递
<Fragment跳转时传递参数及结果回传的方法> <Fragment详解之五——Fragment间参数传递> <Android解惑 - 为什么要用Fragment.se ...
- Android fragment之间消息传递
1. 在Fragment里定义一个内部接口, 在Fragment初始化方法里, 把父Activity转换成这个接口, 赋值给成员变量 public class DummyFragment extend ...
- Fragment之间传值
Activity: String myArguments; public String getarguments() { return myArguments; } public void ...
- Android activity之间传值关键性代码
从当前activity中获取et 表单中的值,并跳转到myactivity.java所绑定的xml布局文件上. private EditText et; Intent intent=new Inten ...
- android fragment传递参数_fragment之间传值的两种方法
在Activity中加载Fragment的时候.有时候要使用多个Fragment切换.并传值到另外一个Fragment.也就是说两个Fragment之间进行参数的传递.查了很多资料.找到两种方法.一种 ...
- Android——软键盘操作+fragment之间传递参数+TextView限制字数,显示"..."
原文地址: Android 手动显示和隐藏软键盘 Android隐藏输入法键盘(hideSoftInputFromInputMethod没有效果) Android Fragment传递参数_Fragm ...
随机推荐
- css3360度旋转动画
@-webkit-keyframes Parallaxs{ from { -webkit-transform: rotate(180deg) ; -moz-transform: rotate(180d ...
- Yahoo! Logo ASCII Animation in 462 bytes of C
Last week I put together another obfuscated C program and have been urged by my coworkers to post it ...
- List中toArray()的使用方法
当我们需要把一个链表中的元素放入数组时,jdk给我们提供了一种方法,也即运用toArray(),方法的使用如下: public class Test { public static void main ...
- HDU 1176 免费馅饼(DP)
点我看题目 题意 : 中文题.在直线上接馅饼,能接的最多是多少. 思路 :这个题其实以前做过.....你将这个接馅饼看成一个矩阵,也不能说是一个矩阵,反正就是一个行列俱全的形状,然后秒当行,坐标当列, ...
- php nl2br() 函数
nl2br() 函数在字符串中的每个新行 (\n) 之前插入 HTML 换行符 (<br />).
- windows phone 中的TextBlock的一些特性(TextWrapping,TextWrapping)
文字很长时,换行:TextWrapping="Wrap" 文字很长时,省略:TextWrapping="WordEllipsis"
- 一个CLI的 的例子
1)这是CLI 调用HTTPOST例子 #using <System.dll> using namespace System;using namespace System::Net;usi ...
- SPRING IN ACTION 第4版笔记-第三章ADVANCING WIRING-009-用SPEL给bean运行时注入依赖值
1.When injecting properties and constructor arguments on beans that are created via component-scanni ...
- Android中改变dialog的显示的位置和大小
private void setDialogSize(Dialog dg) { Window dialogWindow = dg.getWindow(); WindowManager.LayoutPa ...
- Ember.js demo7
<!DOCTYPE html> <html> <head> <script src="http://code.jquery.com/jquery-1 ...